Fast Crochet Patterns

  • Home
  • Contact
  • Patterns
    • Amigurumi
    • Granny Square
    • Flowers
    • Baby
    • Dress
    • Bags
    • Cardigan
    • Accessories
menu icon
go to homepage
  • Home
  • Contact
  • Patterns
    • Amigurumi
    • Granny Square
    • Flowers
    • Baby
    • Dress
    • Bags
    • Cardigan
    • Accessories
search icon
Homepage link
  • Home
  • Contact
  • Patterns
    • Amigurumi
    • Granny Square
    • Flowers
    • Baby
    • Dress
    • Bags
    • Cardigan
    • Accessories
×

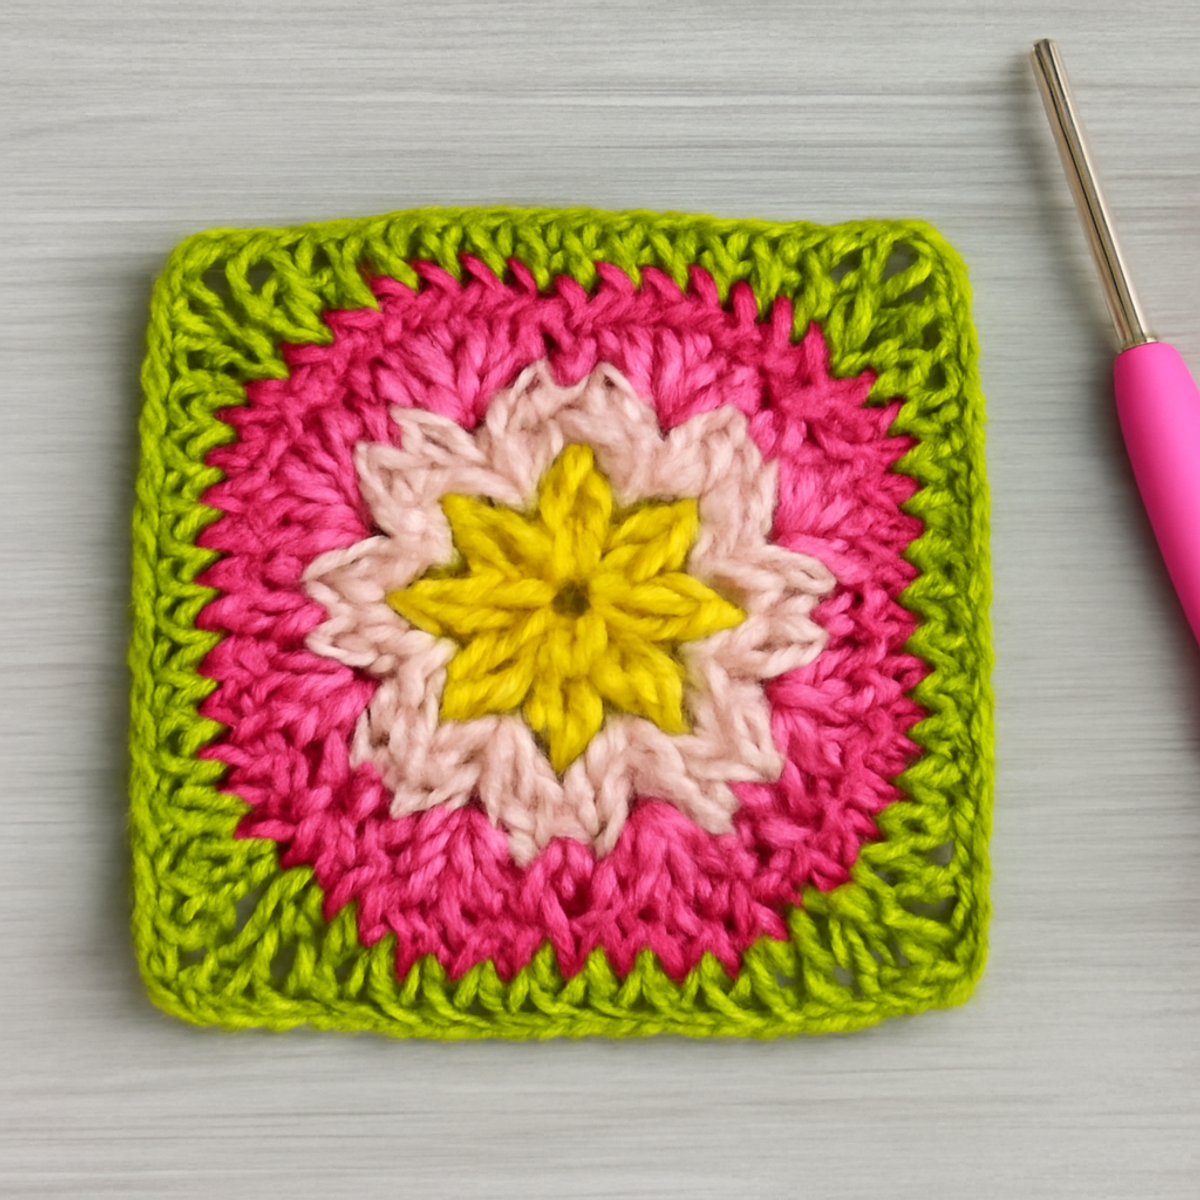
Vibrant Crochet African Flower Square Pattern for All Levels

August 22, 2026 by Publisher Leave a Comment

Vibrant Crochet African Flower Square Pattern for All Levels

As I sat in my cozy nook, surrounded by soft yarn and the afternoon sun spilling in, I couldn't help but let my fingers dance across the vibrant colors of the worsted weight yarn I had chosen for today’s project. The Vibrant African Flower Square crochet pattern is the perfect way to infuse life into your space, combining traditional appeal with contemporary flair. This eye-catching design invites crafters to explore playful color palettes, making it a wonderful stash-buster while enhancing your crochet skills with its layered motifs and intricate stitches. Whether you envision creating stunning blankets or beautifully unique bags, this pattern is a delightful canvas for your creativity. Let’s embark on this joyous crafting adventure and stitch your way to something truly spectacular!

Crochet African Flower Materials & Tools

  • Worsted Weight Yarn – Choose vibrant colors like bright pink, yellow, cream, and green, with approximately 50-70 yards per color estimated for each square.
  • 5.0mm (H) Crochet Hook – A medium-sized hook gives you the perfect balance of tension for the textured stitches in this pattern.
  • Stitch Markers – Use these to easily keep track of your rounds and maintain the integrity of your crochet african flower.
  • Scissors – Essential for trimming yarn ends as you finish each square with clean edges.

Why Choose the Crochet African Flower?

Intricate Design: The African Flower square showcases a stunning blend of traditional and modern crochet aesthetics, making it a captivating addition to any project.

Ideal for Skill Growth: This pattern invites you to enhance your crochet abilities with its layered motifs and complex stitches, giving you the perfect challenge.

Versatile Application: Create everything from eye-catching blankets to chic bags or decorative accents—your creativity knows no bounds!

Colorful Experimentation: Play with vibrant or pastel palettes, transforming your simple yarn into delightful, personalized pieces.

Stash-Buster Friendly: With minimal yardage required per square, it's a fantastic way to use up those leftover skeins from other projects.

Gauge & Sizing Notes

Don't skip the gauge swatch! Checking your crochet gauge is essential for the Vibrant African Flower Square to ensure your squares fit perfectly when joined. A general guideline to aim for is about 4×4 inches (10×10 cm) producing around 14 double crochets and 8 rows. If you want to make your square larger or smaller, simply adjust your starting chain in multiples of 6 + 2 for the appropriate increase or decrease. If your swatch is smaller than expected, try using a larger hook size to achieve the desired tension. Maintaining consistent gauge will ensure a beautiful finished piece!

Step-by-Step Pattern for crochet african flower

Round 1: Create the Flower Center
Start with a magic ring, and work 12 dc (double crochet) into the ring, pulling tight to close. This forms the center of your crochet african flower. After completing the round, join with a sl st (slip stitch) to the top of the first dc. Your piece should form a small circle. (12 sts)

Round 2: Begin Petals
Ch 3 (counts as first dc), then work 1 dc into the same stitch. In the next stitch, make 2 dc (inc) for each petal, alternating with ch 1 between petals for a total of 6 petals. Join with a sl st to the top of your initial ch 3. Your round should show a lovely arrangement with deep V's between each petal. (6 petals)

Round 3: Petal Layers
Change to pink yarn and ch 1. Work 2 hdc (half double crochet) into each ch 1 space from the previous round, creating a solid layer for each petal. Join with a sl st in the top of the first hdc to create a defined edge. Your flower petals should now appear fluffy and pronounced. (12 sts)

Round 4: Color Touches
Now switch to cream yarn. Ch 3; then in the next stitch, make 2 dc (inc) in the first hdc, followed by 1 dc in the next stitch. Repeat this pattern around for a wider petal definition, joining with a sl st at the top of your first ch 3. Your work will begin to take shape into a larger flower. (18 sts)

Round 5: Green Border
Change to green yarn; ch 1, then in the same stitch, make 1 hdc. In the next stitch, make 2 hdc (inc). Repeat across, adding a hdc in each corner to keep your crochet african flower square flat. Join with a sl st to your starting hdc. By this point, your square will start to take on its distinctive floral shape with texture. (24 sts)

Step 6: Finalize Edges
For the final rounds, ch 1, sc (single crochet) evenly around the square edges, making 3 sc in each corner stitch to maintain the curvature. Join with a sl st in the first sc. At this stage, your crochet african flower square will have a neat and tidy finish, ready for assembly or for use as a standalone piece. (varies with size)

Step 7: Assembly of Squares (Optional)
If joining multiple squares, place squares right sides together. Use a sl st to connect the outer edges or whip stitch for a nearly invisible seam. This can create a cohesive look for blankets or bags. Ensure that your edges align as you gather your vibrant creations.

Expert Tips for Crochet African Flower

  • Maintain Tension: Keep your tension consistent throughout to ensure that the squares fit together perfectly when joined, avoiding puckering.

  • Count Stitches Carefully: Losing count can lead to uneven square sizes. Always double-check your stitch count at the end of each round.

  • Secure Color Changes: Use a slip knot when changing colors to avoid gaps, ensuring your crochet african flower looks smooth and polished.

  • Block Your Squares: Blocking enhances defined edges and shapes of your flowers, allowing them to lay flat and showcase your hard work beautifully.

  • Use Stitch Markers: These handy tools help you track your rounds efficiently, preventing any mix-ups and ensuring each section flows as intended.

What to Pair with Vibrant African Flower Square

Crafting a cohesive collection is a delightful way to expand your creativity and fill your home with handmade treasures.

  • Cozy Throw Blanket: Join multiple squares together for a stunning throw that showcases your vibrant crochet african flower design in full bloom.

  • Charming Pillows: Create matching pillows by using the same motifs, adding a soft touch of color and warmth to your living space.

  • Colorful Tote Bag: Transform several squares into a stylish bag, perfect for carrying your projects or shopping while on the go.

  • Festive Table Runner: Line up your flower squares along a base to create an eye-catching table runner that brightens up your dining area.

  • Delicate Coasters: Resize your squares to make charming coasters; they’re practical and will tie in beautifully with your larger projects.

Crochet African Flower Variations

Embark on a journey of creativity and personalization with these delightful variations tailored for your crochet project.

  • Yarn Substitutions: Swap worsted weight for worsted cotton for a lightweight, breathable square perfect for warmer months.
    Explore the vibrant sheen of cotton that beautifully showcases your stitches, resulting in a fresh aesthetic contrast!

  • Size Adjustments: Create larger squares by using a thicker yarn and a larger hook, fitting them perfectly into an afghan or oversized cushion.
    This adjustment allows for cozy comfort while preserving the eye-catching design that you’ve come to love.

  • Texture Modifications: Add playful pom-poms to the corners for a whimsical touch or fringe along the edges to enhance the square's personality.
    These tiny details not only elevate the overall look but also make your project uniquely yours.

  • Color Blocking: Use bold contrasting colors in blocks instead of traditional petals for a modern take on the African Flower.
    This creates a striking visual impact, making your project a standout piece in any setting.

  • Fiber Alternatives: Consider using a blend of yarns, such as a cotton-acrylic mix, to give a softer drape and added durability.
    This combination not only feels great but also adds complex textures that beautifully complement the intricate design.

  • Pastel Palette: Opt for soft pastels instead of vibrant colors for a sweet, delicate aesthetic, perfect for baby blankets or feminine decor.
    The serene color scheme will create a calming environment, transforming your square into a soothing, inviting piece.

  • Decorative Embellishments: Incorporate beads or buttons into your center flower or around the edges to add a touch of glamour to your creations.
    These embellishments can serve as delightful surprises, taking your crochet African Flower from beautiful to extraordinary.

  • Layering with Other Squares: Combine your African Flower squares with simple solid squares for a dynamic visual contrast in blankets or bags.
    This mix showcases the intricate beauty of your flower against the simplicity of the others, making the design pop even more!

Care Instructions for Crochet African Flower

  • Hand Washing: Gently wash your crochet african flower square in cold water with a mild detergent to prevent damage. Avoid agitation to keep the shape and texture intact.

  • Drying/Blocking: Lay the square flat on a clean, dry towel to reshape, allowing it to air dry completely. This helps maintain the beauty of your intricate design.

  • Storage: Store your finished squares in a cool, dry place away from direct sunlight to protect the vibrant colors. Use breathable bags or containers to avoid moisture build-up.

  • Avoid Heavy Weights: When stacking or storing, don't place heavy items on top; this preserves the delicate structure of your crochet african flower and prevents creasing.

Vibrant African Flower Square Crochet Pattern FAQs

Can I use a different type of yarn for the crochet African Flower square?
Absolutely! While worsted weight yarn is recommended for this pattern, you can use cotton or blends for varied textures. Just remember to adjust your hook size accordingly to maintain the integrity of the square.

How can I adjust the size of my African Flower square?
If you’d like to make your square larger or smaller, try using a different hook size or adjusting your tension. For a larger square, increase the number of rounds; for a smaller one, skip some rounds or decrease the stitch count per round.

Why is my crochet African Flower square curling up?
Don't panic! Curling often happens when tension is too tight or when certain stitches pull more than others. To fix this, try loosening your grip as you work, and ensure that you’re using the recommended hook size. Blocking your square after completion can also help flatten it.

What hook size should I use for the crochet African Flower square?
A 5.0mm (US H-8) crochet hook is perfect for this project, allowing for the right tension and stitch definition. If you opt for a different yarn weight, consider adjusting the hook size to maintain your desired density and drape.

How do I avoid gaps when changing colors in my crochet square?
When changing colors, using a slip knot can help maintain tightness and prevent gaps. Additionally, be sure to pull your new yarn snugly as you switch, ensuring a seamless transition between colors.

What if I accidentally drop a stitch while crocheting?
It can happen to the best of us! An easy fix is to gently pull the yarn back up through the dropped stitch using a crochet hook or your fingers. Then, carefully work the stitch back into place, following the stitch pattern you were on.
Filed Under: Uncategorized

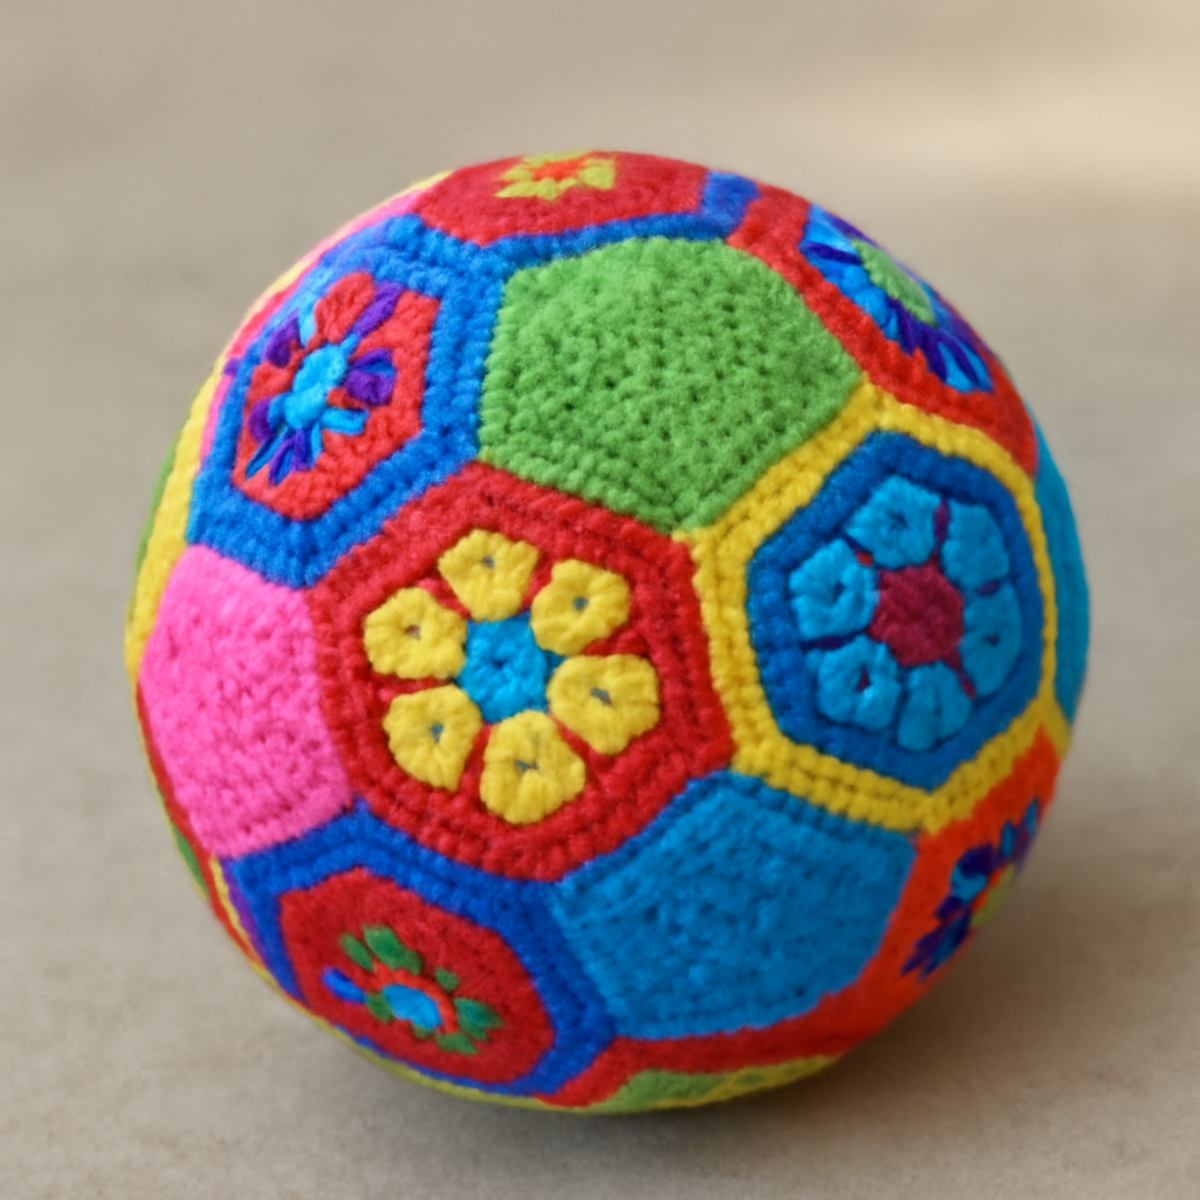
Colorful African Flower Soccer Ball: A Fun Crochet Project

August 22, 2026 by Publisher Leave a Comment

Colorful African Flower Soccer Ball: A Fun Crochet Project

As I sat in my cozy corner, the sun streaming in through the window, I couldn't help but admire the colorful skeins of yarn begging to be transformed into something fun and vibrant. Enter the dazzling African Flower Soccer Ball pattern—truly a joyful project for anyone looking to infuse both creativity and warmth into their home or garden. This enchanting design not only serves as a delightful gift for soccer enthusiasts but also sparks a wonderful opportunity to enhance your crochet skills. With its intricate floral hexagons and playful color combinations, you'll find it to be a fantastic stash-buster that works up surprisingly quick. Crafting this unique soccer ball encourages exploration of colorwork and pattern assembly, enriching your crochet journey while bringing a smile to your face. Ready to make some magic with your yarn? Let's dive in!

African Flower Soccer Ball Materials & Tools

Note: Gather your supplies and get ready to create something vibrant and playful!

Yarn

  • DK or Worsted Weight Yarn – You'll need approximately 600 to 800 yards for this project, depending on your chosen color combinations.
  • Cotton-Acrylic Blend – This combination offers both durability and softness, perfect for the soccer ball.

Tools & Notions

  • 4.0 mm (G) or 5.0 mm (H) Crochet Hook – Select a hook size that feels comfortable for maintaining stitch texture.
  • Stitch Markers – Essential for keeping your hexagons aligned and maintaining pattern consistency during assembly.
  • Safety Eyes (optional) – For added character and fun accents on your soccer ball.

Prepare your workspace and let your creativity flow as you embark on this delightful journey to create your own African Flower Soccer Ball!

Why is This Pattern a Must-Try?

Vibrant Colors: The African Flower Soccer Ball showcases a playful palette, inviting you to experiment with color combinations that reflect your personality and style.

Skill Development: Perfect for intermediate crocheters, this project enhances your ability to create intricate floral hexagons and assemble them into a cohesive shape, boosting your crochet confidence.

Soft & Squishy: Once completed, this ball boasts a delightful texture, making it perfect for both display and play—ideal for kids and adults alike!

Quick & Fun: Despite its complexity, the project works up faster than you might think, making it an engaging and fun way to brighten up your crochet repertoire.

Stash-Buster: Use up those leftover yarn pieces, as this pattern cleverly utilizes DK or worsted weight yarn for a resourceful crafting experience.

Embrace this unique project, and let your creativity shine while crafting a conversation starter for your home or garden!

Gauge & Sizing Notes

Don't skip the gauge swatch! Ensuring your tension is just right when crafting the African Flower Soccer Ball is crucial for achieving the desired shape and size. A general guideline is to achieve a crochet gauge of approximately 4×4 inches (10×10 cm) with 14 double crochets by 8 rows. If you wish to make your ball larger or smaller, simply adjust your starting chain or the number of hexagons you create. For instance, to make your ball bigger, consider increasing your starting chain in multiples of 6. If your swatch is too tight, relax your tension or go up a hook size to get those perfect measurements!

Step-by-Step Pattern for African Flower Soccer Ball

Row 1: Start the Hexagon Flower Center
Begin with a magic ring, ch 3 (counts as 1 dc), then work 11 dc into the ring. Pull the ring tight and join with a sl st in the top of the initial ch 3 (12 dc). Your work should form a round center, tightly closed in the middle.

Row 2: Create the First Round of Petals
Ch 1, work 2 sc in the first st, ch 2, and skip the next st. In the next st, work 2 sc, ch 2, skip the next st; repeat from * to * around. Join with a sl st to the first sc (6 petals total). At this stage, your hexagon should begin to take shape with the petal chains forming between the clusters.

Row 3: Form the Petal Shape
Join new color in any ch-2 space, ch 3 (counts as 1 dc), and work 2 dc, ch 2, 3 dc in the same space. In each subsequent ch-2 space, repeat (3 dc, ch 2, 3 dc). Join with a sl st to the top of ch 3 to close the round (6 petals formed). Your flower pattern will appear distinct and vibrant with open spaces dominating the round.

Row 4: Create the Hexagon Sides
Ch 1, sc in the first dc, ch 1, sc in the next 3 dc, ch 1, and in the next petal’s ch-2 space, sc, ch 2 (this is a corner). Repeat from * to * around, ending with a sc in the last corner space. Join with a sl st to the first sc. The hexagon now should clearly define geometric edges, setting up for assembly.

Row 5: Making the Last Round
Ch 1, sc in the first ch-1 space, ch 2, sc in the next ch-1 space. In each corner (ch-2 space), work (sc, ch 2, sc). Repeat from * to * around. Join with a sl st to the first sc (6 sides). At this point, your hexagon is complete, showcasing the lovely flower motif prominently.

Step 6: Assemble the Soccer Ball
With multiple completed hexagons, position two hexagons right sides together. Using a sl st, join through the back loops of corresponding stitches across the edges. Continue joining adjacent hexagons until you form a spherical shape. Your project should start to resemble the vibrant African Flower Soccer Ball, full of character.

Step 7: Close the Soccer Ball
As you near closing the ball, leave a small opening to stuff the ball lightly with fiberfill or desired stuffing. Continue joining hexagons as necessary until the ball is fully enclosed. The completed piece should feel soft and squishy, perfect for display or play.

Step 8: Final Edging (Optional)
For a polished look, add a round of sc around the entire soccer ball, adjusting your tension as necessary to ensure a smooth finish. This step can also enhance the durability of the seams. Your colorful African Flower Soccer Ball should now be a delightful and finished piece, exuding charm and personality!

What to Pair with the Vibrant African Flower Soccer Ball?

As you celebrate the joy of crafting this lively soccer ball, consider extending that vibrancy into a charming ensemble of playful creations!

  • Colorful Flower Pouch: Create a matching pouch to store your soccer ball or other treasures, using similar floral hexagon motifs for a cohesive look.

  • Floral Picnic Blanket: Crochet a nearby blanket adorned with the same floral patterns. It’s perfect for sunny days at the park, enhancing your outdoor festivities.

  • Cheerful Flower Coasters: Whip up a set of coasters featuring tiny hexagons. They will protect surfaces while keeping your crochet aesthetic alive at home.

  • Playful Mini Flower Ball: Scale down your soccer ball design for a smaller version, perfect for pets or kids, letting the playful nature shine through.

  • Matching Beanie: Create a beanie that mirrors the colors of your soccer ball, ensuring you can sport your crochet passion wherever you go.

African Flower Soccer Ball Variations

Get ready to unleash your creativity as you explore fun twists on the classic crochet design!

  • Yarn Weight Swaps: Try using bulky yarn for a fluffier, larger soccer ball. The extra thickness will make your project pop!

  • Color Blocking: Instead of traditional floral motifs, experiment with bold color blocks for a contemporary style. Choose two or three contrasting shades for a modern aesthetic.

  • Fiber Alternatives: Swap out cotton for 100% acrylic yarn to add more stretch and durability. This will make your soccer ball even more playful and fun!

  • Oversized Hexagons: If you want to create an eye-catching statement piece, increase the size of the hexagons. You'll work up a bigger ball that's perfect for display.

  • Popcorn Petals: Introduce artistic texture by incorporating popcorn stitches within the floral motifs. This tactile addition will create depth and draw the eye, making your ball uniquely yours.

  • Fringe Accent: Consider adding a fringe around the ball's edges for a playful touch. This charming detail will bring a layer of whimsy, perfect for playful environments!

  • Stuffing Variety: Experiment with various stuffing materials like foam or fabric scraps for differing levels of firmness. Each will transform the feel of your soccer ball.

  • Decorative Borders: Finish with a contrasting border around the ball for a polished look. This technique can enhance durability and create a beautiful color-frame effect.

Your African Flower Soccer Ball is waiting for your personal touch—let your imagination run wild!

How to Wash and Care for Your African Flower Soccer Ball

Machine Washing: Use cold water on a gentle cycle to prevent felting and maintain the vibrant colors of your African Flower Soccer Ball.

Hand Washing: For best results, hand wash your ball in cold water with mild soap, gently pressing to remove dirt without excess agitation to protect the stitches.

Drying: Lay your soccer ball flat to dry in the shade. Avoid direct sunlight, as it can fade colors over time and reshape your piece if heated.

Storage: When not in use, store the ball in a cool, dry place. Avoid crushing it to maintain its soft, squishy shape for years of enjoyment.

Expert Tips for Your African Flower Soccer Ball

  • Maintain Even Tension: Consistent tension is crucial for uniform hexagons. Avoid losing stitch count by regularly checking your work, especially on the color changes.

  • Use Stitch Markers: When joining hexagons, place stitch markers to keep pieces aligned and prevent accidental twisting. They are essential tools for pattern consistency.

  • Count Stitches Regularly: Keep track of your stitches in every row. Losing count can lead to uneven shapes, so counting after each round can save you from having to frog your work.

  • Blocking for Shape: After assembly, consider blocking your soccer ball gently. This technique can help set stitches, enhance the final look, and maintain a neat appearance.

  • Secure the Final Round: Be diligent when closing your soccer ball. A tight final round prevents stuffing from escaping and ensures the ball holds its playful shape.

African Flower Soccer Ball FAQs

Can I use different types of yarn for this project?
Absolutely! While the pattern recommends a cotton-acrylic blend for durability and softness, you can experiment with other yarn types. Keep in mind that the yarn weight should remain DK or worsted to maintain the overall structure of the soccer ball.

How can I make the African Flower Soccer Ball larger or smaller?
To adjust the size, simply change your hook size. Using a larger hook will give you a bigger ball, while a smaller hook will create a tighter, smaller shape. You may also consider adding extra hexagons to increase its size or reducing the number of hexagons for a smaller version.

Why is my work curling, and how can I fix it?
Don't panic! Curling often happens due to uneven tension or incorrect stitch counts. Try to keep your tension consistent throughout the project. If your piece is already curling, you can attempt blocking to reshape it. Steam blocking gently can help set your stitches properly.

What hook size should I use for this pattern?
For this African Flower Soccer Ball pattern, a 4.0 mm (G) or 5.0 mm (H) hook is recommended. Choose the size that feels most comfortable for you while maintaining the stitch definition for the hexagons.

How do I fix dropped stitches in my hexagons?
It’s an easy fix! Simply pick up the dropped stitch and work it back up to the row where it belongs. If it’s a quick drop, you can usually pull the yarn back up using your hook. If you've lost several stitches, it might be best to frog back a few rows to maintain the integrity of the pattern.

What should I do if the hexagons don’t seem to fit together?
If your hexagons aren't fitting together well, check your stitch count and gauge. Remember to use stitch markers while joining to align your pieces accurately. If they still won't fit, try blocking them to create a more uniform shape before assembly.

Filed Under: Uncategorized

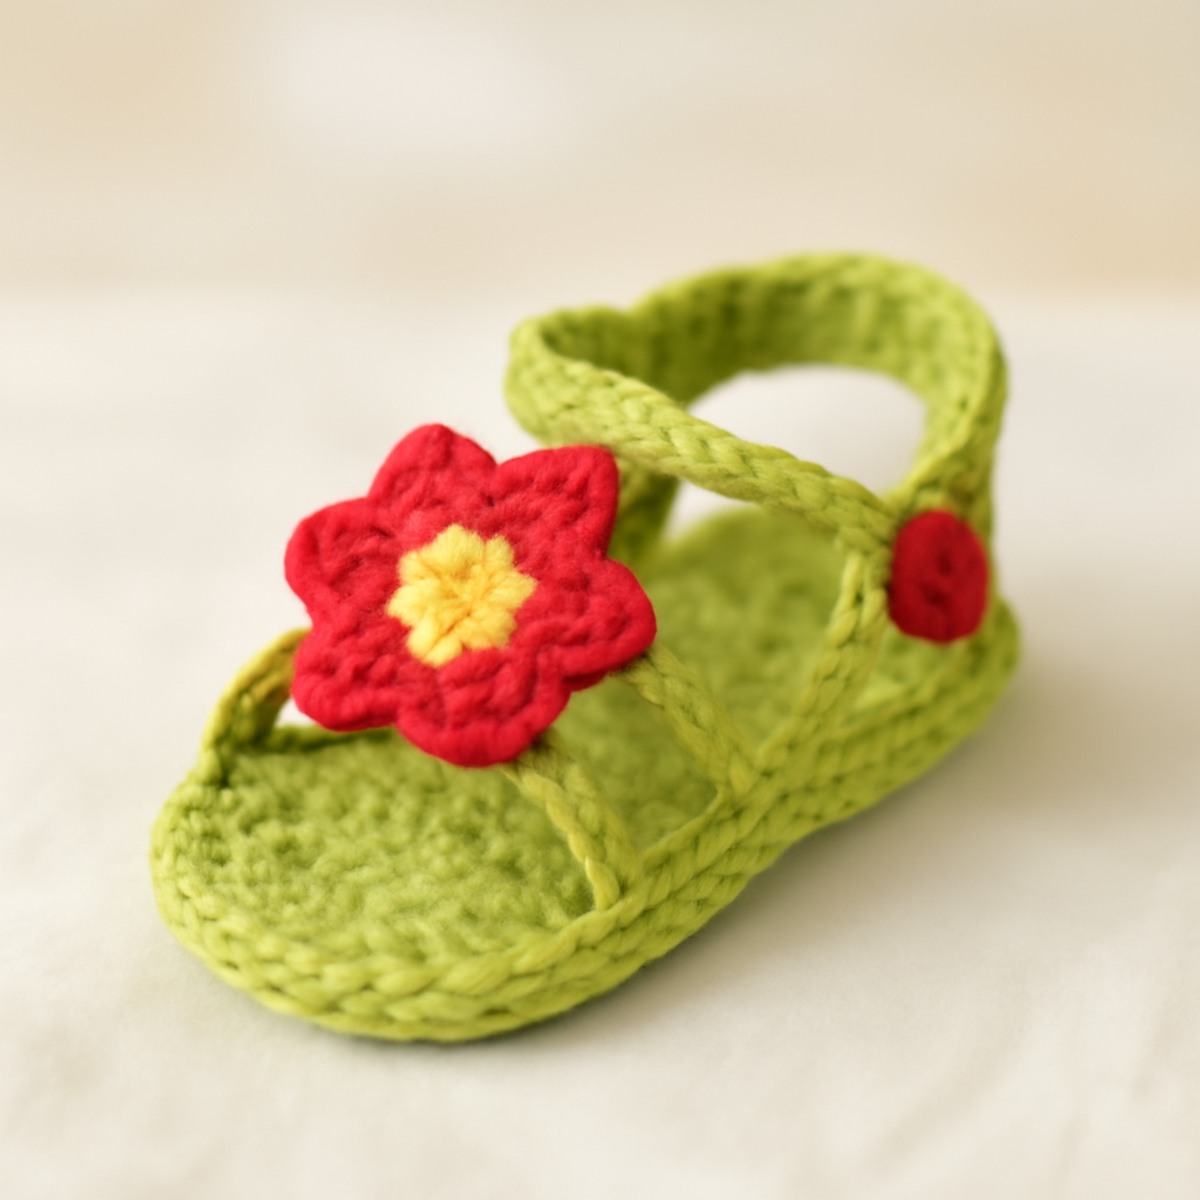
Adorable Flower Power Baby Sandals: A Beginner’s Delight

August 22, 2026 by Publisher Leave a Comment

Adorable Flower Power Baby Sandals: A Beginner's Delight

There’s something undeniably heartwarming about tiny feet adorned in playful crochet, isn’t there? Introducing the Flower Power Baby Sandals—a delightful project that will bring sunshine and smiles to every little outfit. Perfect for summer outings or special occasions, these whimsical sandals feature vibrant colors and charming flower motifs that are sure to capture hearts. One of the best parts of making these flower power baby sandals is how customizable they are, allowing you to pick the perfect palette for your little one. Plus, they offer both protection and breathability for those first wobbly steps. With just a bit of yarn and a few basic stitches, you’ll create a stunning accessory that’s as practical as it is cute. Ready to bring some flower power into your crochet repertoire? Let’s dive into this cheerful adventure together!

Flower Power Baby Sandals Materials & Tools

Yarn

  • Worsted Weight Yarn – Approximately 100-150 yards in bright green for the base, bright red for the flowers, and a hint of yellow for the flower centers is recommended for these flower power baby sandals.

Tools & Notions

  • 5.0mm (H) Hook – This size hook is perfect for creating a comfortable fit and maintaining even tension.
  • Stitch Markers – Helpful for keeping track of your rows and stitches, especially when transitioning between different parts of the sandals.
  • Optional Buttons – Consider adding buttons to the flower centers for an extra touch of whimsy and charm!

Why Choose Flower Power Baby Sandals?

Whimsy and Charm: These adorable sandals add a delightful touch to any baby outfit, making them perfect for summer fun and special occasions.
Easy for Beginners: Written with simplicity in mind, this pattern is a fantastic starting point for those new to crocheting, focusing on basic stitches.
Fun Customization: With endless color possibilities, you can personalize each pair to match your child's wardrobe, allowing your creativity to shine.
Textured Elegance: The combination of single and double crochet stitches crafts a beautiful texture, while the flower motifs pop with charm.
Perfect Fit: Constructed with flexibility in mind, these sandals ensure comfort and support for those first wobbly steps, keeping little feet secure.
Quick Project: Ideal for those crafting on-the-go, these sandals can be made quickly, allowing for instant gratification with a practical outcome.

Gauge & Sizing Notes

Don't skip the gauge swatch! Checking your tension is essential for creating the perfect fit with your flower power baby sandals. Aim for a standard gauge of approximately 4×4 inches (10×10 cm) for your tension swatch, which translates to about 14 single crochets by 8 rows. If you wish to customize the size, you can adjust the starting chain to accommodate different foot sizes; for instance, to make the sandal longer, simply increase your starting chain in multiples of 2. If your tension doesn’t match and your swatch is too small, don’t worry—try going up a hook size to achieve that cozy, snug fit your little one needs!

Step-by-Step Pattern for Flower Power Baby Sandals

Row 1: Create the Sole
Start by making a slip knot, then ch 12. In the second ch from the hook, sc across (11 sc). For the last ch, work 3 sc into it, creating the first curve. Now, continue along the opposite side of the starting chain, sc in each st till the end (22 sts). Your work should form a slight curve resembling a sole.

Row 2: Establish the Shape
Ch 1, then sc around the entire sole, placing 3 sc in the center stitches to maintain the curve (26 sts). Remember to stitch evenly along the edges. After completing this row, your sole should have a nice rounded shape, allowing it to lay flat.

Row 3: Build Up Sides
Join your bright green yarn with a sl st to any stitch. Ch 2, then hdc in the same stitch and each stitch around (26 hdc). This row will help give the sandal its height and shape. You’ll notice the sides begin to rise, providing support for the baby sandal's body.

Row 4: Continue to Build Height
Ch 2, then hdc around again (26 hdc). It's important to keep your tension even to ensure uniformity in the sandal. By now, the sides should look nice and sturdy, forming the body of the flower power baby sandals.

Row 5: Create Straps
Ch 8 to form the first strap and sk the first st. In the next st, sc to create a firm anchor point. Ch 8 again and sk the next st, sc into the next st (this forms the second strap). Your work should start to resemble the sandal shape, with straps for securing.

Row 6: Flower Construction
For your flower, start with a magic ring, ch 2, then work 12 dc into the ring. Pull the ring tight and join with a sl st. Your flower should be fluffy and full, providing the charming feature that sets apart these flower power baby sandals.

Row 7: Adding Petals
Ch 2, then work 1 dc in the same stitch. In the next st, dc, ch 1, dc to create petals (repeat around). Join with a sl st, ensuring each petal stands tall. The flower should now have a lovely texture, ready to embellish the front of your sandals.

Step 8: Attach Flowers
Position your flower at the front of the sandal, ensuring it is centered. Sew it securely with a darning needle and yarn tail. This final touch will add a delightful pop to your flower power baby sandals, and make them truly eye-catching for any little outfit.

Step 9: Finishing Touches
To polish off your sandals, go around the edges with a slip stitch to secure any loose ends, creating a neat finish. Ensure all yarns are woven in properly, so the flower power baby sandals have a professional look. Your finishing touches should leave you with a pair of beautiful, vibrant baby sandals.

Care Instructions for Flower Power Baby Sandals

Machine Washing: Use cold water and a gentle cycle to wash your flower power baby sandals. Avoid agitation to prevent any felting or pilling of the yarn.

Hand Washing: For best results, hand wash your sandals in cold water with mild detergent. Gently squeeze out excess water without wringing or twisting, to protect the beautiful texture.

Drying/Blocking: Lay your sandals flat on a clean towel to dry. Avoid hanging them, as this can distort their shape. Blocking after washing can help maintain their lovely structure and floral details.

Storage: Store your sandals in a cool, dry place away from direct sunlight. Keep them flat or in a breathable bag to avoid any deformation between wearings.

Helpful Tricks for Flower Power Baby Sandals

  • Maintain Even Tension: Consistent tension keeps your sandals uniform in size. If uneven, the sandals may not fit as intended, especially around the edges.

  • Count Your Stitches: Double-check your stitch count often, particularly when transitioning between parts. Losing count could lead to gaps in the straps or misshaped flowers.

  • Secure Your Flowers: When attaching flowers, ensure they are stitched tightly. A loose flower can ensemble a messy appearance, diminishing the charm of your flower power baby sandals.

  • Block for Shape: Consider blocking your sandals after finishing to retain their structure. This technique helps floral embellishments lay flat, giving a polished look.

  • Use Stitch Markers: Utilize stitch markers to help track your stitches and rows. They are invaluable, especially when you’re working complex sections like the straps and flowers.

Flower Power Baby Sandals Variations

There's no limit to how you can transform these adorable sandals, allowing your creativity to flourish and shine!

  • Color Swaps: Replace the bright green base with pastel shades for a soft, dreamy look. Imagine a sweet baby wearing soothing hues like lavender or mint!

  • Variegated Flowers: Use variegated yarn for the flowers to create unique, eye-catching patterns with every pair. Each flower can tell its own vibrant story, making each sandal a special masterpiece.

  • Sizing Adjustments: Customize the size effortlessly by increasing or decreasing the number of stitches in the sole. This way, you can create snug sandals for petite feet or roomier options for growing toddlers.

  • Textured Pops: Add a charming pom-pom to the center of the flower for a fun and playful touch. The added dimension will not only enhance the aesthetics, but it’ll also invite playful touches from curious little hands.

  • Sparkling Embellishments: Integrate beads or buttons at the flower centers for a delightful, whimsical look. A touch of sparkle can elevate these sandals to a fabulous accessory for special occasions!

  • Fringed Edges: Add a fringe border around the edges of the sandal for a boho-inspired twist! Fringes are not just trendy; they can bring a tactile experience for those little explorers.

  • Funky Straps: Swap traditional straps with decorative braids or even lace for a fresh take on the classic design. The unique style can make these sandals stand out just as much as the little ones wearing them.

  • Seasonal Themes: Think beyond the flowers! Consider incorporating seasonal designs, such as little leaves for fall or snowflakes for winter, to create themed sandals throughout the year. Every season can lead to a new delightful creation!

What to Pair with Cheerful Flower Power Baby Sandals

As you welcome the vibrant charm of these tiny sandals into your crochet collection, why not explore matching accessories that embody the same playful spirit?

  • Adorable Baby Hat: Create a cute hat adorned with flowers to keep your little one stylish and sun-safe while enhancing the playful theme.

  • Matching Diaper Cover: A crochet diaper cover in bright green complements the sandals, making a delightful set that is perfect for summer outings.

  • Flower Motif Hair Clips: Crochet tiny flower hair clips to complete the look, allowing little ones to flaunt their flower power in style!

  • Baby Blanket: A lightweight, colorful blanket featuring similar shades provides warmth and comfort, ideal for cozy summer picnics at the park.

  • Crochet Toy Rattle: Craft a playful rattle using the same colors and floral motifs. It’s the perfect companion for your little walker, bringing both joy and engagement!

Embrace your creativity while adding adorable pieces to your little one's wardrobe!

Flower Power Baby Sandals FAQs

Can I use a different yarn for my flower power baby sandals?
Absolutely! While worsted weight cotton yarn is recommended for these sandals, you can substitute acrylic yarn, but keep in mind that it might affect the breathability and softness. If you prefer a slightly thicker or fluffier texture, a wool blend could also work, ensuring it meets the weight category.

How can I adjust the size if my baby’s feet are bigger or smaller?
Don’t panic! You can easily customize the size of the sandals by adjusting the number of stitches in the sole. Simply add or reduce a few chains at the beginning, keeping the overall pattern consistent. You might want to measure your little one’s feet to find the perfect fit.

Why is my work curling at the edges?
Curling can be a common issue, especially if you're not maintaining even tension. I recommend checking your tension throughout your work. More importantly, ensure you're using the correct hook size. If the problem persists, blocking your sandals can help flatten them out.

What crochet hook size should I use for the flower motifs?
For the flower power baby sandals, a size H (5 mm) hook is recommended throughout the project, including for the flowers. However, if you find your flowers are too tight, you may want to switch to a larger hook for them. Just make sure you keep your gauge consistent.

How do I fix dropped stitches in my sandals?
It's an easy fix! If you notice a dropped stitch, simply use a crochet hook to pull the yarn up to the correct row. Then, secure that stitch back in place by crocheting into it again to ensure it stays put. Remember, it’s always best to fix things as you go to avoid larger issues later!

Filed Under: Uncategorized

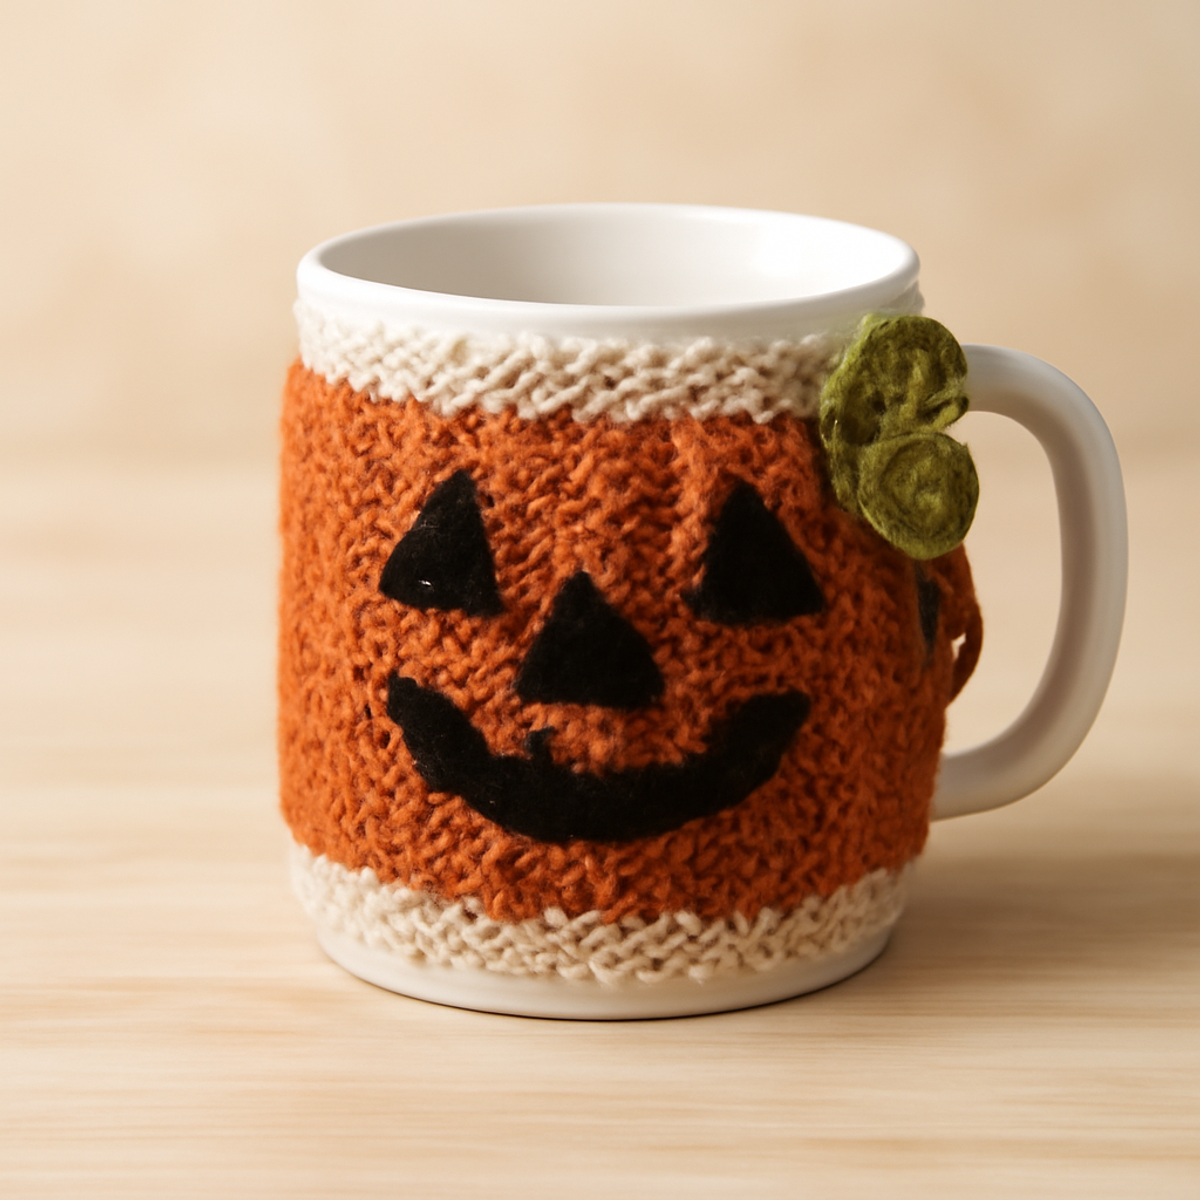
Cozy Pumpkin Spice Crochet Mug Cozy in Just 1 Hour

August 22, 2026 by Publisher Leave a Comment

Cozy Pumpkin Spice Crochet Mug Cozy in Just 1 Hour

There’s something truly magical about wrapping your hands around a warm mug filled with your favorite beverage while the chill of autumn sweeps in. Introducing the Pumpkin Spice Mug Cozy—your new crochet companion that combines playful charm with cozy practicality. This delightful project works up quickly, allowing even beginners to create a festive accessory that provides insulation and style. With its cute jack-o'-lantern design, this mug cozy not only keeps your drink warm but also adds a whimsical touch to your fall decor. Plus, you’ll whip it up in about an hour, making it the perfect gift for fellow coffee lovers or a lovely treat for yourself. Ready to make sipping your pumpkin spice latte a little cozier? Let’s get started on this fun crochet journey together!

Pumpkin Spice Crochet Materials & Tools

Note: Gather your supplies and let’s create a cozy masterpiece!

Yarn

  • Worsted Weight Yarn (Pumpkin Orange, Beige, Dark Green, Black) – You’ll need approximately 150 yards in total to give your mug cozy that festive flair.

Tools & Notions

  • 4.0mm (G) Crochet Hook – Ideal for comfortable handling as you stitch your cozy.
  • Stitch Marker – Helps you keep track of your rounds as you work.
  • Scissors – Use these for cutting your yarn cleanly.
  • Button (0.5 to 0.75 inches) – A charming decorative closure to complete your cozy project.

Why Are You Going to Love This Cozy?

Fast & Fun: Complete this project in just one hour, perfect for those who want quick satisfaction.
Beginner-Friendly: Simple crochet skills are all that's needed, making this a great start for newbies.
Festive Design: The playful jack-o'-lantern design adds a seasonal touch, beautifully enhancing your fall decor.
Versatile Colors: Easily customize your cozy with different hues like burgundy or a plush blend to fit your unique style.
Perfect Gift Idea: Delight your friends and family with a heartfelt, handmade gift that’s both practical and charming!
Warm & Snug: The ribbed texture creates a comfortable grip, ensuring you can enjoy your warm beverages in style.

How to Check Your Gauge for Pumpkin Spice Mug Cozy

Don't skip the gauge swatch! Checking your crochet tension is essential for ensuring your Pumpkin Spice Mug Cozy fits snugly around your favorite mug. Aim for a general guideline of approximately 4×4 inches (10×10 cm) to see how your stitches measure up; if you're working tightly, you might end up with a cozy that's too small! To adjust the sizing, if you want a wider cozy, increase your starting chain in multiples of 4. If your swatch is too small, simply go up to a larger hook size to maintain the cozy’s adorable charm! Enjoy the journey of creating your cozy masterpiece!

Step-by-Step Pattern for Pumpkin Spice Crochet

Row 1: Foundation Chain
Begin by making a foundation chain of 32 stitches. Ensure the chain is not too tight to allow for comfortable stretching later. Once your chain is complete, join the last stitch to the first with a slip stitch (sl st) to form a ring. Your work should sit flat in a circular shape, ready for the next round. (32 sts)

Round 2: Ribbing Foundation
Ch 2 (counts as first hdc), then work 1 half double crochet (hdc) in each chain around. This creates a nice ribbed texture that will continue to build your cozy. Remember to keep your tension even, and at the end of the round, you'll have a total of 32 hdc. (32 hdc)

Round 3-12: Continue Ribbing
Repeat Round 2 for a total of 11 more rounds, working in hdc. As you progress, your cozy will start to rise, forming a lovely ribbed body. Keep stitching until your work measures approximately 9.5 inches in height. Your cozy should feel elastic, hugging the shape of a standard mug as it builds. (32 hdc each round)

Round 13: Switch to Border Color
Change to beige yarn for the final round. Work 1 hdc in each stitch around to create a contrasting border at the top edge of your cozy. This border will help finish off the pumpkin spice mug cozy beautifully. Finish with a slip stitch (sl st) to join, ensuring your stitches are neatly aligned. (32 hdc)

Step 5: Create the Pumpkin Face
Using black yarn, sew on triangles for the eyes and mouth of your jack-o'-lantern face onto the cozy. Position these features evenly to maintain a playful design. You might skip a few rows to allow the face to be clearly visible. This delightful touch gives your pumpkin spice crochet cozy its charming character.

Step 6: Add the Vining Detail
With dark green yarn, create a vine detail for extra flair. Ch 15, then hdc in the second ch from the hook and in each remaining ch. This will form a charming vine to wrap around your cozy. Sew the ends securely to your mug cozy where desired, enhancing the festive look and celebrating the fall season.

Step 7: Button Closure
Finally, attach a button to your cozy using a needle and thread, positioning it on one side for easy closure. This decorative finish adds character and practicality, helping to secure your cozy in place. Your pumpkin spice mug cozy is now ready to keep your favorite hot beverages warm in style!

Helpful Tricks for Your Cozy

  • Consistent Tension: Maintain even tension throughout your work to ensure the mug cozy fits snugly around your mug without being too tight or loose.

  • Stitch Count Matters: Regularly count your stitches after each round to avoid accidentally losing track, which can lead to an uneven appearance or size.

  • Seamless Color Changes: When switching colors for the pumpkin face, weave in ends immediately for a neat finish, minimizing extra weaving at the end of your pumpkin spice crochet project.

  • Light Blocking: Consider lightly blocking your finished cozy with steam to smooth out any uneven stitches, enhancing its overall aesthetic.

  • Button Placement: Secure the button on the side of the cozy to ensure easy access and a charming touch to this festive accessory.

What to Pair with Pumpkin Spice Mug Cozy?

Create a whimsical collection this fall by exploring delightful accessories that enhance your cozy experience!

  • Autumn Leaves Coasters: Perfectly complement your mug cozy with coasters that mimic falling leaves, adding a touch of nature to your table. The seasonal theme ties together beautifully, making every sip a delight.

  • Festive Crochet Pumpkin: Make a small decorative pumpkin to rest beside your mug. This charming companion enhances your fall decor and brings a smile as you sip.

  • Matching Scarf: Whip up a cozy scarf in similar pumpkin spice hues for a charming set. It allows you to embrace the season with warmth and style, perfect for chilly walks.

  • Fall-Themed Dishcloth: Crochet a dishcloth to match your cozy—functional and festive! It’s a fun way to bring a cohesive look to your kitchen and seasonal gatherings.

  • Cute Button Bookmark: Craft a playful bookmark adorned with a matching button to mark your place in cozy reads. It’s a sweet reminder of those cozy sipping moments with your favorite book.

Care Instructions for Pumpkin Spice Mug Cozy

Machine Washing: Use cold water and a gentle cycle to keep your pumpkin spice crochet cozy looking vibrant while avoiding damage.

Hand Washing: For a more delicate approach, hand wash with a mild detergent in cold water, gently squeezing to clean without agitation to prevent felting.

Drying/Blocking: Lay your cozy flat on a clean towel and reshape it as needed to dry. Avoid hanging, as this may distort its shape.

Storage: Store your cozy in a dry, cool place away from direct sunlight to maintain its colors and decorative elements.

Pumpkin Spice Crochet Variations

Feel free to add your unique flair and personality to this cozy project!

  • Color Swaps: Choose a rich burgundy instead of pumpkin orange for a seasonally chic twist. This subtle change can invoke a luxurious autumn vibe.

  • Yarn Alternatives: Opt for a plush acrylic or cotton blend for enhanced absorbency and texture. Each fiber brings its own cozy feel while staying warm.

  • Size Adjustments: Modify the initial chain length to create larger or smaller cozies. Sweeten your gift-giving experience by customizing sizes for everyone!

  • Texture Enhancements: Add a fringe detail along the bottom edge for a whimsical touch, or incorporate a mini pom-pom for an adorable finish that catches the eye.

  • Embellishments: Introduce a small flower or additional button details for charm. These little accents can transform your cozy into a true statement piece.

  • Layered Colors: Experiment with color-blocking by alternating rows of different hues, integrating beige or dark green throughout the cozy for a playful pattern.

  • Seasonal Variations: Change the design for different holidays! Swap the jack-o'-lantern face with a snowman for winter or a bunny for Easter; the possibilities are endless.

Pumpkin Spice Mug Cozy FAQs

Can I substitute the worsted weight yarn with a different fiber?
Absolutely! If you prefer a different feel, you can substitute worsted weight yarn with a cotton blend for added absorbency or a plush acrylic for coziness. Just make sure to check the weight to maintain the overall fit!

How can I adjust the size of my mug cozy?
To make your pumpkin spice crochet mug cozy larger, simply increase the initial chain length. For a smaller version, reduce the chain length accordingly. Just remember to keep the number of stitches consistent in the following rounds!

Why is my cozy curling at the edges?
Don’t panic! Curling can happen if your tension is too tight or if the stitch count has changed. Ensure you're maintaining even tension and check your stitch count at the end of each round. Lightly blocking your cozy can help it lay flat.

What hook size should I use for this project?
I recommend using a 4.0 mm (G) crochet hook for the best results with the pumpkin spice mug cozy. This size works well with worsted weight yarn to help create a snug, cozy fit.

How do I fix dropped stitches in my work?
It's an easy fix! If you notice a dropped stitch, simply use your crochet hook to pull the loose yarn through the last completed stitch, and continue crocheting. Alternatively, you can weave it back in for a seamless look at the end.

How do I ensure my colors change seamlessly?
When switching colors, I suggest weaving in your ends as you go. This keeps your work neat and reduces the number of ends you need to tidy up later. You can also try using the “cut and tie” method for a clean finish between color changes!

Filed Under: Uncategorized

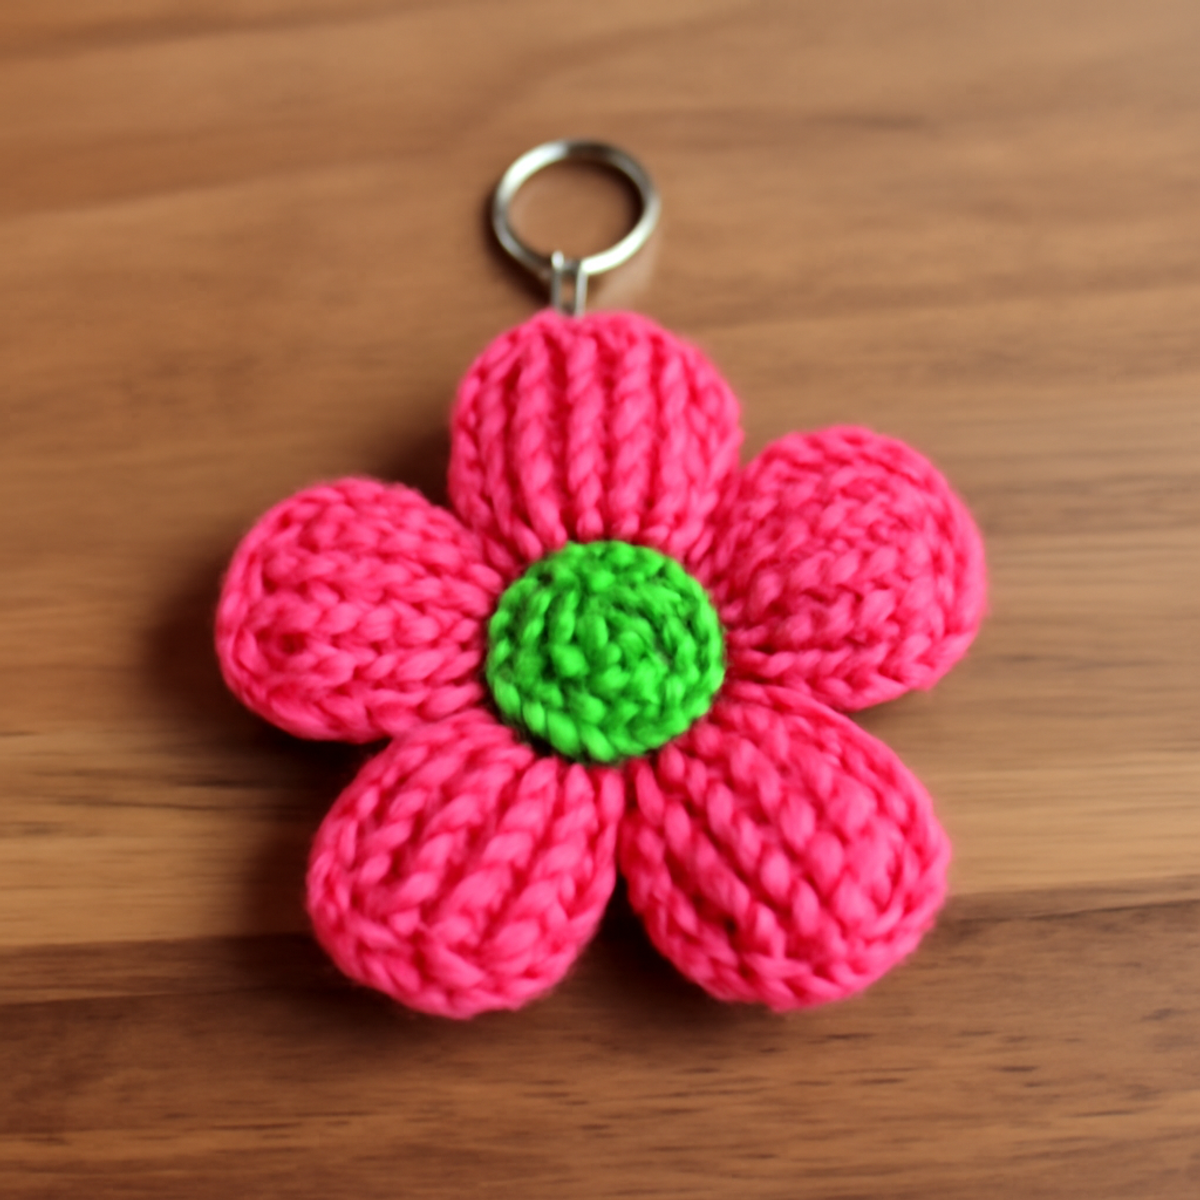
Whimsical Crochet Flower Keychain: A Quick & Easy Guide

August 22, 2026 by Publisher Leave a Comment

Whimsical Crochet Flower Keychain: A Quick & Easy Guide

There’s something undeniably joyful about the feel of vibrant yarn slipping through my fingers as I whip up whimsical crochet flower keychains. Springtime may be a season, but these delightful little accessories are all about year-round cheer! Perfect for adding a personal touch to bags or keys, this crochet flower keychain pattern is not only beginner-friendly but also invites you to unleash your creativity with colors and designs that reflect your unique style. In no time, you'll have charming keychains that are great for gifting or brightening your own day. So grab your favorite medium-weight yarn and a hook, and let’s get ready to create some flower power that’s quick and full of personality!

Crochet Flower Keychain Materials & Tools

Happy crafting! Here are the essentials to get you started on your vibrant crochet flower keychain project:

Yarn

  • Medium Weight Yarn (Acrylic or Cotton) – You'll need approximately 50-75 yards for each flower, perfect for creating a plush look.

Tools & Notions

  • 4.0-5.0 mm (H/I) Crochet Hook – This size will help you achieve the ideal tension and gauge for your crochet flower keychain.
  • Stitch Markers – Use these to keep track of your rounds and ensure consistent petal shapes.
  • Yarn Needle – Great for weaving in ends and finishing your project with a neat touch.
  • Embroidery Thread or Buttons (optional) – Add charming details to the centers or petals for a personal flair.

Why Crochet Flower Keychains Are Fun?

Vibrant colors bring joy to every stitch, making this project a delightful way to express your creativity. Quick to make, these keychains can be crafted in just an afternoon, perfect for those on-the-go moments. Easy for beginners, the simple crochet techniques help you gain confidence with each flower. Personal touches shine through in customizable colors and embellishments, showcasing your unique style. Lastly, cheerful gifts await as these whimsical keychains spread smiles to friends and family alike!

Gauge & Sizing Notes

Don't skip the gauge swatch! Ensuring your crochet flower keychain turns out as delightful as envisioned starts with checking your tension. Aim for a gauge of about 4×4 inches (10×10 cm), which should give you around 12 double crochets by 8 rows, but remember, this may vary based on your personal tension. To scale your crochet flower keychain larger or smaller, adjust your starting chain or the number of rounds worked—think of it as adding or subtracting multiples of 6 for the petals. If your swatch is too small, simply go up a hook size, and if it’s too large, consider using a smaller hook. Happy crafting!

Step-by-Step Pattern for Vibrant Crochet Flower Keychains

Row 1: Magic Ring and Center
Begin by making a magic ring with your medium weight yarn. Chain 2 (this counts as your first double crochet) and then work 11 dc into the ring. Pull the tail to tighten the ring and join with a sl st to the top of the beginning ch-2. Your center should feel secure and firm (12 sts total).

Row 2: Petal Round 1
Ch 1 (this counts as your first sc), then work (1 hdc, 2 dc, 1 hdc) in the same stitch to form the first petal. Sk 1 stitch, and repeat this pattern around, ending with 1 sc in the last stitch. Join with a sl st to the beginning ch to close the round. Your work should start to ruffle, showcasing the petals emerging (6 petals total).

Row 3: Petal Round 2
Ch 1, then sc in the same stitch. Work (1 hdc, 2 dc, 1 hdc) in the first petal’s sc. Sk 1 stitch, and repeat in each petal around. Join with a sl st to the beginning sc. Your flower should appear fuller, and the petals more defined at this stage (6 petals total).

Row 4: Final Petal Round
Ch 1, sc in the same stitch, then (1 hdc, 2 dc, 1 hdc) in the next sc of each petal. Sk 1 stitch, repeating around. Join with a sl st to the first sc. The flower should now have vibrant, rounded petals adding character (6 petals total).

Step 5: Finishing Touches
To finish the crochet flower keychain, fasten off and weave in any leftover ends using a yarn needle. For added embellishment, sew on a button or stitch a small embroidered detail in the flower's center. Your flower should now feel plush and complete, ready to be attached to a keychain loop.

Step 6: Attaching Keychain Loop
To attach the keychain loop, use your yarn needle and a length of yarn. Insert it through the top of the flower and tie securely. Reinforce the attachment by stitching back through a few times to ensure durability. Your vibrant crochet flower keychain is now fully assembled and ready for use!

Care Instructions for Crochet Flower Keychain

Machine Washing: Use cold water on a gentle cycle to clean your crochet flower keychain. This helps maintain the vibrant colors without causing any shrinkage or felting.

Hand Washing: For extra care, consider hand washing your keychain in cool water with mild soap. Avoid vigorous scrubbing to prevent any stretching or pilling.

Drying/Blocking: Lay your crochet flower keychain flat on a clean towel to dry. Reshape the petals as needed before it dries to ensure they maintain their cheerful form.

Storage: Keep your finished keychains in a cool, dry place, away from direct sunlight. This prevents fading and helps your crochet flower keychain stay as vibrant and lovely as the day you made it!

Crochet Flower Keychain Variations

Unlock your creativity and make these charming crochet flower keychains your own with a few simple twists!

  • Yarn Weight Swaps: Experiment with lighter or heavier yarn weights to create larger or smaller flowers, adding versatility to your designs.

  • Color Blocking: Combine multiple colors into a single flower, creating unique petal patterns that reflect your playful spirit. Mixing shades can really make your keychains pop!

  • Fiber Alternatives: Swap acrylic for cotton yarn for a more textured feel. Cotton adds a soft touch and is perfect for a fresh, summer look.

  • Size Adjustments: Alter your hook size or the number of stitches to change the dimensions of your flowers. This allows you to create a bouquet of varying sizes!

  • Beaded Centers: Add beads or buttons to the center of each flower for a touch of sparkle and personality. Beads can truly elevate your keychain's charm.

  • Textured Edging: Incorporate a decorative border stitch around the petals for added flair and dimension. A simple picot edge can make your flowers stand out.

  • Fringe Fun: Attach small strands of yarn to the flower petals, creating a fringe effect for a more playful appearance, reminiscent of breezy summer days.

  • Brooch Conversion: Use the same flower pattern but tweak the attachment to create lovely floral brooches or hair accessories. Let your imagination bloom!

Helpful Tricks for Crochet Flower Keychains

Consistent Tension: Maintain even tension throughout the project to ensure your petals are uniform and beautiful. This will help avoid wonky shapes.

Count Your Stitches: It’s easy to lose count when working in rounds. Check your stitch count regularly to keep track and ensure you don’t miss any petals.

Secure the Magic Ring: Make sure to pull the magic ring snugly. This step is vital for a sturdy flower center that won’t come undone later.

Weave In Ends Nicely: Take your time to weave in ends securely. This not only neaten your work but helps your crochet flower keychain last longer without unraveling.

Reinforce Keychain Loop: When attaching the keychain loop, reinforce with extra stitching to prevent wear over time, ensuring your creation stays intact as you use it.

Finished Shape Matters: Don’t forget to block your finished flowers! This technique enhances the fullness and shape of the petals, allowing them to look their best.

What to Pair with Vibrant Crochet Flower Keychains?

Add a delightful touch to your crafting journey by creating accessories that harmoniously complement your crochet flower keychain project.

  • Cheerful Flower Brooches: Create matching brooches that showcase the same vibrant colors, perfect for adding flair to any outfit.

  • Colorful Mini Bag: Craft a mini bag using similar yarn hues to hold your keychains, blending functionality with charm.

  • Floral-inspired Coasters: Pair your keychains with coasters featuring the same flower motifs, adding a whimsical touch to your home decor.

  • Funky Hair Accessories: Design hair clips or bands echoing your keychain's floral patterns, turning everyday wear into charming statements.

  • Seasonal Gift Tags: Use leftover yarn to craft adorable gift tags adorned with tiny flowers, elevating your gifts with a personal touch.

Vibrant Crochet Flower Keychains FAQs

Can I use a different yarn for my crochet flower keychain?
Absolutely! While the pattern suggests medium weight yarn, you can swap acrylic for cotton or vice versa. Just keep in mind that different yarns may affect the final texture and drape of your flower, so I recommend checking your gauge first to ensure your petals look just right!

How can I make my crochet flower keychain bigger or smaller?
Don't panic! To adjust the size, simply use a larger crochet hook or add more rounds, particularly in the petal sections. Conversely, if you want a smaller flower, you can opt for a smaller hook or reduce the number of stitches in each round. These alterations will beautifully showcase your design flair!

Why is my crochet flower keychain curling at the edges?
This is a common issue, but it's an easy fix! Curling can occur from tight tension. Make sure you're maintaining a relaxed grip while you crochet. Additionally, blocking your finished flower can help to flatten out any curled edges and create a more polished appearance.

How do I fix dropped stitches in my petal rounds?
Don't worry, it happens to the best of us! If you notice a dropped stitch, try to carefully unravel a couple of rounds back to the mistake and re-crochet them. Use your yarn needle to weave the dropped stitch back into place if you’ve already completed your flower. Patience is key, and you'll master it!

What crochet hook size should I use for this project?
I’ve found that a 4.0-5.0 mm (H/I) hook works perfectly for these vibrant crochet flower keychains. This size strikes a balance, allowing you to achieve a nice tension without making the stitches too tight or loose. Your flowers will bloom beautifully with this choice!

Filed Under: Uncategorized

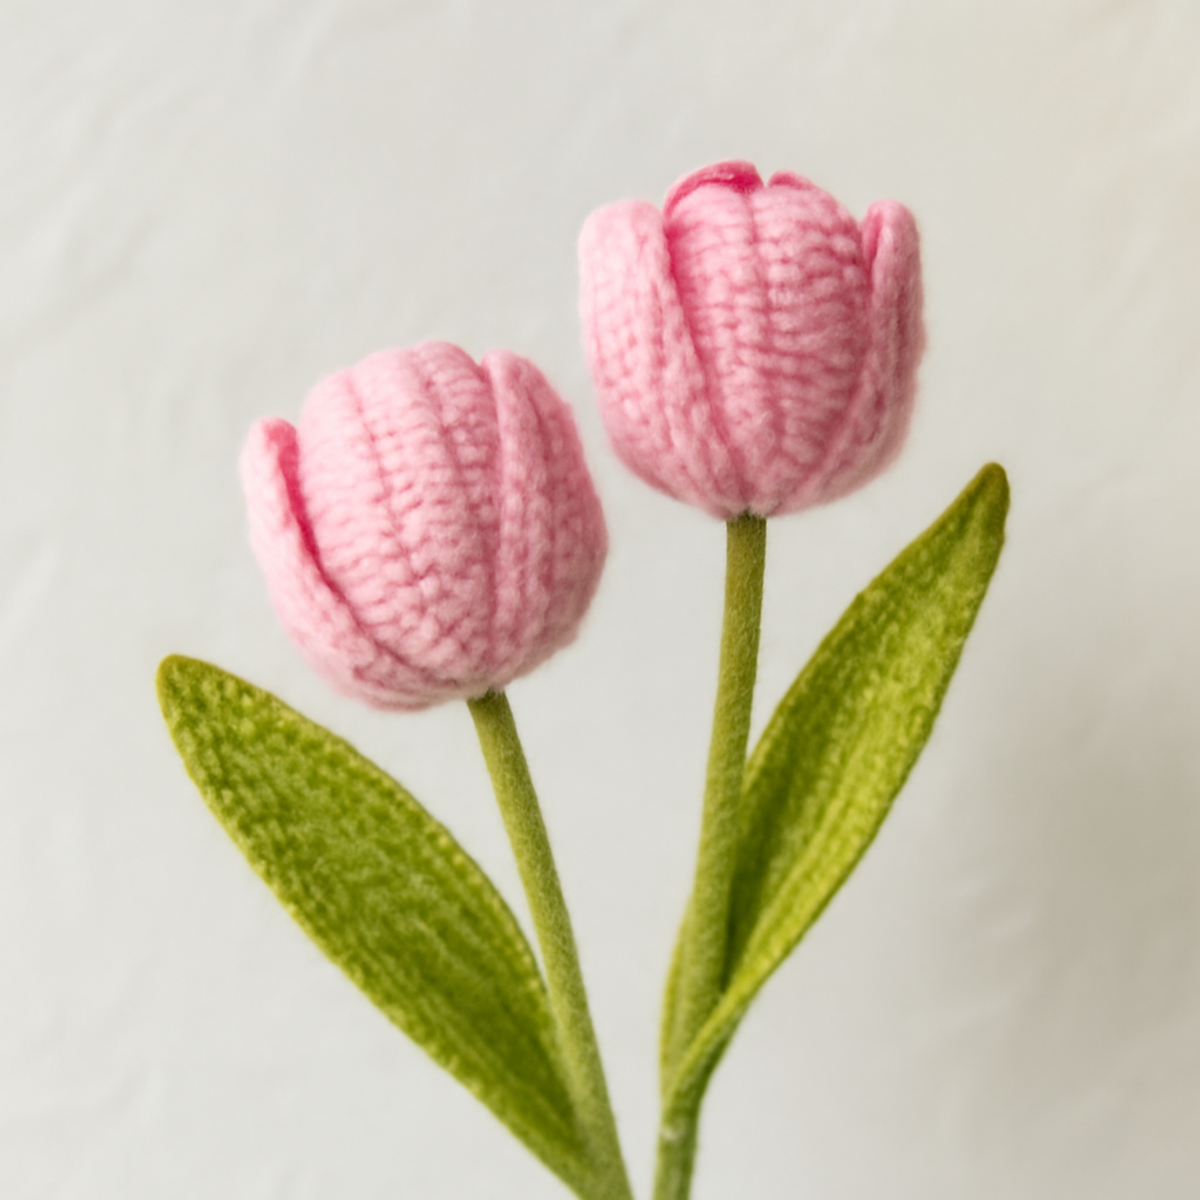
Cozy Crochet Tulips: A Charming Floral Delight for Home

August 22, 2026 by Publisher Leave a Comment

Cozy Crochet Tulips: A Charming Floral Delight for Home

As I sat on my couch with a cup of tea in hand, the vibrant colors of yarn scattered around me sparked an idea: why not bring a touch of spring indoors with some charming crochet tulips? This delightful project not only offers a whimsical flair but also allows you to create beautiful floral decor that never wilts, making it perfect for your home or as thoughtful gifts. Crafted with intermediate techniques, these tulips present a playful challenge while yielding stunning results. Plus, you'll love the opportunity to customize colors that match your aesthetic! Join me in stitching these delightful blooms and add a breath of fresh air to your space—let’s get started!

Crochet Tulips Materials & Tools

  • For this delightful project, gather these essential supplies to bring your crochet tulips to life:

Yarn

  • Medium Weight Yarn – Approximately 100-150 yards of soft pink for the tulip blossoms and about 50 yards of bright green for the leaves, with a preference for acrylic or cotton blends for durability.

Tools & Notions

  • 4.0mm (G) Hook – This size provides a nice balance of tightness and flexibility for detailed stitches.
  • Stitch Markers – Helpful to keep track of rounds and maintain consistent petal size throughout your project.
  • Tapestry Needle – Perfect for weaving in those pesky ends once your tulips are complete.

Get ready to unleash your creativity with these crochet tulips that will add a cheerful touch to any decor!

Why Crochet Tulips Are a Must-Try?

Charming Design: These crochet tulips bring a whimsical elegance to your home, offering a delightful way to showcase your crafting skills while brightening any space.

Playful Challenge: Ideal for those looking to enhance their crochet repertoire, this intermediate-level project incorporates shaping techniques that will keep you engaged and improve your skills.

Endless Customization: With endless color possibilities, you can create tulips that complement your decor or reflect seasonal themes, ensuring that each bloom is uniquely yours.

No Maintenance Needed: Unlike real flowers, these crochet creations require no watering or upkeep, allowing you to enjoy their beauty year-round without any fuss.

Soft & Inviting Texture: Crafted with medium-weight yarn, each tulip offers a soft and pleasing texture, adding warmth and tactile appeal to your home decor.

How to Check Your Gauge for Crochet Tulips

Don't skip the gauge swatch! Ensuring your tension is consistent is crucial for creating the perfectly shaped crochet tulips that you'll adore. A standard guideline is to achieve a tension swatch of approximately 4×4 inches (10×10 cm) with about 12 double crochets and 8 rows. If you're aiming to make your tulips larger or smaller, simply adjust your starting chain in multiples of 6 for the petals or change your hook size. If your swatch is too small, try going up a hook size to achieve the desired dimensions for your lovely floral creations. Happy crocheting!

Step-by-Step Pattern for Cozy Crochet Tulips

Row 1: Creating the Tulip Petals
Start by making a magic ring. Then, ch 2 (counts as first dc), work 11 dc into the ring, pull the tail to tighten (12 dc total). Join with a sl st to the top of the beginning ch-2. Your work should form a small circle; this will become the base of your tulip petals.

Row 2: Shaping the Petals
Ch 2, then in the same stitch, work 2 dc (inc) in each of the next 12 sts (24 dc total). Join with a sl st at the top of the beginning ch-2. You should see your circle expanding, starting to take on a more bell-shaped appearance resembling a tulip blossom.

Row 3: Continuing Petal Detail
Ch 2, dc in next st, inc in next repeat from * to * around (36 dc total). Sl st to the top of the beginning ch-2 to close the round. Your petals should begin to puff outward, creating a rounder shape typical of tulips.

Row 4: Defining the Petals
Ch 2, dc in the next 2 sts, inc in next repeat from * to * around (48 dc total). Join with a sl st at the beginning. The tulip bloom should be visibly inflating and have a lovely rounded flair, setting up the perfect base for your crochet tulips.

Row 5: Forming the Tulip Shape
Ch 1, working in the back loops only, sc in each st around (48 sc total). Join with a sl st at the beginning. This round will tighten up the edges, giving your tulip a defined shape, ready for assembly, with petals gently cascading outward.

Step 6: Making the Leaves
With green yarn, ch 10, hdc in the third chain from the hook and in the next 6 ch (last st on the base), turn and hdc (dec) over the first 2 hdc of the previous row (8 total). Now your leaf should take form, with a beautiful taper to mimic the lively movement of natural leaves.

Step 7: Finishing the Leaves
Ch 1, sl st in the top of the leaf point and work back along the remaining hdc to form a pointed leaf shape, assessing the length as it fits the tulip. Repeat for a second leaf so your crochet tulips appear symmetrically, ready to nestle against the tulip blossom.

Step 8: Assembling Your Crochet Tulips
Thread your tapestry needle and attach each petal to the stem by sewing securely. Position leaves about 1/3 from the base, shaping them as necessary. Be sure to weave in ends and secure everything tightly; your cozy crochet tulips will now be standing proud, ready to display!

What to Pair with Charming Crocheted Tulips?

As you embark on your journey to create these beautiful blooms, why not consider adding a few delightful companions to your crochet collection?

  • Tulle Flower Garland: Create a whimsical garland adorned with tulle flowers that beautifully accentuates your tulips' playful spirit. Hang it near a window to catch the breeze!

  • Crochet Leaf Coasters: Pair your tulips with leaf-shaped coasters that mimic the foliage of your flowers, bringing a cohesive nature-inspired theme to your space.

  • Spring-themed Wall Hanging: Craft a wall hanging that integrates your tulips alongside complimentary motifs, adding warmth and charm to any room with minimal effort.

  • Mini Crochet Vases: Make small crochet vases that can cradle a single tulip or two, providing a sweet touch to tabletops while showcasing your crochet tulips' stunning beauty.

  • Floral Themed Pillow Covers: Enhance your home decor with pillow covers featuring floral patterns inspired by your tulips, inviting the freshness of spring into your living space year-round.

Crochet Tulips: Fun Variations & Substitutions

Let your creativity bloom by customizing your crochet tulips with ease and charm!

  • Yarn Alternatives: Swap medium-weight yarn for cotton for a more vibrant color and crisp structure. The texture adds an airy feel to your blooms.

  • Color Blocking: Mix and match colors! Use two or three shades of pink to create an ombre effect that transitions beautifully across the petals.

  • Size Adjustment: Use a smaller hook to craft mini tulips or a larger hook for bold, dramatic blooms. This allows for playful variety in your floral arrangements.

  • Fiber Choices: Experiment with a bamboo blend for a soft sheen that adds an elegant touch. This choice can elevate the flowers, making them pop in any decor.

  • Embellishments: Add buttons or beads at the petal center for a delightful finishing touch. That little extra detail can truly make your tulips stand out!

  • Texture Transformation: Incorporate fringe along the petal edges for a fun, whimsical look. The additional texture creates a playful yet elegant twist on classic tulips.

  • Seasonal Themes: Change yarn color to white or yellow for Easter decorations or use deep reds and oranges for autumn-themed displays. Your tulips can celebrate every season!

  • Leaf Variations: Craft wider leaves or rounded edges by altering the stitch stitches. This simple modification can bring new life to your tulip design!

Expert Tips for Crochet Tulips

  • Consistent Tension: Ensure your tension is steady throughout to achieve uniform petal size—erratic tension may lead to lopsided blooms.

  • Use Stitch Markers: Employ stitch markers at the beginning of each round to help you maintain an orderly structure and avoid losing count.

  • Block for Clarity: Lightly block your tulip petals after assembly to enhance their shape, ensuring a beautiful, defined floral appearance.

  • Count Twice, Crochet Once: Regularly count your stitches to avoid missing increases or working too few, which can alter the finished look of your crochet tulips.

  • Secure Finishing: Pay attention to weaving in ends securely to prevent unraveling—this will keep your crochet tulips looking fresh and neat for years to come.

How to Wash and Care for Your Crochet Tulips

  • Gentle Hand Washing: Use cool water and a mild detergent to gently clean your crochet tulips. Avoid wringing to prevent damage—just let them soak for a few minutes before rinsing.

  • Drying/Blocking: Lay your crochet tulips flat on a clean towel to dry. To maintain their shape, consider lightly blocking them after washing, allowing your beautiful blooms to regain their definition.

  • Storage: Store your tulips in a cool, dry place away from direct sunlight to prevent fading. Keep them in a breathable bag or box to avoid dust accumulation and preserve their charm.

  • Avoid Agitation: Never machine wash your crochet tulips, as agitation can cause felting or pilling, affecting their delightful appearance and soft texture.

Charming Crocheted Tulips FAQs

Can I use a different yarn for my crochet tulips?
Absolutely! You can substitute medium-weight yarn with other fibers like cotton or bamboo, but be aware that this may alter the texture and drape of your tulips. Just ensure that the weight is similar to achieve the best results.

How do I adjust the size of my crochet tulips?
If you want to make larger or smaller crochet tulips, consider using a larger or smaller hook size. Alternatively, you can add or subtract rows or stitches in your shaping rounds to achieve your desired size. Just remember to adjust your leaf and stem proportions accordingly!

Why are my tulip petals curling up?
Don't panic! This commonly happens due to tight tension or not enough increases in your petal shaping. Make sure your tension is consistent throughout your work, and consider blocking the petals lightly after assembly to help them lay flat.

What hook size should I use for the crochet tulips?
The recommended hook size for this pattern is a 4.0 mm (G) hook. This size strikes the perfect balance between stitch tightness and flexibility, ensuring your tulips maintain their lovely shape while allowing for ease of stitching.

How do I fix dropped stitches in my crochet tulips?
It's an easy fix! Simply use a tapestry needle to pick up the dropped stitch, or if the stitch is significantly lower, you can unravel back to the last completed round and re-work it. Just remember to keep an eye on your stitch count as you go!

Filed Under: Uncategorized

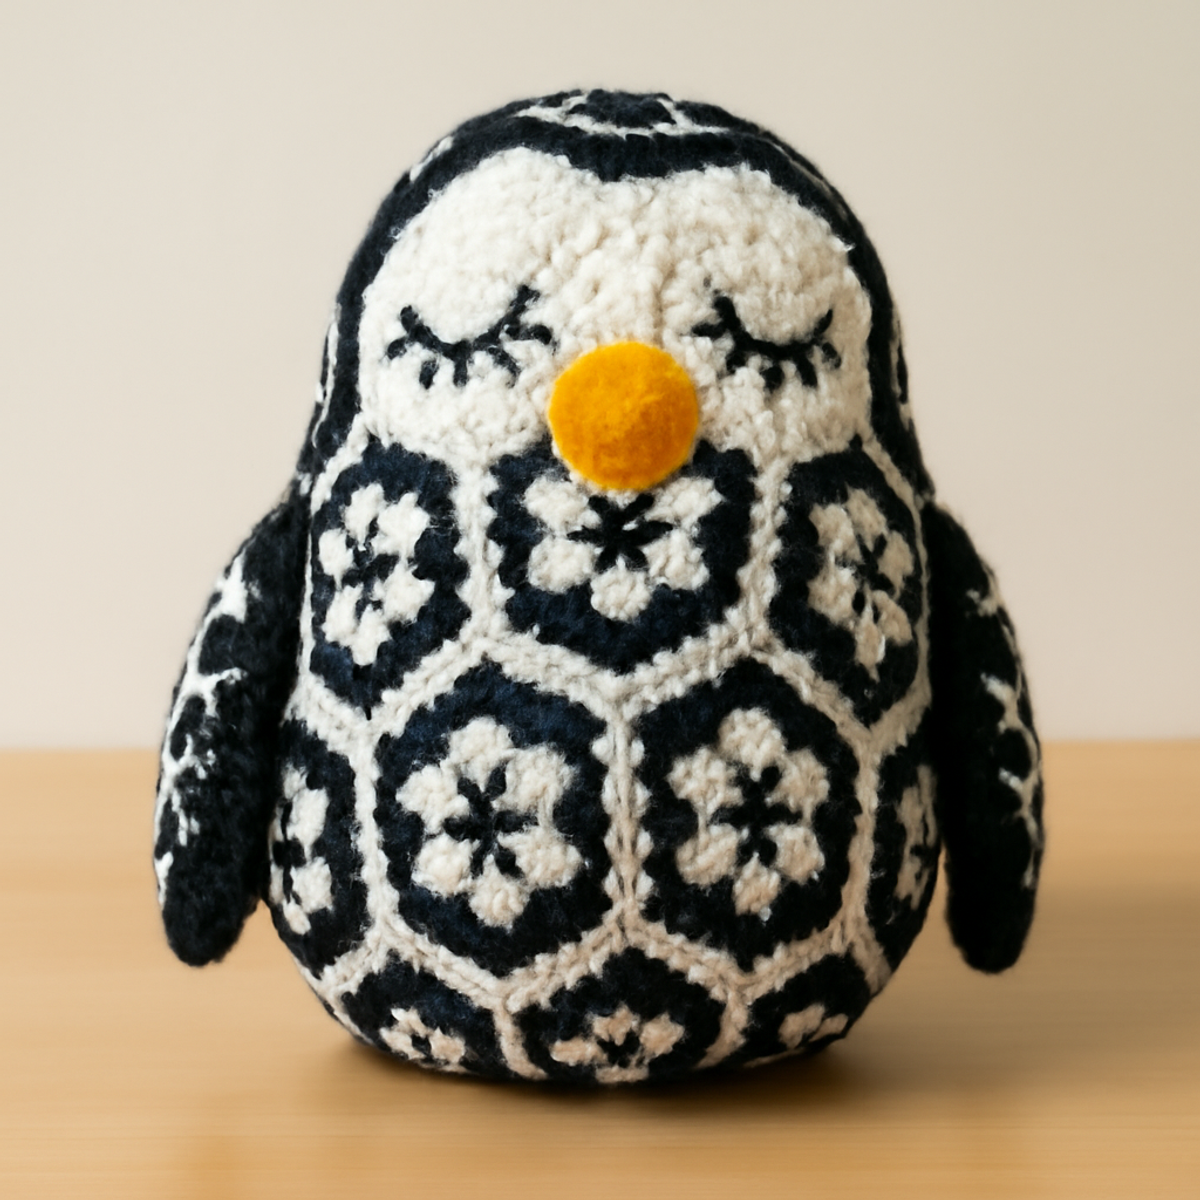
Whimsical Crochet Penguin Plush: Fun & Cozy in Every Stitch

August 22, 2026 by Publisher Leave a Comment

Whimsical Crochet Penguin Plush: Fun & Cozy in Every Stitch

As I sat in my cozy corner with yarn spilling from my stash, the thought of creating a whimsical crochet penguin plush danced in my mind. The Crochet African Flower Penguin is not just another project; it’s a playful companion that's sure to spark joy for both kids and adults alike. With its intricate hexagonal motifs and adorable features, this pattern works up beautifully and allows for endless customization in color and design. Whether you're looking for a charming decorative piece or a special gift, this project is perfect for adding a touch of warmth to your home. Plus, it's a moderate-level challenge that will enhance your skills while keeping crocheting fun! Are you ready to grab your materials and embark on this delightful crafting adventure?

Crochet Penguin Plush Materials & Tools

  • Medium Weight Yarn – Approximately 200-300 yards in black, white, and yellow for the beak will create your charming penguin plush.
  • 4.0 mm (G-6) Hook – This size is ideal for achieving a tight gauge, which is essential for the plush's cuddly form.
  • Yarn Needle – Perfect for seaming and stuffing your delightful creation smoothly.
  • Stuffing – Use polyester fiberfill or any soft stuffing to give your penguin a squeezable, huggable feel.

Embrace the creative journey of making your very own crochet penguin plush and let your imagination soar!

Why Should You Crochet This Penguin Plush?

Whimsical Charm: This crochet penguin plush boasts an enchanting design that appeals to all ages, making it an immediate favorite for both children and adults.

Intricate Motifs: The unique African Flower technique creates stunning hexagonal shapes that are not only visually striking but also a joy to crochet.

Creative Customization: With endless color options and the ability to add personal touches like buttons or unique stitch patterns, each penguin can be a one-of-a-kind masterpiece.

Soft, Cuddly Texture: Crafted with medium-weight yarn, this plush toy is perfect for snuggling, adding a cozy warmth to playtime or decor.

Skill Builder: Ideal for crafters with moderate experience, this project enhances your crochet skills while still providing a playful and satisfying challenge.

Gauge & Sizing Notes

Don't skip the gauge swatch! Checking your tension is crucial for the crochet penguin plush to ensure it comes out just the right size for hugging. Ideally, aim for a gauge of approximately 4×4 inches (10×10 cm), yielding around 12 double crochets by 8 rows. If you're looking to adjust the size of your penguin, increase or decrease your starting chain in multiples of 6 to make the body wider or narrower. If your swatch is too small, simply use a larger hook size to loosen your tension. Remember, ensuring the right gauge means your adorable crochet penguin plush will turn out just as delightful as you envision!

Step-by-Step Pattern for crochet penguin plush

Row 1: Create the First Hexagon
Using white yarn, ch 4 and join with a sl st to form a ring. In the ring, make 1 dc, ch 2, then work (3 dc, ch 2) 5 times total. Join with a sl st to the top of the first dc. Your hexagon should now be forming with 12 stitches around the center ring (12 sts).

Round 2: Build the Petals
Ch 2, then in each ch-2 space, work (2 dc, ch 2, 2 dc) around. Join with a sl st to the top of the first ch-2. Your work should start to take on a beautiful flower shape with each petal distinctly appearing as you complete this round (24 sts).

Round 3: Adding Depth
Change to black yarn. Ch 2, then in each ch-2 space, work (2 hdc, ch 2, 2 hdc). Join with a sl st. Your hexagon should now look more pronounced, with deeper colors framing each petal and giving it structure (36 sts).

Row 4: Forming the Body
Continue with black yarn and slip stitch into the next space. Ch 1, then sc in each dc around, making sure to place 2 sc in each corner space (the ch-2 spaces). This row will start to close the body and allow it to cup slightly, hinting at the shape of your crochet penguin plush (48 sts).

Row 5: Completing the Body
Change back to white. Ch 1, sc in each sc around, placing 2 sc in each corner sc to maintain the rounded edge. Your work should start to curl inwards a bit more, resembling the shape of the penguin (60 sts).

Step 6: Create the Flippers
Start a new hexagon using your black yarn. Follow the same hexagon pattern, but reduce to 6 dc in the first round and work the same petals for the flippers. Make two of these hexagons. They should be smaller compared to the body and resemble little wings (12 sts each).

Step 7: Assembling the Penguin
With the body piece facing you, use a yarn needle to attach the flippers to the sides of the body. Stuff the body lightly with fiberfill to maintain the plush shape as you sew. The flippers should be positioned slightly forward for a cute, engaging look.

Step 8: Add the Head and Beak
For the head, crochet a smaller hexagon, repeating the earlier pattern but using white yarn and changing to black for the final round. Stuff lightly and attach it to the top of the body using a yarn needle. For the beak, create a small triangle with yellow yarn and attach it just below the head.

Step 9: Final Touches and Edging
Create another round of sc in white yarn around the body and head to tidy the edges. This will give your crochet penguin plush a finished look, holding all parts together securely. Your adorable penguin is now taking shape, ready for cuddles!

Step 10: Finishing Up
Check for any loose ends and weave them in with your yarn needle. If you like, use surface slip stitches to add details or embellishments around the eyes or body. Your delightful crochet penguin plush is complete, ready to bring joy to your space or as a lovely gift!

Variations for Crochet Penguin Plush

Unleash your creativity and make this crochet penguin plush truly your own with these delightful variations!

  • Yarn Weight Swaps: Choose lighter or heavier yarn to create a smaller or larger penguin. A thicker yarn can make a wonderfully huggable toy.

  • Fiber Alternatives: Swap cotton for acrylic yarn for a softer texture. This will provide a fluffy, cozy feel perfect for cuddling.

  • Color-Blocking Fun: Use bold colors like turquoise or coral for a trendy twist. Mix and match colors for the hexagons to create a one-of-a-kind piece.

  • Personal Touch with Embellishments: Add buttons or small charms near the beak for unique flair. These little details can make your plush more engaging and personal.

  • Size Adjustments: Alter your hook size for a different scale. Going up a hook size can create a larger plush that's great for display or cuddles!

  • Textures for Interest: Introduce a pop of texture with pom-poms on the penguin’s head or fringing along its body. This will add visual interest and fun appeal.

  • Playful Flipper Design: Change the shape of the flippers by adding rounded edges or changing the stitch used. Variations in shape can evoke a different character entirely.

  • Engaging Borders: Finish off edges with a fun shell stitch or a simple picot border to enhance the overall aesthetic of your adorable creation.

These delightful adaptations not only make the crochet penguin plush more personal but also infuse every stitch with your creativity!

Expert Tips for Your Crochet Penguin Plush

  • Consistent Tension: Maintain even tension throughout your stitches to ensure the plush toy's form is balanced and sturdy for snuggling.

  • Count Stitches: Count your stitches meticulously, especially on hexagonal motifs, to avoid altering the plush's dimensions unintentionally.

  • Use Stitch Markers: Place stitch markers to keep track of rounds or specific stitch counts, which will help avoid losing count during your crochet penguin plush journey.

  • Blocking for Shape: After finishing, block the individual pieces gently to ensure each motif retains its shape for a polished final look.

  • Secure Assembly: Sew all components securely, especially around the flippers and head, to ensure your penguin holds together during playtime and stays cuddly for years.

What to Pair with Crochet Penguin Plush

As you finish crafting your precious penguin, consider these delightful projects that will enhance your whimsical collection.

  • Mini Penguin Friends: Create a series of smaller penguin plushies, each with unique color schemes to form an adorable family. These cuddly companions can be cherished by kids or serve as charming decorations!

  • Hexagonal Flower Blanket: Use the same African Flower technique to build an elegant blanket. This cozy throw not only complements your penguin but also showcases your mastery of hexagonal motifs.

  • Patterned Coasters: Crochet coasters using vibrant colors from your yarn stash to match your penguin. These functional pieces will add a splash of joy to your home while keeping surfaces safe.

  • Whimsical Beanie: Craft a playful beanie featuring a penguin design! It’s a snuggly accessory that extends the charm of your crochet penguin plush into your wardrobe.

  • Penguin-Themed Bag: Design a fun tote or pouch that echoes the penguin's colors, perfect for carrying your crochet supplies or as a quirky gift bag for little ones.

Let each project softly inspire you as you create a delightful collection that reflects your artistic journey!

How to Wash and Care for Your Crochet Penguin Plush

Machine Washing: Use cold water and a gentle cycle to protect the integrity of your crochet penguin plush, preventing agitation that might lead to felting or pilling.

Hand Washing: If more careful cleaning is desired, hand wash your plush in cold water with a mild detergent, gently pressing out dirt without wringing or twisting.

Drying/Blocking: Lay your penguin flat on a clean towel to dry, reshaping it as necessary. Avoid direct sunlight to keep colors vibrant and prevent fading.

Storage: Keep your finished crochet penguin plush in a cool, dry place, away from direct sunlight to maintain its softness and whimsical charm. Always ensure it's clean before storing to preserve its delightful appearance.

Crochet African Flower Penguin FAQs

Can I substitute yarn for this crochet penguin plush?
Absolutely! You can swap acrylic yarn for cotton, but keep in mind that cotton will yield a firmer texture. If you're looking to use a lighter weight yarn, adjust your hook size accordingly to maintain the necessary gauge for a cuddly look.

How can I make my penguin plush bigger or smaller?
If you’d like to alter the size of your crochet penguin plush, simply adjust your hook size. A larger hook will create a bigger plush, while a smaller hook will yield a more petite version. Additionally, you can increase or decrease the number of rounds in the body and head to customize the dimensions further.

Why is my work curling while crocheting?
Don't panic! Curling can be a common issue when working with hexagonal motifs. Make sure you are maintaining consistent tension and counting your stitches properly. If you're still experiencing curling, blocking your finished pieces may help flatten them out and shape them appropriately for assembly.

What size hook should I use for this pattern?
For the Crochet African Flower Penguin, a 4.0 mm (G-6 US letter) hook is recommended. This size is perfect for achieving a tight gauge needed for plush toys, ensuring that your penguin maintains its cuddly form without any gaps.

How do I fix dropped stitches?
It's an easy fix! If you notice a dropped stitch, pull the yarn gently to create just enough slack, then use your yarn needle to carefully weave the end back through the previously crocheted stitches. If necessary, you can also use a crochet hook to lift the dropped stitch and bring it back into place.

What should I do if my stitches are too tight?
If you're finding your stitches too tight, I recommend checking your gauge first. Try relaxing your tension a bit while crocheting. You might also consider using a larger hook size for the remainder of your project, allowing for a softer, more forgiving finish on your crochet penguin plush.

Filed Under: Uncategorized

Whimsical Crochet Chameleon Pattern for Colorful Creations

August 17, 2026 by Publisher Leave a Comment

The moment I picked up my crochet hook, I felt a surge of excitement as I envisioned the playful Crochet Chameleon pattern coming to life in my hands. This project is an incredible blend of creativity and skill, perfect for those who enjoy crafting whimsical designs. What makes this crochet chameleon pattern stand out is its unique opportunity for customizing colors and textures, allowing you to create a delightful burst of personality with each variation. Plus, it’s beginner-friendly, so even novice crocheters can get in on the fun and create this charming companion! Not only does this project help you hone your amigurumi skills, but it also results in a cuddly toy that brings joy—whether as a gift or as a decoration in your home. With every stitch, I found myself surprised by how quickly the chameleon took shape, each color adding a dash of creativity. What colors will you choose for your very own whimsical friend?

Crochet Chameleon Pattern Materials & Tools

Yarn

  • Chenille yarn – Choose soft and plush yarn in lime green, turquoise, yellow, white, and dark brown for a delightful effect; estimated yardage is 100-150 yards per color.

Tools & Notions

  • 4.0 mm hook – A size G hook recommended for flexibility in creating cuddly textures.
  • Safety eyes (12 mm) – Essential for adding a joyful expression to your chameleon.
  • Polyester filling – For stuffiness and maintaining the shape of your plush creation.
  • Yarn needle – Useful for weaving in ends and assembling your crochet chameleon.
  • Scissors – Perfect for trimming yarn ends and ensuring a tidy finish.

Why You’ll Love This Pattern

Versatility is one of the key features of the crochet chameleon pattern. It allows you to explore countless color combinations, enabling you to showcase your artistic flair. Simplicity in construction means that even intermediate crocheters can dive into the details with ease. You can also personalize your creation by experimenting with embellishments or changing the facial expressions, leading to a truly unique toy. Additionally, this project serves as a fantastic stash-buster for those odd skeins you may have lying around. But perhaps the best part is the quick turnaround; you could have this lively chameleon ready in no time! For more inspiration, check out the Crochet Chameleon Charming or consider making a complementary Crochet Sunflower Charming.

Gauge & Sizing Notes for Crochet Chameleon Pattern

Checking your tension is essential for the crochet chameleon pattern. A standard 4×4 inch gauge should measure approximately 10 sc by 10 rows. Matching this gauge is crucial, as uneven tension can lead to a misshapen final product. If you find that your swatch doesn’t match the gauge, consider adjusting your hook size or using a different yarn until you achieve the correct tension. If you desire a larger chameleon, increasing your initial starting chain or rounds by multiples of 6 will ensure that it remains proportionate. Remember, the dimensions of the finished chameleon will be about 10 inches in length and 6 inches in height, making it perfect for little hands. Keeping these sizing notes in mind will help you craft a delightful and captivating crochet chameleon that showcases your creativity!

Step-by-Step Pattern for Crochet Chameleon

Row 1: Create the Head Start with a magic ring and ch 1. Work 6 sc in the ring, pulling tight to close (6).

Row 2: Increase for fullness Ch 1, inc in each st around (12). Be sure to count to keep the round even.

Row 3: Shape the Head Ch 1, sc in next st, inc in next st repeat around (18). This adds a nice rounded shape.

Row 4: Continue Increasing Ch 1, sc in next 2 sts, inc in next st repeat around (24). Taking your time to keep your tension even helps in forming a smooth head.

Row 5: Forming the Neck Ch 1, sc in each st around (24). This row keeps your head well connected to the body.

Row 6: Start the Body Ch 1, sc in next st, dec in next st repeat around (18). This step slowly narrows the form to transition into the body.

Row 7: Simple Body Shaping Ch 1, sc in each st around (18). While working, manage your tension so the stitches stay uniform.

Row 8: Defining the Body Ch 1, sc in next 2 sts, dec in next st repeat around (12). The body is forming nicely, keep it consistent!

Row 9: Close the Body Ch 1, dec around until you are down to 6 sts (6). Once you reach six, stuff the body lightly to get a good shape.

Row 10: Finish the Body Ch 1, sc in each remaining st, then sl st to close the round. Fasten off and weave in the ends (6). Now your body is ready to attach the head!

Row 11: Create the Arms Start with a magic ring, ch 1, and work 6 sc in the ring. Continue with 2 more rows of sc, making a total of 3 rows (6).

Row 12: Forming the Legs Repeat the same method for legs, but make them slightly longer, working 4 rows of sc instead (6). The legs need to be able to support the chameleon’s weight.

Row 13: Making the Tail For the tail, ch 15 and work down the chain with 1 sc per st back to the base, then attach to the body (15). A tail adds character and mobility to your chameleon!

Row 14: Finishing Touches Embroider the facial features using contrasting colors for the eyes and mouth. Attach safety eyes (12 mm) securely to enhance expression (1 for each eye). Your crochet chameleon pattern is almost complete!

Row 15: Final Assembly Stuff all parts lightly, then join the arms, legs, and tail to the body using the yarn needle and remaining yarn ends. Make sure they are securely attached for durability (1 each).

Expert Tips for Crochet Chameleon Pattern

  • Count Stitches: Always count your stitches regularly to avoid losing count—this is essential for maintaining shape and balance in your crochet chameleon pattern.

  • Tension Control: Keep your tension consistent to prevent uneven stitches, particularly in the head and body sections where details are crucial.

  • Foundation Chain: Avoid twisting your foundation chain by ensuring that it’s not overly tight; create a loose loop to guide your subsequent stitches.

  • Color Changes: Plan out your color changes ahead of time to ensure seamless transitions, helping to make your crochet chameleon pattern visually appealing.

  • Assembly Tips: When assembling parts, securely stitch each piece to maintain structure, particularly on arms and legs, where durability matters most.

Crochet Chameleon Pattern Variations

Explore the creative possibilities of your crochet chameleon! You can easily make this project your own with various yarns and techniques.

  • Pastel Shades: Create a softer, whimsical look by using pale colors such as baby pink or mint green. This results in a delicate and charming chameleon.

  • Yarn Blends: Consider mixed fibers like cotton or bamboo for a different texture. These alternatives can yield a lightweight version that’s perfect for warm climates.

  • Color-Blocking: Use a bold, contrasting color scheme (like black and neon) to give your chameleon a modern twist. This striking look can make the toy visually appealing and fun.

  • Larger Size: To create a massive version, opt for chunky yarn and a larger hook size, letting you elevate the charm and make it a statement piece for decor.

  • Different Features: Customize the face with unique eye colors and expressions. For example, swap out traditional safety eyes for embroidered features to evoke a different personality altogether.

  • Textured Variants: Incorporate bobbles or shell stitches on your chameleon’s body to enhance its texture—this tactile addition offers more sensory fun for children.

  • Mixed Media: Add embellishments like felt spots or buttons for extra character. Using different techniques in one project showcases your crochet skills beautifully.

  • Themed Styles: Create a holiday-themed chameleon by using yarn in festive colors and adding small accessories, like a tiny scarf, making it a perfect seasonal decoration. You can further explore the magic of colorful crochet by checking out our Crochet Sunflower Charming or delve into adorable patterns like the Baby Bear Crochet.

How to Wash and Care for Your Crochet Chameleon

  • Machine Washing: Use a gentle cycle with cold water to prevent damage. Place your crochet chameleon in a mesh laundry bag to protect it further.

  • Hand Washing: For more delicate care, submerge your chameleon in cold water with a mild detergent. Gently squeeze the water through to clean without agitation.

  • Drying: Always lay your crochet chameleon flat to dry, reshaping it gently if needed. Avoid hanging it as this can cause distortions.

  • Storage: Store your chameleon in a cool, dry place. Avoid direct sunlight, which can cause colors to fade over time.

Crochet Chameleon FAQs

  • Can I use different yarn types for my crochet chameleon? Absolutely! While chenille yarn is recommended for its plushness, you can use any soft yarn you have. Just make sure to adjust your hook size accordingly.

  • How can I make my chameleon larger? To size up your crochet chameleon, choose a thicker yarn and a larger hook size. You can also increase the starting chain and stitches in each round, keeping proportions in mind.

  • What if I encounter dropped stitches? Don’t panic! If you notice a dropped stitch, simply pull the working yarn back to the point where you lost it and redo that row carefully before proceeding.

  • What should I do if my chameleon curls up? Curls can happen if your tension is too tight. Making sure your stitches are looser and consistent will solve this. You can block your finished piece to help flatten it out.

  • What hook size should I use? A 4.0 mm hook (size G) is recommended for crafting your chameleon. However, adjust it depending on your yarn choice and desired tightness of stitches for the crochet chameleon pattern.

  • Can I customize the face features? Yes! Personalizing the eyes and mouth gives your chameleon character. Use different yarn colors or embellishments to make each creation truly unique.

Filed Under: Amigurumi

Cozy Crochet Duck Pattern for Playful Amigurumi Joy

August 17, 2026 by Publisher Leave a Comment

Surprise! I recently discovered a charming crochet duck pattern that’s not only easy to whip up but also a delightful projet for beginners like me. This lovely duck, with its plush texture and whimsical design, promises a gratifying crafting experience. Best of all, it’s a quick stash-buster that allows you to use up those leftover skeins you have lying around. The joy of crafting this duck lies not just in creating an adorable amigurumi, but also in the cozy memories it evokes, like the innocent toys of childhood. This project is perfect for aspiring crafters looking to enhance their skills with basic stitches. Interested in creating this soft companion that can double as a treasured gift or a charming decor piece? Let’s dive into the joys of crochet and explore how to bring this duck to life!

Crochet Duck Pattern Materials & Tools

Yarn

  • Plush or Velvet Yarn – Choose a suitable yarn for amigurumi projects to create a soft, comfy texture. Approximately 100-150 yards will work well for your crochet duck pattern.
  • Accent Yarn – For the beak and feet, opt for yellow or orange hues to add a cheerful touch to your design.

Tools & Notions

  • 5.0 mm Crochet Hook – This size is perfect for working with plush yarn, providing a comfortable tension for beginners.
  • Safety Eyes – Add charm to your duck’s face; ensure they are securely attached to avoid any mishaps with young children.
  • Yarn Needle – Essential for weaving in the ends and assembling your duck.
  • Stitch Markers – Useful for tracking rounds during assembly, keeping your work organized as you crochet your duck.

Why You’ll Love This Pattern

Crafting this charming crochet duck pattern is a fun and whimsical experience that’s sure to be rewarding. Beginner-friendly, it guides you through each step with easy-to-follow instructions. Texture is a major highlight; using plush yarn results in a soft, cuddly toy. Additionally, it’s incredibly stash-friendly, as you can use leftover yarn from past projects. The customization potential is also a bonus—you can experiment with colors or even add a distinctive bonnet for a unique touch. Plus, the quick finish time means you can have your very own adorable amigurumi duck ready for playtime or decoration in no time! Want to explore more patterns? Check out our Crochet Duck Pattern or for a furry friend, try the Bear Crochet Pattern.

Gauge & Sizing Notes for Crochet Duck Pattern

Checking your tension is crucial for creating the perfect crochet duck pattern. The recommended gauge for this project is 4×4 inches (10×10 cm) with a measurement of 5 sc by 6 rows in single crochet. Make sure your stitches are tight enough to prevent any stuffing from peeking through your work. If the gauge doesn’t match, use a different hook size or adjust your yarn tension accordingly. To adjust the size of the finished duck, you can modify the starting chain or rounds during assembly. For instance, simply add or deduct a few stitches in the initial rounds of the body to achieve a smaller or larger duck. This project will yield a delightful plush toy when made correctly, with finished dimensions of about 18-20 cm (7-8 inches). Crafting with care ensures that your crochet duck pattern will be a cherished toy or decor for years to come.

Step-by-Step Pattern for Crochet Duck Pattern

Row 1: Start the Head Begin with a magic ring. Ch 1, then work 6 sc into the ring, pull tight to close. (6)

Row 2: Increase the Head Ch 1, inc in each sc around. This will create a nice rounded shape. (12)

Row 3: Build Head Shape Ch 1, sc in next sc, inc in next sc repeat around. Continue to form the head. (18)

Row 4: Shape the Head Ch 1, sc in next 2 sc, inc in next sc repeat around. Make sure to keep your tension consistent for a smooth finish. (24)

Row 5: Continuing the Head Ch 1, sc in each sc around. This is a solid round to keep the tension tight. (24)

Row 6: Eyes and Safety In this round, you might want to add safety eyes between rows 2 and 3 for a cute face.

Row 7: Finish Head Shaping Ch 1, sc in next 3 sc, inc in next sc this adds a fuller shape to the head. (30)

Row 8: Starting the Body After finishing the head, ch 1 and sc around. Create necessary rounds to blend smoothly from head to body. (30)

Row 9: Form the Body Ch 1, sc around. Make sure to adjust your tension if needed to avoid any stuffing peeking through. (30)

Row 10: Rounding the Body Ch 1, sc in next 4 sc, inc in next sc this helps form the body shape. (36)

Row 11: Body Continuation Ch 1, sc in each sc around, keeping an eye on your stitch count. (36)

Row 12: Completing the Body Ch 1, sc in next 5 sc, inc in next sc and fully round out the body. (42)

Row 13: Begin Beak Shape Using your accent yarn, ch 1 and inc in each sc around. Then create a smaller piece for the beak, adjusting rounds as needed. (6)

Row 14: Attach Beak After finishing the beak, attach it to the head securely using sl st. Make sure it’s centered.

Row 15: Create Wings Ch 1, then work 8 sc across for each wing. Repeat 2 times. Attach each wing using sl st to the sides of the body.

Row 16: Add Feet Using your yellow or orange accent yarn, create small rounds of 4 sc for each foot. Make sure they are proportionate and attach firmly.

Row 17: Final Assembly Using your yarn needle, sew together all pieces while ensuring each section is secure and positioned properly.

Row 18: Finishing Touches Check over your crochet duck pattern for any loose ends or adjustments, ensuring that cuddly companion is complete. You’ll love the final result!

How to Wash and Care for Your Crochet Duck Pattern

  • Machine Washing: If you must machine wash, use a gentle cycle with cold water. Place the duck in a mesh laundry bag to protect its shape.
  • Hand Washing: For best care, hand wash your crochet duck using mild soap and lukewarm water. Gently swish; do not agitate or twist aggressively.
  • Drying: Always lay the crochet duck flat to dry. Avoid hanging, which can stretch the yarn and deform its shape.
  • Storage: Store your duck in a cool, dry place, ideally in a breathable cotton bag to avoid moisture buildup that can harm plush yarn.

Expert Tips for Your Crochet Duck Pattern

  • Stay Focused: Always keep a close eye on your stitch count; losing track can lead to uneven shaping or an unintended disaster.
  • Count Out Loud: Counting your stitches out loud or using stitch markers can help avoid dropped stitches and maintain consistency throughout the project.
  • Use Tighter Tension: Ensure that your tension is consistent and tight enough to prevent stuffing from showing through the yarn, especially around the head and body.
  • Avoid Twists: When starting your foundation chain, make sure it’s not twisted to prevent issues later; lay it flat as you work into it.
  • Check Your Hook Size: Use a 5.0 mm crochet hook (US size H) as recommended for plush yarn, making it easier to achieve the desired softness and texture.
  • Practice with Leftovers: This crochet duck pattern is great for using up leftover yarn—experiment with colors to personalize your adorable amigurumi companion!

crochet duck pattern variations

Feel free to make this project your own with these fun variations!

  • Color Swaps: Use various bright or pastel colors to create a rainbow of ducks that each tell a different story.
  • Yarn Choices: For a sturdier toy, consider using cotton yarn instead of plush, making it less squishy yet just as adorable.
  • Size Adjustments: You can easily change the size of your duck by switching yarn weights and using corresponding hook sizes for a mini or oversized look.
  • Accessorize: Craft unique hats or bows for your ducks; these cute touches can add personality and charm!
  • Textured Effects: Enhance the duck’s body with bobble or popcorn stitches for added texture and visual interest.
  • Bonnet Variations: Change the bonnet’s design altogether, opting for stripes or polka dots using vibrant colors that complement the main body.
  • Other Characters: Adventure beyond ducks! Why not create a bear using a pattern like our Bear Crochet Pattern to form a delightful family?
  • Embellishments: You can add tiny embellishments like buttons or embroidered patterns for decorative appearances, making your crochet duck truly unique!

Crochet Duck Pattern FAQs

Can I use a different yarn for this pattern?
Absolutely! While plush yarn is recommended for texture, you can experiment with cotton or acrylic yarn to create a unique finish. Just adjust your hook size accordingly.

How can I adjust the size of the duck?
You can change the size by using different yarn weights and corresponding hook sizes. Adding or deducting a few stitches in the initial rounds can also yield a smaller or larger duck.

What if my crochet duck is curling?
If your project curls, it’s often due to tension being too loose. Ensure you’re keeping a consistent stitch tension, or try working with a smaller hook to create tighter stitches.

How do I fix a dropped stitch?
Don’t panic! Simply pull the yarn to unravel and return to the last complete row before the drop. Carefully re-crochet that stitch while maintaining proper tension.

What hook size should I use?
For this crochet duck pattern, a 5.0 mm crochet hook (US size H) is ideal for achieving the plush texture with ease. Ensure it’s suitable for your chosen yarn type.

Can I add facial features easily?
Yes! Adding safety eyes is simple. Just secure them between the second and third rows of the head to give your duck a cute and charming face. Remember to check the placement before attaching them for the perfect look.

Filed Under: Amigurumi

Adorable Crochet Bee Pattern for Whimsical Crafters

August 17, 2026 by Publisher Leave a Comment

Stepping into the whimsical world of crochet, I find myself completely absorbed in my latest project—the adorable crochet bee pattern. As I squish the soft plush yarn between my fingers, I can’t help but smile at the thought of bringing this cheerful creature to life. It’s a quick and beginner-friendly project that offers both a satisfying crafting experience and an excellent way to use up those yarn scraps lingering in your stash. Crochet amigurumi, like this charming bee, not only sparks joy as you create but also results in a huggable piece that can delight a child or brighten any room. The versatility of the crochet bee pattern allows for endless customization, letting you play with various colors and eyes to create your unique personality. How delightful to see this little creature buzzing around alongside your other handmade treasures! Join me in this creative buzz and discover how to craft your very own crochet bee that can be both a great gift and a delightful addition to your crochet collection.

Crochet Bee Pattern Materials & Tools

Yarn

  • Plush / Chenille Yarn – 100-150 yards total in yellow, black, white, and pink. Perfect for creating a soft, squishy bee.

Tools & Notions

  • 4.0 mm (G-6) Hook – Ideal for maintaining the correct tension throughout your crochet bee pattern.
  • Safety Eyes (12 mm) – Choose these for a cute, animated look, enhancing your bee’s personality.
  • Polyester Stuffing – Lightly stuff your pieces to keep the bee cuddly and huggable.
  • Yarn Needle – Crucial for weaving in ends securely for a polished finish.
  • Scissors – Sharp, reliable scissors are necessary for cutting yarn cleanly. Look out for a pair that feels comfortable in your hand.

Why You’ll Love This Pattern

Simplicity is a key feature of this crochet bee pattern, making it incredibly accessible for crafters of all skill levels. Texture is also a standout element: the plush yarn creates a wonderfully soft finish, perfect for cuddling. Additionally, this pattern is a stash-buster, allowing you to creatively use leftover yarn from past projects. You’ll find yourself further inspired by other adorable projects like the Bear Crochet Pattern or the playful Crochet Duck Pattern as you dive into amigurumi. The project also promotes customizability, allowing every crafter to make it uniquely theirs—experiment with eye styles or even embroidery for different expressions! Lastly, the time-saving aspect makes it a quick win, as you can complete this project in just a few hours. Buzzing with potential, this pattern truly stands out for its simplicity and charm.

Gauge & Sizing Notes for Crochet Bee Pattern

When crafting the crochet bee pattern, checking your tension is essential to ensure the finished product retains its desired shape and size. For this pattern, aim for a gauge of 4×4 inches (10×10 cm), which is approximately 16 sc across and 12 rows when using a 4.0 mm (G-6) hook. If your swatch doesn’t match, consider adjusting your hook size or changing yarn brands to achieve the correct gauge. Additionally, you can adjust the starting chain to resize the bee—if you want a larger bee, increase the number of stitches in your initial rounds; for a smaller version, decrease them instead. Discover the fun in expressing your creativity with this crochet bee pattern, and remember that customization is key—by properly gauging and sizing, you can easily make it unique to your crafting style!

Step-by-Step Pattern for Crochet Bee Pattern

Row 1: Start the Magic Ring Create a magic ring with your yellow plush yarn. This will be the base of your bee’s head. Pull the tail to close the ring slightly, ensuring a snug starting point.

Row 2: First Rounds of Sc Work 6 single crochet (sc) stitches into the magic ring. Pull the magic ring tight to close any gaps. This row establishes a solid foundation for shaping your bee’s head. (6 sc)

Row 3: Increase the Size Begin by putting 2 sc in each stitch around the previous round to build up your bee’s head. This will create circular growth, turning it into a rounded shape. Count your stitches to ensure you have a total of 12 stitches at the end. (12 sc)

Row 4: Continuing the Shape In the next round, alternate between 1 sc and 2 sc in the next stitch, increasing in every second stitch. This helps maintain the curve of the bee’s rounded head. You should have 18 stitches by the end of this round. (18 sc)

Row 5: Further Increasing Add again, this time working 2 sc in the next stitch followed by 1 sc in the next two. Repeat this until you reach the end, rounding out your bee’s shape further. Count to ensure you now have 24 total stitches. (24 sc)

Row 6: Making the Face Begin making facial features by working a few rounds of 1 sc for about 4-5 rounds without increases. This forms the forehead and allows more definition for the bee’s face. You should maintain 24 stitches for these rounds.

Row 7: Start the Body Switch to your black yarn and continue with 1 sc in each stitch for one round. This is where the body begins to take shape. Keep tension consistent for a seamless transition. (24 sc)

Row 8: Create Stripes Next, alternate between the yellow and black yarn in segments. For this row, make 1 sc all the way around with black. This is crucial for the classic bee look, and reinforces the bee’s rounded shape. Maintain 24 stitches. (24 sc)

Row 9: Decrease for Shaping To taper the waist of your bee, begin a series of decreases. Work 1 sc in the next 2 stitches, followed by a decrease. Repeat this around to ensure a tightly shaped body. You should finish with 18 stitches. (18 sc)

Row 10: Forming the Bottom Now, switch back to yellow and continue to work in rounds without increases or decreases until you reach your desired height of the body, about 3-4 inches tall. Count to confirm consistent stitching. (18 sc)

Row 11: Make Arms and Legs Using yellow yarn, create four small cylindrical pieces about 2 inches long using 6 sc in a magic ring, then continue with 1 sc in each stitch until complete. This adds adorable limbs to your buzzing bee. (6 sc for each, total 4)

Row 12: Attaching Components Now, securely attach all the pieces together, making sure to position them symmetrically. Cross-verify each piece’s attachment for stability. This assembly will proudly form your adorable crochet bee.

Expert Tips for Crochet Bee Pattern

Count Stitches: Always count your stitches after each round to prevent losing track of your crochet bee pattern. A mistake here can lead to an uneven shape.

Check Tension: Maintain a consistent tension while working to ensure an even finish. For the crochet bee pattern, tension affects the softness and fullness of your bee.

Correct Hook Size: Using the right hook size (4.0 mm or G-6) is crucial. A larger hook may create gaps, while a smaller one might make stitching difficult.

Avoid Twisted Chains: When starting your foundation chain, ensure it’s not twisted before joining. This helps in maintaining the right structure for your amigurumi bee.

Stuff Lightly: Use polyester stuffing moderately to keep your crochet bee plush yet structured. Over-stuffing can distort its shape.

Explore Colors: Get creative! Choose different color combinations for stripes or facial features in your crochet bee pattern, making it reflective of your unique style.

How to Wash and Care for Your Crochet Bee

Machine Washing: If you choose to machine wash, use a gentle cycle with cold water. This keeps your crochet bee looking fresh without damaging the plush yarn.

Hand Washing: For best results, hand wash your crochet bee in cool water with mild detergent. This ensures the delicate fibers stay intact and the colors remain vibrant.

Drying: Lay your crochet bee flat to dry. Avoid hanging it up, as this can distort its shape, especially with plush yarn.

Storage: Store in a cool, dry place, free from direct sunlight. This helps preserve the yarn’s softness and prevents fading over time.

crochet bee pattern variations

Feel free to explore your creativity by customizing the crochet bee pattern to suit your style!

  • Soft Pastels: Use soft pastel shades instead of traditional colors for a more whimsical appearance that appeals to both children and adults.
  • Bigger Buzz: Swap to a thicker yarn and use a larger hook size to create a larger bee, perfect for a decorative piece.
  • Embroidered Features: Instead of safety eyes, try embroidery for facial features that give your bee a unique and personalized touch.
  • Striped Fantasy: Change the color patterns dramatically by creating stripes in an alternating color scheme, or even tie-dye for a vibrant twist!
  • Accessorized Bee: Add fun accessories like a tiny flower or bow to enhance your bee’s character, making it a distinctive gift or decor item.
  • Theme-Based Bees: Create variations based on different themes; a Halloween bee with black and orange stripes could be a fun seasonal project. You can design each bee distinctly based on celebrations or themes surrounding the year.
  • Mixed Fiber Fun: Experiment with different yarn types, such as combining cotton and acrylic for varied textures. This not only adds visual interest but also diversifies the feel of the bee.
  • Size Alterations: Adjust the dimensions of your bee by changing the stitch count or modifying your hook size, enabling you to create everything from mini creations to plushies.

Consider sharing your creations with the community through Crochet Bee Pattern or explore other enticing projects like the Bear Crochet Pattern.

Crochet Bee Pattern FAQs

Can I use different yarn types for the crochet bee?
Absolutely! Switch out plush yarn for cotton or wool to create variations. Just keep in mind the weight and texture difference, as this can change the finished size and look.

What if I want to adjust the size of my crochet bee?
No problem! You can increase or decrease the initial stitch count when starting, or modify the number of rounds in the body to achieve your desired size. Always gauge before you begin for best results.

How do I fix dropped stitches?
Don’t panic! If you find a dropped stitch, simply pull back to the last round with the correct count and rework from there. Stitch markers might help you keep track during assembly.

What if the bee’s wings curl?
If the wings of your crochet bee are curling, try blocking them. Gently wash the wings, reshape them, and pin them flat until dry to maintain their intended form.

What hook size should I use?
The pattern calls for a 4.0 mm (G-6) hook, which is perfect for achieving the soft texture of the bee. Adjusting the hook size can change the outcome, so stick to the recommended for best results.

Can I use safety eyes of different sizes?
Of course! Feel free to experiment with different safety eye sizes to provide a personalized expression on your crochet bee. Just keep in mind the age of the intended recipient for safety reasons.

Filed Under: Amigurumi

  • « Previous Page
  • 1
  • …
  • 36
  • 37
  • 38
  • 39
  • 40
  • 41
  • Next Page »

Recent Posts

  • Chic Crochet Watch Band Pattern: Scalloped Elegance
  • Vibrant Crochet Granny Square: A Floral Delight to Create
  • Pocket Otter Crochet: Your Adorable Amigurumi Companion
  • Cozy Up with This Festive Crochet Tree Cozy Pattern
  • Chic Crochet Babydoll Dress: A Timeless Pattern for Spring

Recent Comments

No comments to show.
Fast Crochet Patterns Logo

Welcome to Fast Crochet Patterns, your curated editorial blog for modern, handmade aesthetics. Discover an elegant collection of contemporary designs and carefully crafted tutorials—where every beautiful pattern is completely free to inspire your next creation.

Join the Studio

Subscribe for our latest free patterns and warm, minimal crochet inspiration delivered to your inbox.


Collections

  • Accessories
  • Amigurumi
  • Baby
  • Bags

More Patterns

  • Cardigan
  • Dress
  • Flowers
  • Granny Square

Information

  • About
  • Contact
  • Privacy Policy
  • Terms Of Use
  • Disclaimer

© 2026 Fast Crochet Patterns. All rights reserved.