Fast Crochet Patterns

  • Home
  • Contact
  • Patterns
    • Amigurumi
    • Granny Square
    • Flowers
    • Baby
    • Dress
    • Bags
    • Cardigan
    • Accessories
menu icon
go to homepage
  • Home
  • Contact
  • Patterns
    • Amigurumi
    • Granny Square
    • Flowers
    • Baby
    • Dress
    • Bags
    • Cardigan
    • Accessories
search icon
Homepage link
  • Home
  • Contact
  • Patterns
    • Amigurumi
    • Granny Square
    • Flowers
    • Baby
    • Dress
    • Bags
    • Cardigan
    • Accessories
×

Stunning Crochet Flower Square: A Cozy, Intermediate Motif

August 22, 2026 by Publisher Leave a Comment

Stunning Crochet Flower Square: A Cozy, Intermediate Motif

As I immersed myself in the vibrant world of crochet, the delicate layers of a flower began to emerge from my hook, whispering tales of springtime blooms. Introducing the Layered Flower Crochet Square! This beautiful project not only adds a charming floral touch to any creation but also allows you to showcase your skills through its intricate design. Crafted for the intermediate crocheter, this crochet flower square is versatile enough to enhance everything from cozy blankets to stylish bags. You’ll love how quickly it works up, making it a perfect choice for those moments when you want to see your progress unfold. Plus, the energetic colors will brighten any space, inviting joy and cheer into your home. Ready to dive into the lush petals and delightful stitches? Let’s bring this beauty to life!

Crochet Flower Square Materials & Tools

  • Medium Weight Yarn – You will need approximately 100-150 yards in three colors (pink, peach, and green) for this cozy project.
  • 5.5mm (I-9) Hook – This size will give you a comfortable stitch tension, ensuring your flower motifs are well-defined.
  • Stitch Markers – These are helpful for keeping track of your rounds and petal placements.
  • Scissors – Essential for finishing off your yarn tails neatly.
  • Yarn Needle – Necessary for weaving in ends and assembling your pieces smoothly.

Embrace the beauty of this crochet flower square as you explore its layered design!

Why Choose This Crochet Flower Square?

Unique Floral Design: The layered petals create a stunning flower motif that catches the eye and showcases your crochet artistry.

Intermediate Challenge: Sharpens your skills with engaging techniques while remaining manageable for seasoned beginners.

Versatile Use: Perfectly adaptable for blankets, bags, or decorative pieces, elevating any project you choose to incorporate it into.

Quick Satisfaction: The crochet flower square works up rapidly, allowing you to revel in your progress while enjoying the creative flow.

Aesthetic Appeal: Bursting with color, this design brightens any space, bringing a cheerful vibe to your home decor.

Gauge & Sizing Notes

Don't skip the gauge swatch! Checking your crochet gauge is vital for ensuring your Layered Flower Crochet Square turns out beautifully and to the correct size. A common guideline is to aim for a 4×4 inch (10×10 cm) square to achieve the right tension, generally around 14 double crochets by 8 rows; however, actual measurements may vary based on your yarn and hook choice. To adjust the size of your square, simply increase your starting chain by multiples of 6 to make it larger or decrease for a smaller motif. If your tension doesn’t match, don’t worry! If your swatch is too small, try going up a hook size to achieve that perfect flower-shaped square.

Step-by-Step Pattern for crochet flower square

Row 1: Starting the Flower Center
Start with a magic ring, then work 12 double crochets (dc) into the ring, ensuring it’s tight to create a solid center for your crochet flower square. Pull the magic ring closed and slip stitch (sl st) to the top of the first dc to join. Your circle should have a neat appearance, and the stitches should be even and snug (12 sts).

Row 2: First Layer of Petals
Ch 3 (counts as 1 dc) and then work 2 dc into the same stitch. Skip 1 dc, then sl st in the next dc. Repeat this pattern around the circle to create the first layer of petals. You should have a total of 6 petals, each formed by 3 dc, spaced with sl st. Your work should start to take on a flower-like shape now (6 petals).

Row 3: Second Layer of Petals
Ch 3 to begin the next layer, then work 2 dc into the same sl st from the previous row. In the ch-1 space between petals, work 3 dc to create a more dimensional petal effect. Sl st into the next sl st between petals to secure. Continue this process all the way around with a total of 6 added petals that should be fuller and overlapping (12 petals total).

Row 4: Forming the Square Base
Switch to a single crochet (sc) by making a sc in each petal base around while working into the gaps between each petal. This will begin to create the base of your crochet flower square. Make sure to maintain consistent tension for a neat edge. Your work should feel flat and squared off now (12 sc).

Row 5: Establishing the Square Corners
In the corners, work 3 sc in each corner space to create rounded corners for the square shape. Continue with 1 sc in each side until you reach the next corner. This step gives your crochet flower square its defined structure and should feel sturdy (24 sc total).

Row 6: Finalizing the Square Shape
For this round, work 1 sc in each stitch around the entire square and place 3 sc in each corner space. This will further secure the shape and provide a pleasant border. Your crochet flower square should feel cohesive and ready for the final touch (36 sc).

Step 7: Edging the Square
With a contrasting color, join yarn at any corner and ch 1, then work 1 sc in each sc around, placing 3 sc in each corner. This final round gives a finished look to your crochet flower square and enhances the design. Your finished piece should feel plush and vibrant, embellished by the colorful edging (36 sc).

Crochet Flower Square Variations

Unleash your creativity by making this crochet pattern uniquely yours! Explore delightful twists that add personal flair to this beautiful design.

  • Color Swaps: Experiment with seasonal palettes; try earthy tones for autumn or cheerful pastels for spring vibes.
  • Fiber Changes: Opt for a cotton blend instead of acrylic. This swap brings a crisp texture that enhances the floral details beautifully.
  • Larger Motif: Use a larger hook size to create a bigger square, perfect for making bold decorative pieces or even throws.
  • Mini Square: For a sweet touch, work up a mini version using lighter yarn and a smaller hook to create coasters or embellishments.
  • Fringe Fun: Add playful fringe along one side of the square for a whimsical character that complements the floral design.
  • Textured Border: Instead of a simple edge, experiment with a scalloped or shell stitch border for added dimension and warmth.
  • Layered Textures: Incorporate a puff stitch in the center of the flower to create a lovely, raised effect that invites touch.
  • Motif Joining: Use these squares as colorful patches in larger projects, cleverly sewing or crocheting them together for vibrant blankets or bags.

Expert Tips for Crochet Flower Square

  • Keep Tension Even: Maintaining consistent tension is key to achieving a beautifully shaped crochet flower square. Practice tension control to avoid uneven edges.

  • Use Stitch Markers: Place stitch markers at the end of each round to help keep track of your progress, especially helpful for color changes and layered petals.

  • Count Stitches Carefully: Always double-check your stitch count at the end of each row. Losing count can lead to uneven petals or an unbalanced square.

  • Block Your Square: Lightly block the finished piece to enhance its features and ensure the flower opens beautifully, showcasing the intricate design without distortion.

  • Final Edging Matters: Use a contrasting color for the border to frame your crochet flower square. This adds a polished finish and can make your design pop further.

What to Make after Layered Flower Crochet Square?

Create a delightful matching set that brings your crochet flower square to life, perfect for brightening any space.

  • Charming Flower Pillow: Use the same whimsical colors to craft a cozy pillow that complements your floral motif beautifully.
    With its inviting texture, this pillow will transform any nook into a sunny retreat.

  • Floral Bag Pouch: A petite bag pouch featuring the same layered flower design is great for storing your crochet tools or treasures.
    It’s a perfect blend of practicality and beauty that showcases your love for crochet.

  • Bright Wall Hanging: Turn your squares into a stunning wall hanging that brings nature's vibrancy indoors.
    This project allows a playful and artistic display of your crochet skills, making any wall pop with color.

  • Sweet Flower Coasters: Create matching coasters that echo the charm of your flower square, ideal for sunny tea parties.
    These will add a touch of whimsy to your dining experience, pairing function with aesthetic delight.

  • Cozy Blanket Squares: Join several crochet flower squares to create a gorgeous, colorful blanket perfect for snuggling.
    Each square connects like a cheerful patchwork, celebrating the beauty of your creations.

Care Instructions for Crochet Flower Square

  • Machine Washing: Use cold water on a gentle cycle, ensuring that your crochet flower square stays intact without agitation that could cause pilling or felting.

  • Hand Washing: If you prefer, hand wash with a mild detergent in cold water. Gently press the water out, avoiding wringing to maintain the square's beautiful shape.

  • Drying/Blocking: Lay flat on a clean surface to dry, reshaping as necessary. Blocking helps the flower’s layers to open up, ensuring your crochet flower square remains vibrant and defined.

  • Storage: Store flat to prevent deformation. Avoid placing heavy items on top to keep the flower design crisp and beautiful for future displays.

Layered Flower Crochet Square FAQs

Can I substitute yarn types for my crochet flower square?
Absolutely! While the pattern calls for a medium-weight (worsted) yarn, you can easily swap acrylic for cotton or vice versa. Just keep in mind that cotton will give a crisper finish, while acrylic tends to be softer and fluffier. Always check your gauge when changing yarns to ensure your dimensions remain consistent!

How do I adjust the size of my crochet flower square?
If you’d like to make your square bigger or smaller, consider using a different hook size. A larger hook will yield a looser stitch and a bigger square, while a smaller hook will tighten your stitches, making a smaller square. Alternatively, you can add or subtract rounds, but be sure to maintain a balanced stitch count for a beautiful finish.

Why is my crochet flower square curling at the edges?
Don’t panic! Curling can often occur if your tension is too tight or if the stitch count isn’t correct. To fix this, you can block your finished square to help it lay flat. Just dampen it lightly and place it flat to dry, reshaping it as needed. You can also try adjusting your tension and ensuring your stitch count is accurate in future projects.

What size hook should I use for the best results on my crochet flower square?
For this pattern, a 5.5 mm (I-9) hook is recommended, as it provides a comfortable stitch tension while defining the flower motifs nicely. If you find your stitches are coming out too tight or too loose, feel free to experiment with hook sizes to find the perfect fit for your crochet style!

How do I fix dropped stitches in my crochet flower square?
It’s an easy fix! If you notice a dropped stitch, simply pull the yarn back to the dropped stitch and use your hook to bring it back up through the rows. If it’s a bit tricky, you can always use a yarn needle to weave the yarn back into place discreetly. Just ensure your stitch tension is consistent to avoid future drops!
Filed Under: Uncategorized

Cheerful Crochet Sun Square Pattern for Bright Decor

August 22, 2026 by Publisher Leave a Comment

Cheerful Crochet Sun Square Pattern for Bright Decor

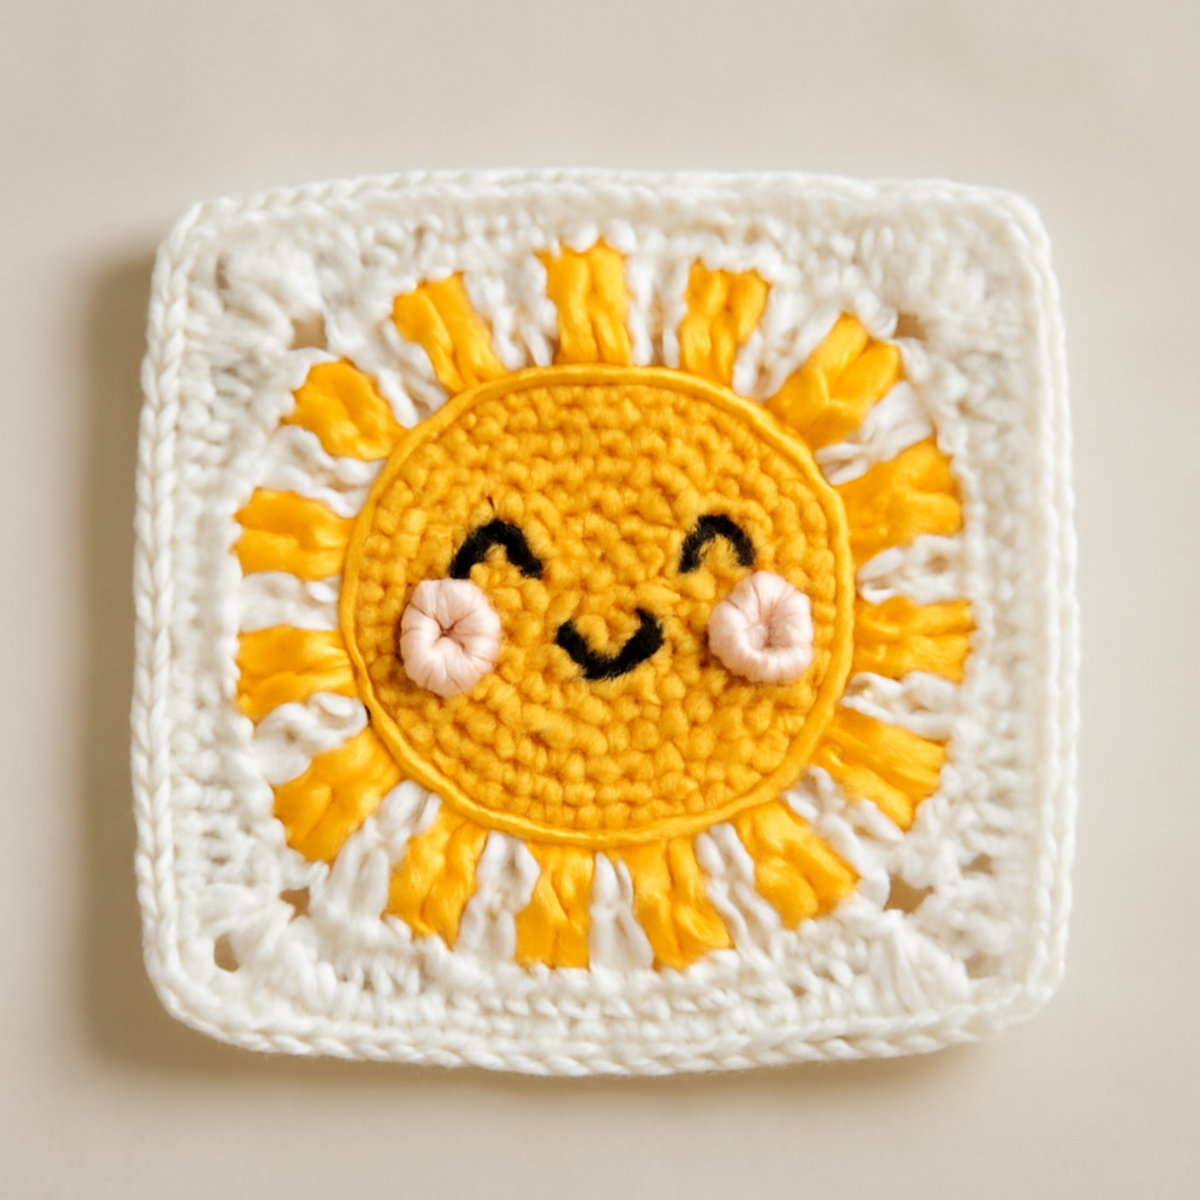
Sitting on my couch with a warm cup of tea, I can’t help but feel giddy as I stitch away at the cheerful crochet sun square. This delightful pattern is not just a project; it's an invitation to bring a burst of joy into your crafting space. Perfect for both beginners and intermediate crafters, this decorative square motif showcases a sunny design that brightens up any home décor or children's accessory. Making this crochet sun square allows you to refine essential crochet skills, like color changes and textured stitches, while creating a vibrant piece that’s great as a stand-alone decoration or a playful patch for a larger project. Whether you're planning to gift it or add it to your own collection, you'll love the joy it brings. Grab your yarn and let’s get started on a sunny adventure!

Crochet Sun Square Materials & Tools

  • Medium Weight Yarn (Category 4) – Use a vibrant yellow for the sun, white for the background, and a small amount of peach or pink for the cheeks; approximately 150 to 200 yards total is estimated.
  • 4.0mm (G/6 US) Crochet Hook – This size is recommended for achieving a nice tension and texture in your crochet sun square.
  • Safety Eyes – Optional embellishment for adding character to your sun’s face!
  • Buttons – Use these to decorate your square for additional charm.
  • Stitch Markers – Keep track of your rounds easily, especially when changing colors.

Why Make a Crochet Sun Square?

Endless Versatility: This cheerful motif is perfect for various uses, from brightening a room as decor to completing a cozy blanket.

Skill Enhancement: Perfect for beginners and intermediates, you'll practice essential techniques, boosting your crochet confidence with easy color changes and textured stitches.

Vibrant Aesthetic: Using vibrant yellow and white, your finished piece radiates warmth and joy, making it an eye-catching addition to any project.

Creative Customization: Play around with colors and facial expressions to make each sun square uniquely yours, adding sparkle or pastels for different vibes.

Gauge & Sizing Notes

Don't skip the gauge swatch! Checking your tension is crucial for achieving the desired dimensions of your crochet sun square. A recommended gauge is to aim for your stitches to fit within a 4×4 inch (10×10 cm) square. This will ensure your finished square is vibrant and uniform. If you want to make your crochet sun square larger or smaller, adjust your starting chain in multiples of 6 to scale it accordingly. If your tension is too tight or too loose, you might need to swap your hook for a larger or smaller size. Happy crafting, and may your sunny motifs shine bright!

Step-by-Step Pattern for crochet sun square

Row 1: Start the Sun Center
Begin with a magic ring and work 6 sc into the ring. Pull the loop tight to close and join with a sl st to the first sc. This creates the small circular base of your crochet sun square. Your work should have a snug center (6 sts).

Row 2: Increase the Sun Center
Ch 1 to start the next round, then in each st from the previous round, inc by placing 2 sc in each (12 sts). Join with a sl st to the first sc. Your circle should begin to expand, forming the sun's face.

Row 3: Continue Expanding
Ch 1, then sc in the next st, inc in the following st; repeat around (18 sts). Finish with a sl st to join. You will notice the sun shape starting to take form and grow in size.

Row 4: Adding Texture
Ch 1, sc in the next 2 sts, inc in the next st; repeat to end (24 sts). Join with a sl st. Your crochet sun square should feel fuller, with a textured look enhancing the cheerful design.

Row 5: Explore Color Change
Switch to your white yarn. Ch 1, then sc in each st around (24 sts). Make sure to carry the yellow yarn along the edge lightly. Your fabric should now show a clean transition from the sun to the next border.

Row 6: Create Sun Rays
Ch 1 and sl st in the first st, ch 3, sl st back into the same st for the ray; repeat around the circle (12 rays total). Join with a sl st. You'll see the sun’s energetic rays radiating outward in vibrant yellows and whites.

Row 7: Adding the Last Border
Switch back to yellow yarn. Work a round of sc around the entire piece, ensuring you cover the previous rays evenly (30 sts). Join with a sl st. The crochet sun square should feel sturdy and have defined edges.

Step 8: Final Assembly
Ensure all color changes are neat, then block your crochet sun square to shape it properly and define dimensions. Your completed piece will radiate joy, ready to brighten any space as a lovely decorative motif.

Expert Tips for Crochet Sun Square

  • Consistent Tension: Keep your tension even throughout the project. This uniformity is crucial, especially when switching colors, to maintain the overall appearance of your crochet sun square.

  • Count Your Stitches: Regularly check your stitch count, especially after each round. Use stitch markers to mark the beginning of each round and prevent losing track.

  • Secure Color Changes: When changing colors, ensure you carry the unused yarn along the edge lightly. This avoids any loose ends and keeps your crochet sun square looking neat and tidy.

  • Blocking Benefits: Don't skip blocking! It helps define the shape and enhances the dimensions of your finished piece, making the sun rays and center stand out beautifully.

  • Review as You Go: Periodically hold your work up to a light source to spot any gaps or uneven stitching. Fix them early to avoid extra work later on.

Crochet Sun Square Variations

Feel the creative spark as you explore delightful ways to customize your crochet sun square to make it uniquely yours!

  • Color Swaps: Choose pastel shades instead of bright yellows for a soft, whimsical vibe. Pastels can create a dreamy effect, adding a gentle touch to your space.

  • Larger Hook Size: Experiment with a bigger crochet hook for a more open, airy texture. This can give your square a light and breezy feel, perfect for a sunny look.

  • Different Facial Expressions: Alter the sun's face using various crochet stitches to create smiles, frowns, or even silly expressions. Each personality will add character and fun to your piece!

  • Sparkle Yarn: Incorporate glimmering or shimmery yarn into your design for eye-catching accents. This addition can elevate the festive appeal, making your sun motif shine even brighter.

  • Fringe Finish: Add fringe around the edges for a playful finish. Just a few strands can provide extra texture while maintaining that cheerful, whimsical charm.

  • Border Variations: Experiment with different borders, such as scallops or a layered approach, to frame your sun square. A unique border can enhance the overall design and elevate its look.

  • Sizing Adjustments: Adjust your stitch count to create a larger or smaller sun square. This versatility allows your project to suit various uses, from coasters to larger decorative items.

  • Textured Stitches: Incorporate puff stitches or bobbles within the sun's rays for added dimension. This tactile element can help draw in the eye and create captivating visual interest.

Care Instructions for Crochet Sun Square

Machine Washing: Wash your crochet sun square in cold water on a gentle cycle to preserve its vibrant colors and prevent any shrinking or stretching.

Hand Washing: For delicate care, immerse in cold water with mild soap, gently agitating to remove dirt, and avoid wringing to prevent distortion.

Drying/Blocking: Lay your finished square flat to dry, reshaping it as needed. This helps define the sunny design and maintains its cheerful aesthetic.

Storage: Store your crochet sun square in a dry, cool place away from direct sunlight to avoid fading, ensuring it remains bright and beautiful for years to come.

What to Pair with Sunny Crochet Square

Embrace the joy of creativity by crafting a delightful matching set that radiates warmth and cheer, perfect for any sunny day!

  • Bright Crochet Coasters: Create a cheerful set of coasters that will bring sunshine to your coffee table, mirroring the vibrant hues of your square.

  • Sunshine Pillow Cover: Turn one or multiple squares into a charming pillow cover, perfect for enjoying cozy reading sessions on the couch.

  • Colorful Crochet Bunting: Use the same sunny palette to craft a festive bunting, bringing a playful vibe to any party or children's room.

  • Cheerful Hat: Design a whimsical hat featuring the sun motif, ideal for keeping little ones warm while brightening up winter days.

  • Lightweight Beach Tote: Combine multiple crochet sun squares into a stylish tote, perfect for carrying beach essentials while showcasing your creative flair.

Crochet Sun Square FAQs

Can I use a different type of yarn for my crochet sun square?
Absolutely! While a medium-weight acrylic or cotton yarn is recommended for this project, you can substitute with other yarn types. Just make sure to check the yarn weight and adjust your hook size accordingly to maintain a similar texture and finished size.

How can I make my crochet sun square larger or smaller?
To adjust the size, you can change your hook size. Using a larger hook will give you a more open and airy square, while a smaller hook will yield a tighter fabric. Additionally, you can add extra rounds in the sun center or increase the number of stitches in each increase round to achieve your desired size.

Why is my work curling at the edges?
Don't panic! Curling can occur when the tension is too tight, especially during color changes. To fix this, try using a looser tension as you crochet or check that you are not inadvertently pulling on your stitches. Blocking your finished square can also help to flatten and define the edges.

What hook size should I use for the crochet sun square?
The pattern recommends a 4.0 mm (G/6 US) crochet hook. This size strikes a lovely balance between drapey and structured fabric. If you're using a different yarn weight, feel free to adjust the hook size to match the yarn's needs while staying aware of your gauge.

How can I prevent dropped stitches while working on my crochet sun square?
Keep a close eye on your stitches as you crochet, especially when switching colors. If you notice a dropped stitch, don't fret—simply use your hook to pick it back up and pull it back through to secure it. Regularly count your stitches and use stitch markers to help maintain your stitch count as you go!

My colors are not transitioning smoothly. How can I improve this?
To ensure smooth color transitions in your crochet sun square, try to carry the unused yarn along the edge lightly without pulling it too tightly. This can help reduce gaps or unevenness. For added finesse, practice your color changes on a sample swatch to perfect your technique before diving into the full project!

Filed Under: Uncategorized

Chic Skull Crochet Square: Aesthetic & Versatile Design

August 22, 2026 by Publisher Leave a Comment

Chic Skull Crochet Square: Aesthetic & Versatile Design

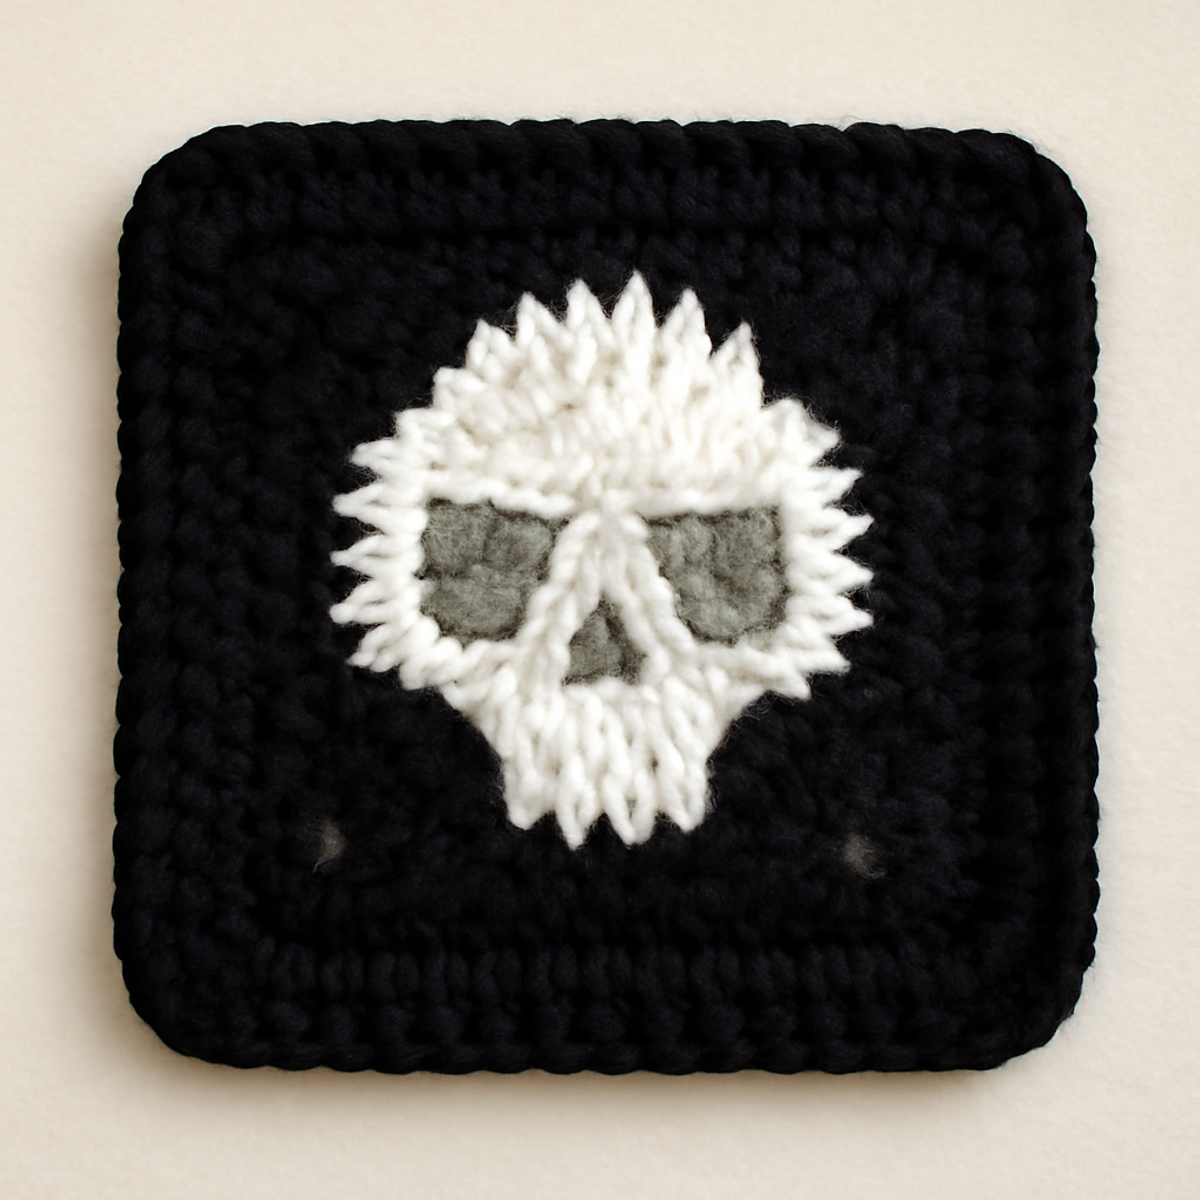
Have you ever felt that exhilarating rush when a project clicks just right, especially when it involves a fun twist on the classic crochet square? That’s exactly what you’ll discover with this skull crochet square! Perfect for adding a dash of whimsy and a hint of edgy flair to your home decor, this versatile motif opens up a world of creative possibilities—from coasters to trendy bags and even larger blankets. Plus, it’s a fantastic way to play around with color, inviting you to personalize your piece to suit your style. With a medium skill level, you can expect to make this stunning piece in no time, allowing you to showcase your crochet prowess or impress a fellow yarn enthusiast. So grab your hook, and let’s dive into this skull design that promises to spark your imagination and creativity!

Skull Crochet Square Materials & Tools

Yarn

  • Medium Weight Yarn (Category 4) – Approximately 150-200 yards in your choice of colors, soft acrylic works beautifully for texture.
  • Black Yarn – Needed for the square's base and finishing touches to frame the skull motif.
  • White & Gray Yarn – Essential for creating the skull design, offering that iconic contrast.

Tools & Notions

  • 5.5mm (I/9) Crochet Hook – Perfect for achieving a defined yet flexible stitch work to bring the skull crochet square to life.
  • Stitch Markers – Handy for tracking rounds, especially as you navigate your way through the skull details.
  • Yarn Needle – Useful for weaving in ends and ensuring a clean finish on your project.

Let your creativity soar with this skull crochet square as you blend elegance with a touch of whimsy!

Why Is This Skull Crochet Square So Unique?

Versatile Use: This skull crochet square isn't just a pretty design—it's a functional piece that can easily transform into coasters, bags, or even larger throws! Creative Outlet: With a fun skull motif, you can express your style and embrace the macabre aesthetic that's trending in crafting. Quick to Make: Ideal for a lazy afternoon, this project can be completed in a short timeframe, giving you instant gratification. Colorful Possibilities: The pattern invites endless creativity; experiment with colors to make each square truly your own. Chic Texture: The combination of stitches provides a distinct texture, ensuring that your finished piece is not only visually striking but also delightfully tactile.

Gauge & Sizing Notes

Don't skip the gauge swatch! Checking your tension is essential to ensure your skull crochet square turns out just right. Aim for a standard gauge of approximately 4×4 inches (10×10 cm) in your tension swatch to help guide your measurements. To adjust the size of your project, consider increasing your starting chain in multiples of 4—this way, you can create larger squares for blankets or smaller ones for coasters. If your tension doesn't match the gauge, no worries! Simply go up a hook size if your swatch is too small, or down a size if it's too large, allowing your unique skull crochet square to shine in any style.

Step-by-Step Pattern for Crochet Skull Motif Square

Row 1: Foundation Chain
Begin by making a foundation chain of 20 ch. Join with a sl st to the first ch to form a ring, being careful not to twist your chain. This initial round sets the stage for your crochet skull square. Now, your work should lie flat and circular, ready for the next round. (20 sts)

Round 2: Establishing the Base
Ch 1, then work 1 sc in each st around, joining with a sl st to the first sc. Ensure your stitches are snug, as this will support the structure of the square. Your work should start to take a square shape now, maintaining an even tension throughout. (20 sts)

Round 3: Creating the Sides
Ch 1, and work 1 sc in the same st. Now, work 1 sc in each of the next 4 sts, then 2 sc in the next st (inc), and repeat this pattern around. This increment will create a larger square. Your work should be expanding nicely, and stay flat after this round. (24 sts)

Round 4: Continuing the Square
Ch 1, then 1 sc in the first st, followed by 1 sc in each of the next 5 sts, and 2 sc in the next st (inc). Repeat the sequence around. This will gradually enlarge your crochet skull square, keeping everything aligned. The sides should start looking even and well-formed now. (28 sts)

Round 5: Introducing the Skull Motif
Transition to your white yarn. Ch 1, and work 1 sc in each of the first 4 sts. Next, work 1 hdc in the next st, 1 dc in the following st, and 1 dc in the next st (this forms the skull's eye socket area). After completing the round, you should see the beginning of the skull shape emerging clearly. (32 sts)

Round 6: Detailing the Skull
Continue using white yarn. Ch 1 and work 1 sc in the first 3 sts. Now, create the skull pattern: 1 hdc in the next st, 1 dc in the next 2 sts, and 2 dc in the following st (inc). Repeat this all around. Your skull design should be becoming more defined as you shape the contours. (36 sts)

Round 7: Finalizing the Skull Heights
Switch to gray yarn for details. Ch 1 and work 1 sc in each of the first 4 sts. Now, work the decor: 2 dc in the next st (inc), then 1 hdc, and 2 hdc in the next 2 sts. Your skull motif should now clearly display its measured features, fostering a striking look. (40 sts)

Round 8: Finishing the Skull Design
Ch 1, and sc around the entire round, ensuring even tension to keep the skull details sharp. This round frames your design, helping to finalize the shape of your crochet skull square. Once completed, your work should feel sturdy and polished. (40 sts)

Step 9: Edging for Clean Finish
Change back to black yarn. Ch 1, then work 1 sc in each st around for a nice finishing touch. This creates a solid border on your crochet skull square, making it look crisp. After you finish, the square should feel complete, with all details nicely accentuated. (40 sts)

Expert Tips for Skull Crochet Square

  • Maintain Tension: Ensure consistent tension as you crochet to keep the skull design clear and prevent distortion in your work.

  • Stitch Counting: Regularly count your stitches to avoid miscounts, especially when shaping the skull. A single missed stitch can alter the entire pattern!

  • Blocking Benefits: Don’t skip the blocking process—it's key to achieving well-defined edges and helps your crochet skull square lay flat for optimal presentation.

  • Color Change Care: When introducing new colors, take your time to weave in ends and manage your yarn to avoid tangles or loose bits.

  • Final Inspection: Before finishing, assess your piece for any skipped stitches or loose ends. A quick review will ensure your finished square looks polished and professional!

What to Pair with Crochet Skull Motif Square?

Elevate your crafting journey by exploring delightful projects that resonate with your unique style and aesthetic.

  • Textured Coasters: Create a matching set using the same yarn colors to complement your skull design, perfect for protecting surfaces.

  • Edgy Tote Bag: Use the skull square as a stunning patch on a tote, merging utility and artistry for your daily adventures.

  • Chic Pillow Covers: Transform multiple squares into a stylish pillow cover that adds a touch of personality to your living space.

  • Whimsical Keychain: Crochet a mini version of the skull square to fashion an eye-catching keychain that showcases your creative flair.

  • Bold Blanket: Connect several skull motifs to craft a larger blanket that brings warmth and character to your home décor.

How to Wash and Care for Your Skull Crochet Square

Machine Washing: Use cold water on a gentle cycle to protect your skull crochet square from agitation that can cause felting or pilling.

Hand Washing: For optimal care, hand wash in cold water with mild detergent, gently swishing the piece—never wring or twist to avoid distortion.

Drying/Blocking: Lay your square flat to dry on a clean towel, reshaping if necessary. This maintains the design and texture while ensuring it looks crisp after washing.

Storage: Store your completed projects in a cool, dry place away from direct sunlight to preserve colors and prevent any unwanted stretching or damage to your skull crochet square.

Skull Crochet Square Variations

Let your imagination run wild as you explore delightful twists to personalize your crochet project!

  • Yarn Weight Swaps: Switch to a lighter weight yarn for a more delicate feel, making your square airy and quaint. This tweak opens up the option for layering or using it in lightweight summer decor.

  • Fiber Alternatives: Experiment with cotton yarn for a breathable, soft texture—perfect for coasters that absorb moisture while adding an airy quality. You'll love the versatility of cotton through different seasons.

  • Color Blocking: Try contrasting panels in unexpected colors, mixing a vibrant hue with a classic black to make your skull motif pop even more. This playful contrast adds a touch of drama to your design!

  • Size Adjustment: Up the ante by using a larger hook or more chains in your starting foundation to create an oversized square. Just imagine a statement piece that can serve as a centerpiece or funky wall art!

  • Pom-Pom Accents: Attach fluffy pom-poms to each corner or center of the square for a whimsical flourish. They’ll dance with movement, adding a playful touch to this striking design!

  • Fringe Trims: Adding fringe around the edges introduces a playful bohemian vibe while emphasizing your crochet skills. The texture change sparks a fun new visual element that's sure to catch eyes!

  • Textured Borders: Surround your square with a textured border of stitches like shell or picot crochet to elevate its appeal. That crisp finish will frame your skull perfectly, giving it an eye-catching edge.

  • Alternative Motifs: Instead of a skull, swap in designs like stars, moons, or spooky bats for seasonal decor variations that keep your craft fresh and fun. Your creativity has no bounds!

Crochet Skull Motif Square FAQs

Can I use a different yarn type for the skull crochet square?
Absolutely! Although the pattern is designed with a medium weight (Category 4) soft acrylic yarn, you can substitute it with cotton or other blends. Just be mindful that different fibers may affect drape and texture, so it’s essential to maintain gauge for the best results!

How do I make the crochet skull square larger or smaller?
To adjust the size of your skull crochet square, you can either increase your hook size for a larger gauge or use a lighter weight yarn with the same hook for a smaller square. Additionally, adding or reducing stitches in each round can help you customize the dimensions.

Why is my work curling at the edges?
Don’t panic! Curling can often occur if your tension is too tight or inconsistent. To fix this, try loosening your tension or checking your stitch count. If necessary, blocking your finished square can help flatten and shape it perfectly!

What crochet hook size should I use for this project?
For the skull crochet square, a 5.5mm (I/9) crochet hook is recommended to bring your stitches to life with the right definition. If you decide to switch yarn types, you might want to adjust the hook size accordingly; just be sure to check your gauge.

How do I fix dropped stitches while working on my square?
It's an easy fix! Simply locate the dropped stitch and carefully pull the working yarn through to create a new stitch at the same level. For ensure secure edges, make sure to count your stitches regularly—this helps catch any errors early on.

Can I add other motifs to the skull crochet square pattern?
Of course! While this pattern focuses on the skull motif, you're welcome to get creative. Consider incorporating different designs like bats or ghosts, or even blend multiple motifs together for a truly unique piece that reflects your personal style!

Filed Under: Uncategorized

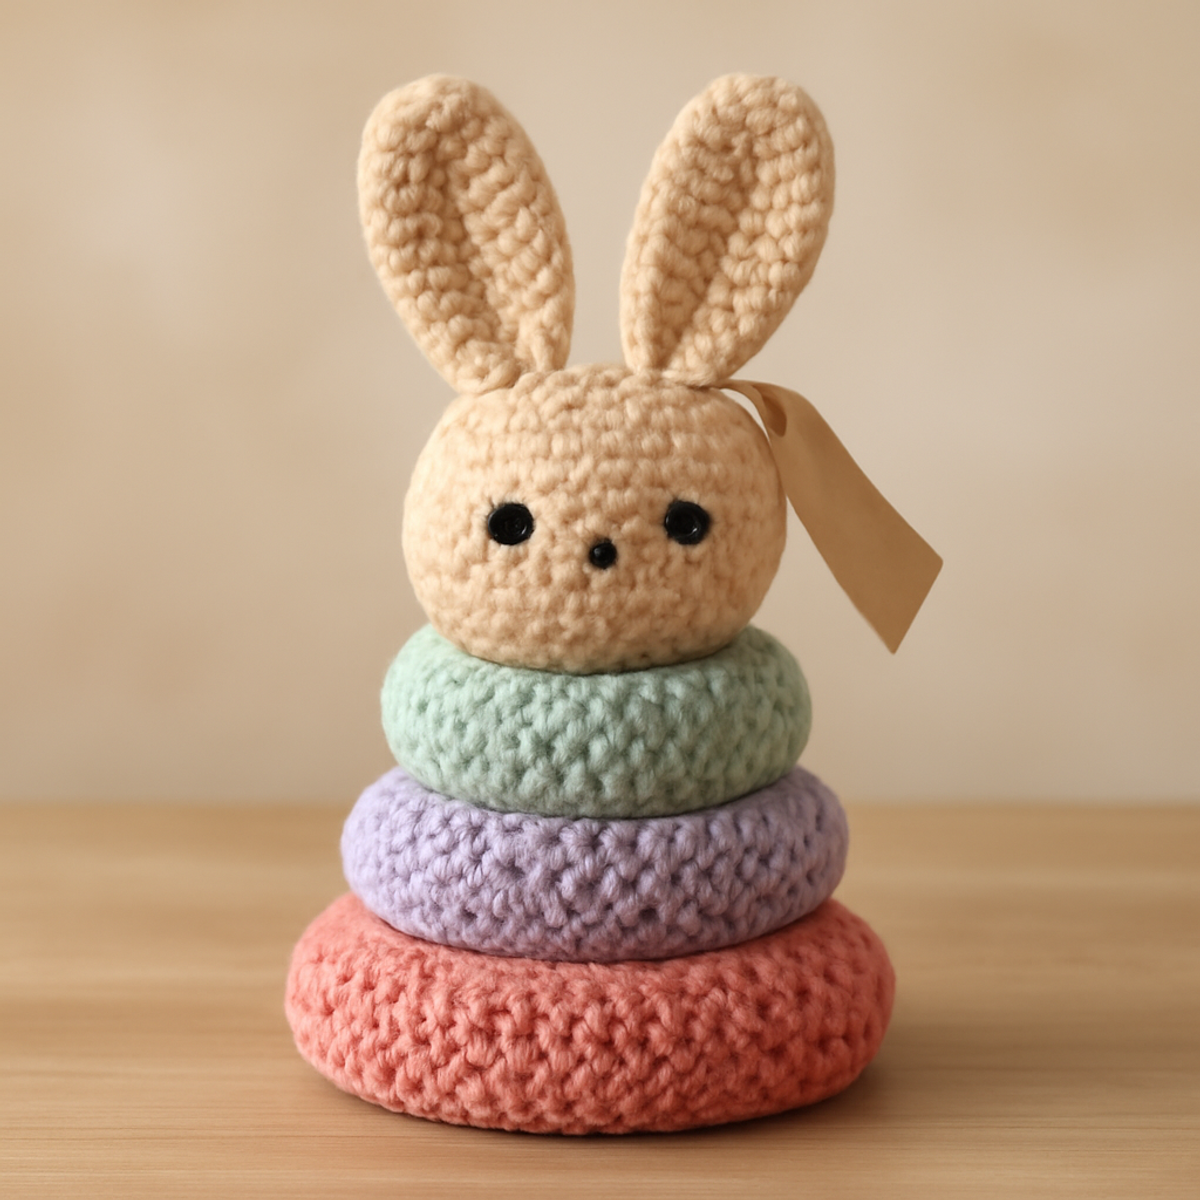
Whimsical Crochet Bunny Stacking Toy for Playful Crafters

August 22, 2026 by Publisher Leave a Comment

Whimsical Crochet Bunny Stacking Toy for Playful Crafters

As I sift through my yarn stash, the soft texture of a medium-weight acrylic catches my eye, whispering promises of playful creations just waiting to spring to life. Today, I'm excited to share the "Playful Bunny Stacker: A Crochet Toy Pattern for Little Ones," a delightful whimsical project that combines fun and function. This crochet bunny stacking toy not only serves as an engaging activity for little ones, encouraging hand-eye coordination and tactile exploration, but it also adds a charming touch to any nursery decor. With its various rings in vibrant colors, this pattern allows for creative expression and is perfect for those who enjoy working with multiple techniques. Whether you're looking for a cozy afternoon project or a unique gift, this bunny stacking toy is sure to be a beloved companion for any child. Grab your hook, and let’s hop into the delight of stitching together this cuddly tale!

Crochet Bunny Stacking Toy Materials & Tools

  • Medium Weight Yarn – Approximately 150 yards in soft acrylic or cotton blend for a plush feel.
  • 4.5mm (G/6) Hook – Ideal for creating a sturdy yet soft texture in your crochet bunny stacking toy.
  • Safety Eyes – For adding a charming face to your bunny; ensure they are securely attached for child safety.
  • Yarn Needle – Essential for weaving in ends and sewing pieces together for a polished finish.
  • Stitch Marker – Helpful for tracking rounds, especially in the continuous spiral of the bunny's head.

Why is this bunny stacking toy special?

Whimsical Design: The playful shape of the bunny adds a delightful touch, making it perfect for both playtime and nursery decor.
Skill Enhancement: This intermediate pattern introduces various stitches and techniques, providing a rewarding challenge for crafters looking to grow their skills.
Encourages Learning: As little hands stack and explore, they will enhance their hand-eye coordination while engaging in tactile play.
Charming Decor: With its vibrant colors and cute aesthetics, this toy is not just a plaything but also a gorgeous addition to any child's room.
Creative Freedom: Feel free to customize colors or even change the theme to other cute animals, ensuring each piece is uniquely your own!

How to Check Your Gauge for Crochet Bunny Stacking Toy

Don't skip the gauge swatch! Checking your gauge is essential for creating a beautifully balanced crochet bunny stacking toy. Aim for a standard crochet gauge of approximately 4×4 inches (10×10 cm) to achieve the best fit. If your tension doesn't match, try adjusting your hook size; if your swatch is too small, simply go up a hook size. To make this stacking toy larger, increase your starting chains and rounds in multiples of 6 + 2 for consistent increases. This way, you'll ensure that your playful creation retains its lovely shape and balances perfectly for little hands to enjoy!

Step-by-Step Pattern for crochet bunny stacking toy

Row 1: Head Creation
Begin by making a magic ring. In the ring, work 6 sc to create the foundation of the bunny's head. Pull the ring tightly to close. This will create a small circle, and your work should start to cup slightly. Continue crocheting in a continuous spiral without joining rounds.

Row 2: Increasing the Head
In the next round, work 2 sc in each sc from the previous round, increasing your stitch count. You will have 12 sts at the end of this row. This round should start to take shape as the head becomes fuller. Remember to maintain a consistent tension for an even finish!

Row 3: Shape the Bunny's Head
For the third round, make 1 sc in the next stitch, then 2 sc in the following stitch and repeat this around. You will have 18 sts at the end of this round. The head should be visibly rounded by now, developing a lovely plump shape.

Row 4: Adding More Shape
Continue to crochet the head by making 1 sc in the next 2 stitches, then 2 sc in the next stitch. Repeat around for this round, resulting in 24 sts. The shape should be more pronounced, and you might notice your stitches curling inwards a bit.

Row 5: Finishing the Head
Now, for the fifth round, make 1 sc in the next 3 stitches, then 2 sc in the following stitch. Repeat this around for a total of 30 sts. The bunny's head should be a soft dome by this stage, and your work should really start taking form.

Step 6: Bunny Ears
Next, create the bunny ears. Start with a new piece by chaining 15. From the second ch from the hook, work 1 hdc in each chain across. This sets the base for the ears. You should have a nice length, creating a floppy effect that defines the bunny's charm.

Step 7: Shaping the Ears
For the second row of the ears, turn, ch 1, and work 2 hdc in the first st, then 1 hdc in the next 5 stitches, 2 hdc in the next stitch. Finish with 1 hdc in the last 3 stitches. You will have 9 sts now. The ears are starting to take shape with a slight curve.

Step 8: Completing Ears
For the third and final row of the ears, turn your work, ch 1, and work 1 hdc in the first 7 stitches, then 2 hdc in the last stitch. You will have 10 sts total. This project gives the bunny its playful and cuddly look as the ears finish rounding off nicely.

Step 9: Beginning the Base Rings
To create the bottom ring of the stacking toy, start again with a magic ring and work 6 sc into the ring (like the head). Pull it tight and crochet in continued rounds. This base will provide stability for your adorable crochet bunny stacking toy.

Step 10: Building the First Ring
In the next round, work 2 sc in each stitch around. You will now have 12 sts in this round. This will start forming the round shape of your first stacking ring. The edges should gently round out, creating the supportive base for the toy.

Step 11: Second Ring
Continue building upwards with the second ring, working 1 sc in the next stitch, then 2 sc in the next stitch around for a total of 18 sts. This expansion creates a broader ring, suitable for the stacking purpose while providing texture in the design.

Step 12: Adding Final Rings
Repeat a similar increase for the third and fourth rings, working the third ring with 1 sc in the next 2 stitches, then 2 sc in the next stitch, and ending with 24 sts. Finally, make the fourth ring by repeating the same pattern to complete the stacking structure.

Step 13: Assembly of the Bunny Stacking Toy
Now it's time to assemble your crochet bunny stacking toy. Place the rings with the largest at the bottom and smallest on top. Securely sew the bunny head onto the top ring, ensuring everything is tightly fastened. Your adorable crochet bunny stacking toy is now complete and ready for play!

What to Make after the Playful Bunny Stacker?

As you embark on crafting your delightful crochet bunny stacking toy, why not consider creating a cozy collection of complementary pieces to enrich the playful atmosphere?

  • Bunny Ear Headband: This charming accessory can bring the whimsy of the bunny stacking toy to life, making playtime even more magical. Imagine your little one wearing their favorite toy's ears while stacking rings.

  • Soft Bunny Blanket: Create a plush blanket in coordinating colors that adds warmth and comfort, perfect for snuggling during playtime or story time. It's a beautiful way to tie the whole theme together.

  • Mini Bunny Bags: Whip up adorable little bags that match the colors of your stacking toy. These can store small treasures, fostering imaginative play and keeping little items together.

  • Bunny-Themed Wall Decor: Transform your yarn stash into charming wall hangings or canvases that echo the cute aesthetics of your crochet bunny pairing. Make your nursery or play area come alive!

  • Playful Bunny Coasters: How about some functional art? Craft whimsical coasters featuring bunny motifs that echo the crochet bunny stacking toy’s playful spirit, merging utility with fun decor.

By adding these accessories to your crafting journey, you can create an enchanting world that celebrates the joy of whimsy and creativity!

Expert Tips for Your Crochet Bunny Stacking Toy

  • Gauge Consistency: Ensure you maintain a consistent gauge throughout your crochet bunny stacking toy to avoid size discrepancies. Check your tension frequently, especially during the head's spiral formation.

  • Stitch Markers: Using stitch markers can help you accurately track your stitch count, particularly in the continuous rounds of the bunny's head. This prevents losing count, a common mistake among crocheters.

  • Blocking Tips: Lightly block the rings once complete to maintain their shape. This extra step enhances the overall look and sturdiness of your stacking toy.

  • Secure Attachments: When sewing the bunny's head onto the rings, ensure it's secured tightly to prevent it from wobbling. Double-check your stitches for a robust finish.

  • Enjoy Customization: Feel free to experiment with different colors and textures to make your crochet bunny stacking toy uniquely yours. Personal touches make every project special!

crochet bunny stacking toy Variations

Explore exciting ways to customize your crochet bunny stacking toy and let your creativity shine!

  • Yarn Substitutions: Try a cotton blend for a firmer texture, perfect for warmer climates or outdoor play.
  • Color Play: Use vibrant colors like bright yellows and blues to create a stunning rainbow effect on each ring.
  • Themed Characters: Swap the bunny for other animals, such as a friendly bear or playful elephant, for a delightful twist.
  • Larger Rings: Increase the size of the rings for a more substantial toy; this change will add extra fun for little hands!
  • Textured Elements: Add pom-poms or fun fringes to the edges of the rings for a playful touch that invites tactile exploration.
  • Sound Surprise: Incorporate a rattle or crinkle paper inside the rings to make every stacking session extra engaging and entertaining.
  • Mixed Techniques: Combine crochet with simple knitting elements to create unique borders along the rings, enhancing the overall design.
  • Size Adjustments: Feel free to modify the overall dimensions of the bunny for personalized gifting—make it a mini version for travel or a larger one for cuddles!

How to Wash and Care for Your Crochet Bunny Stacking Toy

  • Machine Washing: Use a gentle cycle with cold water to preserve the integrity of your crochet bunny stacking toy. Avoid agitation to prevent felting or pilling of the yarn.

  • Hand Washing: For a more delicate clean, wash your toy by hand in lukewarm water with a mild detergent. Gently squeeze out excess water, taking care not to wring or stretch the fibers.

  • Drying/Blocking: Lay your crochet bunny stacking toy flat on a clean towel to air dry; this helps maintain its shape. Avoid hanging it to dry, which can lead to stretching.

  • Storage: Store your toy in a dry, cool place away from direct sunlight to prevent fading. Consider placing it in a breathable bag to keep dust away while maintaining its lovely texture.

Crochet Bunny Stacking Toy FAQs

Can I use a different type of yarn for this crochet bunny stacking toy?
Absolutely! You can substitute medium weight yarn with similar weights, such as DK or light worsted yarns, but keep in mind that the finished size and plushness may vary. If you're opting for cotton instead of acrylic, the texture might become firmer but offers durability and is great for little hands.

How can I make this bunny stacking toy smaller or larger?
To adjust the size, you can either change your hook size (a larger hook will create a bigger toy, while a smaller hook will yield a smaller one) or modify your weight of the yarn, using bulkier yarn for a larger result. Just keep in mind that sizing adjustments may also affect the amount of yarn needed.

Why is my work curling up while I'm crocheting the rings?
Don't panic! Curling often occurs due to tension issues or not having enough increases in your rounds. I recommend checking your gauge first and ensuring you are following the increase pattern accurately. Crocheting too tightly can also contribute to this, so try to relax your tension a bit.

What hook size should I use if I'm a loose crocheter?
If you tend to crochet loosely, I suggest starting with a 4mm (G/6) hook instead of 4.5mm (G/6). This smaller size can help tighten your stitches for a denser fabric. Always check your gauge to achieve the desired look!

How do I fix a dropped stitch in my bunny stacking toy?
It's an easy fix! Simply pull up the loop of the dropped stitch with a crochet hook, and insert it back into the correct stitch. Depending on where the drop occurred, you might need to weave the yarn tail back into your work to secure it. Just be patient, and take it one stitch at a time!

What can I do if my bunny's ears don't stand up?
If your bunny's ears aren't standing up as you'd like, try using a bit of wire inside the ear to give it structure. Alternatively, you can run a few rows of slip stitches through the top of the ear to hold its shape better. Just ensure you leave any sharp ends safely tucked away!

Filed Under: Uncategorized

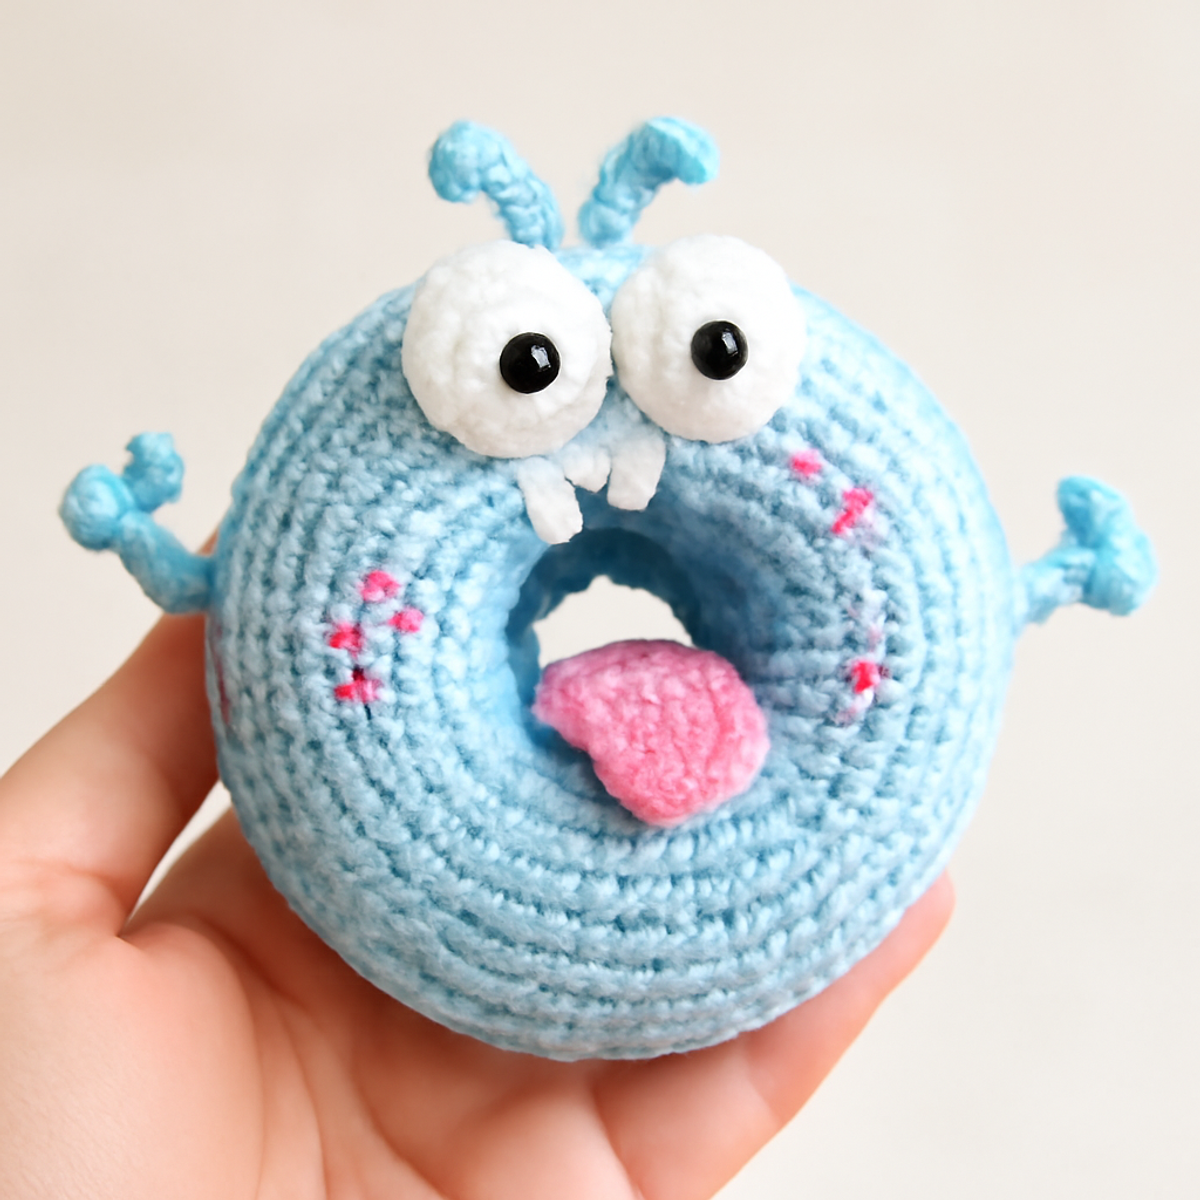
Playful Crochet Monster Donuts: A Cozy DIY Delight

August 22, 2026 by Publisher Leave a Comment

Playful Crochet Monster Donuts: A Cozy DIY Delight

As I watched my nephew’s face light up at the sight of a brightly colored plush toy, I was reminded just how magical handmade treasures can be. With this crochet monster donuts pattern, you can create a whimsical companion that resonates with joy and playfulness. These delightful little creatures, crafted from soft yarn, not only serve as playful gifts but also add a splash of color to your decor. What’s more, their engaging design makes crochet monster donuts enjoyable for all skill levels, while their lightweight, plush texture ensures they’re the perfect cuddle buddy for children. Ready to bring a little whimsy into your life? Let’s dive into the fun of making these quirky donuts together!

Crochet Monster Donuts Materials & Tools

  • Yarn

    • Light Worsted Weight Yarn – Use approximately 40-60 yards of 100% cotton or a similar fiber for a soft and durable finish, perfect for crochet monster donuts.
  • Hook

    • 3.5mm (E/4) Crochet Hook – Ideal for tight stitch definition, ensuring your donuts are sturdy and safe for play.
  • Notions

    • Safety Eyes – Add a fun expression to your donuts; these ensure the eyes are secure for little ones.
    • Stitch Markers – Helpful for marking rounds, especially during increases, to keep your project on track.
    • Tapestry Needle – Essential for weaving in ends and sewing on the limbs and other details after assembly.

Why Are Crochet Monster Donuts Adorable?

Whimsical Design: Each donut showcases a playful character that’s sure to captivate hearts of all ages. Cuddly: Crafted from soft yarn, these plush toys are not only adorable but also safe for kids to snuggle with. Beginner-Friendly: With just basic crochet stitches involved, this pattern is accessible to crafters of all skill levels. Customizable: Make each donut your own by choosing colors and expressions, ensuring every creation tells a unique story. Quick Project: You’ll enjoy the satisfaction of finishing these cute companions in no time, making them perfect for gifts or instant decor updates.

Gauge & Sizing Notes

Don’t skip the gauge swatch! Checking your tension is essential for ensuring your crochet monster donuts turn out just right. A typical crochet gauge for this project is around 4×4 inches (10×10 cm), which may translate to roughly 18 single crochets by 22 rows – but your exact measurement may vary based on your unique tension. If you aim to make these adorable donuts larger or smaller, you can adjust the starting chain in multiples of 6 + 2 to alter their diameter as desired. If your swatch is smaller than expected, consider going up a hook size for a looser tension, ensuring your monster donuts come out soft and cuddly!

Step-by-Step Pattern for crochet monster donuts

Row 1: Start the Donut Base
Ch 2, work 6 sc in the second ch from the hook. Pull the first round tight and place a stitch marker in the first st to track your rounds. You are creating a small circle, so your work should feel solid and tight, which will shape the base for your crochet monster donuts. This first round counts as (6 sts).

Row 2: Increase the Circle
In this round, work 2 sc in each stitch around. This will help expand the base of your donut, resulting in 12 stitches total. Remember to place your stitch marker again. As you crochet, your circle should start to form an even round, indicating that you are on the right track to creating that perfect donut shape (12 sts).

Row 3: Continue Increasing
For the third round, make 1 sc in the first stitch, then 2 sc in the next stitch; repeat this around. This increases the size of the base while giving it a little more definition. By the end of this round, you should see your donut taking form, comprised of 18 stitches (18 sts).

Row 4: More Rounds for Structure
Now, work 1 sc in each stitch around for the next three rounds. This will add height and bulk to your donut. Your work should feel sturdy and should resemble more of a bowl shape as you continue this step, rounding out the body of your crochet monster donuts (18 sts each round).

Row 5: Begin Decrease for the Top
In this round, work 1 sc in the first two stitches, then 1 dec, and repeat around. This will gradually reduce the stitches and begin to define the top of your donut. Your work should start to cup slightly at the top, transitioning beautifully from the body towards the center (12 sts).

Row 6: Finalize the Cup
For the last round before closure, work 1 sc in the first stitch, then work 1 dec across to finish. Your donut should now have the cupped top shape with 6 stitches remaining. This part of your crochet monster donuts should feel plush and ready to be stuffed (6 sts).

Step 7: Stuff the Donut
At this stage, take your stuffing and gently fill the body of your donut until it feels soft yet plump. Make sure to distribute the stuffing evenly to keep the donut shape intact. You want your work to feel cuddly and ready for cuddles!

Step 8: Close the Top
Using the tapestry needle, work a sl st through the remaining stitches to close the top of your donut firmly. Draw the yarn tight to ensure there are no gaps in your cute monster. This will seal in your plush stuffing and give a completed appearance to your crochet monster donuts.

Step 9: Create the Mouth and Accents
Using a contrasting color, ch 5 for the mouth; sl st back to the base for finalizing the shape. You may add a small tongue with additional ch or sc as you prefer. This detail will add personality to your crochet monster donuts, making them truly unique.

Step 10: Finish with Limbs and Antennae
Crochet limbs and antennae separately with your chosen colors. For the limbs, make 4 sc, and for antennas, ch 10 and sl st as a curl. Stitch them securely onto your donut, ensuring they are well-placed and ready for fun! Each detail adds character to your beloved crochet monster donuts.

Expert Tips for Crochet Monster Donuts

  • Consistent Tension: Keep your tension even throughout the project to ensure all parts fit snugly together, enhancing the final look of your crochet monster donuts.

  • Stitch Markers: Use stitch markers to keep track of your rounds, especially when increasing. This helps prevent losing count and keeps your donut shape even and beautiful.

  • Fill Firmly: When stuffing your donut, aim for a soft yet plump finish. Distribute stuffing evenly to maintain the round shape without any lumpy areas.

  • Close Securely: When finishing, use a slip stitch to close the top tightly. Ensuring no gaps will keep your stuffing secure and maintain the integrity of your crochet monster donuts.

  • Details Matter: Pay attention to your accents and features. The small details, like the mouth and limbs, add personality and make each donut unique and charming!

Care Instructions for Crochet Monster Donuts

  • Machine Washing: Use cold water on a gentle cycle to preserve the integrity of your crochet monster donuts. Avoid agitation to prevent any felting or pilling.

  • Hand Washing: If you prefer, gently soak your donuts in lukewarm water with mild detergent. Swirl delicately, then rinse thoroughly to maintain shape and color quality.

  • Drying/Blocking: Lay your crochet monster donuts flat on a clean towel to dry completely. This will help retain their adorable shape and softness without causing any distortion.

  • Storage: Store in a cool, dry place away from direct sunlight to keep your plush toys looking vibrant. Proper care will ensure that these playful companions remain cherished for years to come.

Crochet Monster Donuts Variations

Embrace the joy of customization as you make these delightful treasures uniquely yours.

  • Yarn Substitutions: Try acrylic yarn for a more budget-friendly option that still retains softness and vibrancy in color.

  • Texture Play: Swap out the cotton for fluffy or velvet yarn to make your donuts irresistibly cuddly. This will create a sensory experience for both kids and adults.

  • Color Schemes: Use pastel colors for a whimsical spring touch or opt for jewel tones during the fall. Every color can evoke a different mood!

  • Size Adjustments: Experiment with larger or smaller hooks and yarns to create varying sizes. A giant donut would be a fun statement piece, while mini ones could be perfect for ornaments.

  • Personalized Features: Add customized expressions to each donut—quirky smiles, silly frowns, or even funny eyebrows—making every creation a character of its own.

  • Fringe & Pom-Poms: Incorporate fun details like yarn fringe or pom-poms on the limbs for extra flair. These playful additions will bring life and texture to your crochet monster donuts.

  • Seasonal Themes: Create donuts that reflect holidays—think spooky monsters for Halloween or cheerful colors for Christmas. Seasonal themes can keep your crafting lively and fresh!

  • Interactive Elements: Consider adding crinkly material inside for sound, or using a plush, squeaky toy filling to make playtime even more entertaining. The options are endless; let your creativity run wild!

What to Pair with Whimsical Monster Donuts

As you embrace your crochet journey, consider crafting delightful companions that bring a playful harmony to your creations.

  • Cheerful Mini Baskets: These adorable baskets can be made in complementary colors, perfect for holding your crochet monster donuts or storing yarn for your next project.
  • Festive Garland: String together small crocheted donuts or other shapes for a whimsical decoration that enhances any playful space.
  • Cuddly Monster Pillows: Create plush pillows inspired by your donut designs, adding comfort and character to your living room or kid’s bedroom.
  • Joyful Amigurumi Friends: Design other quirky amigurumi characters to accompany your crochet monster donuts, making for an enchanting plush toy collection.
  • Cozy Colorful Blankets: Crochet a blanket with vibrant colors that reflect your donut fabrications, providing a warm backdrop for your new plush companions.

Crochet Monster Donuts FAQs

Can I substitute the yarn for my crochet monster donuts?
Absolutely! You can substitute light worsted weight cotton yarn with other fibers like acrylic or bamboo. Just keep in mind that the final texture and look may vary, so it’s a good idea to check your tension to ensure the same plush feel.

How can I make my crochet monster donuts bigger or smaller?
If you want to adjust the size of your donuts, consider using a larger hook and bulkier yarn for bigger donuts, or a smaller hook with thinner yarn for smaller donuts. Just remember to adjust your stitch count accordingly while keeping a consistent gauge!

Why is my crochet work curling at the edges?
Don't panic! Curling can happen with single crochet stitches if your tension is too tight. I recommend checking your gauge and loosening your stitches a bit. Also, adding a few rounds of increases could help flatten the edges as you form the donut shape.

What size hook should I use for my crochet monster donuts?
For this project, a 3.5mm (E/4) crochet hook is ideal. It ensures tight stitches for a sturdy donut, making it perfect for toys. If you find your stitches are too loose or tight, feel free to adjust the hook size accordingly!

What do I do if I accidentally dropped a stitch while crocheting?
It’s an easy fix! Just use your tapestry needle to pick up the dropped stitch and pull it back up to the current row. If the stitches look odd, you can frog back a few rows to where you feel comfortable and start again!

How do I securely attach safety eyes to my crochet monster donuts?
To attach safety eyes, push them through your donut's body before completely closing it up, ensuring they’re secured tightly. If you’re worried about them coming loose, you can add a small dab of fabric glue behind them for added security!

Filed Under: Uncategorized

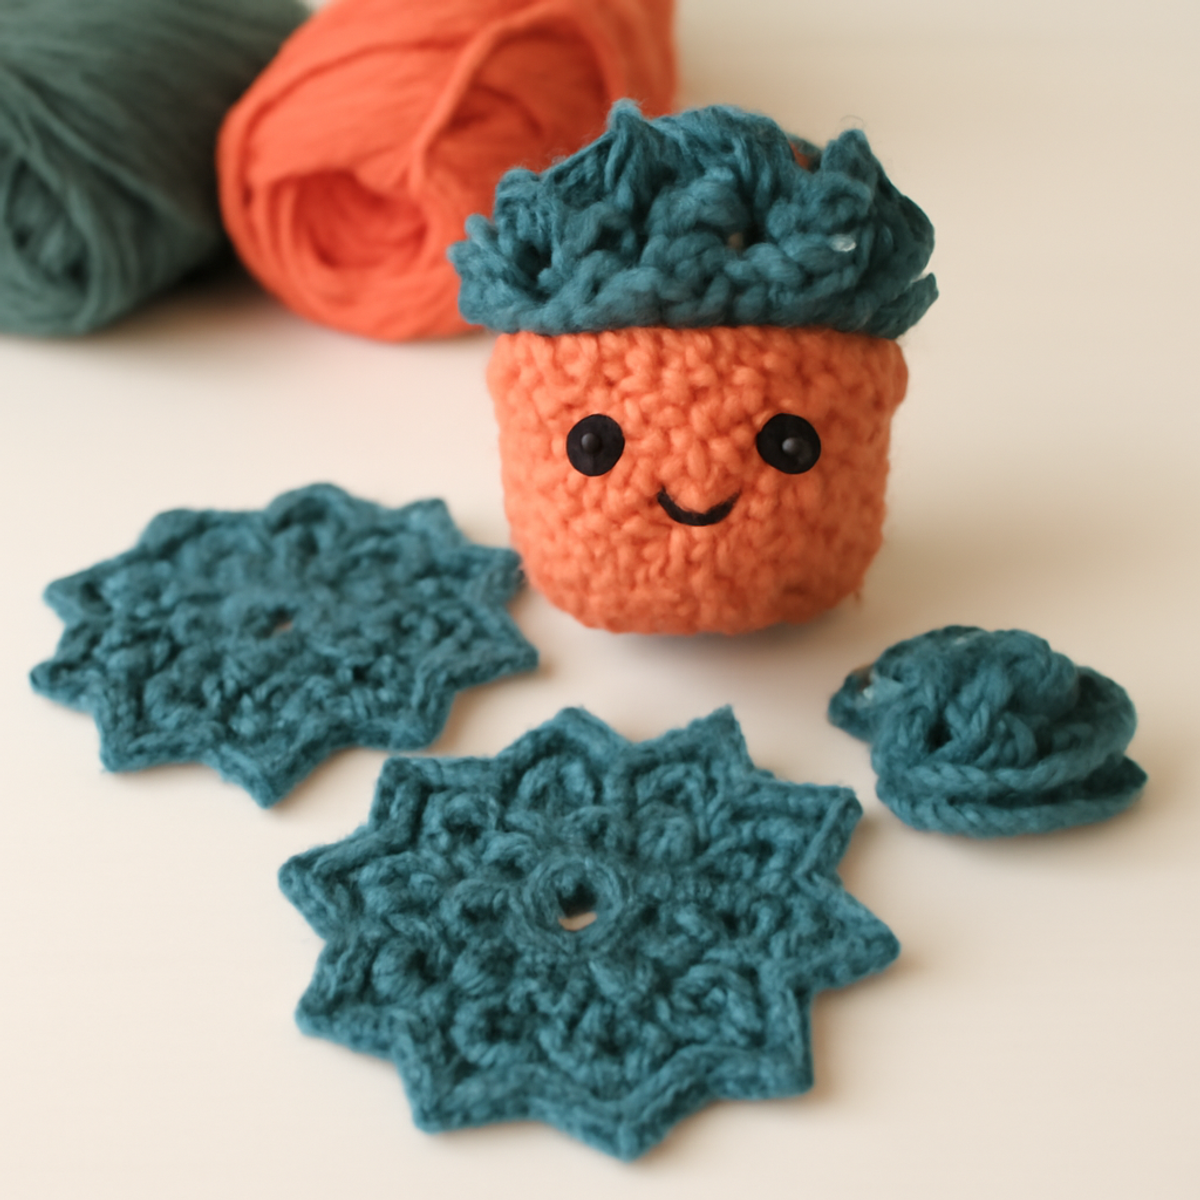
Charming Succulent Coasters: A Cozy Crochet Delight

August 22, 2026 by Publisher Leave a Comment

Charming Succulent Coasters: A Cozy Crochet Delight

As I settled into my favorite crafting nook, the soft, squishy texture of my cotton blend yarn slipped through my fingers, whispering promises of cozy projects to come. Today, I’m excited to share a delightful pattern for charming succulent coasters—perfect fusion of style and function that will surely brighten your home decor! Designed for those looking to enhance their crochet skills, this project not only features eye-catching designs but also allows for customization with a rainbow of colors. You'll love how these coasters serve as both artistic display pieces and practical additions that protect your surfaces. Whether you’re a dedicated fiber artist or a passionate beginner, the succulent coasters will invite creativity to your crafting table. Ready to add a sprinkle of nature-inspired whimsy to your home? Let’s dive into this fun crochet adventure together!

Charming Succulent Coaster Set Materials & Tools

Yarn

  • Worsted Weight Cotton Blend – Approximately 150-200 yards of turquoise yarn for the coasters; a lovely medium weight perfect for succulent coasters.
  • Vibrant Orange Cotton Blend – An estimated 25-50 yards for the pot, adding a bright, cheerful splash of color.

Tools & Notions

  • 5.0 mm (H-8 US) Crochet Hook – Ideal for achieving the desired stitch definition and crispness in your work.
  • Yarn Needle – Helpful for weaving in ends and assembling your succulent coasters beautifully.
  • Safety Eyes (optional) – For adding a playful touch to the pot, making your coasters truly charming and whimsical!

Why Are Succulent Coasters a Must-Make?

Intricate design: The charming succulent coasters showcase stunning, detailed stitches that will challenge and refine your crochet skills.

Whimsical touch: Their playful theme brings a delightful splash of nature into your home decor, elevating any table setting with style.

Customizable flair: Enjoy personalizing your coasters with different colors and fibers, ensuring each piece reflects your unique taste.

Functional art: These coasters are not only beautiful but also practical, protecting your surfaces while adding a touch of whimsy.

Perfect for all levels: Whether you're an intermediate crafter or a confident beginner, this pattern will guide you through an enjoyable crochet journey.

Embrace your creativity and watch your home transform with these delightful succulent coasters!

Gauge & Sizing Notes

Don't skip the gauge swatch! Achieving the right tension is vital for your charming succulent coasters, as it ensures that they will match beautifully in size and shape. A standard crochet gauge to aim for is generally around 4×4 inch (10×10 cm), but for this specific project, focus on your own tension to suit your personal style. If you want to make your coasters larger, simply start with multiples of 6 in your initial round. If your tension swatch is too small, try going up a hook size, and remember, adjusting your yarn or hook can help achieve the perfect fit for your succulent coasters!

Step-by-Step Pattern for Charming Succulent Coasters

Round 1: Starting Your Base
Begin by creating a magic ring and chaining 1 (ch 1). Work 8 single crochets (sc) into the ring. Pull the tail to close the ring tightly. This will form the center of your coaster. Ensure your stitches are snug to avoid gaps; your work should lie flat against your surface. (8 sts)

Round 2: Increasing the Circle
In this round, you'll increase your stitch count. Start with a slip stitch (sl st) to the first sc. Now, work 2 single crochets (sc) in each stitch around for a total of 16 stitches. This round establishes a wider base for your succulent coasters, and you'll notice your work beginning to take shape. (16 sts)

Round 3: Building Up the Coaster
Continue working on your base by chaining 1 (ch 1) and then placing 1 single crochet (sc) in the first stitch, followed by an increase (2 sc) in the next stitch. Repeat this pattern around. Your coaster will gradually expand, and you should feel it becoming more rounded and defined. (24 sts)

Round 4: Creating Petal Shape
For the petal effect, chain 3 (ch 3) and then double crochet (dc) in the first stitch, followed by chaining 2 (ch 2) and making a slip stitch (sl st) back into the same stitch. This creates your first petal. Repeat around the round, working a total of 6 petals. Your coaster should now resemble lovely succulent shapes. (6 petals)

Round 5: Adding Texture
Continue enhancing the texture by making a slip stitch (sl st) to the base of each petal to separate them. Then, chain 5 (ch 5) and create a double crochet (dc) into the next petal base. Repeat this for each petal to create a tiered effect around the coaster. Your piece should look increasingly lush and textured. (6 tiered stitches)

Round 6: Finishing Off the Body
Now to add depth, repeat Round 5 but include an additional round of slip stitches (sl st) connecting to the previous tiered stitches. This will give your succulent coasters a final flourish, maintaining a well-defined shape and adding even more character. At this stage, the coasters should appear lush and inviting.

Step 7: Edging for a Polished Look
To finish, switch to a contrasting color yarn, such as vibrant orange. Slip stitch (sl st) into any stitch along the edge and chain 1 (ch 1). Work 1 single crochet (sc) in each stitch around, ensuring to cleanly edge your succulent coasters. This completes their look and adds a professional touch.

Step 8: Assembly and Final Touches
Weave in any loose ends with a yarn needle. Lightly block your succulent coasters if needed to enhance their shape, using a steam method to set the stitches. Your charming succulent coasters are now ready to showcase along with your decor, blending functionality and artistry beautifully!

What to Pair with Charming Succulent Coasters?

As you embark on creating your succulent coasters, consider extending your crafting journey with delightful pieces that enhance your home décor.

  • Matching Placemats: Create a set of vibrant placemats that echo the whimsical succulent theme, perfect for entire dining tables.
  • Succulent Pot Holders: Crochet charming pot holders in coordinating colors for an adorable touch to your potted plants.
  • Colorful Coaster Holder: Design a simple yet stylish holder to keep your succulent coasters organized and ready for use.
  • Floral Tablet Sleeves: Craft soft protective sleeves for your tablets or e-readers, adorned with similar floral motifs for coherence.
  • Decorative Wall Hangings: Experiment with a wall hanging featuring succulent-inspired shapes, adding character and fun to any room.

Each suggestion not only complements the design of your crochet coasters but invites even more creativity into your crafting space!

Expert Tips for Succulent Coasters

  • Consistent Tension: Maintaining even tension is key for a uniform look in your succulent coasters. Too tight or loose stitches can affect size.

  • Stitch Count Matters: Always double-check your stitch count at the end of each round to avoid mistakes that might lead to uneven shapes.

  • Use a Stitch Marker: Place a stitch marker in the first stitch of each round. It’s a small but effective tool that prevents losing your starting point during intricate rounds.

  • Avoid Gaps: Ensure your magic ring is pulled tight to avoid gaps in the center, which can detract from the finished look of your coasters.

  • Finishing Touches: Consider lightly steaming your finished work to set the stitches and define the petal shapes, giving your succulent coasters that polished appearance.

How to Wash and Care for Your Succulent Coasters

Machine Washing: Use a gentle cycle in cold water with a mild detergent to preserve the vibrant colors and intricate stitches of your succulent coasters.

Hand Washing: For extra care, hand wash the coasters in cold water, using gentle agitation to avoid felting or pilling.

Drying/Blocking: Lay the coasters flat to dry on a clean, dry towel, reshaping them as necessary to maintain their lovely form and texture.

Storage: Store your finished succulent coasters in a cool, dry place away from direct sunlight to protect their colors and ensure long-lasting beauty.

Succulent Coasters: Customization Ideas

Embrace your creativity and let your imagination run wild by exploring delightful variations for your succulent coasters.

  • Color Variations:
    Experiment with pastel shades, jewel tones, or even a rainbow palette to suit your decor theme. Each color variation can evoke a different season or mood!

  • Yarn Substitutions:
    Swap cotton for bamboo blends for a silky finish or wool blends for extra warmth. These materials can change the feel and aesthetics of your coasters beautifully.

  • Sizing Adjustments:
    Alter the hook size to create larger or smaller coasters, perfect for different table settings. Just imagine a stunning centerpiece with varying coaster sizes!

  • Texture Modifications:
    Add playful embellishments like pom-poms or fringes around the edges for a charming twist. These details lend a unique personality to each piece.

  • Pattern Manipulations:
    Incorporate a simple lace stitch or a bobble stitch in place of the base for a textured effect. These small changes bring new life to your coasters.

  • Contrast Edging:
    Experiment with different edging techniques, like a scalloped border, to enhance your coasters' visual appeal. This will give your pieces a polished and complex finish.

  • Seasonal Themes:
    Adjust your color and embellishment choices to match holidays or seasons, creating coasters perfect for specific celebrations. Imagine wreath and snowflake motifs for winter!

  • Personal Touches:
    Consider adding personalized monograms or small embellishments inspired by your favorite plants, making each coaster a true expression of your unique style.

Let your crafting journey shine brightly through these captivating variations, transforming your succulent coasters into cherished, one-of-a-kind pieces!

Charming Succulent Coaster Set FAQs

Can I substitute the medium weight cotton blend yarn with a different fiber?
Absolutely! While the recommended cotton blend gives a lovely texture, you can use other fibers like bamboo for a smoother finish or acrylic for a more budget-friendly option. Just keep in mind that substitutions may affect the overall drape and look of your succulent coasters.

How do I adjust the size of my succulent coasters?
To make your coasters larger or smaller, you can adjust your hook size! For bigger coasters, try a larger crochet hook; for smaller ones, a smaller hook will work well. Just remember, this may impact your stitch count and the overall structure, so keep an eye on gauge!

Why is my work curling while crocheting the coasters?
Don’t panic! If your work is curling, it may be due to tight stitches or an unbalanced tension. Try relaxing your grip and ensuring your stitches aren’t too tight. You can also attempt to block your coasters once finished to help with the curling issue.

I’m having trouble with dropped stitches; how do I fix them?
It's an easy fix! If you notice a dropped stitch, you can carefully pull the yarn up to the last completed row and use a yarn needle to reinsert it into the correct position. Be patient, and take your time to weave it back in for a smoother look.

What size hook should I use for different yarn choices?
For most worsted weight cotton blends like the one suggested in this pattern, a 5.0 mm (H-8 US) crochet hook is ideal. If you opt for thicker yarns, consider increasing the hook size accordingly to maintain your desired stitch definition!

How can I ensure consistent sizing across all my coasters?
To achieve uniformity, pay close attention to your stitch count and tension throughout the project. Use a stitch marker in the first stitch of each round to help keep track, ensuring your coasters have that perfect matching set aesthetic!

Filed Under: Uncategorized

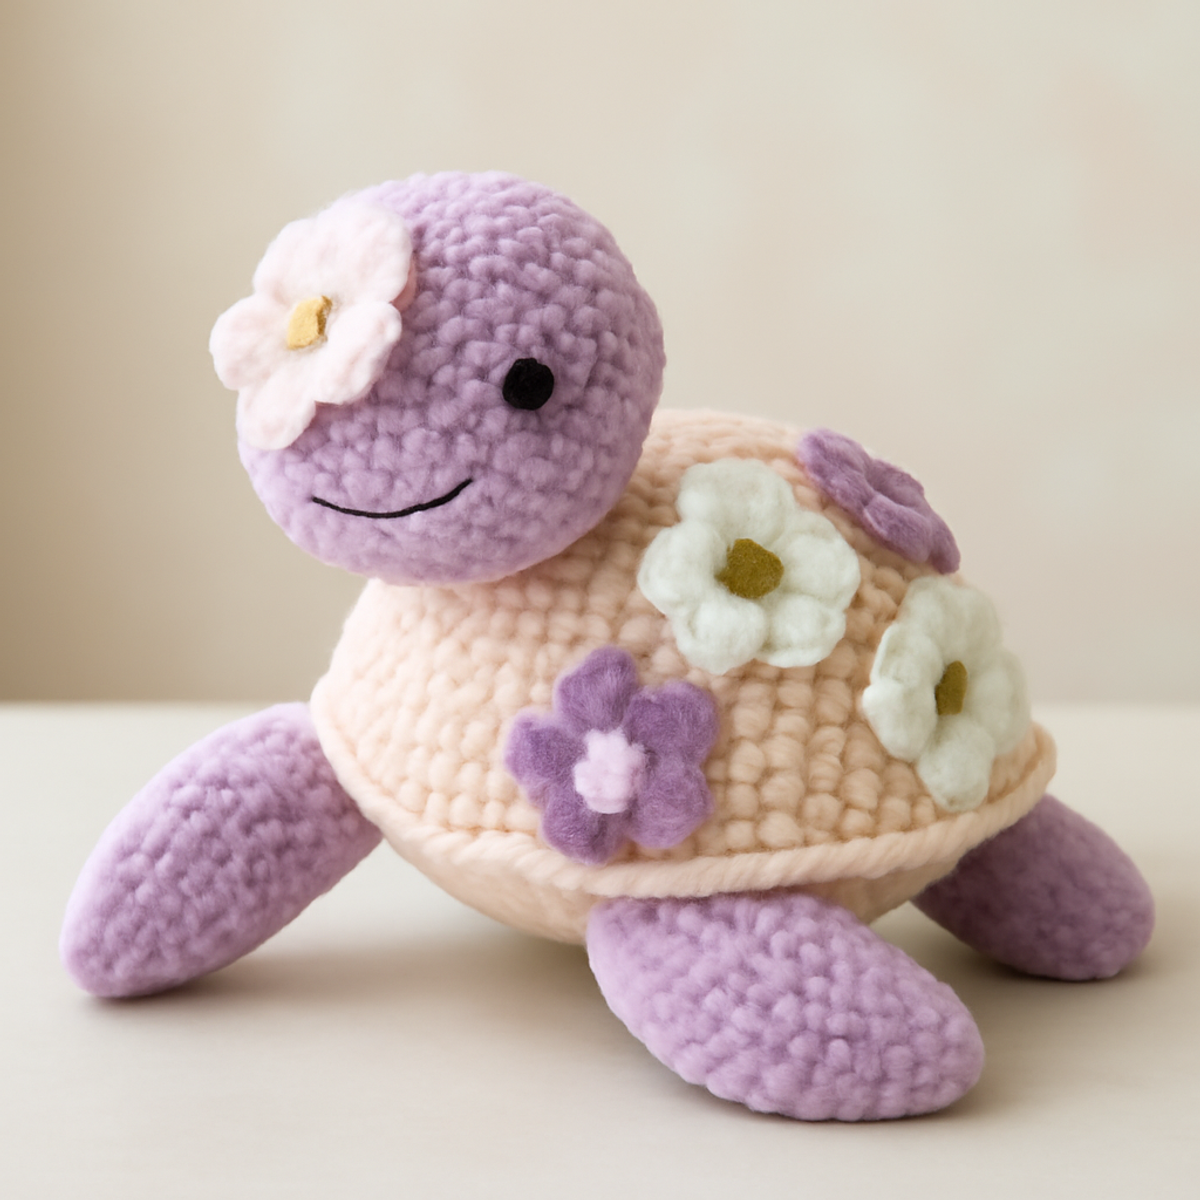
Charming Crochet Turtle Plushie: Fun & Whimsical Project!

August 22, 2026 by Publisher Leave a Comment

Charming Crochet Turtle Plushie: Fun & Whimsical Project!

As I sat down with my colorful skeins, my fingers brushed against the soft, plush yarn that promised to transform into something special: an adorable crochet turtle plushie. This project is not just about creating a whimsical addition to your collection; it invites you to dive into a world of creativity with your choice of colors and delightful embellishments like flowers. Perfect for showcasing your skills while also being a fantastic gift for children or a charming decoration for your home, this pattern unwraps two standout benefits: the joy of crafting a cuddly companion and the chance to refine your crochet techniques. Whether you're an experienced crafter looking for a fun project or a beginner eager to learn, this turtle plushie is sure to spark your imagination. Grab your hooks and let’s get started on this delightful adventure!

Crochet Turtle Plushie Materials & Tools

  • Yarn

    • Bulky or Super Bulky Yarn (5-6 weight) – Approximately 200 to 300 yards is suggested for this cuddly creation.
  • Tools & Notions

    • 6.5 mm (K) Crochet Hook – This size is ideal to achieve the plush gauge and texture needed for the crochet turtle plushie.
    • Safety Eyes – For detailing the turtle’s face, ensure they are securely fastened for safety.
    • Stitch Markers – Helpful to keep track of your rounds and stitches during the project.
    • Fiber Fill – Use this for stuffing the plush body to achieve its delightful shape.

Why is this turtle plushie a must-craft?

Creative Opportunity: This crochet turtle plushie allows for playful expression through color choices and embellishments, making each creation truly unique!

Intermediate Challenge: The pattern incorporates various stitches, enhancing your skills while keeping the crafting experience enjoyable.

Soft & Cuddly Texture: Thanks to the bulky yarn, the finished plushie is soft to the touch, making it a delightful companion for both kids and adults.

Perfect for Gifts: Its whimsical design makes it an ideal gift, offering charm and character that paves the way for heartfelt connections.

Room for Customization: With options to alter colors, sizes, and add fun accessories, the possibilities for personalization are endless and exciting!

Gauge & Sizing Notes

Don't skip the gauge swatch! Ensuring your crochet turtle plushie turns out just right begins with checking your tension. Aim for a gauge of approximately 5 inches (12.5 cm) across your tension swatch using half double crochet (hdc) stitches, which is crucial for maintaining the plushie's intended dimensions. If your swatch measures smaller, try going up a hook size; if it's larger, consider going down a size or using a thicker yarn. To adjust the overall size of your turtle, increase your starting chain in multiples of 6 for the body and flippers. Remember, a well-checked gauge means a beautifully crafted crochet turtle plushie!

Step-by-Step Pattern for crochet turtle plushie

Row 1: Body Start
Begin with a magic ring and work 10 hdc (half double crochet) into the ring. Pull the ring tight to close. This will form the base of your crochet turtle plushie. Your work should start looking like a small circle. Remember to mark the first stitch of your round for easier counting. (10 sts)

Row 2: Increase Round
In this row, work 2 hdc in each stitch around for a total of 20 hdc. This will begin to create the body shape of the turtle. As you progress, the circle should start to cup, giving it a rounded appearance. Make sure to keep your tension consistent for a smooth finish. (20 sts)

Row 3: Building the Body
Continue with 1 hdc in the first stitch, then 2 hdc in the next stitch around. This establishes a pattern of inc (increase) stitches, gradually building the body of your crochet turtle plushie. You'll complete this round with a total of 30 hdc, ensuring that your turtle is forming a gentle dome shape. (30 sts)

Row 4: More Increases
Repeat the same increase pattern, working 1 hdc in the first two stitches and then 2 hdc in the next stitch. This rounds out the design and ensures your plushie retains its shape. At the end of this round, you should have 40 hdc. Your work will look fuller and rounder at this point. (40 sts)

Row 5: Straight Body
For this round, work 1 hdc in each stitch around, maintaining the 40 hdc count established in the previous row. This solidifies the body of the turtle and keeps the structure consistent. Your crochet turtle plushie will start feeling more substantial as you work through this row. (40 sts)

Row 6: Flattening the Base
Begin to shape the bottom of the turtle by working 1 hdc in the first three stitches then 2 hdc in the next stitch around. This will create a slight flare, giving the turtle a more defined base. End this round with 50 hdc total. Your turtle should feel stable and sturdy. (50 sts)

Row 7: Start the Shell
Switch to a different color for a contrast shell if desired. Start with 1 sc (single crochet) in the first stitch, followed by 1 inc in the next. Continue this pattern, alternating between 1 sc and inc throughout the round. This will begin creating the dome shape of the turtle's shell. You should finish with 70 sc. (70 sts)

Row 8: Shell Stability
In this round, crochet 2 sc in the first stitch, then 1 sc in the next four stitches, repeating this pattern around. This maintains the shell's shape while leaving it slightly domed. Your work should continue to rise in the center, emulating a turtle shell’s curve. (84 sts)

Row 9: Complete the Shell
Continue with a round of only sc in each stitch around, keeping the count consistent at 84 sc. This provides a firm base for the rest of the plushie and allows for easier shaping later. Your turtle's shell should feel plush and stable at this stage. (84 sts)

Step 10: Flippers
To make the flippers, create a chain of 6 and work 5 sc back into the chain. Continue with a straight row of 5 sc. You will need four flippers, so repeat this process. The flippers should appear like small ovals. Set them aside for assembly, ensuring they have enough room to attach to the body later.

Step 11: Assembly
Lay the flippers on the sides of the turtle’s body, securing them with sl st (slip stitch) to attach. Position them evenly to create a balanced look. Next, sew on the safety eyes between the shell and the body, ensuring they are tightly fastened for safety. The turtle should start to take shape as you join the flippers.

Step 12: Decorative Flowers
For the crochet flowers, ch (chain) 4 and join with a sl st to form a ring. Work 6 sc into the ring, then ch 3, and slip stitch back into the base. Repeat to create a few flowers. You can sew these onto the turtle's shell for a whimsical touch. The flowers will add character and charm to your crochet turtle plushie.

Expert Tips for Crochet Turtle Plushie

  • Consistent Tension: Maintain even tension throughout to ensure a uniform and plush texture in your crochet turtle plushie. Uneven tension can lead to lumps or gaps.

  • Mark Your Rounds: Use stitch markers to easily keep track of your round beginnings. This helps prevent losing count or mistakenly skipping a stitch.

  • Safety First: When attaching safety eyes, ensure they are secured tightly. This guarantees they won’t detach during play, maintaining the safety and integrity of your plushie.

  • Blocking Technique: Don't skip blocking your finished plushie! It helps even out stitches and enhances the plush appearance, making your turtle look its best.

  • Double Check Your Count: Always double-check your stitch count at the end of each round. This prevents mistakes in shaping that could distort the adorable look of your crochet turtle plushie.

Crochet Turtle Plushie: Fun Variations

Invite your creativity to flourish by personalizing this adorable crochet turtle plushie with exciting twists and unique choices!

  • Yarn Substitutions: Consider using cotton yarn for a breathable texture, perfect for warmer climates or as a summery decoration.

  • Color Customization: Ditch the traditional greens! Opt for vibrant blues or pastel colors to give your turtle a whimsical personality that matches your style.

  • Fiber Alternatives: Swap out polyester for a luxurious acrylic blend to achieve a soft, plush feel, enhancing the overall cuddly experience.

  • Size Adjustment: For larger turtles, increase your hook size to 8 mm or use super bulky yarn (7 weight) to create a bigger plushie that commands attention.

  • Texture Modifications: Add playful elements like fringe around the shell or pom-poms at the flippers—these details will bring extra charm and whimsy to your creation.

  • Themed Embellishments: Create a little party hat or a bowtie for your turtle! These accessories will add unique flair that can be tailored for special occasions.

  • Flower Variations: Experiment with flower types! Try crocheting daisies or even tiny succulents to showcase seasonal themes, each adding its own delightful touch.

With these variations, your crochet turtle plushie can evolve into a new masterpiece with every creation!

What to Pair with the Crochet Turtle Plushie?

As you complete your charming crochet turtle plushie, consider crafting delightful companions that expand your creative adventure.

  • Bright Flower Embellishments: Add cheerful flowers to adorn your plushie, enhancing its playful spirit and showcasing your unique color palette.

  • Cuddle Buddy Blanket: Create a cozy blanket using the same soft yarn, perfect for snuggling up with your new turtle! Its plush texture will complement your plushie beautifully.

  • Matching Turtle Keychain: Whip up a mini version of your turtle plushie as a keychain for a whimsical accessory that matches your creation perfectly.

  • Snuggly Pillow: Design a pillow in a complementary color to offer a cozy space where your turtle can rest, inviting warmth and comfort to your home.

  • Adorable Animal Friends: Explore making a cozy menagerie of animal plushies, keeping with the cute theme and providing your turtle company on your crafting journey.

How to Wash and Care for Your Crochet Turtle Plushie

Hand Washing: Use cold water and a gentle detergent to clean your crochet turtle plushie. Avoid harsh chemicals to maintain the yarn's softness and structure.

Drying: Lay your plushie flat on a clean, dry towel. This prevents stretching and helps preserve its adorable shape, ensuring it stays cuddly and soft.

Blocking: If desired, lightly steam or block your plushie after washing. This evens out stitches and enhances its plush appearance, making your crochet turtle plushie look even more delightful.

Storage: Store your plushie in a cool, dry place, away from direct sunlight. This keeps the colors vibrant and prevents any fading, maintaining its charm for years to come.

Crochet Turtle Plushie FAQs

Can I use a different type of yarn for my crochet turtle plushie?
Absolutely! While the pattern recommends bulky or super bulky yarn, you can definitely substitute it with other types, like cotton or acrylic. Just keep in mind that using a lighter yarn may result in a smaller plushie. Make sure to adjust your hook size accordingly to achieve the desired texture!

How can I make my crochet turtle plushie bigger or smaller?
To increase the size, consider using a larger hook or thicker yarn than the suggested 6.5 mm (K) hook and bulky weight yarn. Conversely, if you want a smaller version, you can switch to lighter yarn and use a smaller hook. Also, reducing the overall stitch count in each round will help control the dimensions!

What should I do if my crochet work is curling up?
Don’t panic! Curling is often caused by tighter stitches or uneven tension. I recommend checking your gauge first to ensure you're using the right hook size and yarn weight. If your work is still curling, try using a larger hook to create a looser texture, which can help flatten it out.

How do I fix dropped stitches in my plushie?
It's an easy fix! For dropped stitches, look for the stitch loops on your work and carefully work them back into place with your hook. If the drop happened a while back, you might need to unravel a few stitches to redo them properly. Just take your time, and it will be as good as new!

What hook size should I use if I change the weight of the yarn?
Great question! If you swap out yarn, you'll need to adjust your hook size based on the new yarn weight. Always refer to the yarn label for recommended hook sizes, and make a small test swatch to ensure it matches the desired gauge to keep your crochet turtle plushie looking perfect.

Filed Under: Uncategorized

Whimsical Daisy Flower Crochet Pattern for All Levels

August 22, 2026 by Publisher Leave a Comment

Whimsical Daisy Flower Crochet Pattern for All Levels

As I settled into my favorite cozy spot, a skein of light worsted yarn caught my eye, whispering of whimsical creations waiting to be born. In that moment, I decided to crochet the adorable Daisy Flower Buddy—a charming plush toy that brings warmth and a smile to anyone lucky enough to receive it. This playful daisy flower crochet pattern is designed with both beginners and seasoned crafters in mind, making it a perfect way to hone your skills while crafting something delightfully huggable. Not only does it offer a therapeutic escape, but it's also a fantastic stash-buster that allows you to explore vibrant color combinations. Imagine the joy of gifting these cute little buddies or merely adding them to your decor! Are you ready to dive in and start stitching?

Daisy Flower Crochet Materials & Tools

Yarn

  • Light Worsted Yarn (Category 3) – Approximately 150-200 yards total in soft cotton or an acrylic blend for added plushness.
  • Green Yarn – For the body, start with a cheerful green shade to represent the stem.
  • White Yarn – Perfect for creating the whimsical petals with a scalloped edge.
  • Yellow Yarn – Use this for the adorable round face that will bring your buddy to life.

Tools & Notions

  • 4mm (G-6) Hook – This size works wonderfully for achieving a cuddly texture in your daisy flower crochet project.
  • Safety Eyes (9-10mm) – Add a playful touch with these eyes that will enhance your buddy's charm.
  • Yarn Needle – Essential for sewing and weaving in ends; choose one with a large eye for easy threading.
  • Scissors – To keep everything neat and tidy as you complete your project.

Why Try the Daisy Flower Crochet?

Versatile Design: This pattern is perfect for crafters of all skill levels, offering a whimsical charm that can brighten up any room or make thoughtful gifts. Intriguing Textures: Using soft cotton or acrylic blends adds a cuddly touch, making each flower buddy irresistible to hug. Quick Project: Ideal for short crafting sessions, this project allows you to enjoy a sense of accomplishment without requiring hours of work. Creative Customization: Enhance your daisy flower crochet buddies by experimenting with colors or adding unique embellishments, ensuring each creation is one-of-a-kind. Huggable Size: At approximately 8 inches tall, these adorable plush toys are just the right size to bring smiles to children and adults alike. Dive into this delightful project and let your creativity blossom!

Gauge & Sizing Notes

Don't skip the gauge swatch! Ensuring the correct tension when crafting your Daisy Flower Buddy is essential to achieving the desired size and plushness. A general guideline for this project is to check your crochet gauge with a 4×4 inch (10×10 cm) swatch; it should yield approximately 14 single crochets by 8 rows—but results may vary based on your personal tension. If you're looking to adjust size, remember that to make this charming buddy wider, increase your starting chain in multiples of 6. If your tension doesn't match, don't worry! Simply try going up a hook size for looser stitches, or down a hook size if your swatch is too small. Happy crocheting!

Step-by-Step Pattern for Daisy Flower Buddy Crochet

Row 1: Starting the Body
Begin with your green yarn to create a magic ring. Work 6 single crochets (sc) into the ring and pull it tight to secure it. Slip stitch (sl st) into the first sc to join, ensuring your work is round. Your work should form a small center to begin the daisy flower crochet buddy (6 sts).

Row 2: Increasing the Base
For the second round, chain 1 and make 2 single crochets (sc) in each stitch around. This increases the size of the base and forms a solid foundation for the body. Slip stitch (sl st) to join at the end of this round. Your piece should now be more rounded, and you should have a total of 12 stitches (12 sts).

Row 3: Building Up the Body
Continue with Row 3 by chaining 1, then working 1 single crochet (sc) in the first stitch, followed by 2 single crochets (sc) in the next stitch. Repeat this pattern around the round. Your body will begin to take shape, gradually expanding for the daisy flower crochet buddy (18 sts).

Row 4: Expanding the Body
For this round, chain 1 and work 1 single crochet (sc) in the first two stitches, then an increase (2 sc in one stitch). Repeat this sequence around. As you crochet, you’ll notice your work should start to form a gentle curve, creating the body of the flower buddy (24 sts).

Row 5: Finalizing the Body Shape
Chain 1 to start Row 5. Work 1 single crochet (sc) in the next three stitches followed by an increase (2 sc in the next stitch). Continue this pattern around. At the end, your daisy flower crochet buddy's body will be expanding comfortably, making it plush and huggable (30 sts).

Row 6: Finishing the Body
Complete the body by working 1 single crochet (sc) in each stitch around for the next two rounds (Rows 6-7). This should create a nice height while maintaining a firm structure. Make sure to count your stitches, and at the end of Row 7, your work should remain stable and seamless (30 sts).

Row 7: Preparing for Petals
Now it’s time to transition from the body to the petals. Finish the last round of the body and fasten off the green yarn. Weave in any loose ends. Your daisy flower crochet buddy is now ready for its adorable petals!

Row 8: Making the Petals
Switch to white yarn and attach it to the outer edge of the body. Chain 3, then work into the same stitch with 3 double crochets (dc), chain 1, and slip stitch (sl st) into the next stitch. This forms your first petal. Repeat around to complete a full round of petals; your work should now flare out beautifully (6 petals total).

Row 9: Adding More Detail to Petals
For added texture, go back to each petal and slip stitch (sl st) into the base of the petal. Then chain 3 and work 2 double crochets (dc), followed by a chain 1. Slip stitch (sl st) into the bottom again. This scalloped edge enhances the whimsical design of your daisy flower crochet buddy (6 petals).

Step 10: Shaping the Face
Switch to yellow yarn to form the face of your daisy flower crochet buddy. Make a magic ring and work 6 single crochets (sc) into the ring. Join with a slip stitch (sl st) and continue building round by round with increases (1 sc in each stitch followed by 2 sc) until the face measures about 4 inches across (24 sts).

Step 11: Assembling the Buddy
To assemble, stitch the facial piece onto the front of the body with your yarn needle. Then, position and sew the safety eyes onto the face and embroider a smiling mouth. Your daisy flower crochet buddy is coming to life beautifully!

Step 12: Finishing Touches
Finally, attach the petals around the face securely, making sure they are evenly spaced. Weave in all ends and give your daisy flower crochet buddy a gentle squeeze. If desired, blocking the petals can enhance their crisp appearance. Your charming buddy is now complete and ready for cuddles!

How to Wash and Care for Your Daisy Flower Crochet

Machine Washing: Use cold water on a gentle cycle to preserve the shape and texture of your daisy flower crochet buddy while avoiding agitation that may cause felting.

Hand Washing: If preferred, hand wash with mild soap in cold water and gently swish to clean. Rinse thoroughly to remove any detergent residue without stretching the fibers.

Drying/Blocking: Lay your daisy flower crochet buddy flat to dry away from direct sunlight. This will prevent distortion and maintain its adorable appearance.

Storage: Store in a cool, dry place, away from direct sunlight to keep your cuddly creation safe while preventing any fading in colors.

Expert Tips for Daisy Flower Crochet

  • Tension Matters: Keep a consistent tension throughout your project for an even plush appearance, helping your daisy flower crochet buddy look its best.

  • Count Your Stitches: Regularly counting stitches will ensure dimensions are accurate and help avoid sizing mishaps that can lead to frustration.

  • Block for Crispness: Consider blocking the petals after you’ve assembled them. This gives a crisp, flat appearance that enhances your budding creation.

  • Select Soft Yarns: Choosing the right fiber—like a soft cotton or acrylic blend—provides the cuddly feel that makes your daisy flower crochet buddy irresistible.

  • Secure Petals Properly: When attaching petals, ensure they are evenly spaced and secured well, so your design is balanced and visually pleasing.

Daisy Flower Crochet Customizations

As you embark on this delightful journey of creating your Daisy Flower Buddy, remember that every stitch can be a canvas for your imagination!

  • Yarn Weight Swap: Use a heavier yarn for a sturdier buddy. This creates a plush, large daisy flower crochet character perfect for snuggles.
  • Color Combinations: Mix pastel hues for a soft floral aesthetic, or opt for vibrant shades to add a playful flair to your floral buddy.
  • Fiber Change: Experiment with cotton or bamboo yarn for a breathable buddy, giving a distinctly different texture and feel to your creation.
  • Size Modifications: Use a larger hook with thicker yarn for a giant buddy, or thinner yarn with a smaller hook for a cute, mini version.
  • Unique Embellishments: Personalize features with bows, whimsical hats, or special facial expressions to create a truly individual daisy flower crochet buddy.
  • Adding Fringe: Integrate playful fringe around the petals or base of your buddy for an eye-catching, textured finish that adds depth and fun.
  • Textured Borders: Crochet a decorative border around the body or face with contrasting colors for an enhanced visual appeal that ties the piece together beautifully.
  • Safety Eyes & Accessories: Swap traditional eyes for whimsical buttons or felt shapes, or add tiny accessories like scarves or hats for a touch of character.

What to Make after Daisy Flower Buddy

Creating your Daisy Flower Buddy is just the beginning of your whimsical crochet adventure. Let’s explore charming projects that beautifully complement this delightful plush toy.

  • Daisy Petal Blanket: A cozy throw with floral motifs—perfect for snuggling up next to your new buddy.
  • Matching Flower Keychain: A mini version of your Daisy Flower Buddy to keep your keys cheerful and bright. Crafting this little charm is a delightful way to extend your whimsical theme.
  • Plush Flower Basket: Use the same yarn colors to create a vibrant basket, ideal for holding all your crafting supplies.
  • Floral Coasters: Whip up cute coasters that echo the whimsical theme, letting your decor blossom while protecting surfaces.
  • Friendship Flower Garland: A string of daisies to create a playful atmosphere, perfect for decorating a child's room or party space.

Daisy Flower Buddy Crochet FAQs

Can I use a different type of yarn for the daisy flower crochet buddy?
Absolutely! While this pattern calls for light worsted cotton or an acrylic blend, you can substitute with other yarns. Just keep in mind that the finished size and texture might vary. Make sure to check your gauge to ensure your buddy turns out the way you want!

How can I make my daisy flower crochet buddy bigger or smaller?
It's easy to adjust the size of your plush toy! To make it larger, try using a thicker yarn and a corresponding larger hook. For a smaller version, opt for thinner yarn and a smaller hook. Just remember to adjust your stitch counts accordingly!

Why is my work curling up as I crochet?
Don't panic! Curling is often a result of tension issues or using a hook that’s too small for your yarn. Make sure your tension is consistent and consider switching to a larger hook. If you're still seeing curls, try blocking your piece once it’s finished to flatten it out.

What hook size should I use for my daisy flower buddy?
For this project, a 4mm (G-6) hook is recommended to achieve that soft and cuddly texture. If you decide to change your yarn weight, you might need to adjust your hook size accordingly to match the new yarn's gauge.

How do I fix dropped stitches in my project?
It's an easy fix! Simply locate where you dropped the stitch, and use your yarn needle to pull the working yarn back through the stitch. If it's a single crochet that's dropped, you can also use your hook to pull the yarn back up. Just take your time, and don't stress!

What should I do if my final dimensions don’t match the pattern?
If the size of your finished buddy is off, first check your stitch counts and tension. Keeping consistent tension is crucial! If you’re still not achieving the correct size, consider adjusting your hook size or experimenting with the recommended yarn weight. Happy crafting!

Filed Under: Uncategorized

Quick & Cozy No-Sew Cat Plush: Adorable Cuddly Craft

August 22, 2026 by Publisher Leave a Comment

Quick & Cozy No-Sew Cat Plush: Adorable Cuddly Craft

Has there ever been a more delightful reason to pick up your crochet hook than creating your very own no-sew cat plush? This charming little feline is not only incredibly easy to whip up, but it also offers a heartwarming blend of cuteness and cuddly texture that will charm both kids and cat lovers alike. In just a few cozy hours, you can have a delightful toy ready for gifting—or keeping! The best part? There’s no sewing involved, making this project perfect for beginner and intermediate crafters seeking a fun, stress-free experience. So, let’s dive in and bring this adorable plush cat to life, one fluffy stitch at a time!

No-Sew Cat Plush Materials & Tools

  • Medium Weight Yarn – Approximately 50 to 75 yards of 100% polyester or acrylic yarn for a soft and fuzzy finish.
  • 4.0mm (G) Hook – A recommended size to ensure firm, well-defined stitches that keep the plush shape.
  • Safety Eyes – Two 12 mm diameter safety eyes to add an adorable and whimsical touch to your no-sew cat plush.
  • Contrasting Yarn – A small amount of contrasting yarn for embroidering the nose and mouth, enhancing your cat's charming facial features.

Happy crafting!

Why Choose This No-Sew Cat Plush?

Endless Cuteness: This no-sew cat plush is the perfect companion for all ages, combining whimsy with a huggable format that brings smiles.

Quick to Make: Thanks to its simple design, you can easily finish this cozy project in just a few hours—ideal for unexpected gifting occasions.

All About the Texture: The plush, squishy feel of this cat makes it irresistible to cuddle, enhancing its appeal as a delightful toy or decorative piece.

Customization Galore: Whether you prefer vibrant hues or pastel tones, customizing your cat with different yarn colors adds a personal touch to your creation.

Stress-Free Crafting: Skip the sewing, minimize the mess, and enjoy a relaxing crocheting experience that lets you focus on creativity and fun!

How to Check Your Gauge for no-sew cat plush

Don't skip the gauge swatch! It’s essential to check your tension before diving into your no-sew cat plush project to ensure the final product is the perfect size for cuddling. A common guideline is to aim for a gauge of approximately 4 inches (10 cm) square = 14 single crochets by 8 rows, but always adjust according to your yarn and hook choice. If you want your plush to be bigger, increase your starting chain in multiples of 6; conversely, for a smaller plush, decrease accordingly. If your swatch is smaller than expected, simply go up a hook size to achieve a softer drape. Happy crafting!

Step-by-Step Pattern for no-sew cat plush

Row 1: Start with the Body
Begin by creating a magic ring. Into the ring, work 6 single crochet (sc) stitches (6 sts). Pull the ring tight to close; your work should form a small circle. This will be the foundation of your no-sew cat plush, serving as the base that will expand into the adorable body shape.

Round 2: Increase the Body
In the next round, work 2 sc in each stitch around (12 sts). As you crochet, note that the circle should start to expand and become more pronounced. Consistent stitching will help maintain a firm structure. Your no-sew cat plush is beginning to take shape beautifully!

Round 3: Create More Volume
For round three, work 1 sc in the first stitch, then 2 sc in the next and repeat this pattern around (18 sts). This increase will give your plush more depth and a rounded appearance, allowing it to achieve the plump look characteristic of a cuddly cat.

Round 4: Continue Building the Body
In this round, simply do 1 sc in each stitch around (18 sts). Your work should maintain a consistent size without any decreases or increases. As you complete this round, the base of your no-sew cat plush will feel solid and ready for the next stages of construction.

Round 5: Add More Length
Repeat round four to continue building the body, ensuring you have 18 sc (18 sts). Keep crocheting with even tension so the plush's shape remains uniform. After this round, you’ll notice the height of your plush starting to emerge.

Rounds 6-10: Lengthen the Body
For these rounds, again do 1 sc in each stitch around (18 sts for each round). This step is crucial as it adds the necessary length to your no-sew cat plush. Continue to crochet steadily until you reach your desired size, typically around 5 inches tall.

Round 11: Begin Decreasing
Now, it’s time to taper the body. Work 1 sc in each of the first 2 stitches, then 1 dec (decrease) around (12 sts). You should see your work start to curve inward as you prepare to close the plush's top.

Round 12: Close the Body
To finalize the body, work 1 sc in each of the first stitch and then 1 dec all around (8 sts). As you finish this round, your plush should start to pull together at the top, creating a rounded closed shape like a cat’s head.

Step 2: Ears
To make the ears, create a new magic ring and work 6 sc into the ring (6 sts). This small circle will form the base of each ear. Make sure to pull the magic ring tightly so that the stitches stay snug.

Step 3: Form the Ear Shape
In the next round, work 2 sc in each stitch around (12 sts). Notice how your work starts to take on a triangular form. After this round is complete, each ear will be the perfect size for your no-sew cat plush!

Rounds 4-5: Complete the Ears
For these rounds, do 1 sc in each stitch around (12 sts). Your ear pieces should look plump and cute, ready to attach to the body. Once you're satisfied with the size, finish by fastening off, leaving a long tail for attaching.

Step 4: Attach Ears
Position the ears on top of the head of your no-sew cat plush, aligning them evenly. Pull the long tail of each ear through the body and secure them without any sewing, using slip knots if necessary. Your plush is coming together in a delightful way!

Step 5: Add the Face
Using safety eyes, place them securely into the head of your plush. Then, with contrasting yarn, embroider a cute little nose and mouth. Your no-sew cat plush should now have its adorable expression, making it irresistibly charming!

Step 6: Make the Tail
To create a tail, chain 10 stitches. In the last chain, work 1 sc to form a tapered end. This little detail adds to the cuteness of your no-sew cat plush. Once complete, secure the tail into the body, pulling any loose ends through to hide them.

Final Touches
Weave in any remaining yarn ends, ensuring everything is securely tucked away. Gently fluff your plush to enhance its cuddly texture. Your no-sew cat plush should now be soft and ready to be loved, completing this joyful crafting experience!

How to Wash and Care for Your No-Sew Cat Plush

  • Gentle Washing: Hand wash your no-sew cat plush in cold water using a mild detergent to preserve its soft texture. Avoid machine washing to prevent felting or pilling.

  • Drying/Blocking: Lay your plush flat on a clean towel to air dry. Avoid hanging it up, as this might distort its adorable shape.

  • Storage: Store your no-sew cat plush in a cool, dry place, away from direct sunlight to prevent fading and maintain its charming colors. Keep it in a soft bag to minimize dust exposure.

  • Fluffing: If your plush loses some of its squishiness over time, gently fluff it by massaging the material, revitalizing its cuddly texture for endless hugs!

What to Pair with Your No-Sew Cat Plush?

Let your creativity flourish by crafting complementary pieces that add to the whimsical world of your cuddly creation.

  • Cozy Cat Bed: Create a warm haven for your no-sew cat plush with a simple round bed that mimics a snuggly nook. It will enhance the plush's charm!

  • Playful Yarn Ball: Whip up a vibrant yarn ball, perfect for tossing and playing alongside your adorable cat. It's a delightful, interactive addition to the plush's environment.

  • Cute Cat Blanket: Stitch a matching blanket using the same yarn to cuddle up with your no-sew cat plush, offering an inviting space for imaginative play.

  • Charming Bow Tie: Craft a tiny bow tie for your no-sew cat plush. Imagine the whimsical touch it adds, making your plush even more adorable and personalized!

  • Mini Cat Toys: Create a series of small toys like fish or mice to keep your cat plush entertained. These delightful additions will complement the playful nature of your cuddly friend.

Expert Tips for No-Sew Cat Plush

  • Maintain Tension: Consistent tension is key to a smooth appearance. If your plush feels floppy or uneven, adjust your grip on the yarn for firmer stitches.

  • Count Carefully: Losing count can lead to uneven shapes. Use a stitch marker or keep a tally as you crochet to help keep track of your rounds.

  • Secure Eyes: Double-check that the safety eyes are attached tightly. Pull lightly on them to ensure they won’t come loose during playtime.

  • Finishing Touch: After weaving in ends, gently fluff your plush to enhance its cuddly look. If it’s still not as squishy as you want, consider a gentle wash to boost softness.

  • Avoid Mistakes: If your cat seems to taper incorrectly, review your decrease rounds. Ensure you’re decreasing evenly to maintain a balanced shape in your no-sew cat plush.

No-Sew Cat Plush Variations

Embrace the joy of customization as you explore delightful ways to make this plush cat uniquely yours!

  • Yarn Colors: Experiment with various colors—solid, variegated, or even ombre shades—to create a plush that matches your decor or personality.

  • Fiber Options: Swap in cotton yarn for a breathable, softer finish, or try a wool blend for warmth and a textural twist. Each fiber brings its own charm to the design.

  • Size Adjustments: Use a larger hook for a bigger plush, or a smaller one to create a daintier version. Adjusting the size opens up new possibilities for playtime!

  • Textured Features: Add a playful twist with pom-poms on the ears or a fluffy tail. These little details can enhance the plush’s character and whimsy.

  • Accessory Fun: Dress your cat with a contrasting yarn bow tie or collar to give it a stylish flair. Accessories can easily transform your plush into a unique friend.

  • Color Blocking: Create a fun, patchwork effect by using multiple colors in the body. Alternate the sections for a playful visual impact that cheers up any space.

  • Embellishments: Consider adding small, embroidered patterns on the body or using surface crochet techniques to create whimsical designs. Every stitch tells a story!

  • Safety Eyes Alternatives: If you prefer a softer look, use stitched fabric features instead of safety eyes. This gives your no-sew cat plush a warm, homemade charm.

Adorable No-Sew Cat Pattern FAQs

Can I use a different type of yarn for this no-sew cat plush?
Absolutely! While a medium-weight yarn like 100% polyester or acrylic is recommended for its softness, you can experiment with other fibers such as cotton for a different texture. Just keep in mind that the finished plush may have a different feel and appearance.

How can I make my no-sew cat plush larger or smaller?
To adjust the size, you can either increase your hook size for a looser stitch or decrease your hook size for a tighter finish. You can also modify the number of rounds you crochet for the body; simply add or remove rounds based on your desired size!

Why is my work curling as I crochet?
Don’t panic! Curling can occur if your tension is too tight. Consider loosening your grip on the yarn, and check that you are consistent with your stitch tension throughout the project. Sometimes, a slight adjustment is all it takes to straighten things out!

How do I fix dropped stitches in my no-sew cat plush?
If you notice a dropped stitch, it's an easy fix! Simply identify where the stitch is missing, and you can use a hook to bring the yarn back up to the correct row. Make sure to work gently to avoid creating holes in your plush.

What size crochet hook should I use for this pattern?
For this no-sew cat plush, a 4 mm (US size G) crochet hook is recommended. This size allows for firm stitches that hold their shape well. However, if you find your plush feels too loose, consider switching to a smaller hook for a snugger finish!

How do I ensure the safety eyes are secure?
I recommend checking your safety eyes before finishing the plush. Make sure they are pressed in tightly and test them by gently pulling on them. If they feel loose, you may want to replace them or reinsert them for extra security.

Filed Under: Uncategorized

Charming Crochet Flower Pattern for Quick Spring Decor

August 22, 2026 by Publisher Leave a Comment

Charming Crochet Flower Pattern for Quick Spring Decor

In a cozy corner of my craft room, the scent of fresh spring air inspires me to bring a burst of color to my latest crochet project—Playful Purple Flower Motifs! This delightful crochet flower pattern not only infuses joy and vibrancy into any space but also works up quickly, making it perfect for crafters looking to add a personal touch to their garments or home décor. With just a few basic techniques, you can create these charming motifs that radiate cheerfulness, transforming your yarn stash into stunning florals. The best part? You have the freedom to play with colors, allowing your creativity to blossom like the flowers themselves. Let’s dive into this colorful world together and create some floral magic with our hooks!

Charming Crochet Flower Materials & Tools

  • Worsted Weight Yarn – Use a light purple for the petals and bright yellow for the centers, with an estimated 50-100 yards of each color depending on how many flowers you plan to create.
  • 4.0mm (G-6) Hook – This size is recommended for creating tight stitches that highlight the details of your beautiful crochet flower pattern.
  • Stitch Markers – Helpful for keeping track of rounds, especially if you're new to crocheting!
  • Yarn Needle – Essential for weaving in ends neatly after completing your flowers.

Why choose this crochet flower pattern?

Instant Gratification: This beginner-friendly crochet flower pattern allows you to create adorable motifs in no time, making it a perfect weekend project.

Versatile Use: These flowers brighten up garments, hair accessories, or home décor, offering countless possibilities for embellishment.

Playful Colors: With vibrant purple and sunny yellow, you can easily personalize your flowers, exploring different color combinations for unique results.

Tactile Appeal: The blend of single and double crochet stitches gives each flower a soft yet structured feel, making them visually striking and delightful to touch.

Creative Customization: Feel free to experiment with sizes and add beads or leaves for a complete botanical effect, inspiring your imagination to soar!

How to Check Your Gauge for Playful Purple Flower Motifs

Don't skip the gauge swatch! Ensuring your tension is consistent is key to achieving the beautiful petals in your crochet flower pattern. A general guideline is to create a 4-inch (10 cm) swatch and aim for 14 double crochets and 8 rows. If your flower turns out smaller than expected, simply increase your starting chain in multiples of 4 when forming the petals. If your tension is too tight, try using a larger hook size to help you create those lovely, ruffled petals. By taking the time to check your gauge, you’ll ensure your Playful Purple Flower Motifs bloom just the way you envision!

Step-by-Step Pattern for Playful Purple Flower Motifs

Row 1: Create the Center
Begin by making a magic circle with your bright yellow yarn. Ch 1 to secure, then work 6 sc into the circle. Pull the tail to close the circle tightly, and slip stitch into the first sc to join. Your work should feel compact, with a nice round center (6 sts).

Row 2: Form the Petals
Change to light purple yarn. Ch 3 to start the first petal (counts as 1 dc), then work 2 dc into the same stitch. For each of the next 5 stitches, sl st into the next sc from Row 1, ch 3, then work 3 dc in the same stitch to create a petal. Join with a sl st into the top of the starting ch 3. You should see 6 puffy petals forming (6 petals).

Row 3: Finish the Motif
To finish, cut the yarn leaving a tail for weaving. Pull the yarn through the last loop to secure. Weave in any ends with your yarn needle. At this stage, the flower should have a beautiful rounded appearance with defined petals that add charm. Each flower will measure approximately 3 inches in diameter.

Step 4: Optional Blocking
If desired, lightly steam or pin your crochet flower motifs to block them. This will enhance the shape of your petals and give a polished finish. Use a soft cloth to protect the yarn while blocking. After this step, your Playful Purple Flower Motifs will have a lovely flutter and look even more stunning as embellishments!

Crochet Flower Pattern Variations

Feel free to let your creativity flourish as you explore exciting variations for this crochet flower pattern!

  • Color Combinations: Experiment with pastels for a soft look or vibrant hues for a bold statement. Mixing colors adds a personal touch to your flower collection.

  • Size Adjustments: Use a thicker yarn and larger hook to create oversized flowers. This dramatic effect makes a stunning impact in your décor.

  • Bead Embellishment: Add a splash of sparkle by stitching beads into the center. Perfect for special occasions, the shimmer will elevate your floral design.

  • Leaf Addition: Crochet a round of green stitches beneath your flowers to create lovely leaves. This extra detail brings a complete botanical vibe to your motifs.

  • Texture Enhancements: Incorporate fun textures by adding pom-poms to the flower centers. The playful dimension introduces an unexpected charm to your design.

  • Fringe Accents: Create a whimsical effect by attaching fringes to the bottom of the flowers. This unique twist adds movement and flair to your crochet bouquet.

  • Border Variety: Frame your flowers with a contrasting colored border for a finished look. A decorative touch will truly make your flowers pop in any arrangement.

  • Yarn Alternatives: Swap out worsted weight yarn for cotton or bamboo blends for a lighter feel. Both options offer a soft drape that's perfect for summer projects.

How to Wash and Care for Your Crochet Flower Pattern

  • Machine Washing: Use cold water on a gentle cycle to protect the texture and shape of your crochet flower motifs. Avoid agitation to prevent any felting or pilling.

  • Hand Washing: For best results, gently hand wash in cold water with mild soap. This method will help maintain the vibrant colors and prevent distortion of the flower's shape.

  • Drying/Blocking: Lay your crochet flowers flat on a clean, dry surface to air dry. Blocking can enhance the petals' shape—use a light steam or pin technique if desired.

  • Storage: Store your finished flowers in a cool, dry place away from direct sunlight. This will help preserve the colors and keep them looking fresh for future use.

What to Pair with Playful Purple Flower Motifs?

As you bask in the joy of creating your crochet flower pattern, consider enhancing your crafting journey with complementary projects that radiate beauty.

  • Colorful Hair Accessories: Create delightful hair clips or headbands adorned with these floral motifs for a whimsical touch to your hairstyle. These accessories are perfect for spring outings, bringing a joyful vibe to your look.

  • Charming Gift Tags: Adorn your presents with crochet flower embellishments on gift tags. They add a heartfelt, personal touch that elevates any gift-giving occasion into something truly special.

  • Whimsical Wall Art: Combine several flower motifs into a vibrant wall hanging. This eye-catching decor piece not only showcases your crochet skills but also brightens up any space with cheerfulness.

  • Floral Coasters: Transform your flowers into charming coasters that showcase their beauty while protecting your surfaces. They add a touch of comfort and style to gatherings or quiet evenings at home.

  • Cheerful Brooches: Attach a floral motif to a pin backing for a unique, wearable piece of art. A playful brooch can brighten up any outfit and serves as a lovely conversation starter.

Expert Tips for Crochet Flower Success

  • Maintain Tension: Keep your tension consistent throughout the project to ensure your petals hold their beautiful shape. Uneven tension can lead to wonky petals!

  • Use Stitch Markers: It's easy to lose count when forming the petals. Use stitch markers to help track the rounds, especially if you're a beginner.

  • Count Carefully: Always double-check your stitch count after completing each row. Missing a stitch could affect the overall appearance of your crochet flower pattern.

  • Secure Ends Neatly: Weave in yarn ends securely to ensure your creations look polished and professional. A tidy finish enhances the beauty of your flower motifs.

  • Consider Blocking: After finishing, blocking can help set the shape of your crochet flowers. Lightly steam or pin them to accentuate the petal curl for a lovely final touch.

Playful Purple Flower Motifs FAQs

Can I substitute the yarn for this crochet flower pattern?
Absolutely! While worsted weight yarn in light purple and bright yellow is recommended for the best results, you can certainly substitute with cotton or bamboo yarns for a different texture. Just ensure the weight and fiber content match closely to maintain the structure of your flowers!

How can I adjust the size of the crochet flower motifs?
If you want to make bigger or smaller flowers, you can play with yarn thickness and hook size. Using a thicker yarn and a larger hook will give you more dramatic flowers. Conversely, a finer yarn with a smaller hook will yield petite, delicate blossoms!

Why are my flower petals curling?
Don't panic! Curling petals can often be fixed by adjusting your tension. Try to maintain an even stitch size throughout your work. Additionally, blocking your finished flowers will help set their shape — just steam them lightly or pin them down as needed!

What size hook should I use for this pattern?
The recommended hook size for the Playful Purple Flower Motifs is 4.0 mm (G-6). This size is perfect for achieving a tight stitch that showcases the beautiful details of the petals. However, you can adjust the hook size based on your personal tension; just remember that it might change the final appearance of your flowers.

How do I fix a dropped stitch in my crochet flower?
It’s an easy fix! Simply locate the dropped stitch and gently unravel the last few stitches back to where you fell off. Using your hook, pull the dropped stitch back up to the current row. Remember to keep your tension consistent to avoid future mishaps!

Filed Under: Uncategorized

  • « Previous Page
  • 1
  • …
  • 34
  • 35
  • 36
  • 37
  • 38
  • …
  • 41
  • Next Page »

Recent Posts

  • Chic Crochet Watch Band Pattern: Scalloped Elegance
  • Vibrant Crochet Granny Square: A Floral Delight to Create
  • Pocket Otter Crochet: Your Adorable Amigurumi Companion
  • Cozy Up with This Festive Crochet Tree Cozy Pattern
  • Chic Crochet Babydoll Dress: A Timeless Pattern for Spring

Recent Comments

No comments to show.
Fast Crochet Patterns Logo

Welcome to Fast Crochet Patterns, your curated editorial blog for modern, handmade aesthetics. Discover an elegant collection of contemporary designs and carefully crafted tutorials—where every beautiful pattern is completely free to inspire your next creation.

Join the Studio

Subscribe for our latest free patterns and warm, minimal crochet inspiration delivered to your inbox.


Collections

  • Accessories
  • Amigurumi
  • Baby
  • Bags

More Patterns

  • Cardigan
  • Dress
  • Flowers
  • Granny Square

Information

  • About
  • Contact
  • Privacy Policy
  • Terms Of Use
  • Disclaimer

© 2026 Fast Crochet Patterns. All rights reserved.