Fast Crochet Patterns

  • Home
  • Contact
  • Patterns
    • Amigurumi
    • Granny Square
    • Flowers
    • Baby
    • Dress
    • Bags
    • Cardigan
    • Accessories
menu icon
go to homepage
  • Home
  • Contact
  • Patterns
    • Amigurumi
    • Granny Square
    • Flowers
    • Baby
    • Dress
    • Bags
    • Cardigan
    • Accessories
search icon
Homepage link
  • Home
  • Contact
  • Patterns
    • Amigurumi
    • Granny Square
    • Flowers
    • Baby
    • Dress
    • Bags
    • Cardigan
    • Accessories
×

Sage Floral Crochet Dress Pattern for Sunny Days

September 1, 2026 by Publisher Leave a Comment

Sage Floral Crochet Dress Pattern for Sunny Days

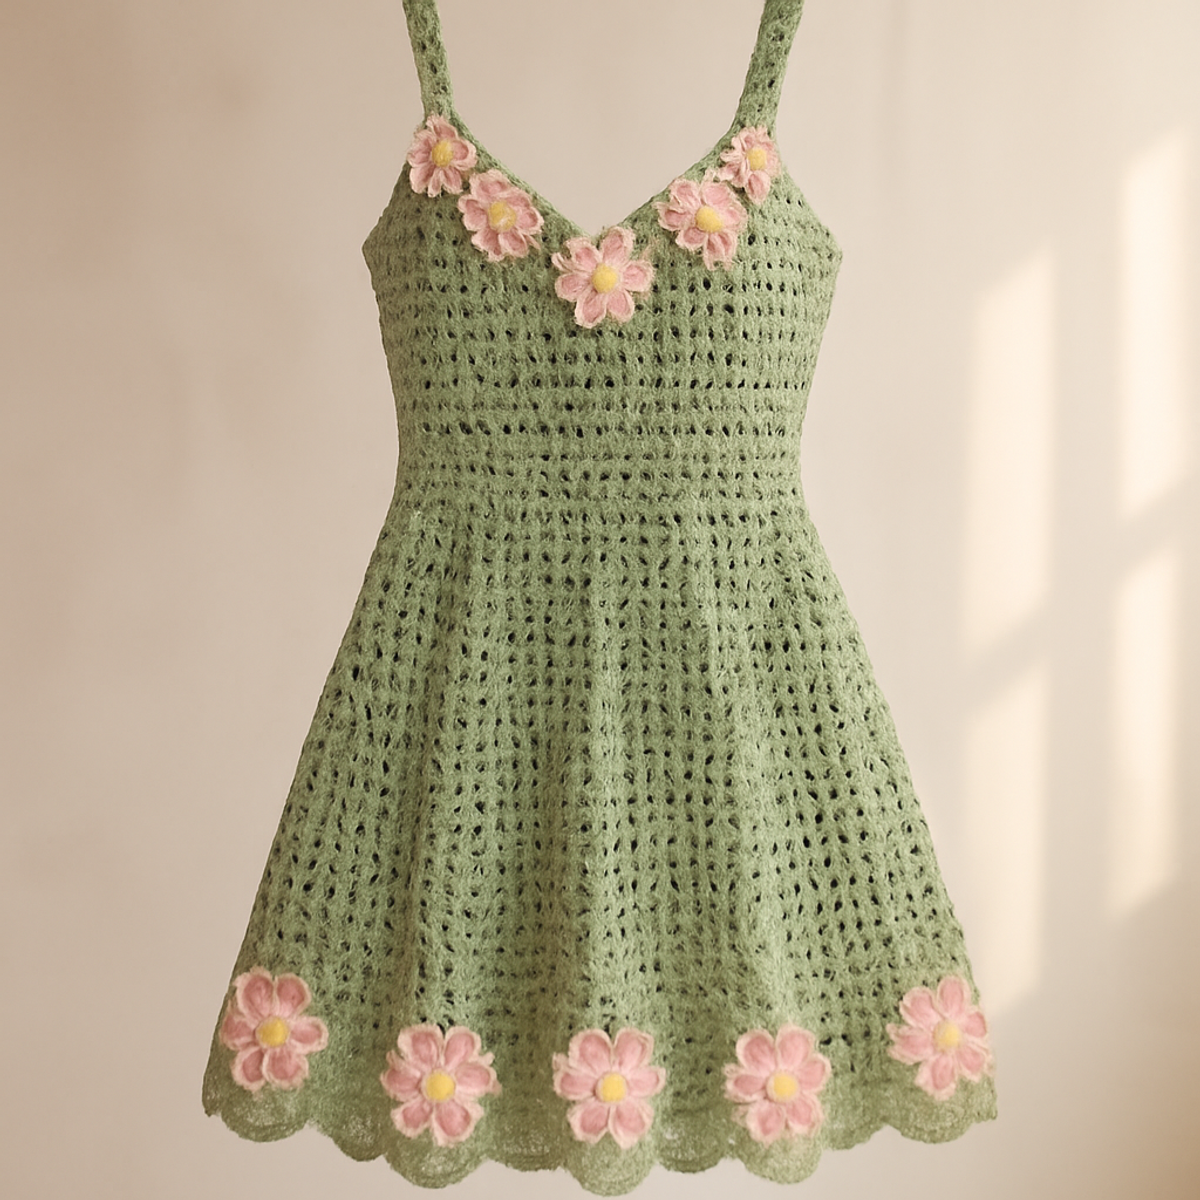
With summer just around the corner, I find myself dreaming of airy, feminine styles that capture the essence of sun-drenched days. The Sage Floral Crochet Dress is not only a delightful project to hook up but also embodies the enchanting charm of handmade fashion. This crochet dress pattern features intricate floral details and an open stitch design, making it the perfect choice for casual outings or a lovely day at the beach. Its breathable construction ensures you stay cool while you showcase your unique flair, and the customizable nature allows you to play with colors and yarns to make it truly your own. Whether you’re an experienced crocheter or a crafty enthusiast ready to test your skills, this pattern invites you to create something both stunning and personal. So, let’s dive into this charming project and get those hooks moving!

Sage Floral Crochet Dress Materials & Tools

Note: Gather your materials for this beautiful crochet dress pattern!

Yarn

  • Light to Medium Weight Cotton Blend Yarn – Approximately 600-800 yards is needed for sizes S to L to achieve that airy, breathable effect.

Tools & Notions

  • 3.0 mm (E/4 US) Hook – Ideal for both open and solid crochet stitches, providing a delicate finish.
  • Stitch Markers – Essential for maintaining your pattern and tracking stitch changes throughout the project.
  • Buttons – Use them as decorative floral centers to enhance the feminine charm of your dress.

Why Choose This Crochet Dress Pattern?

Effortless Elegance: This crochet dress pattern combines intricate floral elements with a lightweight, open-stitch design, perfect for summer vibes.

Breathable Comfort: Ideal for warm days, its airy fabric keeps you feeling fresh and stylish without sacrificing comfort.

Personal Touch: You can tailor your dress to your taste, experimenting with colors and yarns to create unique looks.

Fashion-Forward Aesthetic: The delicate floral details elevate your outfit, making it a standout piece for casual outings or beach days.

Skill Challenge: Designed for medium to advanced levels, this pattern encourages you to hone your skills while enjoying a satisfying crochet journey.

Gauge & Sizing Notes

Don't skip the gauge swatch! Checking your tension is crucial for the Sage Floral Crochet Dress to ensure it fits perfectly and drapes beautifully. A standard guideline suggests that a 4×4 inch (10×10 cm) square should yield approximately 16 double crochets by 10 rows, but be sure to do a test swatch to match your own tension. If your measurements don’t align with this, you can easily adjust the size of your dress; for instance, to make it larger, increase your starting chain in multiples of 6 + 2. If your swatch is smaller than desired, consider moving up a hook size for a looser crochet gauge. Happy crafting!

Step-by-Step Pattern for Sage Floral Crochet Dress

Row 1: Bodice Foundation Chain
Start by making a foundation chain of 50 chains (or adjust for your size). This will form the bodice. Ensure you're working loosely so your chain doesn’t tighten. Once completed, join to the first chain with a slip stitch (sl st) to form a circle, taking care not to twist your chain.

Row 2: First Bodice Round
Ch 2 (counts as first dc), then work 1 dc in each chain around for a total of 50 dc. At the end of the round, join with a sl st to the top of the beginning ch-2. Your work should begin to take shape and feel like a snug band around the bosom.

Row 3: Bodice Increases
Ch 2, 1 dc in next 2 sts, inc in the next st; repeat from * to * around. This will add gentle structure to the bodice, creating slight flaring. You should now have a total of 66 sts at the end of the round. Slip stitch to join and ensure your work maintains a clean edge.

Row 4: V-Neck Shaping
Ch 2, work 1 dc in the next 3 sts, dec (dc2tog) in the next st; repeat from * to * around until you reach the starting point. The bodice will start to cinch inwards, forming a v-shape at the neckline. End this round with 50 sts after your decreases.

Row 5: Complete Bodice Rows
Ch 2, 1 dc in the next st, inc in next st; repeat from * to * around. As you crochet, your bodice will begin to feel more defined. Complete this round with 75 sts, adding depth and comfort to the fit while preparing to transition to the skirt.

Row 6: Skirt Setup
Ch 3 (counts as first dc), then work 1 dc in each stitch around for a total of 75 dc. This round establishes the body of the skirt that will drape beautifully. After joining, you’ll notice the transition to a flared shape beginning to form.

Row 7: Open Stitch Skirt
Ch 1, skip 1 st, 1 dc in next st, ch 1; repeat from * to * around. This round introduces a lovely openwork stitch pattern that adds airy lightness to the skirt. You should have approximately 75 open spaces created, enhancing the summer vibe of the Sage Floral Crochet Dress.

Row 8: Floral Detail Placement
Ch 1, work sc in next ch-1 space for the entire round. As you create these stitches, visualize the placement for your floral motifs. Ensure the sc are compact and neat, for the floral elements will interlace charmingly along the skirt by the end of the project.

Row 9: Crochet Flowers
Make a small floral motif in any ch-1 space from previous rows: Ch 5, sl st to form a ring, work 5 sc inside the ring, sl st to join. Repeat this for each space where you'd like to place a flower, integrating delicate charm into your dress as you crochet them one by one.

Step 10: Final Assembly
Once your flowers are complete, carefully sew them onto the hem of the skirt, spacing them out evenly for a balanced look. After assembly, use a yarn needle to weave in any loose ends, finishing off your beautiful Sage Floral Crochet Dress with care.

Step 11: Edge Finishing Touches
For the final embellishing, crochet a border along the bottom of the dress using a combination of sc and decorative shells. Ch 1, sc in the next st, then 5 dc in the next st, sc in the next st; repeat around. Your dress should now have a polished and elegant finish, ready for sunny days!

Crochet Dress Pattern Variations

With each stitch, you can infuse your personal style into this stunning creation.

  • Yarn Substitutions: Swap in a bamboo blend for a lustrous sheen that adds a touch of elegance. The fabric will drape beautifully, enhancing the summer vibe.

  • Color Blocking: Experiment with bold, contrasting colors like fuchsia and teal to create a vibrant statement piece. Color-blocking can add a playful twist that stands out beautifully.

  • Skirt Length Adjustment: Lengthen the skirt for a dreamy maxi dress or shorten it for a youthful mini version. Both alterations maintain the dress's original charm while providing new styling options.

  • Fiber Alternatives: Consider a lightweight acrylic yarn for a softer feel and vibrant hues. This swap makes the dress more budget-friendly while still capturing the same airy essence.

  • Textured Details: Add a delicate fringe or scalloped border to the hem for an extra flourish. These details can enhance the overall feminine aesthetic, making your dress uniquely yours.

  • Sleeves Option: Introduce flowing sleeves made with an openwork stitch to add romance. This modification complements the dress's feminine character, perfect for sunset strolls.

  • Floral Embellishment Variations: Use different flower motifs for the hem and neckline, like daisies or roses, for a unique touch. Mix and match to create a garden-inspired masterpiece.

  • Underlining for Structure: For a more defined look, consider adding a lightweight lining in a complimentary color beneath the skirt. This addition can enhance comfort and create a professional finish.

Expert Tips for Your Crochet Dress

  • Tension Matters: Always check your tension before starting. Uneven tension, especially in open stitch patterns, can lead to inconsistencies in size and drape.

  • Count Carefully: Keep track of your stitches at each round, particularly during increases and decreases, to avoid losing count and affecting your dress’s fit.

  • Use Stitch Markers: Place stitch markers at the start of each round. This helps you monitor your progress and maintain stitch placement for an even clean edge.

  • Floral Details: When crocheting flowers, securely attach them to the dress, ensuring they maintain their shape and don’t flop or lose definition once completed.

  • Block for Success: Don’t skip the blocking step! It not only opens up the stitches beautifully but gives your crochet dress a polished, professional finish.

  • Explore Variations: Don’t hesitate to customize your dress by trying different colors or yarn types; the crochet dress pattern invites you to express your unique style.

How to Wash and Care for Your Crochet Dress

Machine Washing: Use cold water on a gentle cycle. Place your crochet dress in a mesh laundry bag to prevent tangling and snagging during washing.

Hand Washing: For extra care, hand wash in cold water with a mild detergent. Gently agitate the water to avoid stretching the delicate stitches, ensuring your crochet dress pattern remains intact.

Drying/Blocking: Lay flat to dry on a clean, dry towel. Avoid hanging, which can stretch the fabric; instead, block to shape and open up the stitches for that lovely, finished look.

Storage: Store your crochet dress in a cool, dry place, ideally folded rather than hung, to maintain its beautiful shape and drape.

What to Pair with the Sage Floral Crochet Dress?

As you embark on this delightful crochet dress pattern, consider creating charming accessories that enhance its beauty and add a cohesive touch to your summer wardrobe.

  • Floral Clutch: A matching handbag made with the same yarn brings a cohesive and stylish charm to your look. Imagine pulling this handmade accessory along as you twirl in your dress, completing your outfit effortlessly.

  • Lace-Edged Shawl: A delicate shawl can add an elegant layer, perfect for cool evenings. Its openwork design mirrors the floral details of the dress, tying your ensemble together beautifully.

  • Crochet Sun Hat: Protect yourself from the sun in style! A matching sun hat crafted from the same cotton blend can enhance your beach vibe while showcasing your creativity.

  • Flower Hair Clips: Adorn your hair with tiny crochet flowers made from leftover yarn. These whimsical clips not only complement your dress but add a lovely touch to your overall summer aesthetic.

  • Matching Anklets: Crochet some airy anklets to peek out from beneath your dress. A playful detail that brings a touch of whimsy and femininity to your summer outfits.

Sage Floral Crochet Dress FAQs

Can I substitute the yarn for my crochet dress pattern?
Absolutely! If you prefer working with a different yarn, a light acrylic or bamboo blend can work wonderfully. Just keep in mind that the drape and texture may change, so check your gauge to ensure the fit remains true to the pattern.

How can I adjust the sizing of the dress?
No problem! To make the dress larger, simply add extra stitches when establishing your foundation chain and ensure your total stitch count aligns throughout the bodice and skirt sections. For a smaller fit, reduce the foundation chain and adjust your stitch counts during increases and decreases accordingly.

Why is my work curling, and how do I fix it?
Don't panic! Curling can happen with certain stitch patterns, especially when using lighter yarns. Make sure to check your tension; if it’s too tight, your work may curl. An easy fix is to give your dress a good blocking after finishing.

What size hook should I use for this pattern?
The recommended hook size for the Sage Floral Crochet Dress is a 3.0 mm (E/4 US). This size works best with the open stitch designs and will ensure your dress turns out with the lovely draping effect intended.

I dropped a stitch while crocheting the flowers; what do I do?
It’s an easy fix! Simply use a crochet hook to carefully pick up the dropped stitch and re-insert it back into the work. If you’re in doubt, weave in the ends securely and redo the flower. Practice makes perfect!

How can I maintain consistency in my tension while working the open stitches?
Great question! To maintain a consistent tension, periodically check your work by measuring your previous rows and counting your stitches. Using stitch markers at the start of each round can also help you stay on track with your stitch placement, making your dress come out beautifully!
Filed Under: Uncategorized

Charming Frog Cup Coaster Crochet Pattern for Cozy Homes

September 1, 2026 by Publisher Leave a Comment

Charming Frog Cup Coaster Crochet Pattern for Cozy Homes

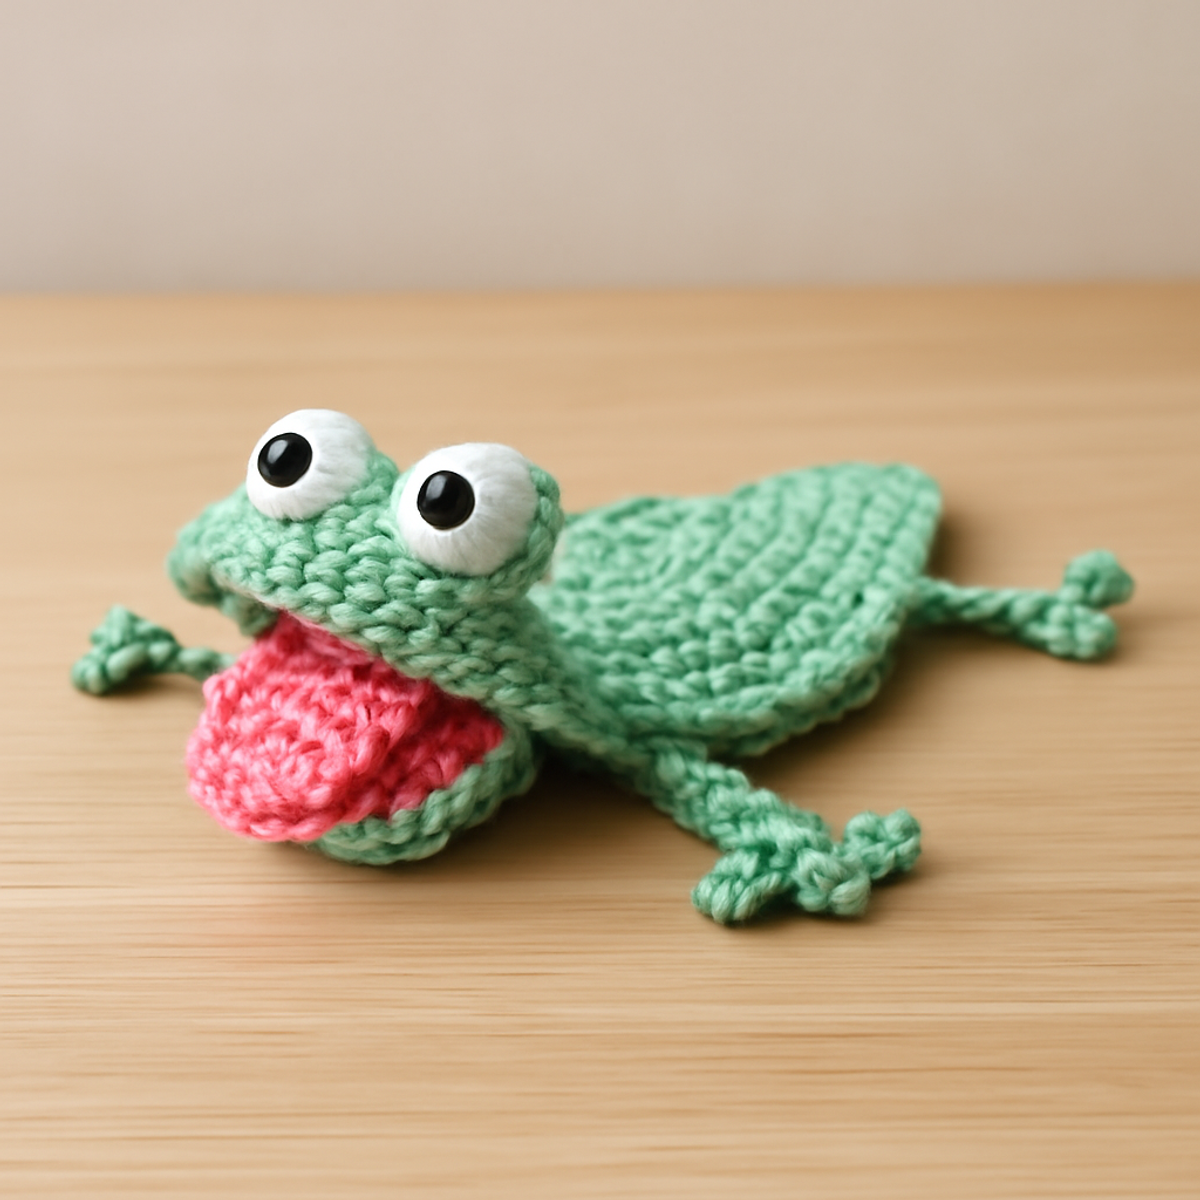
There’s something enchanting about stitching up your own whimsical home accents, don’t you think? With this delightful crochet frog cup coaster, you’re not just crafting a practical addition to your kitchen or workspace—you’re inviting a splash of joy into your everyday routine. This intermediate-level project allows you to express your creativity while providing a unique gift that’s sure to bring smiles. Imagine protecting your surfaces from hot beverages, all while showcasing a cute, functional decor piece that reflects your personality. Plus, it’s a fantastic opportunity to use up those leftover yarn scraps! Grab your mint green and pink cotton yarn—let's hop into this fun-making adventure together and create a charming frog that will leap into the hearts of family and friends.

Frog Cup Coaster Materials & Tools

  • Lightweight Cotton Yarn – Use mint green, pink, white, and black colors; estimated total yardage of 100-150 yards for the whole project.
  • 3.5mm (E/4) Crochet Hook – Ideal for achieving the perfect tension while crafting your frog cup coaster.
  • Safety Eyes (Optional) – For bringing your frog to life with a cute, expressive face!
  • Yarn Needle – Essential for weaving in ends and securing your work as you go.

Why is this frog cup coaster special?

Whimsical Design: This charming frog cup coaster adds a playful touch to your home decor, making it a delightful conversation starter.

Easy Assembly: With a mix of basic stitches and assembly techniques, you'll have fun crafting your way to a finished piece!

Soft & Plush Texture: Made with lightweight cotton yarn, the coaster has a gentle drape that looks and feels wonderful while keeping your surfaces safe.

Creative Personalization: You can easily experiment with various colors and embellishments, making each coaster a unique reflection of your style.

Perfect for Gifting: This adorable design makes a fantastic gift for friends and family, spreading joy through its functional charm.

Gauge & Sizing Notes

Don't skip the gauge swatch! Ensuring the correct tension is crucial for your frog cup coaster, as it guarantees your finished piece fits perfectly and looks as delightful as you envision. A standard gauge measurement for this project is approximately 4×4 inches (10×10 cm) = 14 single crochets by 8 rows, but this can vary depending on your crochet technique. If you want to adjust the size of your coaster, simply alter your starting chain in multiples of 6, adding or subtracting as needed. If your swatch turns out too small, don't fret—try going up a hook size to achieve that cozy, whimsical result that defines your charming frog cup coaster!

Step-by-Step Pattern for frog cup coaster

Row 1: Start the Body
Ch 4, join with a sl st to form a ring. In the ring, work 6 sc (6 sts). Pull the tail tight to close the ring. Your work should start forming a small circle, which is the base of the frog cup coaster.

Row 2: Increase Round
Ch 1, 2 sc in each st around (12 sts). This row adds a bit of roundness to the frog's body. Your work should expand and look like a simple round dish, laying flat.

Row 3: Continue Increasing
Ch 1, *sc in the next st, 2 sc in the next st; repeat from * around (18 sts). This row helps create the curvature of the frog's body further. You should notice the coaster starting to cup slightly.

Row 4: Shape the Body
Ch 1, *sc in the next 2 sts, 2 sc in the next st; repeat from * around (24 sts). The frog cup coaster should continue growing, maintaining that lovely rounded shape.

Row 5: Begin Body Sides
Ch 1, sc in each st around (24 sts). This solid row will help to form the sides of your frog. Your coaster should feel firm and almost take on a bowl-like structure now.

Row 6: Define the Mouth
Ch 1, *dec, sc in the next 2 sts; repeat from * around (18 sts). This row starts shaping the frog’s mouth, and you'll see a gentle indent forming. Keep an eye on those stitch counts!

Row 7: Create Bottom Lip
Ch 1, *dec, sc in the next st; repeat from * around (12 sts). The mouth shape becomes more defined, and you'll notice a subtle dip that mimics the frog’s charming smile.

Row 8: Finish Body
Ch 1, sc in each st around (12 sts). This final row for the body gives the frog cup coaster a polished look. Your work should feel complete and take on a cute, rounded form.

Step 9: Legs
Ch 4, sl st in 2nd ch from hook, sc in next, hdc in last ch. This forms one leg, so repeat this process for a second leg and attach with sl st into the body. The legs should look lively and increase the playful aspect of your frog.

Step 10: Eyes
With white yarn, make 2 ch 2, 6 sc in the ring (6 sts) for each eye. Join and fasten off, then attach to the body using sl st, positioning them evenly on either side. The eyes will help bring your frog cup coaster to life!

Step 11: Tongue
Using pink yarn, ch 5, and sc in 2nd ch from hook, sc in next 3 ch (4 sts). Attach with a sl st to the mouth area. The tongue should hang out just a bit, adding to your frog's whimsical charm.

Step 12: Edging
With green yarn, attach anywhere on the edge, ch 1, and work evenly spaced sc around (approximately 30–40 sts total). This charming border will complete your frog cup coaster and provide a polished finish, ready for use as a lively home accent.

Frog Cup Coaster Variations

There's endless joy in customizing your crochet project, allowing your unique style to shine through!

  • Color Combinations: Play with vibrant yellows, blues, or soft pastels to add character and personalization to your frog.

  • Woodland Creatures Coasters: Create a whole set of delightful animal coasters by using this pattern as a base for other charming critters!

  • Larger Size: Scale up the design for larger mugs or use as playful table decoration; perfect for hosting fun gatherings.

  • Embellishments: Add tiny flower appliques or leaf motifs on the back of the frog for an extra touch of whimsy.

  • Texture Alterations: Experiment with different yarn fibers, like bamboo or wool, for a varied texture and unique feel.

  • Fringe Fun: Attach playful fringe around the edge for a lively finish that enhances your coaster’s whimsical charm.

  • Border Variations: Create a colorful border using contrasting yarn colors to further enhance the cuteness of your frog cup coaster.

  • Seasonal Themes: Use colors or embellishments related to holidays; imagine a froggy design for Easter or summer picnics!

How to Wash and Care for Your Frog Cup Coaster

  • Hand Washing: Gently wash your frog cup coaster in cold water with a mild detergent. Avoid squeezing or wringing to preserve the soft texture and cute shape.

  • Drying/Blocking: Lay your frog flat to dry in a shaded area. This helps maintain its size and shape, ensuring it remains a delightful accent for your home.

  • Storage: Store your frog cup coaster in a cool, dry place. Keep it away from direct sunlight to prevent color fading and preserve its playful charm for years to come.

  • Avoid Agitation: Do not machine wash or tumble dry your coaster, as agitation may cause unwanted felting or pilling. Treat your frog cup coaster with care to keep it looking fresh and fun!

Expert Tips for Your Frog Cup Coaster

  • Maintain Consistent Tension: Keeping your tension even throughout ensures a harmonious appearance, avoiding any lumpy or uneven stitches that could distract from your design.

  • Count Carefully: Pay close attention to your stitch count, especially when transitioning between the body and limbs. It helps maintain the frog's proportions perfectly!

  • Block Your Work: Lightly blocking the finished piece can enhance its definition and shape, giving your frog cup coaster that polished look before you assemble it.

  • Mark Your Rows: Use stitch markers to indicate the start of each round, preventing any confusion with counting and ensuring your work stays on track.

  • Use a Yarn Needle: Weave in ends securely to prevent unraveling. A tidy finish not only looks better but also makes your coaster durable for functional use.

What to Pair with Frog Cup Coaster

Create a whimsical set that brings your cozy space to life!

  • Frog Mug Cozy: A matching cozy for your mug ensures a delightful color harmony while preventing hands from burning. Imagine sipping hot cocoa wrapped in the same playful theme!

  • Playful Animal Coasters: Explore other animals like turtles or bunnies to form a cheerful set. These adorable designs will elevate your table decor and keep your surfaces protected.

  • Crochet Frog Keychain: Craft a tiny frog keychain for a cute companion to your coaster. This fun little project can add a touch of whimsy to your everyday essentials!

  • Frog-Themed Headband: A lovely headband featuring frog motifs can be a unique accessory. Pairing it with your cup coaster creates a playful ensemble that's perfect for themed gatherings.

  • Colorful Yarn Scraps Blanket: Use leftover yarn to create a cozy scrap blanket. This not only extends your crafting journey but also turns your unused yarn into a delightful patchwork masterpiece!

Frog Cup Coaster FAQs

Can I use a different type of yarn for my frog cup coaster?
Absolutely! While the pattern suggests a lightweight cotton yarn for that plush texture, you can swap in an acrylic or cotton-blend yarn if it's more readily available. Just be mindful that different fibers may affect the drape and final appearance, so consider checking your gauge!

How can I make the frog cup coaster bigger or smaller?
To adjust the size, you can add more increase rounds at the beginning of the pattern or decrease the number of rounds to create a smaller version. Keep in mind that this might also affect the proportions of the limbs and features, so some tweaking might be necessary!

Why is my frog cup coaster curling at the edges?
Don’t panic! Curling can happen if your stitches are too tight or if your yarn is on the thicker side. Try blocking your completed coaster by gently wetting it and laying it flat to dry, shaping it into your desired form. This usually helps flatten those edges quite well!

What hook size should I use for my frog cup coaster?
The recommended hook size is a 3.5mm (E/4), but this can vary based on your personal tension. If you're finding your stitches too loose or tight, feel free to try a hook that’s either slightly smaller or larger to achieve the desired look and feel.

How do I fix a dropped stitch on my frog cup coaster?
It's an easy fix! Simply use a yarn needle to pick up the dropped loop and pull it through the last stitch row you made. Then secure it tightly by weaving in the tail along the back. This will keep your coaster looking neat and finished!

Can I add embellishments to my frog cup coaster?
Absolutely! Adding tiny flower appliques or even experimenting with different eye designs can enhance the whimsical nature of your frog cup coaster. Get creative—this is your time to shine and make a unique piece that truly reflects your style!

Filed Under: Uncategorized

Whimsical Flower Coasters Crochet: A Cozy DIY Project

September 1, 2026 by Publisher Leave a Comment

Whimsical Flower Coasters Crochet: A Cozy DIY Project

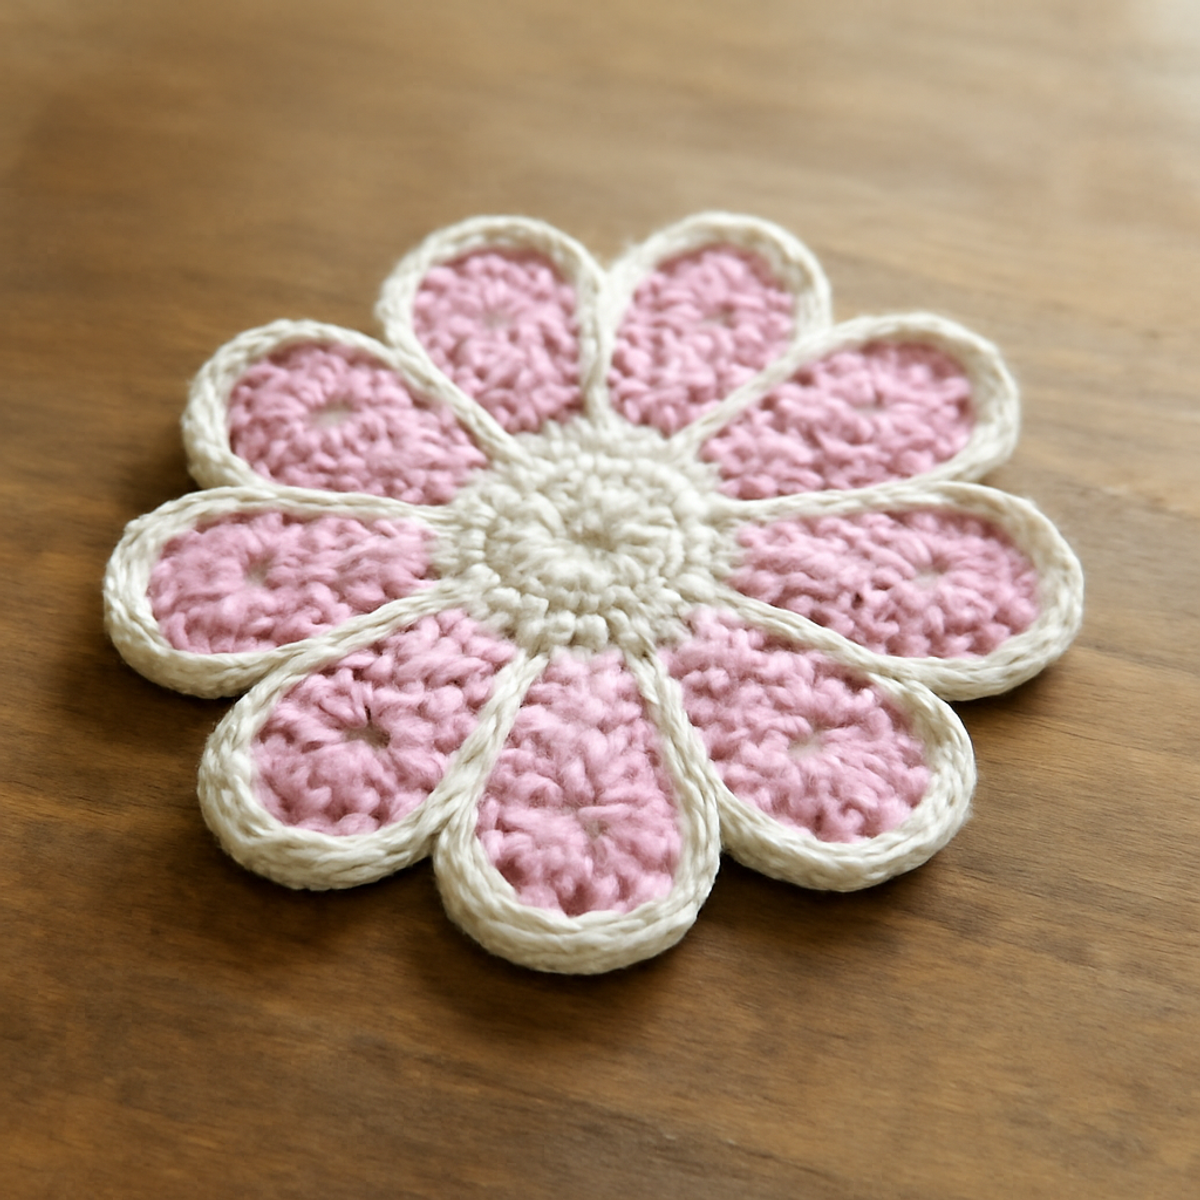
There's something so delightful about bringing a splash of color into your home, especially when that color comes from handmade crochet projects. Today, I'm excited to share my latest creation, the 'Charming Flower Coasters,' perfect for both seasoned crafters and those just dipping their toes into the world of yarn. These whimsical flower coasters crochet not only serve as practical accessories to protect your surfaces from hot mugs and cold beverages but also brighten up any table setting with their vibrant hues and intricate design. What I love most is how quickly they work up, making them a wonderful option for last-minute gifts that showcase your crafting skills. So, let’s get started and create something beautiful together!

Flower Coasters Crochet Materials & Tools

Yarn

  • Medium Weight Yarn (Category 4) – Approximately 50-75 yards of cotton or a cotton blend is ideal for durability and easy care.

Tools & Notions

  • 4.5mm (US Size 7) Hook – This size helps create tight stitches that hold their shape beautifully.
  • Stitch Marker – Keep track of rounds for consistent petal sizes, especially useful in floral designs.
  • Scissors – For cutting yarn at the end of your projects.

Dive into the vibrant world of flower coasters crochet with these essentials, ensuring your crafting experience is smooth and joyful!

Why Choose Flower Coasters Crochet?

Vibrant Pieces: The Charming Flower Coasters add a burst of color to any home, instantly elevating your decor while serving a practical purpose.

Skill-Friendly: Perfect for beginners and experienced crafters alike, this project balances ease with enough creativity to keep you engaged.

Quick to Make: Working up in no time, these coasters are the ideal solution for last-minute gifts or seasonal decor accents.

Customizable Options: Feel free to experiment with colors and yarn types, tailoring the coasters to match your personal style or the recipient's taste.

Functional Décor: They not only protect your surfaces but also serve as eye-catching conversation starters when entertaining.

Gauge & Sizing Notes

Don't skip the gauge swatch! Proper tension is crucial for your flower coasters crochet, as it ensures each coaster will be a delightful match in size and texture. While specific measurements for this project aren't defined, a general guideline for a standard coaster is approximately a 4×4 inch (10×10 cm) square. If you’re looking to adjust the size of your coasters, remember that you can easily increase the starting chain in multiples of 6 or modify your hook size. If your swatch is smaller than desired, try going up a hook size to achieve that cozy, handcrafted feel perfect for showcasing your skills!

Step-by-Step Pattern for Charming Flower Coasters

Row 1: Start the Center
Begin with a magic circle and make 6 single crochets (sc) into the circle. Pull the tail tight to close the circle. Slip stitch (sl st) into the first sc to join the round. This will form the solid center of your flower coaster, and your work will look like a small, rounded shape with a defined center (6 sts).

Row 2: Building the Base
Ch 2 (this counts as your first double crochet, dc), then make 2 dc in each sc around for a total of 12 dc. Slip stitch to the top of the initial ch-2 to close the round. At this point, your piece should begin to flatten out, forming a small circle as you create a sturdy base for the petals (12 sts).

Row 3: Start the Petals
Ch 3 (counts as 1 dc), then work 1 dc in the same stitch as the sl st, followed by 3 double crochets (dc) in the next stitch. Skip the next stitch and slip stitch (sl st) into the following stitch, creating your first petal. Repeat this sequence around for a total of 6 petals. You should see lovely raised petals forming around the center (6 petals).

Row 4: Extend the Petals
To enhance the petals, join with a sl st into the space between the petals. Ch 3, and then work 2 dc, ch 2, 3 dc all in the same space for a cluster, creating a fuller petal. Slip stitch to the base of the next petal’s space and repeat this pattern for each petal around. Your work will become more textured and dimensional (6 clusters).

Row 5: Create the Border
Finish your flower coasters crochet by slip stitching into each of the 2-ch spaces. Then, work 1 sc in each of the dc and ch-2 stitches. This final edging will give your coasters a lovely, polished finish, helping them hold their shape. After completing this round, your coasters should feel neat and tidy while still showcasing their floral beauty (12 sc).

Step 6: Final Touches
To complete your charming flower coasters, slip stitch into the first sc, cut the yarn, and pull it through to secure. Weave in any loose ends with your yarn needle for a clean finish. Your coasters should now be fully formed with defined petals, ready to add a spruce of charm to any home (finalized coasters).

Care Instructions for Flower Coasters Crochet

Machine Washing: Use cold water on a gentle cycle to wash your flower coasters crochet. Avoid harsh agitation to prevent any felting or pilling, keeping your coasters vibrant and intact.

Hand Washing: If preferred, hand wash your coasters in lukewarm water with a mild detergent. Gently squeeze and avoid wringing to maintain their lovely shape and details.

Drying/Blocking: Lay your coasters flat to dry on a clean towel, reshaping any uneven areas. This helps maintain their beautiful floral design and ensures they stay functional.

Storage: Store your finished coasters in a cool, dry place away from direct sunlight to prevent fading. Keep them stacked flat in a drawer or on a shelf for easy access when they’re needed.

Expert Tips for Flower Coasters Crochet

  • Consistent Tension: Maintain even tension throughout your stitches to ensure that your flower coasters crochet have a uniform shape and size, enhancing their overall aesthetic.

  • Use a Stitch Marker: To avoid losing count or getting twisted, mark the start of each round, which helps track your progress while creating those lovely petals.

  • Blocking Matters: Lightly block your finished coasters to flatten any waviness, allowing them to set beautifully while showcasing their intricate floral design.

  • Check Your Edges: As you complete the border, confirm that you’re not missing edges; working into every stitch keeps your coasters nicely structured and neat.

  • Final Weaving: Don’t skip weaving in loose ends after finishing—this detail ensures a clean look and prevents unraveling, making your project last beautifully.

  • Enjoy the Process: Remember, every stitch you make is a step toward a delightful addition to your home decor. Enjoy the creative journey of making your flower coasters crochet!

What to Pair with Charming Flower Coasters

Creating a harmonious atmosphere at home is an enchanting journey, especially when you complement your coasters with delightful matching pieces.

  • Floral Table Runner: A beautifully crocheted table runner adorned with flowers brings a cohesive look to your dining space. Perfect for hosting!
  • Matching Mug Rugs: Small, whimsical mug rugs not only enhance your beverage experience but also add a pop of color under each cup.
  • Bouquet Wall Hanging: Create a striking wall art piece using flowers inspired by your coasters, bringing the joy of crochet to vertical spaces.
  • Decorative Plant Hanger: A hanging planter crocheted to match will add a fresh vibe to any room, allowing nature to bloom indoors.
  • Charming Napkin Rings: Crocheted napkin rings in similar colors can elevate your dining experience, making every meal feel special and whimsical.

Each of these projects complements the flower coasters crochet wonderfully, building a delightful environment filled with love and creativity!

Flower Coasters Crochet Variations

There's nothing quite like the joy of personalizing your crochet creations! Let your imagination run wild with these fun ideas to make your flower coasters truly unique.

  • Color Combinations: Experiment with bright or pastel shades to create an eclectic set or coordinate for a more cohesive look.
  • Thicker Yarn: Swap to a chunky cotton or bamboo blend for a cozier feel and a sturdier coaster! This twist adds warmth and texture.
  • Larger Hook: Use a bigger hook size to produce larger coasters, perfect for placing under bowls or larger mugs! Scaling up just makes everything feel more inviting.
  • Texture Additions: Incorporate decorative stitches like shell stitches or bobbles for added texture and dimension. Each stitch can elevate the coaster’s personality!
  • Fringe Detail: Add stylish fringe around the edges for a playful bohemian twist! This will give your coasters a relaxed, whimsical vibe.
  • Seasonal Themes: Change colors based on holidays or seasons, like vibrant oranges and browns for autumn or icy blues for winter. Your coasters can adapt with the seasons!
  • Embellished Centers: Sew on small buttons or beads at the center of each flower for an extra touch of charm. These little details can make all the difference!
  • Mini Coasters: Create smaller versions for coasters meant for shots or small cups, perfect for parties or gatherings. Everyone will love these fun little touches!

Charming Flower Coasters FAQs

Can I substitute different yarn types when making flower coasters crochet?
Absolutely! While a medium weight cotton or cotton blend is ideal for durability, you can experiment with other yarn types, such as acrylic or a bamboo blend. Just keep in mind that these substitutions may alter the coasters' texture and absorbency.

How do I make the flower coasters bigger or smaller?
Don't panic! To adjust the size of your flower coasters, you can use a larger hook for bigger coasters or a smaller hook for a tighter fit. Additionally, adjusting the number of stitches in each round and the number of petals can also help you customize the size according to your preference.

Why is my flower coaster curling at the edges?
This can happen if your stitches are too tight or if you have uneven tension. I recommend checking your tension throughout the project, and blocking your coasters after finishing can also help flatten any curl. Lightly steam blocking will give them a nice polished finish!

What hook size should I use for the best results?
I recommend using a 4.5 mm (US size 7) hook for creating these delightful coasters. This size helps produce tight stitches that keep their shape wonderfully. If your coasters are curling, consider using a larger hook for a looser weave.

How do I fix dropped stitches in my flower coasters crochet?
Fixing dropped stitches is an easy fix! Simply locate the dropped stitch, and use your crochet hook to pull the yarn back up to the current row. If you're not comfortable reworking the stitches, just weave in the end using a needle to secure the area, and it will almost invisibly blend into the flower design.

Filed Under: Uncategorized

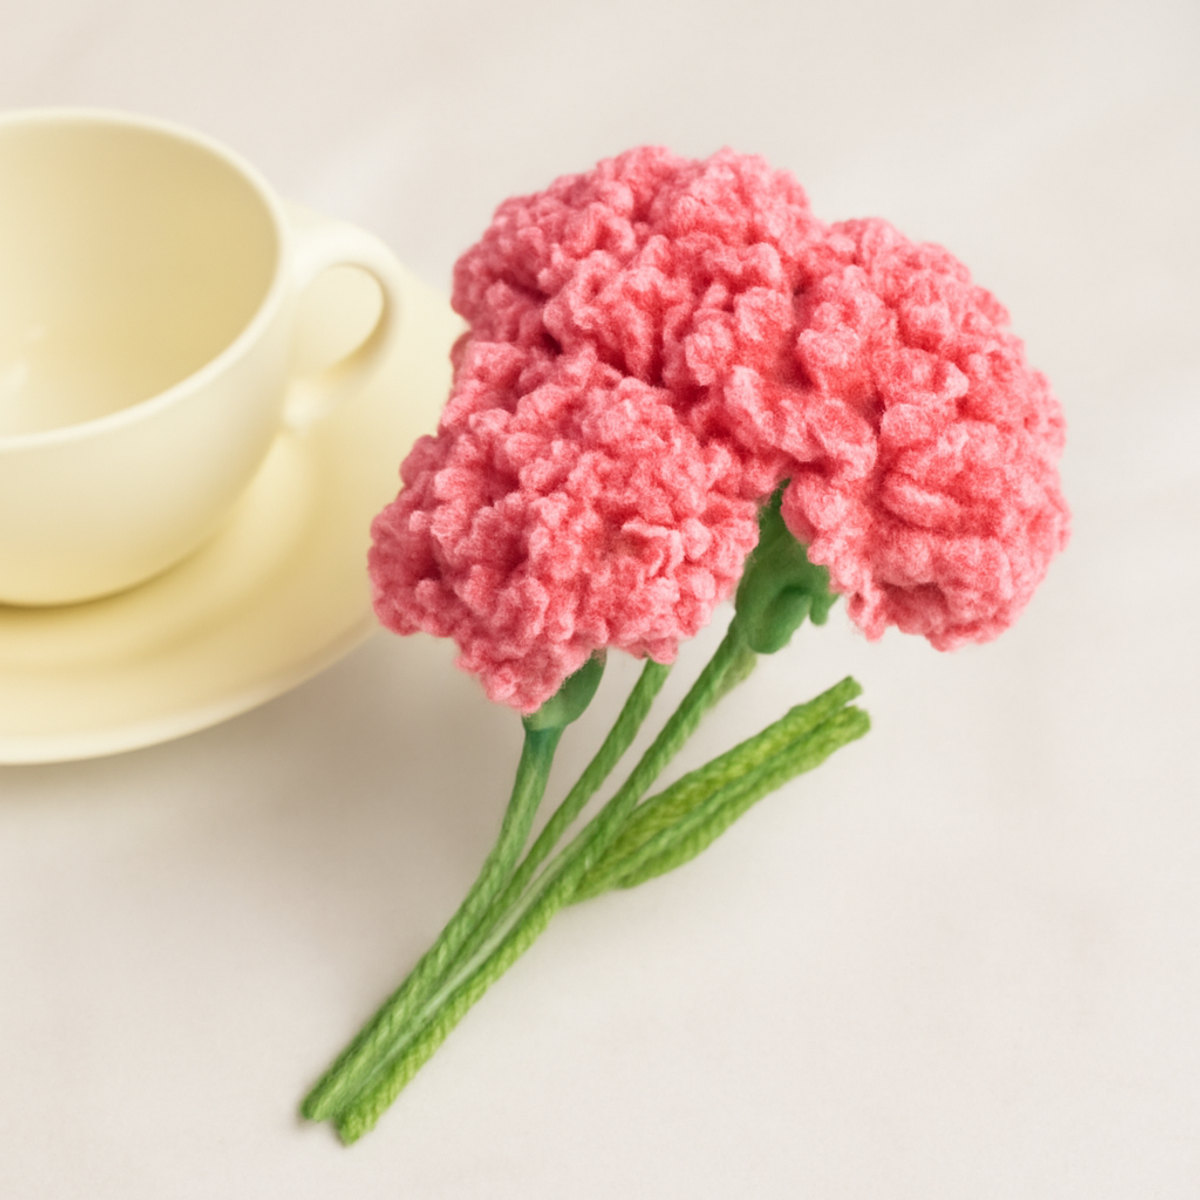
Charming Crochet Carnations: Aesthetic Flower Tutorial

September 1, 2026 by Publisher Leave a Comment

Charming Crochet Carnations: Aesthetic Flower Tutorial

Tucked away in the heart of spring, the delicate charm of crochet carnations beckons us to celebrate the beauty of handmade elegance. As I sit here with my favorite soft pink yarn, I'm thrilled to dive into this intermediate pattern that's perfect for adding a touch of everlasting beauty to your home. With these crochet carnations, you can customize colors to craft a unique bouquet that reflects your personal style, making them not only ideal for home décor but also a thoughtful, wilting-free gift for loved ones. Plus, their lovely, soft drape and fluffy textures give each flower a lifelike feel that truly brings your creations to life. Are you ready to grab your hook and create your own bouquet of beautiful blossoms? Let's get stitching!

Charming Crochet Carnations Materials & Tools

  • Yarn

    • DK or Sport Weight Yarn – Soft pink for petals and bright green for stems; you'll need approximately 100-150 yards, depending on how many flowers you create.
  • Tools & Notions

    • 3.5mm to 4.5mm (E to 7) Crochet Hook – Perfect for achieving the intricate textures needed in your crochet carnations.
    • Glue Gun – Useful for securing the petals to the stems during assembly.
    • Floral Wire – Essential for creating sturdy stems to your flowers.
    • Tapestry Needle – For weaving in ends and finishing touches to your lovely carnations.

Enjoy creating your beautiful, everlasting crochet carnations!

Why Make Crochet Carnations?

Endless Customization: With this project, you can mix and match colors, creating a bouquet that truly represents your aesthetic. Intricate Texture: The combination of various stitches means each flower has a unique look and feel, ensuring every creation is one-of-a-kind. Durable Beauty: Unlike real flowers, these crochet carnations won’t wilt, offering a lasting decoration for your home. Perfect for Gifting: They make thoughtful gifts that add a personal touch without the worry of maintenance. Dive into crafting and enjoy the therapeutic joy of creating with yarn!

Gauge & Sizing Notes

Don't skip the gauge swatch! Checking your tension is crucial for achieving beautiful crochet carnations that bloom to your desired size. A good rule of thumb for this project is to aim for a tension of approximately 4×4 inches (10×10 cm), which typically translates to around 12 double crochets by 10 rows, but gauge can vary based on personal crocheting style. If you wish to make your flowers larger, consider increasing your starting chain or rounds in multiples of 6. If your tension doesn't match the sample, don’t worry! Simply adjust your hook size — going up a size can help if your swatch is too small. Happy crocheting!

Step-by-Step Pattern for Charming Crochet Carnations

Row 1: Creating the Flower Centre
Start by making a magic ring. Ch 3 (counts as first dc), then work 11 dc into the center (12 dc total). Pull the magic ring tight to close. You should see a nice round center that is slightly rounded. Join with a sl st to the top of the initial ch-3 to complete the round.

Round 2: Forming Petals
Ch 3 (counts as first dc), then make 1 dc in the same st, followed by 2 dc in each st around for additional fluff (24 dc total). Your work should start to widen and create a fuller shape. Join with a sl st to the top of the beginning ch-3.

Row 3: Shaping the Petals
Ch 1, 1 sc in next st, 2 hdc in the next st, repeat from * to * around. This creates a textured petal effect. You should have a distinct difference between the base and the petals, with a total of 36 sts at the end of this round. Join with a sl st in the first sc.

Row 4: Adding Sweetness to the Petals
Ch 1, 1 sc in next 2 sts, 2 dc in the next st, repeat from * to * around. This will enhance the bloom of your crochet carnations. Keep an eye on the flower's curve as it should now look rounded and voluminous, totaling 48 sts. Join with a sl st in the first sc.

Row 5: Creating Depth
Ch 1, 1 sc in next 3 sts, 2 hdc in the next st, repeat from * to * around, signaling the last round to accentuate the floral design further. Visualize the flower blooming, with 60 sts established by the end. Join with a sl st into the first sc.

Step 6: Building the Stem
Switch to green yarn. Ch 10 to begin. In the 2nd ch from the hook, work 1 sc in each ch (9 sc total). Your stem should be firm yet slightly flexible. To shape it, you can use floral wire to help provide stability, securing it at the base of the flower.

Step 7: Attaching the Flower to the Stem
Using your glue gun, carefully affix the flower head to the top of the stem, ensuring it is centered well. Allow to cool completely for a secure bind. The transition from flower to stem should feel seamless, presenting a lovely charm.

Step 8: Final Touches
Weave in any loose ends using your tapestry needle for a clean finish. Block your flowers gently to enhance the petal shapes and give a lifelike appearance. Now your crochet carnations are ready to brighten up your home or be gifted to loved ones!

Crochet Carnations Variations

Embrace your creativity with these delightful twists that will make your crochet carnations even more special!

  • Color Combinations: Experiment with shades of pink, white, or even vibrant purples to craft a unique bouquet that reflects your personal style.

  • Yarn Weight Switch: Use chunky yarn for oversized flowers. This change adds an eye-catching pop, perfect for statement pieces in your décor.

  • Flower Size Adjustment: Different hook sizes or yarn weights can create a lovely mix of flower sizes. Imagine a blooming garden of extraordinary perspectives!

  • Embellished Centers: Add beads or sequins to the centers of your flowers for an extra dash of charm and personality. These little touches can tell a story, making each flower uniquely yours!

  • Fringed Petals: Create a whimsical look by adding fringe to the edges of the petals for texture. This playful detail elevates your crochet carnations to a fun new level.

  • Lush Borders: Incorporate a delicate border around the flowers for added definition. This finishing touch enhances the overall design, making your creations stand out beautifully.

  • Mixed Fiber Choices: Try cotton yarn for a fresh and airy feeling or acrylic for added durability. Each fiber brings its own character, enriching your crochets’ charm.

  • Staggered Heights: Assemble flowers at different heights on your stems for a more dynamic arrangement. This adds a sense of movement, giving life to your bouquet.

Expert Tips for Crochet Carnations

  • Check Your Tension: Always ensure your tension is consistent; tight stitches can limit the flexibility and fullness of your crochet carnations' petals.

  • Use a Stitch Marker: Mark your rounds with a stitch marker to help keep track of your stitch counts. This is especially helpful during the intricate petal phase.

  • Lightly Block for Shape: After completion, gently block your flowers to open up the petals, enhancing their lifelike appearance and texture.

  • Secure Loose Ends: Weave in all loose ends neatly to ensure a polished finish, preventing any unraveling and maintaining the beauty of your crochet carnations.

  • Count Carefully: Be vigilant when counting stitches to avoid common mistakes, like losing count. Using a tally or marker can help maintain accuracy throughout the project.

How to Wash and Care for Your Crochet Carnations

Machine Washing: Always wash your crochet carnations in cold water on a gentle cycle to prevent any potential felting or pilling. Consider placing them in a mesh laundry bag for added protection.

Hand Washing: If desired, gently hand wash your crochet carnations in cold water with mild detergent. Swirl them carefully without agitating to maintain their shape and texture.

Drying/Blocking: Lay your crochet carnations flat on a clean towel to air dry. Avoid hanging to prevent distortion of their lovely, fluffy petals. Lightly block them to enhance their shape as needed.

Storage: Store your beautiful crochet carnations in a cool, dry place. Keep them out of direct sunlight to preserve their colors and maintain their aesthetic charm throughout the seasons.

What to Pair with Charming Crochet Carnations?

As you bask in the joy of creating these vibrant flowers, let’s explore delightful projects to complement your crochet journey.

  • Cozy Crochet Vase: A perfect home for your carnations, this soft, textured vase enhances the beauty of your bouquet.
  • Floral Table Runner: Crochet a delicate runner to showcase your carnations, creating an inviting space for gatherings or quiet mornings.
  • Charming Keychains: Transform scrap yarn into tiny floral keychains, making cheerful gifts or cozy accessories for your everyday essentials.
  • Crochet Napkin Rings: Add elegance to your dining table with matching napkin rings that echo the airy beauty of your crochet carnations.
  • Floral Hair Accessories: Create delightful hair clips or headbands adorned with mini crochet blossoms, turning everyday wear into an artistic statement.

Charming Crochet Carnations FAQs

Can I use a different type of yarn for my crochet carnations?
Absolutely! While the pattern specifies DK or sport weight yarn, you can certainly experiment with different fibers. Just keep in mind that a thicker yarn may result in larger flowers, and be sure to adjust your hook size accordingly to maintain the right tension.

How can I make my crochet carnations bigger or smaller?
If you want to adjust the size of your flowers, consider using a larger hook or a thicker yarn. Conversely, a smaller hook or lighter yarn will create smaller flowers. Another option is to modify your stitch count slightly; just be sure to keep your gauge in mind!

Why is my work curling up while crocheting?
Don't panic! Curling is often caused by tight tension or an incorrect stitch count. I recommend checking your tension and making sure your stitches are uniform. If you're following along and still see curling, you might consider blocking your flowers once they're finished to help them lay flat.

What size crochet hook should I use for this project?
A 3.5mm to 4.5mm (E to 7) crochet hook works best for these crochet carnations. However, feel free to adjust slightly depending on your tension and whether you prefer a looser or tighter fabric!

I dropped a stitch while crocheting—how do I fix it?
It's an easy fix! Simply identify where you've dropped the stitch, undo the working yarn back to that point, and carefully reinsert the hook into the correct stitch to continue your pattern. If it’s tricky, use a tapestry needle to help pull the yarn back through!

Can I add embellishments to my crochet carnations?
Of course! Adding beads or even different yarns for the flower centers can enhance the beauty of your crochet carnations. It's a fantastic way to personalize each bloom and make your bouquet uniquely yours!

Filed Under: Uncategorized

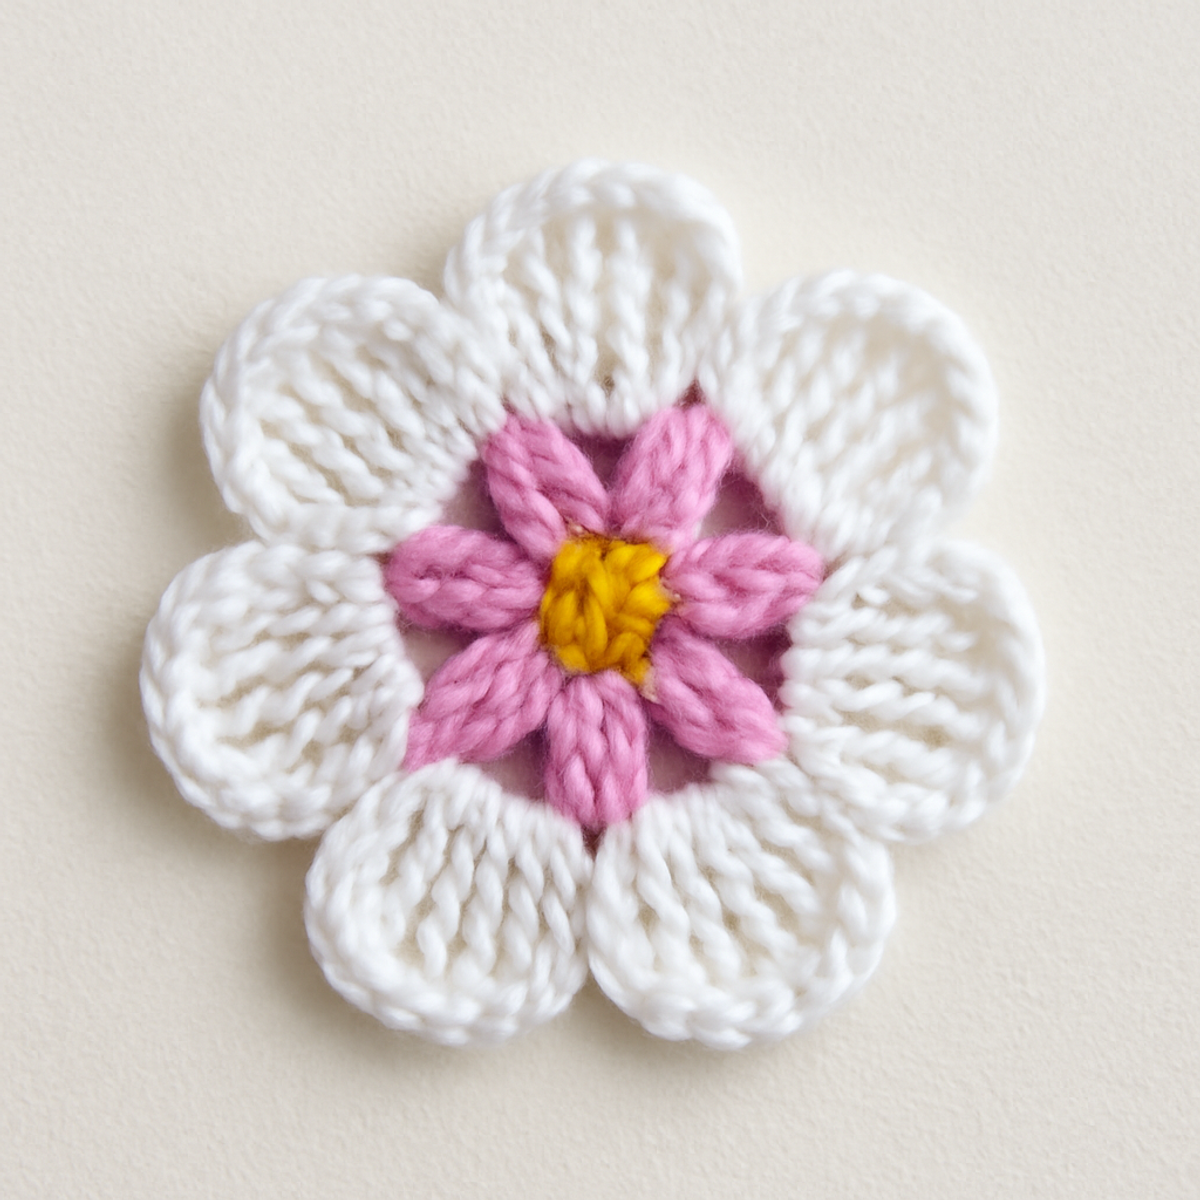
Whimsical Crochet Flowers: Easy Motif Tutorial for Beginners

September 1, 2026 by Publisher Leave a Comment

Whimsical Crochet Flowers: Easy Motif Tutorial for Beginners

There’s something magical about transforming a simple yarn into enchanting crochet flowers that burst with life and color! With the “Easy Crochet Flower Motif,” you'll find yourself creating charming floral designs that not only look stunning but are also remarkably quick to make. These delightful crochet flowers are a fantastic way to add a whimsical and romantic touch to your hats, bags, or home decor, allowing you to express your creativity with ease. Plus, incorporating different colors into your flowers means endless customization possibilities, which every crafter loves. Whether you’re just starting out or looking to enhance your skills, these motifs promise joy and satisfaction in your stitching journey. So, are you ready to bring some floral flair to your next project? Let's get started on those delightful crochet flowers!

Easy Crochet Flowers Materials & Tools

  • Light Worsted Weight Yarn – Choose 20-30 yards of cotton or a cotton-blend yarn to create perfect crochet flowers.
  • 4.0mm (G/6) Hook – This size is ideal for achieving defined stitches in your whimsical designs.
  • Yarn Needle – Essential for weaving in ends to give your crochet flowers a polished finish.
  • Optional Buttons – Add these to the centers for a delightful, decorative touch to your crochet flowers.

Why Crochet Flowers Are a Must-Try?

Quick & Enjoyable: These adorable motifs are designed for rapid production, allowing you to crochet several flowers in no time.

Versatile Embellishments: Perfect for hats, bags, or home decor, their whimsical design adds a charming touch to any project.

Beginner-Friendly: The straightforward stitches make this pattern accessible, whether you’re new to crochet or seeking something simple and satisfying.

Customizable Colors: Play with color combinations to personalize each flower, giving you endless opportunities for creativity.

Unique Texture: The soft fluffiness of cotton yarn brings a delightful dimension to your flowers, enhancing their visual appeal.

Dive into crochet flowers and experience the joy they bring to your creations!

Gauge & Sizing Notes

Don't skip the gauge swatch! Ensuring you check your crochet gauge is crucial when crafting your crochet flowers, as it guarantees that your motifs will turn out beautifully and proportionally on your projects. While an exact measurement for these flowers may vary, a good guideline is that a 4×4 inch (10×10 cm) square should yield a tension of approximately 14 double crochets by 8 rows. To adjust the size of your crochet flowers, simply increase your starting chain in multiples of 6 to make them larger or decrease the chains to create petite versions. If your swatch is smaller than desired, consider moving up to a larger hook size to achieve that whimsical look you’re striving for!

Step-by-Step Pattern for Easy Crochet Flower Motif

Row 1: Create the Center
Start by making a magic ring. Crochet 12 double crochets (dc) into the ring, then tighten to close it. This forms the central circle of your flower. Slip stitch (sl st) into the first dc to join the round. Your work should be shaped into a small, round disc (12 sts).

Row 2: Add Pink Layer
Change yarn color to your desired shade for the flower layer. Chain 1, then work 1 single crochet (sc) in the same stitch, followed by 1 sc in each of the next 3 dc. Chain 2; repeat around the circle. Join with a sl st in the first sc. You should have small petals forming (12 sts total, with extra chains).

Row 3: Start the Petals
To form the petals, chain 5. In the second chain from the hook, work 1 sc, followed by 1 half double crochet (hdc) in the next chain, and finish with 2 dc in the last chain. Slip stitch into the base to attach the petal. Repeat this process for the remaining dc around the circle, creating multiple petals. Your flower should begin to appear dimensional.

Row 4: Complete Petals
Continue working the petals until you have a total of 6 or 8, evenly spaced around the center. Ensure each petal is securely attached and spaced evenly. Your petal edges may flare out gently now, giving the flower its whimsical shape.

Step 5: Final Assembly
To secure everything, sl st in the base of the first petal, then weave in any loose ends with your yarn needle. Make sure the flower maintains its shape—this is your delightful crochet flower! The petals should now have a light, fluffy look, measuring approximately 4-5 inches in diameter.

Step 6: Blocking (Optional)
For a polished finish, lightly block your flower. Pin it to your desired shape on a flat surface and let it set. This step enhances the petal definition and gives your crochet flower a crisp appearance, ready for use as a decorative element in your projects.

Expert Tips for Crochet Flowers

  • Maintain Tension: Consistent tension is vital throughout your rows. Practice holding your yarn evenly to create beautiful, uniform petals.

  • Count Your Stitches: Carefully count each stitch and chain while forming petals; losing track can lead to uneven designs and frustration.

  • Secure Assembly: Ensure all pieces are securely joined to maintain the flower’s shape. Check each connection to prevent any loose petals!

  • Block for Definition: Don’t skip the blocking step! It enhances your flower’s shape and stitch definition, making your crochet flowers look their best.

  • Use Quality Yarn: Choose a good quality cotton or cotton-blend yarn for better drape and durability, enhancing the overall look of your floral creations.

crochet flowers: Variations & Substitutions

Explore the world of customization and let your creativity bloom! Every crocheter's journey can be made unique with these delightful variations to the flower motif.

  • Yarn Weight Swap: Use a heavier yarn for a bigger flower or a lighter sport-weight for a daintier look.
    Embrace the beauty of versatility! A change in weight not only alters size but also adds a unique flair to your projects.

  • Fiber Alternatives: Experiment with cotton blends or acrylic for different textures.
    Cotton offers softness and drape, while acrylic provides warmth and durability. Discover the delightful differences in how each fiber feels and looks!

  • Color Blocking: Combine multiple shades in one flower for a fun, vibrant effect.
    Visual surprises await as you transition from rich deep hues at the center to lively pastels at the tips. This technique gives each flower personality with just a few extra yarn balls!

  • Beaded Centers: Enhance your flowers by stitching in beads or buttons at the center.
    A touch of sparkle can elevate the whimsical quality of your motifs, transforming them into eye-catching embellishments with minimal effort.

  • Petal Shapes: Alter the length and fullness of your petals for a more unique flower design.
    Even small adjustments can yield breathtaking results as your flowers take on striking variations, adding character and charm to your crochet collection.

  • Fringe Accents: Add a delicate fringe to the edge of your petals for a playful twist.
    This fun technique can give your flowers an unexpected texture, making them truly stand out while remaining soft and elegant.

  • Size Adjustments: Change the number of stitches in your double crochets to create flowers of varying sizes.
    From petite to grand, imagine how your crochet flowers can fit different projects and themes beautifully—each size has a story to tell!

  • Color Gradients: Try a gradient effect by transitioning colors from center to tips of the flower.
    This stunning approach fills your blooms with depth and visual interest, making your crochet projects truly one-of-a-kind.

What to Pair with Easy Crochet Flower Motifs?

Crafting whimsical crochet flowers opens the door to a world of delightful pairings that elevate your projects to new heights.

  • Floral Headband: Create a charming headband adorned with these flowers, perfect for spring outings or fun festivals. This versatile accessory brings a touch of romance to any hairstyle.

  • Bag Embellishments: Sew or glue your crochet flowers onto tote bags or purses for an extra pop of color. It's a delightful way to personalize your accessories, making them uniquely yours.

  • Matching Hair Clips: Fashion little clips featuring your crochet flowers for a whimsical hair accessory duo. These sweet additions are perfect for kids or adults looking to brighten their look.

  • Flower Coasters: Use these motifs to make decorative coasters that brighten your coffee table. They not only add a splash of color but also protect your surfaces with their fun charm.

  • Curtain Tiebacks: Stitch a few flower motifs together to create lovely tiebacks for your curtains. They can soften your decor and add a playful touch to your home.

Every pairing enhances the beauty of your crochet flowers, allowing your creativity to bloom even further with every stitch!

Care Instructions for Crochet Flowers

Washing: Gently hand wash your crochet flowers in cold water using a mild detergent to prevent any damage. Avoid agitation to keep them looking fresh and beautiful.

Drying/Blocking: Lay your flowers flat on a clean towel to dry, ensuring they maintain their shape. For a polished look, block them lightly to define the petals and enhance the overall design.

Storage: Store your crochet flowers in a dry, cool place, ideally in a breathable bag or box. Avoid crushing them, as this will help retain their soft and lovely texture.

Maintenance: To keep your crochet flowers vibrant, avoid direct sunlight during storage, and steam gently if they lose their shape over time.

Easy Crochet Flower Motif FAQs

Can I substitute yarn types when making crochet flowers?
Absolutely! While a light worsted weight cotton yarn is best for these flowers, you can substitute with acrylic or a cotton-blend. Just keep in mind that using a different fiber may affect the drape and texture, so choose something soft and not too heavy.

How do I make my crochet flowers bigger or smaller?
To size up your crochet flowers, simply increase the number of stitches in your rows or use a thicker yarn and larger hook. For a smaller version, decrease the number of stitches or opt for a lighter yarn paired with the recommended hook size. It’s a creative way to match your flowers to your projects!

Why is my crochet flower curling at the edges?
Don't panic! This is a common occurrence, especially with cotton yarn. Make sure you're following the stitch count accurately, as inconsistent tension can cause curling. Blocking your flower after completion will help it lay flat and enhance its shape beautifully.

What hook size should I use for these crochet flowers?
A 4.0 mm (G/6) crochet hook is recommended for achieving the defined stitches of these motifs. If you find your stitches are too tight or loose, you could adjust to a smaller or larger hook accordingly, but starting with a G/6 is ideal for beginners.

How do I fix dropped stitches in my crochet flower?
It's an easy fix! Simply grab your yarn needle and thread it through the dropped stitch, gently tugging it to pull it back up to the correct row. Then, make sure to secure the stitch with a little extra yarn at the base to prevent future drops. It's all part of the crafty journey!

What if my finished flower isn’t as fluffy as I wanted?
If your crochet flowers lack that lovely fluffiness, first check your yarn type; a good quality cotton or cotton-blend will help. Also, ensure that your flower is well-blocked after completing it. Give it a gentle stretch to enhance the shape and achieve that delightful texture.

Filed Under: Uncategorized

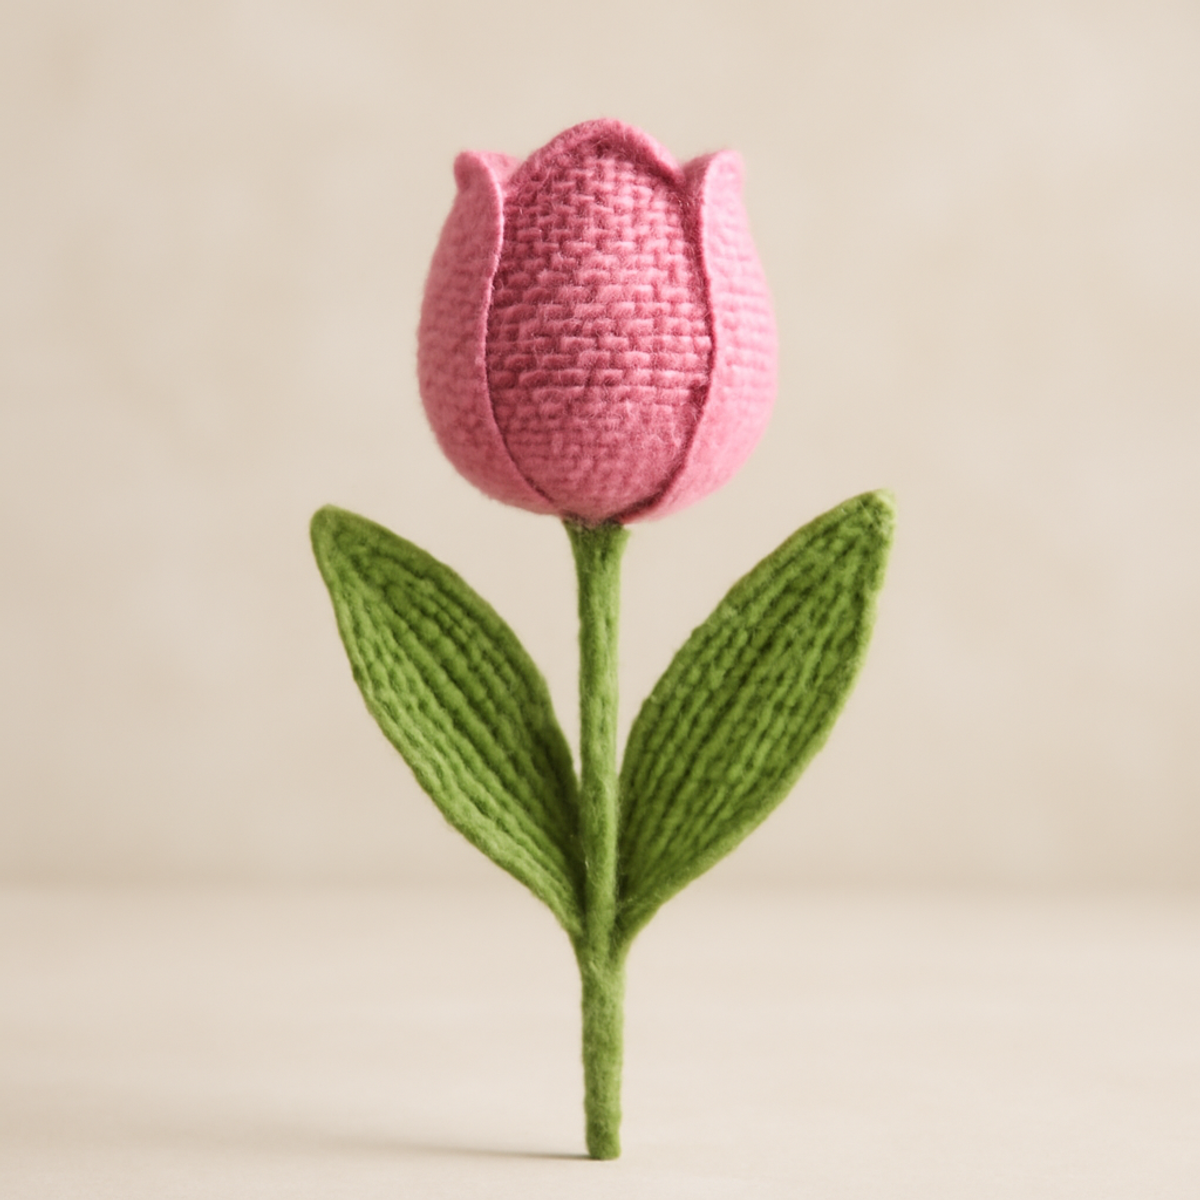
Charming Crochet Tulip Pattern: A Cozy Floral Delight

September 1, 2026 by Publisher Leave a Comment

Charming Crochet Tulip Pattern: A Cozy Floral Delight

As I sat on my cozy couch, yarn in hand, I found joy in transforming simple strands into something captivating. The crochet tulip pattern beckons, inviting crafters to indulge in the art of floral creation while learning essential skills along the way. This project isn’t just another flower; it’s a playful yet elegant way to brighten up your decor with personalized touches. One of the highlights is how easy it is to customize; you can mix and match your favorite colors for the petals, resulting in a unique tulip that reflects your style. Plus, this pattern is perfect for all skill levels, making it a delightful blend of creativity and learning. Grab your hook, and let’s dive into crafting a charming crochet tulip that will bring a touch of beauty to any setting!

Charming Crochet Tulip Materials & Tools

  • Yarn

    • Worsted Weight Yarn – Approximately 100-150 yards of pink yarn for petals and 50-75 yards of green yarn for leaves and stem; suitable for your vibrant crochet tulip pattern.
    • Fiber Type – Acrylic or cotton yarn works beautifully for a soft, structured finish.
  • Tools & Notions

    • 2.5mm (B-1) Crochet Hook – Ideal for achieving the fine stitches required for this project.
    • Yarn Needle – Essential for assembly and securely fastening ends.
    • Scissors – For trimming yarn as needed during your crafting journey.
    • Floral Wire or Pipe Cleaner – Provides structure to your tulip, enhancing its shape.
    • Stitch Markers – Helpful for tracking rows as you create your lovely flower.
    • Optional Fiberfill – If you choose to make a plush version of your crochet tulip, this will add a delightful softness.

Why Choose This Crochet Tulip Pattern?

Vibrant Aesthetic: The charming design of this crochet tulip adds a touch of elegance to any home decor, making it a perfect centerpiece or accent piece.

Easy Customization: With options for various colors, you can tailor your tulip to match personal style or seasonal themes, ensuring each flower is uniquely yours.

Skill Development: This pattern is great for beginners and intermediate crafters alike, enhancing important skills like stitch management and assembly.

Quick & Rewarding: Spend a few hours transforming yarn into a delightful flower, providing instant satisfaction as your creation comes to life.

Cozy Texture: The use of worsted weight yarn results in soft yet sturdy petals that hold their shape beautifully, making your crochet tulip both inviting and durable.

Gauge & Sizing Notes

Don't skip your tension swatch! Checking your gauge is crucial when working on the crochet tulip pattern, as it ensures your blooms come out beautifully shaped and proportional. A general guideline for this project is to aim for a gauge of 4×4 inches (10×10 cm), which usually translates to about 14 double crochets by 8 rows. To adjust the size of your tulip, you can increase your starting chain in multiples of 2 if you wish to make a larger flower; conversely, to reduce size, simply decrease your chain. If your tension doesn't match, don't worry! If your swatch is too small, try using a larger hook size for a better fit. Happy crocheting!

Step-by-Step Pattern for Charming Crochet Tulip

Row 1: Creating the Petal Base
Chain 15 plus 1 turning chain. In the second chain from the hook, work 1 sc, then 1 hdc in the next chain. In the next chain, work 3 dc for the petal shape, followed by 1 hdc and 1 sc in the last chain. Turn your work and repeat the above stitches on the second side (12 sts).

Row 2: Shaping the Petal
For the second side of the petal, start with 1 sc, then 1 hdc in the next stitch. Work 3 dc to create the curve, followed by 1 hdc and 1 sc before connecting both ends. Use a sl st in the top chain to close the petal, then fasten off and weave in the ends. (Total: 2 petals).

Row 3: Make More Petals
Repeat Rows 1 and 2 until you have a total of 6 petals for your crochet tulip pattern. Each petal should have a gentle curve, feeling smooth and somewhat structured. Arrange the petals to ensure they are symmetrical and create a lovely shape.

Step 4: Assembling the Flower
Take all 6 petals and overlap them slightly to form the tulip's bloom. Using a yarn needle and working from the base, stitch the petals together securely, making sure the tops are gathered closely for a rounded finish. (Your flower will start to take shape at this point.)

Step 5: Closing the Petal Top
Once the petals are securely stitched together, close the top edges by sewing in and out of the stitches on the top row. This will help stabilize the flower. If you desire a plush look, add a small amount of fiberfill now, gently stuffing the petals to create a fuller bloom.

Step 6: Creating the Leaves
To make the leaves, chain 10. In the third chain from the hook, work 1 hdc, 1 dc in the next chain, then 1 hdc. For the remaining chains, work 1 sc and fasten off. Shape the leaf by folding the ends slightly toward the center, securing the shape as you go.

Step 7: Attaching Leaves
Position the leaves around the base of your assembled flower, slightly overlapping them for a natural appearance. Stitch them in place securely using your yarn needle to give your crochet tulip pattern a cohesive and complete look. The leaves should spread out elegantly, framing the bloom beautifully.

Step 8: Final Touches
Trim any visible yarn ends, ensuring a tidy finish for your crochet tulip. Use a floral wire or pipe cleaner as a stem to enhance the flower's structure. Insert the wire into the base of the flower, and your charming crochet tulip is now ready to brighten any space!

What to Pair with Charming Crochet Tulip

As you delight in crafting your vibrant tulip, consider enhancing your space with a matching project that beautifully complements these blossoms.

  • Crochet Leaf Coasters: Create charming coasters that echo the tulip’s leaves, adding a cohesive and playful touch to your decor. These coasters can be in varying shades of green, mirroring the leaves of your tulips while also protecting your surfaces.

  • Colorful Flower Pot Cover: Whip up a cozy, colorful cover for your favorite plant pot, harmonizing with the vibrant petals of your tulips. This project allows for delightful customization, letting your personality shine through in a flawless garden display.

  • Floral Wall Hanging: Design a stunning wall hanging using your crochet tulip pattern alongside additional blooms or greenery. This artistic flair will bring warmth and whimsy to any room, creating an enchanting focal point for your space.

  • Crochet Spring Headband: Use leftover yarn to create a playful headband that features a tulip-inspired design. This accessory not only compliments your floral theme but also brings a touch of whimsy to your outfit.

  • Matching Crochet Baskets: Craft lovely baskets to store your yarn or craft supplies. By choosing colors that reflect your tulip petals and leaves, you'll keep your crafting space organized while keeping the floral aesthetic alive.

Crochet Tulip Pattern Variations

Embrace the joy of personalization with these delightful variations for your crochet tulip pattern!

  • Color Combinations: Mix contrasting colors for petals like bright yellow and deep purple to create a vibrant garden feel. Play around with seasonal palettes—think pastel hues for spring or warm tones for autumn!

  • Glossy Yarns: Opt for metallic or glossy yarn to give your tulip a sophisticated shimmer. This twist adds elegance, perfect for special occasions or decorative pieces.

  • Yarn Weight Swap: Use a bulkier yarn to make a larger tulip, enhancing its presence as a statement piece. A thicker yarn offers a cozy, plush look, turning your flower into an eye-catching focal point.

  • Variegated Leaves: Try variegated yarn for your leaves to lend a whimsical vibe. The subtle color transitions will create an enchanting contrast against the solid petals.

  • Textured Edges: Add a playful edge by incorporating a scalloped stitch around the top of the petals. This modification introduces a lovely texture and visual interest, perfect for those who adore unique details.

  • Add a Pom-Pom: Finish with a charming pom-pom at the center of the tulip to add a fun touch. This playful embellishment can echo the colors of the petals, creating a delightful pop!

  • Fringed Leaves: For an adventurous twist, create fringes along the edges of the leaves. This technique adds a bohemian flair, setting your tulip apart in any floral display.

  • Size Adjustments: Play with hook sizes to adjust the tulip's overall height—create mini versions for table centerpieces or grander blooms for floor arrangements. Let your crochet tulip journey reflect your imagination!

Expert Tips for Your Crochet Tulip

  • Manage Your Tension: Consistent tension is key for even petals. If they feel too loose, consider switching to a smaller hook size for a tighter finish.

  • Count Carefully: Losing count while crocheting petals can lead to asymmetry. Keep a stitch marker handy or count out loud to maintain uniformity.

  • Block Your Petals: Lightly block your finished petals to set their shape. This helps them maintain their beautiful curves and adds a polished look to your crochet tulip pattern.

  • Secure Finishes: When assembling, ensure your yarn ends are fastened tightly. This prevents unraveling and maintains the integrity of your delicate flower structure.

  • Practice Patience: Take your time with each petal and leaf. Rushing may lead to mistakes; enjoy the process and let your creativity blossom!

How to Wash and Care for Your Crochet Tulip

Hand Washing: Gently hand wash your crochet tulip in cold water with mild detergent to prevent damage and maintain its shape. Avoid wringing to keep the petals from stretching.

Drying/Blocking: Lay the crochet tulip flat on a clean, dry towel to air dry. For optimal shape, lightly block the petals by adjusting their curves while damp.

Storage: Store your finished crochet tulip in a cool, dry place, away from direct sunlight, to preserve its vibrant colors and prevent fading.

Avoiding Agitation: Never machine wash or agitate your crochet tulip; this could lead to felting or pilling, which detracts from its charming appearance.

Charming Crochet Tulip FAQs

Can I substitute different yarn types for my crochet tulip pattern?
Absolutely! While the pattern suggests worsted weight yarn, you can experiment with other types. If you opt for cotton instead of acrylic, you’ll get a different texture—smoother and a bit more structured. Just be sure to check your gauge, as this will impact the final size of your tulip.

How can I make my crochet tulip pattern larger or smaller?
If you'd like to adjust the size, consider using a thicker yarn and a larger hook for a more substantial tulip. Alternatively, using a finer yarn and a smaller hook will give you a daintier version. Remember to maintain the same stitch count for the petals to keep the design consistent!

Why is my crochet tulip curling at the edges?
Don’t panic! Curling edges often happen when the tension is too loose. If this is the case, switching to a smaller hook size can help create a tighter fabric. You might also try lightly blocking your petals by adjusting their shape while damp to help flatten them.

How do I fix dropped stitches in my crochet tulip?
It’s an easy fix! Just pull the working yarn back to the dropped stitch, lift it quickly to make sure all loops are picked up again. Use your crochet hook to ensure each stitch is secure, and if you're unsure, don’t hesitate to give it another go—practice makes perfect!

What hook size should I use for my crochet tulip pattern?
For best results, a 2.5mm (B-1) crochet hook is recommended to achieve the defined stitches needed for your tulip's delicate petals. If you find your stitches too tight or too loose, adjust your hook size accordingly for a better fit.

How do I keep my crochet tulip looking neat and structured?
Maintaining even tension while crocheting is key! Carefully count your stitches for each petal to ensure uniformity. When assembling, make sure to fasten all ends securely. These small details create a well-structured, beautifully crafted flower!

Filed Under: Uncategorized

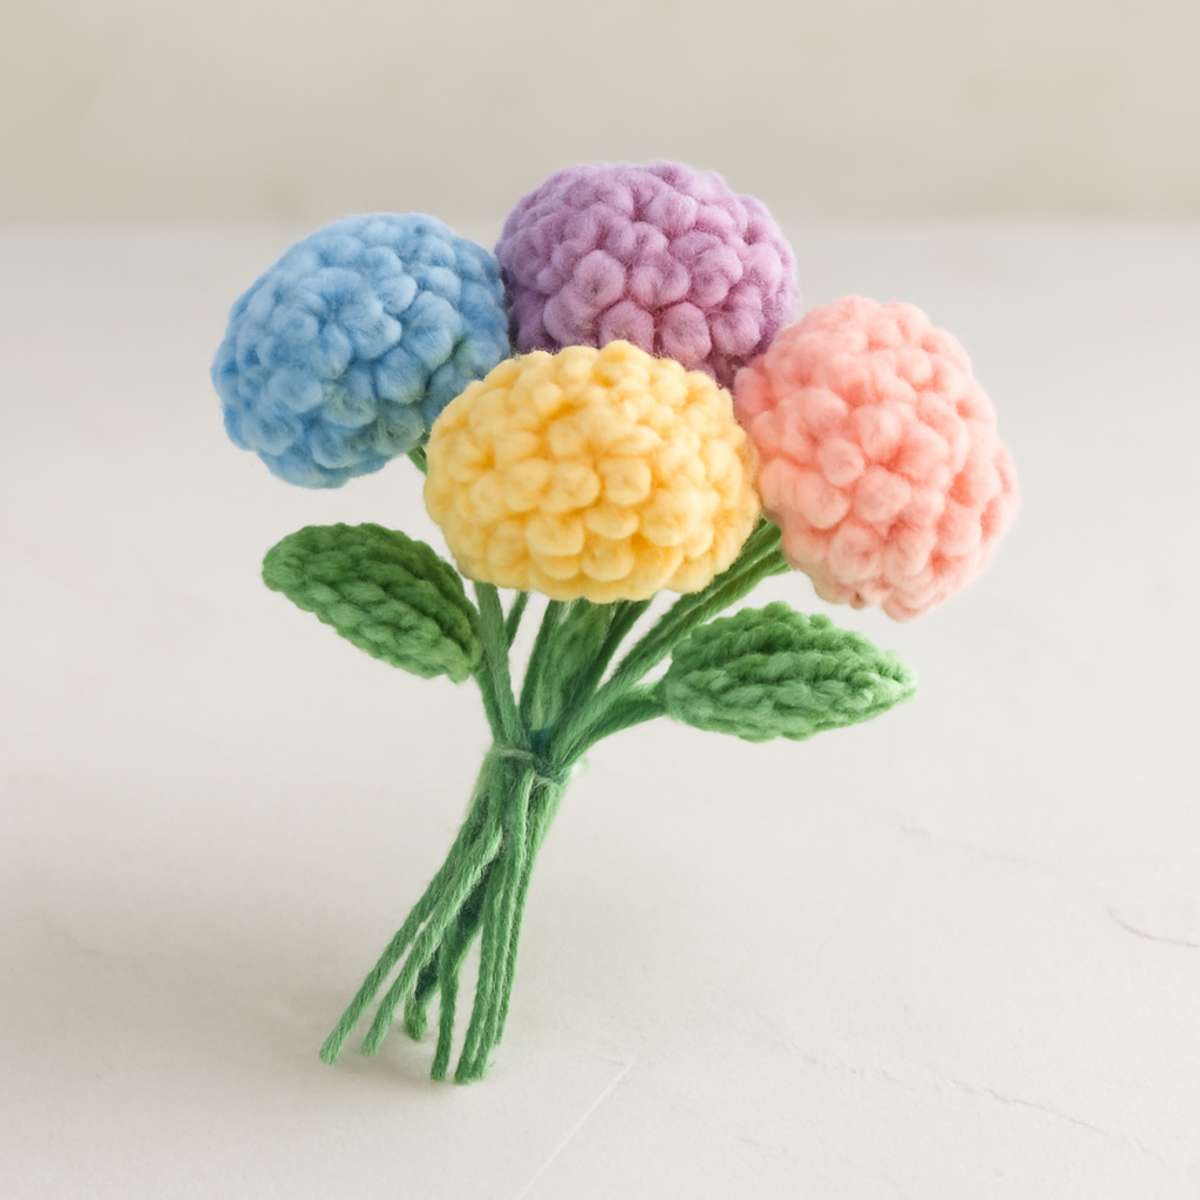
Vibrant Crochet Pompon Flowers for Spring Decor Bliss

September 1, 2026 by Publisher Leave a Comment

Vibrant Crochet Pompon Flowers for Spring Decor Bliss

Spring is in the air, and what better way to celebrate the season than with vibrant crochet pompon flowers that infuse your home with cheerful charm? These delightful blooms not only add a splash of color to your decor but also make for thoughtful, handmade gifts that will warm hearts. With their fluffy texture and the playful dance of pastel shades, crafting these flowers is a wonderful way to hone your crochet skills while creating something joyous. Plus, they work up quickly, making them perfect for last-minute decorations or gifts. Join me as we embark on this blooming adventure and fill your space with the beauty of handcrafted florals!

Crochet Pompon Flowers Materials & Tools

  • Medium Weight Yarn – Approximately 150-200 yards of acrylic or cotton in cheerful pastel colors like blue, yellow, pink, lavender, and green work beautifully for your crochet pompon flowers.
  • 4.0mm (G/6) Hook – This size is perfect for achieving the necessary stitch density to create that fluffy pompon texture.
  • Stitch Markers – Use these to track your rounds and maintain your flower's shapely structure as you crochet.
  • Scissors – Keep a good pair handy to snip yarn ends and keep your project tidy.
  • Yarn Needle – You'll need this for weaving in ends and securely assembling the components of your crochet pompon flowers.

Why Crochet Pompon Flowers Will Delight You

Bursting with color, these crochet pompon flowers are a vibrant addition to any spring decor, instantly brightening your space. Easy to create, they require basic skills but yield stunning results, making them perfect for intermediate crafters. Fluffy textures add a tactile charm that'll have your friends reaching out to touch them. Versatile colors allow you to mix and match pastel shades, letting you express your creativity freely. Quick to make, enjoy the satisfaction of a finished project in just a few hours, whether it’s for gifting or sprucing up your home!

Gauge & Sizing Notes

Don't skip the gauge swatch! Checking your crochet gauge is essential for these crochet pompon flowers, as the right tension will ensure that your blooms maintain their lovely fluffiness and correct size. A good starting point is to make a tension swatch measuring 4×4 inches (10×10 cm) in your chosen yarn, with an estimated count of 12 double crochets and 8 rows. If you'd like to make your flowers larger, consider increasing your starting chain by multiples of 4 for the petals. Conversely, if you find your swatch too small, simply switch to a larger hook size to achieve the desired measurements!

Step-by-Step Pattern for Crochet Pompon Flowers

Row 1: Creating the Flower Base
Start by making a slip knot, ch 4, and join with a sl st to form a ring. Ch 2 (counts as first dc), then work 11 dc into the ring for a total of 12 sts. Pull the tail to close the ring tightly, and your work should appear like a small circle.

Row 2: Shaping the Petals
Ch 2, then into the same st as ch 2, work 2 dc (this is your first petal). Skip the next dc, and in the following dc, work (2 dc, ch 2, sl st) to form a petal. Repeat from * to * around for a total of 6 petals. At the end of the round, there should be 6 petals flaring out.

Row 3: Creating the Pompon Texture
To create a fluffy texture for your crochet pompon flowers, join your yarn with a sl st to the ch-2 space of any petal. Work (5 dc, ch 2, sl st) in the same space. Repeat this in each ch-2 space around. Your flowers should start to form a fuller, round shape due to the addition of petals' texture.

Row 4: Finishing Up the Bloom
After completing all petals, join with a sl st to the top of the first ch-2. Fasten off and leave a long tail for assembly. Gently fluff the flower by separating the petals and shaping them for a rounded look, ensuring your crochet pompon flower has dimension and pops with color.

Step 5: Preparing the Leaves
For each leaf, ch 12, then sc in the 2nd ch from the hook and in the next 3 ch. Hdc in the next 5 ch, then dc in the last 3 ch. This will create a leaf shape. Fasten off, leaving a long tail for attaching. Repeat to make at least 2 leaves for each flower, allowing them to give contrast to the crochet pompon flowers.

Step 6: Crafting the Stems
To create the stems, ch 30 or your desired length. Work sc into each ch until you reach the end, keeping a consistent tension. This slender stem will provide the necessary support for each flower. Fasten off and weave in your ends. The stems should be around 6–8 inches to give a beautiful height to your blossoms.

Step 7: Assembly of Flowers
Attach the blooms to the stems by using the long tails from the flowers. Wrap the tails securely around the top of each stem, ensuring they are tightly fastened. You may wish to use additional yarn to reinforce where the blooms meet the stems, making sure that your crochet pompon flowers stay secure and beautiful in their display.

Step 8: Final Touches
Once all components are assembled, take a moment to arrange the flowers and leaves as desired. You can tweak the placement for a natural look. If desired, carefully block your crochet pompon flowers to enhance their structure by soaking and shaping them before letting them dry. Enjoy your colorful, chic arrangement!

Expert Tips for Crochet Pompon Flowers

  • Even Tension: Maintain a consistent tension throughout your stitches to ensure that your crochet pompon flowers come out with a uniform texture and that delightful fluffy look.

  • Count Carefully: Be diligent in keeping track of your stitch counts, especially when creating petals and leaves. Losing count can lead to uneven flowers that may not resemble the pattern.

  • Secure Assembly: When attaching blooms to stems, reinforce their stability by wrapping the flower tails tightly. A few extra stitches can prevent blooms from wobbling or coming loose.

  • Soak and Block: If using cotton yarn, consider soaking and blocking your flowers after completing them. This technique enhances shape and firmness, elevating the final display of your crochet pompon flowers.

  • Tail Management: Don't forget to weave in all yarn ends securely. This final touch not only tidies up your project but also ensures durability and a polished look.

Crochet Pompon Flowers Variations

Feel free to let your creativity bloom by customizing your crochet pompon flowers for a truly personal touch!

  • Yarn Weight Changes: Experiment with lighter or heavier yarns to create mini or oversized flowers. Adjust your hook size accordingly for balance.
  • Color Combinations: Try using bold, rich colors for a striking floral display or soft muted tones for a cozy vibe. Seasonal palettes bring added charm!
  • Embellishments: Add beads or buttons in the center of each flower for a unique decorative flair. These little details can make your flowers stand out even more!
  • Metallic Threads: For a festive occasion, incorporate a sparkle yarn. It adds that touch of glam, making your crochet pompon flowers truly shine.
  • Fringed Edges: Add a pop of texture by incorporating fringe on the blooms or around the leaves. This can turn your flowers into a delightful focal point.
  • Different Leaf Shapes: Experiment with various leaf shapes to create diversity among your flowers. A wider leaf can give a bold contrast to the fluffy blooms.
  • Sizing Adjustments: By modifying the stitch count in your initial rounds, you can easily create flowers of varying sizes—stack them together for a layered look!
  • Textured Borders: Finish off your blooms with a simple shell or picot border around the edges. This adds a lovely finish and a bit of whimsy to each flower's shape.

What to Pair with Crochet Pompon Flowers?

Crafting vibrant crochet pompon flowers opens doors to delightful projects that can elevate your decor even further.

  • Cheerful Leafy Garland: Create a lovely garland adorned with leaves that perfectly complement the bright pompon flowers, bringing a feeling of spring to any room.

  • Whimsical Flower Pot Cozy: Wrap your favorite flower pot in a cozy, crocheted design. This pairing adds a touch of warmth to your blooms while emphasizing their cheerful, vibrant nature.

  • Colorful Pompon Coasters: Adorn your coffee table with cheerful coasters featuring mini pompon flowers, making your living space a vibrant oasis of color and texture.

  • Matching Crochet Flower Hair Clips: Craft charming hair clips using the same pompon flowers to spread joy not only in your home but also in your wardrobe.

  • Floral Wall Hanging: Embrace the beauty of your crochet pompon flowers by mounting them in a stunning wall display that celebrates their cheerful essence and brightens up your walls.

Each of these ideas beautifully complements your original crochet pompon flowers, creating a cohesive and inviting decor theme. Happy crafting!

Care Instructions for Crochet Pompon Flowers

  • Machine Washing: Use cold water on a gentle cycle for cleaning your crochet pompon flowers. Avoid agitation to prevent felting or damage to the fluffy texture.

  • Hand Washing: For extra care, hand wash in cold water with a mild detergent. Gently squeeze to remove dirt without twisting or scrubbing the item.

  • Drying/Blocking: Lay your flowers flat to dry, reshaping them as necessary. Blocking can enhance their form, so soak and pin down to maintain their gorgeous pompon shape.

  • Storage: Store your crochet pompon flowers in a cool, dry place, ideally in a breathable bag or container to protect them from dust without crushing their delicate shape. Enjoy your lovely crochet pompon flowers for seasons to come!

Crochet Pompon Flowers FAQs

Can I substitute yarn types for my crochet pompon flowers?
Absolutely! While a medium weight yarn (like worsted) is recommended for the delightful fluffiness, you can experiment with different fibers. If you prefer to use cotton for its durability, just keep in mind that it might result in a firmer texture. As always, check your gauge to ensure your flowers maintain their intended shape!

How can I adjust the size of my crochet pompon flowers?
Don’t worry! Making larger or smaller flowers is simple. If you want bigger blooms, consider using a heavier yarn (such as bulky) and adjusting your hook size accordingly. For smaller flowers, switch to a lighter yarn and a smaller hook. Just remember to keep an eye on your stitch counts!

Why is my crochet pompon flower curling at the edges?
Don't panic! Curling can occur if your tension is too tight or if you aren’t following the stitch counts accurately. Check your tension and try to relax your grip. If it's still curling after adjusting, soaking and blocking your finished flowers should help flatten them and enhance their shape.

What size crochet hook should I use for the crochet pompon flowers?
A 4.0 mm (G/6) crochet hook is recommended for achieving that lush pompon texture. If you decide to use a different yarn weight, feel free to adjust your hook size accordingly! For heavier yarn, a larger hook helps maintain the right stitch density.

How do I fix dropped stitches in my crochet pompon flowers?
It's an easy fix! Simply identify where the stitch was dropped and locate the last completed stitch. Reinsert your hook into that stitch and carefully pull the yarn through to bring your dropped stitch back into play. Keep your tension even as you continue crocheting to prevent future mishaps.

Can I add embellishments to my crochet pompon flowers?
Absolutely! Adding embellishments like buttons or beads can bring extra charm to your crochet pompon flowers. Just sew them securely in the center of your blooms after assembly to give them a unique touch, perfect for personalizing gifts or decorations!

Filed Under: Uncategorized

“Whimsical Crochet Bookmark with Strawberries & Daisies”

September 1, 2026 by Publisher Leave a Comment

"Whimsical Crochet Bookmark with Strawberries & Daisies"

There’s something magical about slipping into a cozy reading nook, a warm cup of tea in hand, and a beautiful crochet bookmark nestled between the pages of your favorite book. With my Charming Strawberry and Daisy Bookmark, you can add a delightful touch of whimsy to your reading routine. Designed for those who have mastered basic crochet stitches, this intermediate project bursts with vibrant colors and imaginative elements that not only mark your place but also showcase your creativity and personal flair. Not to mention, this crochet bookmark is a fantastic stash-buster—perfect for using up leftover yarn scraps! Whether you’re gifting it to a fellow book lover or simply keeping it for yourself, this fun accessory will surely brighten anyone's reading journey. So, let’s dive into the stitches and create a piece that’s as charming as the stories it holds!

Charming Crochet Bookmark Materials & Tools

  • Light Worsted Weight Yarn – Choose colors like bright red, white, yellow, and vibrant green to bring the strawberries and daisies to life; you'll need approximately 150-200 yards total.
  • 4.0mm (G-6) Hook – This size helps maintain a sturdy structure with a lovely drape for your crochet bookmark.
  • Yarn Needle – Essential for weaving in ends seamlessly, keeping your piece neat and tidy.
  • Scissors – Useful for trimming your yarn cleanly as you progress through your crochet journey.
  • Stitch Marker – Consider using this to keep track of the various components and rows, ensuring even spacing and symmetry.

Get ready to create a whimsical crochet bookmark that’s sure to charm any book lover!

Why is this crochet bookmark special?

Vibrant Aesthetic: The playful combination of strawberries and daisies instantly brightens your bookshelf, making every reading session feel like a garden escape.

Crafting with Ease: This project is perfectly crafted for intermediate crocheters, allowing you to express your skills without overwhelming complexity.

Perfect Personal Touch: Add your own color schemes and embellishments, making each bookmark uniquely yours or tailored for gifts.

Inspire Creativity: The whimsical design encourages you to experiment with different colors and floral designs, letting your imagination bloom.

Stash-Buster Delight: Utilize leftover yarn scraps, turning remnants into a functional piece of art that’s both practical and aesthetically pleasing!

Gauge & Sizing Notes

Don't skip the gauge swatch! Ensuring the correct tension is crucial for your Charming Strawberry and Daisy Bookmark, as it helps maintain the whimsical proportions of your design. A good starting point is a general guideline, where your tension swatch should measure around 4×4 inches (10×10 cm), roughly translating to 14 double crochets by 8 rows. If you find your stitches are tighter or looser, you can adjust the sizing accordingly—if your bookmark needs to be wider, simply increase your starting chain in multiples of 4. If your swatch appears too small, try going up a hook size to achieve that delightful look!

Step-by-Step Pattern for Charming Strawberry and Daisy Bookmark

Row 1: Foundation Chain
Start by chaining 60 (or desired length for your crochet bookmark). This chain will serve as the base of your bookmark. Keep your stitches loose enough to prevent curling. Use a slip stitch to form a ring, ensuring there are no twists in your chain.

Row 2: First Strawberry
In the second chain from the hook, make 1 sc, then 2 dc in the next chain. Continue with 1 sc in the next chain and 2 dc in the following chain. Repeat across until you have 12 total sections of this stitch pattern for the strawberry (12 sts). Your work should start to show a curved shape resembling the strawberry.

Row 3: Strawberry Seeds
Change to white yarn and create seed stitches on the strawberry. Chain 1, then work a sl st into each dc of the previous row, adding 1 seed stitch on each dc. Total should be 12 sl sts. This will add texture and detail to your strawberry.

Row 4: Connect Cord
Switch back to your green yarn and chain 15 to create the stem on top of the strawberry. Then sl st into the first sc of the strawberry base to secure it. This forms the connection between the decorative elements and the cord of your crochet bookmark.

Row 5: First Daisy
To create your first daisy, attach white yarn 2 chains down from the last step. Begin with 5 ch for the petals. For each petal, dc in the 4th ch from the hook (3 dc total), then slip stitch back to the base. Repeat this for 5 petals to form your flower (5 petals). Your daisy should bloom vividly beside the strawberry.

Row 6: Daisy Center
With yellow yarn, make 3 sc in the center of the daisy. This solidifies its structure, giving it a cheerful contrast against the white petals. After completing this round, your daisy should be fully formed and attractive!

Row 7: Attach Elements
Fasten off the yellow and white yarns. Securely attach the completed daisy to the green cord using a sl st. Position it a few inches from the strawberry to ensure a balanced and whimsical look.

Row 8: Leaves
To create leaves, attach the green yarn a few chains down from the daisy. Work 1 hdc, 2 dc in the same stitch, then sl st to the next to form the leaf shape. Continue this for 2-3 leaves spaced out along the cord. Your leaves will add a lovely finishing touch, contributing to the garden-inspired aesthetic.

Row 9: Finishing Touch
Weave in any remaining ends with your yarn needle to tidy up your crochet bookmark. Take a moment to block it lightly, ensuring your stitches lay flat and the bookmark maintains its shape. Your Charming Strawberry and Daisy Bookmark is now complete, ready to brighten your reading adventures!

What to Pair with Charming Strawberry and Daisy Bookmark?

Creating delightful accessories for your reading adventures can elevate the cozy atmosphere while enriching your crafting experience.

  • Cozy Mini Pillow: Crochet a small pillow in matching colors to add a burst of cheer to your reading nook. Perfect for snuggling up with a book!

  • Vibrant Book Sleeve: Keep your favorite stories safe and stylish with a matching book sleeve that showcases the whimsical theme of your bookmark.

  • Colorful Keychain: Craft a playful keychain featuring strawberries and daisies to carry a piece of your crochet magic wherever you go.

  • Charming Coasters: Make coasters using similar color palettes to protect your surfaces while sipping tea during those quiet reading moments.

  • Flower Garland: Create a whimsical flower garland with repeated daisies to decorate your crafting space, reminding you of your crochet bookmark's playful spirit.

Care Instructions for Your Crochet Bookmark

Machine Washing: If necessary, wash your crochet bookmark in cold water on a gentle cycle to prevent pilling and felting. Place it inside a mesh laundry bag for extra protection.

Hand Washing: For delicate care, soak the bookmark in lukewarm water with mild detergent. Gently agitate without twisting to keep your crochet bookmark looking its best.

Drying/Blocking: Always lay your bookmark flat to dry on a clean, dry towel. Blocking ensures it maintains its shape and the whimsical elements stand out beautifully.

Storage: To preserve its vibrant aesthetic, store your crochet bookmark in a cool, dry place away from direct sunlight. This helps maintain the color and texture for many reading adventures to come!

Crochet Bookmark Variations & Substitutions

Customize your crochet bookmark to reflect your unique style and creativity, enhancing your crafting journey!

  • Yarn Weight Swaps: Try using a heavier yarn for a more substantial feel, like a worsted weight, to create a cozy, bulky bookmark.

  • Fiber Alternatives: Opt for a cotton and bamboo blend for a softer drape—great for those who prefer sustainable yarn options.

  • Color Blocking: Instead of the traditional fruit-flower combination, create a two-tone design by alternating colors to reflect your favorite book’s cover.

  • Size Modifications: Lengthen the cord to 75 inches for larger books or shorter sizes for petite paperbacks, making it versatile for different reading materials.

  • Texture Additions: Add a playful pom-pom at the end of the cord for whimsical flair, or incorporate fringe for a bohemian touch.

  • Seasonal Themes: Craft a holiday version by replacing strawberries and daisies with festive elements like snowmen or holly, giving a seasonal twist to your bookmark.

  • Bead Embellishments: String small wooden beads along the cord for a personal touch, infusing your crochet bookmark with a bit of rustic charm.

  • Multiple Layers: Create stacked strawberries or daisies to produce a 3D effect, adding depth and visual interest to your beloved crochet piece.

Expert Tips for Crochet Bookmark

  • Maintain Tension: Keep your tension consistent throughout your project to avoid uneven stitches, especially when changing colors. This ensures a polished look.

  • Stitch Counting: Always count your stitches as you work through the components. It helps maintain symmetry and prevents losing track of patterns, particularly with the strawberries and daisies.

  • Secure Finishing: Weave in ends thoroughly with your yarn needle after completing your crochet bookmark. This prevents unraveling and keeps your piece looking tidy.

  • Blocking Basics: After finishing, lightly block your bookmark to ensure all elements lie flat. This enhances the overall shape and design, making the colors pop.

  • Color Changes: When switching yarn colors, be mindful of how you carry your yarn to avoid knots. This keeps your crochet bookmark looking neat and clean throughout the process.

Charming Strawberry and Daisy Bookmark FAQs

Can I use different yarn types for this crochet bookmark?
Absolutely! While the pattern suggests a light worsted weight cotton blend for durability, you can substitute with acrylic or bamboo yarn. Just keep in mind that your finished bookmark may have a different texture and drape; acrylic tends to be lighter, while cotton offers a sturdy feel.

How can I make my crochet bookmark longer or shorter?
To adjust the length, simply alter the number of foundation chain stitches based on your preference. For a longer bookmark, add stitches in increments of 5. If you’d like a shorter version, decrease the number by the same increments. Just remember to keep the decorative elements in proportion to maintain balance!

Why is my work curling at the edges?
Don't panic! Curling can often happen due to tight stitches or uneven tension. I recommend checking your gauge and making sure you're not pulling too tightly on your yarn. You can also try blocking your bookmark after finishing; it can significantly help flatten it out and give it a neat appearance.

What size hook should I use for this pattern?
The recommended size for this crochet bookmark is a G-6 (4.0 mm) hook, which helps create a sturdy structure while allowing for a beautiful drape. If you're using a different yarn weight, consider adjusting your hook size accordingly to achieve the desired tension and stitch definition.

How do I fix dropped stitches while working on my bookmark?
It's an easy fix! If you realize you’ve dropped a stitch, simply reinsert your hook into the dropped stitch from the front, then yarn over and pull up the loop. Make sure to count your stitches afterward, so you don’t lose track of your pattern. Always keep some extra yarn handy to avoid any frustration!

What if my stitches aren’t looking uniform?
If you're finding inconsistencies in stitch size, it may be a sign of uneven tension. Focus on keeping a steady grip on your yarn and maintaining a relaxed posture while crocheting. Remember, practice makes perfect! If needed, take a moment to unravel and redo a few rows to achieve that lovely finish you’re aiming for.

Filed Under: Uncategorized

Charming Crochet Rose Pattern for Gorgeous Home Decor

September 1, 2026 by Publisher Leave a Comment

Charming Crochet Rose Pattern for Gorgeous Home Decor

As I sat with my crochet hook nestled between my fingers, I couldn’t help but smile at the thought of blooming roses crafted from yarn. This crochet rose pattern not only allows us to capture the beauty of flowers without the green thumb but also introduces vibrant colors and charming textures that elevate any handmade piece. Perfectly suited for those with an intermediate skill level, these roses are incredibly versatile—ideal for embellishing accessories like hats and bags, or simply as striking standalone decorations. Plus, there’s an incomparable joy in creating something as intricate and delightful as a real flower, and you’ll find yourself enchanted with each layered petal. Are you ready to embrace springtime vibes and create your own lovely crochet roses? Let’s get stitching!

Charming Crochet Roses Materials & Tools

  • Yarn

    • Medium Weight Yarn (Category 4) – Approximately 200-300 yards in cotton or acrylic, suitable for creating those beautiful layers in your crochet rose pattern.
    • Green Yarn – For crafting the leaves, select a shade that complements your rose colors.
  • Tools & Notions

    • 4.0mm (G/6) Crochet Hook – This size is essential for achieving the right tension in your petals and leaves.
    • Stitch Markers – Helpful for keeping track of rounds, ensuring your petals maintain their lovely shape.
    • Yarn Needle – Use this to securely assemble your roses after crocheting, making sure all elements are perfectly in place.

Embrace your creativity and bring these delightful crochet roses to life!

Why are crochet roses so delightful?

Versatile Use: These charming crochet roses can effortlessly enhance your decor, whether as brooches, hair accessories, or lovely embellishments for bags. Intricate Design: With layered petals, they mimic the beauty of real roses, bringing a touch of nature indoors. Colorful Options: Play with vibrant yarn colors to create unique blooms every time! Satisfaction in Crafting: Enjoy the rewarding process of creating something that looks beautifully intricate yet is crafted by your own hands. Ideal for Gifting: Send love with your handmade creations, perfect for any occasion! You'll fall in love with the charm these roses bring to your projects.

Gauge & Sizing Notes

Don't skip the gauge swatch! For your charming crochet rose pattern, checking your tension is essential to ensure that your petals lay beautifully and your flowers achieve the correct size. A general guideline is to aim for a crochet gauge of approximately 4×4 inches (10×10 cm) = 18 double crochets by 10 rows. If your rose comes out too small, simply increase your starting chain in multiples of 6 for larger layers or consider using a larger hook size. Conversely, if your swatch is too large, try going down a hook size to achieve the lovely snugness these roses deserve. Happy stitching!

Step-by-Step Pattern for Charming Crochet Roses

Row 1: Magic Circle Center
Start by creating a magic circle. Work 6 single crochets (sc) into the circle and pull tight to close. Your work should resemble a small circle at this stage, providing a foundation for the petals. This is the center of your crochet rose pattern. (6 sts)

Row 2: First Petal Layer
Chain 2 (ch 2) for height, then double crochet (dc) 2 times into the first stitch. For each subsequent stitch, work 3 dc into each of the next 5 stitches, creating a total of 18 stitches in this round. Your work should flare outwards, forming the first layer of petals. (18 sts)

Row 3: Building the Petals
Begin with a chain 2, then work a double crochet (dc) into the first stitch. In the next stitch, perform an increase by working 2 dc. Repeat this pattern (1 dc, inc) around until you return to the start. This defines the petals’ shape, giving them a nice curl. (24 sts)

Row 4: Second Petal Layer
Chain 2 and work 2 dc into the first stitch, then 1 dc into the next 2 stitches, followed by an increase of 2 dc in the next stitch. Repeat this sequence around to give your rose more volume and dimension. Your crochet rose pattern should look fuller now. (30 sts)

Row 5: Final Layer
Chain 2 and begin with 3 dc into the first stitch, then work 1 dc in the next 3 stitches, followed by an increase of 2 dc in the next stitch. Continue this pattern around to create the final, lush layer of petals. Your rose should be taking a beautiful shape now, showing multiple layers. (36 sts)

Row 6: Slipping Stitches to Finish
To secure the petals, work a slip stitch (sl st) into each stitch around this last round. This helps shape the petals and neatens the edges. Your crochet rose should have a rounded appearance at this point, ready for an added touch of leaves.

Step 1: Creating Leaves
For the leaves, start with a chain of 10 (ch 10). Work 1 single crochet (sc) in the second chain from the hook, followed by another sc, then 2 half double crochets (hdc) in the next 4 stitches, and finish with 1 dc in the last stitch. This forms a lovely leaf shape. Turn your work for the other side. (10 sts)

Step 2: Shaping the Leaf
For the second side of the leaf, chain 1 and turn your work. Begin with 1 dc in the first stitch, then work 2 hdc in the next 2 stitches, followed by 2 sc in the next 2 stitches. Slip stitch in the last stitch to finish off, making it nice and tidy. However your leaf should have a pointed tip resembling natural foliage.

Step 3: Assembly
Using a yarn needle, attach the leaves to the base of your finished rose. Secure each leaf to maintain a natural positioning and provide stability to the flower. Your crochet rose pattern is now complete, showcasing delicate leaves and layered petals, perfect for any project you envision!

What to Pair with Charming Crochet Roses?

As you delight in crafting these whimsical roses, consider enhancing your collection with perfect complementary projects that sing in harmony.

  • Leafy Brooch: Create a stunning brooch featuring rich green leaves, bringing your crochet rose pattern to life as an elegant accent.
  • Floral Garland: Connect multiple roses with delicate leaves to form a beautiful garland, perfect for decorating your space or special events.
  • Hair Accessories: Design matching hair clips or headbands adorned with your crochet roses, adding a touch of floral charm to any hairstyle.
  • Embellished Hat: Make a cozy hat and sew your roses as vibrant embellishments, adding warmth and beauty to your winter wardrobe.
  • Bouquet Arrangement: Craft a bouquet with multiple roses in varied colors, providing a bouquet that never wilts—an ideal centerpiece for your home.
  • Gift Wrap Decor: Use your crochet roses to decorate gift bags or wrapping paper, transforming every present into a personalized work of art.

Crochet Rose Pattern Variations

Feel inspired to put your own twist on this lovely crochet rose pattern and watch your creativity bloom!

  • Yarn Alternatives: Consider trying cotton or luxurious silk yarn for a different texture; each choice gives the roses a unique vibe.

  • Weight Swap: For larger roses, opt for bulky yarn and increase your hook size. This gives your flowers a bold, striking presence, perfect for statement decor.

  • Color Play: Use variegated yarn for a mesmerizing petal look; the shifting colors create an eye-catching design that feels fresh and lively.

  • Seasonal Shades: Customize your blooms with seasonal colors—think deep reds and greens for a festive holiday feel, or soft pastels for spring celebrations!

  • Texture Additions: Embellish with fringes or pom-poms at the center for a delightful touch. These small alterations can elevate your crochet rose into a whimsical decoration.

  • Mini Roses: Scale down your pattern using finer yarn and a smaller hook to achieve adorable mini roses. They make charming accents for gifts and cards.

  • Color Blocking: Experiment with two-tone petals by changing colors for each layer. This technique allows you to blend hues creatively and adds visual interest.

  • Mixed Media: Incorporate metallic threads or sparkles into certain layers for a glamorous finish. The shimmer gives your roses an enchanting, festive glow.

Expert Tips for Crochet Roses

  • Tension Matters: To maintain a beautiful structure, use a lighter grip on your crochet hook. This helps the petals lay flat and look plush.

  • Count Stitches: Regularly counting your stitches, especially during intricate petal work, prevents shaping issues. Keep track to ensure symmetry in your crochet rose pattern.

  • Block Your Roses: Blocking can enhance the shape and appearance of your finished roses. This technique allows you to stretch and mold them into a more lifelike look.

  • Use Stitch Markers: Employ small stitch markers to track rounds effectively. This is especially crucial when working on multiple petal layers to keep everything aligned.

  • Secure Your Edges: After finishing, retrace the edges with slip stitches to tidy up your petals. This will give your crochet roses that polished, professional finish.

How to Wash and Care for Your Crochet Rose Pattern

Machine Washing: Use cold water and a gentle cycle to protect the delicate layers of your crochet roses. Always place them in a mesh laundry bag to avoid agitation that could lead to felting or pilling.

Hand Washing: For best results, hand wash in cool water with mild soap. Gently swish the roses to clean without compromising the intricate details of the petals.

Drying/Blocking: Lay your crochet roses flat to dry on a clean towel, reshaping them if necessary to enhance their form. Blocking can help maintain the intricate petal structure, making them look beautifully lifelike.

Storage: Keep your finished crochet roses in a cool, dry place away from direct sunlight. Use acid-free tissue paper between layers to prevent crushing, maintaining their lovely appearance for future enjoyment.

Charming Crochet Roses FAQs

Can I use a different type of yarn for this crochet rose pattern?
Absolutely! While the pattern recommends medium-weight cotton or acrylic yarn, you can certainly experiment with other yarn types. Just keep in mind that changes in yarn weight will affect the overall size and shape of your roses. If you opt for thicker yarn (like a bulky weight), your roses will be larger and more plush. Conversely, using a thinner yarn will yield smaller, more delicate blooms.

How can I adjust the size of my crochet roses?
If you'd like to create bigger or smaller roses, you can change the yarn weight and hook size accordingly. For larger roses, try using a bulky yarn and an appropriately larger hook. To make smaller versions, you could use a lighter weight yarn and a smaller hook. Additionally, adjust the number of rows and stitches you work to add more or reduce petal layers as needed.

Why is my crochet rose curling and not lying flat?
Don't panic! This is a common issue. If your petals are curling, it might be due to tension or the type of yarn you're using. Make sure you’re not gripping the yarn too tightly; giving it a lighter grip can help. Additionally, blocking your finished rose can help reshape and flatten the petals, making them look more lifelike!

What if I've dropped a stitch while making the petals?
It's an easy fix! If you notice a dropped stitch, simply reinsert your hook into the stitch below where you lost it, and pull the yarn through to create a new stitch. You can also use a yarn needle to weave in the loose yarn if it's particularly tricky. Remember, it's okay to take a moment to fix it—your rose will look much better without any mistakes!

What hook size should I use for this crochet rose pattern?
For this crochet rose pattern, a size G/6 (4.0 mm) crochet hook is recommended. This size will help you achieve the right tension for those lovely layers of petals. If you feel that your stitches are too tight or too loose, you might consider trying a different hook size to see what works best for you and your yarn choice.

How can I make my crochet roses look more realistic?
To enhance the lifelike appearance of your crochet roses, focus on your tension and shaping. Be sure to count your stitches to maintain symmetry in your petals. After finishing, don't forget to block your roses by wetting them and shaping them into form while drying. Consider using a variegated yarn for unique petal effects, or add embellishments like safety eyes for extra detail.

Filed Under: Uncategorized

Charming Crochet Flowers: Quick & Easy Floral Patterns

September 1, 2026 by Publisher Leave a Comment

Charming Crochet Flowers: Quick & Easy Floral Patterns

As I sift through my vibrant yarn stash, the idea of crafting charming crochet flowers fills me with delight. This delightful crochet flower collection invites you to create four beautiful blooms: a daisy, a rose, a forget-me-not, and a puff flower—all perfect for adding a cheerful touch to your day! What I love most about these crochet flowers is their versatility; they work up quickly and can easily embellish everything from hair clips to cozy blankets. Plus, imagine the joy of gifting a handmade flower, bringing a personal touch to any occasion. Whether you’re new to crocheting or looking to expand your skills, these patterns provide a wonderful way to let your creativity blossom. So grab your hook, and let’s bring a bit of nature inside with these lovely floral creations!

Charming Crochet Flower Materials & Tools

Create beautiful blooms with ease!

Yarn

  • DK/Worsted Weight Cotton Yarn – Recommended for its durability and ease of shaping, each flower approximately requires 10 to 30 yards of yarn depending on the type.

Tools & Notions

  • 3.0mm to 4.0mm (US F-5 to 7) Hook – Ideal size for achieving the best results with your crochet flowers.
  • Scissors – Essential for trimming yarn ends and keeping your projects tidy.
  • Yarn Needle – Perfect for weaving in ends to give your flowers a polished finish.
  • Stitch Marker – Helpful for keeping track of rounds while crafting your lovely flowers.
  • Floral Wire (optional) – Use to shape petals for a more defined look, if desired.

Why Create Crochet Flowers?

Versatile Designs: These patterns showcase a charming variety of flowers, perfect for any skill level. From a classic daisy to a whimsical puff flower, there's something for everyone, making them ideal for embellishing hair clips, bags, or even blankets.

Quick to Make: With just 10 to 30 yards of yarn needed per flower, you can whip up a beautiful bloom in no time, making them perfect for last-minute gifts or a cozy afternoon project.

Unique Textures: Each flower features a delightful mix of textures, from the soft petals of the forget-me-not to the plush design of the puff flower, creating a stunning visual appeal.

Endless Customization: Enjoy the freedom to experiment with colors and yarn types, allowing your crochet flowers to reflect your personal style and creativity!

Gift-Worthy: Handmade crochet flowers bring a personal touch to any occasion, making them special gifts for loved ones or delightful additions to your own decor.

Gauge & Sizing Notes

Don't skip the gauge swatch! Ensuring your tension matches the intended measurement is crucial when creating your crochet flowers. A good starting point for checking gauge is to crochet a 4×4 inch (10×10 cm) square and see if your tension swatch yields the desired texture and size. If you find your stitches are tighter or looser than expected, adjust your hook size accordingly; for example, if your swatch is too small, try going up a hook size. To scale your crochet flowers larger or smaller, remember to adjust your foundation chain or the number of rounds in increments that suit your vision—multiples of 6 for petal sections work well! This way, you can create beautiful blooms that fit perfectly into your creative projects.

Step-by-Step Pattern for Charming Crochet Flowers

Row 1: Daisy Center
Begin your daisy flower by creating a magic ring and chaining 3. Work 11 double crochets (dc) into the ring, then pull the tail to tighten. Join with a slip stitch (sl st) to the top of the initial chain 3. Your work should form a small circle with 12 stitches in total (12 sts).

Row 2: Daisy Petals
To form the petals, chain 2, then work 1 hdc (half double crochet), 1 dc (double crochet), 1 hdc, and 1 sl st into the next stitch. Repeat from * to * around the center for a total of 6 petals. Join with a sl st to close, and your flower should now have a lovely daisy shape.

Round 1: Rose Base
Start the rose by chaining 51. In the third chain from the hook, work 2 dc in the same stitch, then skip 2 chains. In the next chain, work 1 sc (single crochet), skip the next two chains, and 2 dc in the next stitch. Repeat this pattern across until you reach the end of the chain. You should have a ruffled edge with 25 total sets of petals (50 sts).

Round 2: Rose Petals
Continue the rose by turning your work, and in the first stitch, work 1 sl st, 1 sc, and 2 dc into each of the next 3 stitches. This will create a layered petal effect. Repeat around with a slip stitch at the end, allowing your flower to slightly cup at this point.

Row 1: Forget-Me-Not Center
For the forget-me-not, start with a magic ring, chaining 3. Work 9 dc into the ring and pull tight. Then, join with a sl st to complete the center. You should now have a vibrant center with 10 stitches (10 sts) showing a small circle.

Row 2: Forget-Me-Not Petals
Proceed to form petals by chaining 4, then make a sl st into the first chain. In the same original stitch, work 1 sc, followed by 1 hdc, and 1 dc, creating a flower shape. Repeat this around the center, securing the petals with a sl st, planting your work firmly at this stage.

Row 1: Puff Flower Base
Begin the puff flower with a magic ring; chain 3. Work 3 dc, chain 1, and 3 dc into the ring, allowing for a deep central puff. Pull the ring to secure, yielding a rounded shape with a fluffy center, totaling a stitch count of 12 stitches (12 sts).

Round 2: Puff Flower Petals
For the petals, chain 5, then in the same stitch, make 1 dc, chain 2, 1 dc for each petal around your center. This builds a textured petal, repeating for a total of 6 petals. Join with a sl st in the first chain to close, giving your flower a full and rounded appearance.

Expert Tips for Crochet Flowers

Consistent Tension: Ensure your flowers have a uniform look by maintaining consistent tension throughout each stitch. Practice with a swatch when changing yarns.

Count Regularly: Frequently count your stitches, especially in petal sections, to prevent discrepancies that can disrupt the flower’s shape.

Block for Shape: After finishing, blocking your flowers gives them a neat finish and helps maintain their intended shape, enhancing the overall look of your crochet flowers.

Secure Ends: Don’t forget to weave in all your ends securely using a yarn needle. This gives your flowers a polished appearance, perfect for gifting.

Use Floral Wire: If you want to shape the petals more dramatically, consider using floral wire. It allows you to add firmness and style to your lovely blossoms.

What to Pair with Charming Crochet Flowers?

As you create these delightful crochet flowers, think about how a matching piece can showcase your craftsmanship beautifully.

  • Cozy Headband: Add a touch of floral charm by adorning a headband with these vibrant blooms, perfect for keeping your ears warm in any season.
  • Embellished Tote Bag: Brighten your everyday bag with a cluster of crochet flowers, making your outings more cheerful and stylish.
  • Charming Hair Clips: Secure your locks with vibrant hair clips embellished with small crochet flowers for floral flair wherever you go.
  • Floral Garland: Connect your crochet flowers into a playful garland that adds whimsy to any room's decor—a stunning way to bring nature inside.
  • Delightful Coasters: Create unique crochet coasters featuring flower designs, elevating your coffee table decor while adding a touch of color.

How to Wash and Care for Your Crochet Flowers

Machine Washing: Use cold water and a gentle cycle to maintain the integrity of your crochet flowers. Avoid agitation to prevent unwanted felting or pilling.

Hand Washing: For a tender touch, hand wash your crochet flowers in cold water with mild detergent. Gently squeeze to clean without stretching their beautiful shapes.

Drying/Blocking: Lay your crochet flowers flat on a clean towel to dry. If blocking, pin each flower into shape as they dry to help them hold their intended look beautifully.

Storage: Keep your crochet flowers in a cool, dry place, away from direct sunlight. Store them in a breathable bag to protect against dust while preserving their vibrant colors and details.

Crochet Flowers Variations & Substitutions

Explore the endless possibilities of customizing your floral creations to truly make them your own!

  • Yarn Weight Swaps: Experiment with lighter or heavier yarns to adjust your flowers’ sizes, creating blooms from dainty to bold.

  • Fiber Alternatives: Opt for acrylic or wool instead of cotton for different textures; acrylic gives a soft drape, while wool offers warmth.

  • Color-Blocking Ideas: Use multiple color changes to create eye-catching, vibrant petals that add a playful flair to your floral designs.

  • Size Adjustments: Increase the number of petals or switch to a larger hook size to create statement flowers perfect for larger accessories.

  • Texture Modifications: Add a pom-pom or fringe to the flower center to introduce a unique textural element that brings your flowers to life.

  • Decorative Centers: Experiment with buttons, beads, or floral embellishments in the center to give your crochet flowers a personalized touch and extra charm.

  • Border Edging: Adding a contrasting or matching border around petals can enhance the definition and style of your flowers, giving them a polished finish.

Charming Crochet Flower Collection FAQs

Can I use a different type of yarn besides cotton for these crochet flowers?
Absolutely! While cotton yarn is recommended for its durability, you can definitely experiment with other fibers like acrylic or wool. Just keep in mind that different yarn types can affect the drape and texture of your flowers, so it’s a good idea to make a swatch to see how your selected yarn behaves.

What if my crochet flower is curling at the edges?
Don't panic! Curling is a common issue when working with crochet patterns. This can usually be resolved by blocking your flower after finishing. Just wet the flower gently, shape it to your desired look, and let it dry flat. This will help it maintain its intended shape beautifully!

How can I size up or size down my crochet flowers?
If you want to make your flowers larger, consider using a bigger hook size and increasing the number of yarn overs in your stitches! Conversely, to make them smaller, use a smaller hook and reduce your stitch count slightly in the patterns. Either way, just remember to check your gauge to achieve your desired look!

What should I do if I accidentally drop a stitch while crocheting?
It’s an easy fix! Just use a crochet hook to catch the dropped stitch. Gently pull the yarn and reintroduce it into your working piece. You can also use a yarn needle to weave the stitch back in securely so it won't come undone the next time you work on it.

What hook size works best for these crochet flower patterns?
For the best results with your crochet flowers, I recommend using a crochet hook size between 3.0 mm to 4.0 mm (US F-5 to 7). This range will help you achieve a nice balance of tightness and texture in your stitches, making your flowers come to life beautifully!

Filed Under: Uncategorized

  • « Previous Page
  • 1
  • 2
  • 3
  • 4
  • 5
  • …
  • 38
  • Next Page »

Recent Posts

  • Chic Crochet Watch Band Pattern: Scalloped Elegance
  • Vibrant Crochet Granny Square: A Floral Delight to Create
  • Pocket Otter Crochet: Your Adorable Amigurumi Companion
  • Cozy Up with This Festive Crochet Tree Cozy Pattern
  • Chic Crochet Babydoll Dress: A Timeless Pattern for Spring

Recent Comments

No comments to show.
Fast Crochet Patterns Logo

Welcome to Fast Crochet Patterns, your curated editorial blog for modern, handmade aesthetics. Discover an elegant collection of contemporary designs and carefully crafted tutorials—where every beautiful pattern is completely free to inspire your next creation.

Join the Studio

Subscribe for our latest free patterns and warm, minimal crochet inspiration delivered to your inbox.


Collections

  • Accessories
  • Amigurumi
  • Baby
  • Bags

More Patterns

  • Cardigan
  • Dress
  • Flowers
  • Granny Square

Information

  • About
  • Contact
  • Privacy Policy
  • Terms Of Use
  • Disclaimer

© 2026 Fast Crochet Patterns. All rights reserved.