Fast Crochet Patterns

  • Home
  • Contact
  • Patterns
    • Amigurumi
    • Granny Square
    • Flowers
    • Baby
    • Dress
    • Bags
    • Cardigan
    • Accessories
menu icon
go to homepage
  • Home
  • Contact
  • Patterns
    • Amigurumi
    • Granny Square
    • Flowers
    • Baby
    • Dress
    • Bags
    • Cardigan
    • Accessories
search icon
Homepage link
  • Home
  • Contact
  • Patterns
    • Amigurumi
    • Granny Square
    • Flowers
    • Baby
    • Dress
    • Bags
    • Cardigan
    • Accessories
×

Crochet Flowers: Cozy Floral Motifs for Every Craft Project

August 23, 2026 by Publisher Leave a Comment

Crochet Flowers: Cozy Floral Motifs for Every Craft Project

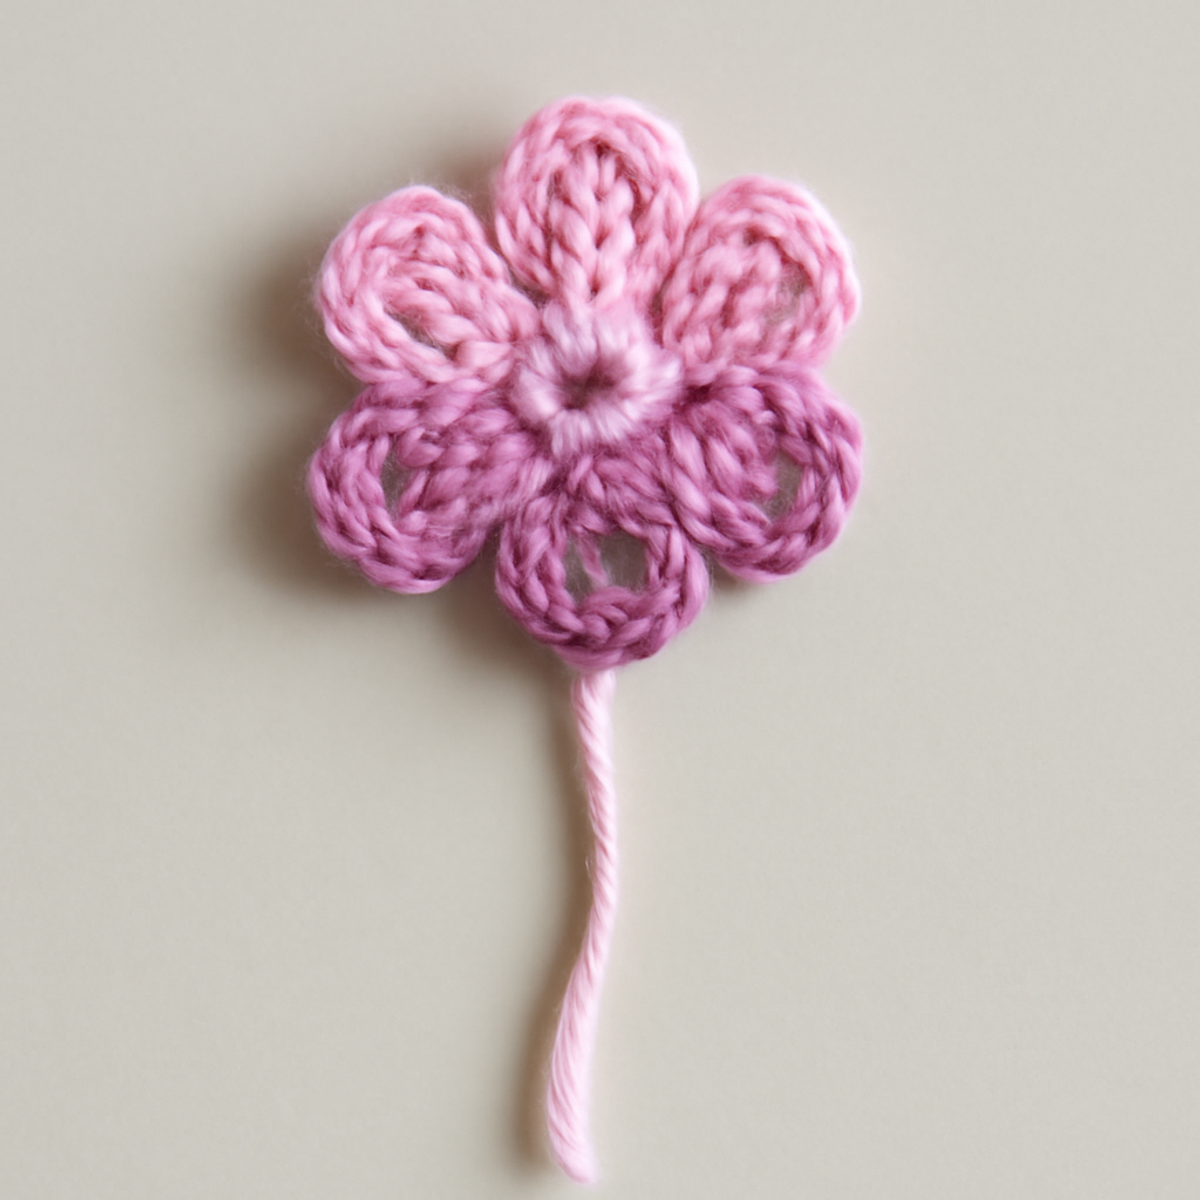
As I settled into my favorite corner with a comfy chair and a soft cup of tea, the idea of bringing a touch of spring into my home sparked a wave of excitement. Today, I’m thrilled to share my pattern for Sweet Blooms: Crochet Flower Motif, where crafting delightful crochet flowers becomes an engaging journey for everyone—from eager beginners to seasoned crafters. This charming pattern not only allows you to practice fundamental crochet skills, but it also provides a quick project option that’s perfect for adding playful embellishments. Each flower can be transformed into lovely appliqués, elegant accessory decorations, or even stand alone as part of a beautiful floral arrangement. Perfect for exploring vibrant color combinations, these crochet flowers will infuse your creations with warmth and cheer. So, let’s grab our hooks and yarn, and dive into the joy of crafting these sweet floral treasures together!

Crochet Flowers Materials & Tools

  • Worsted Weight Yarn – You'll need about 100-150 yards of medium-weight yarn, ideally in shades of pink and lavender to create delightful crochet flowers.
  • 4.0mm (G-6) Hook – This size is perfect for achieving the soft texture and delicate details of your flowers.
  • Yarn Needle – Essential for weaving in ends and perfecting your finished piece.
  • Stitch Marker (optional) – Helpful for tracking your rounds as you create your floral motifs.

Why Crochet Flowers are a Must-Try?

Engaging and Fun: This pattern offers an enjoyable way to dive into crochet, allowing beginners to explore essential stitches while keeping experienced crafters entertained with a quick project.

Versatile Use: These flowers can easily be transformed into charming appliqués, decorative accessories, or standalone marvels for your floral arrangements, making them perfect for a variety of crafting needs.

Perfect for Color Play: Unleash your creativity with endless color combinations, encouraging you to mix and match yarns for a unique touch to every piece.

Lightweight & Beautiful: Sporting a soft, drapey texture, these crochet flowers maintain their shape without being bulky, adding a delicate appeal to your handmade items.

Enhanced Craftsmanship: Experience the satisfaction of turning simple materials into delightful crafts that evoke the wonder of spring and warmth in your home!

Gauge & Sizing Notes

Don't skip the gauge swatch when working on your crochet flowers! Checking your tension is vital to ensure each blossom blooms beautifully at the intended size. While the pattern may not specify an exact gauge, a general guideline is to aim for a 4×4 inch (10×10 cm) square that aligns with your desired petal fullness. If you find your tension is tighter or looser than recommended, simply adjust your hook size: use a larger hook if your swatch is too small, or a smaller one if it's too large. To create bigger flowers, increase the starting chain in multiples of 8 for the base round. Happy crafting with your crochet flowers!

Step-by-Step Pattern for Sweet Blooms: Crochet Flower Motif

Row 1: Foundation Chain
Start by making a slip knot and chaining 4. Join to the first chain with a slip stitch to form a ring. This creates the foundation for your crochet flower. You should have a small loop in the center. Make sure it's snug, as this will be the base for your petals.

Round 1: Base Round
Chain 1 to begin. Work 8 single crochets (sc) into the ring. Use a stitch marker to mark the last stitch if needed. Join with a slip stitch to the first sc to complete the round. The small circle should feel tight and firm; this will provide a sturdy base for the flower petals (8 sts).

Round 2: Petal Formation
Chain 3 (counts as the first double crochet, dc). In the same stitch, work 2 dc, followed by 2 more dc into the next stitch. Repeat this around the circle, creating a total of 8 petals. Join with a slip stitch to the top of your initial chain 3. At this point, your work should begin to flourish and cup outward (24 dc).

Round 3: Scalloped Edge
Chain 1 and single crochet in the same stitch as your slip stitch. For each petal, make a sc, chain 2, sc in the top of each double crochet. This will create a lovely scalloped effect along the edges of your flower petals. You should have 8 scallops once finished, enhancing the beauty of your crochet flower (8 scallops).

Step 1: Assembly
To finish, cut your yarn, leaving a long tail. Use a yarn needle to weave in the ends, securing your flower. You may also use this tail to stitch your crochet flower onto a fabric or another project. Gently flatten your petals and block the flower if necessary to ensure they lay beautifully (flower is complete).

Expert Tips for Crochet Flowers

Watch Your Tension: Maintaining consistent tension is key to achieving uniform petal shapes; practice with extra stitches if needed to find your comfort zone.

Count Your Stitches: Be diligent about counting your stitches in each round to avoid losing track; this prevents uneven flowers, especially when making multiple crochet flowers.

Secure Finishing: When you weave in ends, ensure to slip stitch or knot securely to prevent unraveling, helping your finished flowers stay intact during their use.

Block for Shape: After completing your petals, blocking can set their shape beautifully; this helps them lay flat and showcases those intricate designs perfectly.

Crochet Flowers: Variations & Substitutions

Customize your crochet flowers to reflect your unique style and creativity, making them truly one-of-a-kind treasures!

  • Yarn Weight Swaps: Use lighter or heavier yarns for smaller or larger flowers, bringing new dimensions to your projects.
  • Fiber Alternatives: Experiment with cotton for a cool, crisp look, or acrylic for softness and durability, each offering distinct textures.
  • Color Blocked Petals: Alternate colors for each petal to create eye-catching designs, blending shades to match seasonal themes!
  • Petal Shapes: Try pointed petals or varying petal counts for diverse styles; the flowers can transform from simple to stunning with just a tweak.
  • Textural Touches: Add pom-poms or tassels for added whimsy; these little details can elevate your flowers to standout pieces in any arrangement.
  • Seasonal Hues: Swap the pinks for autumnal tones like warm oranges and deep reds to create themed decorations for fall.
  • Size Adjustments: Create larger or smaller flowers by adjusting your hook size or yarn weight, perfect for various applications in crafting.

Feel free to mix and match these variations to craft a collection of flowers as vibrant and unique as the memories they inspire!

What to Pair with Sweet Blooms

As you embrace the whimsy of crochet flowers, why not extend that charm into matching creations that radiate warmth and beauty?

  • Leafy Green Appliqués: Add a lush touch by crafting leafy motifs to accompany your flowers, creating a whimsical garden effect.

  • Charming Crochet Headband: Create a sweet headband embellished with your crochet flowers to wear or gift, perfect for spring outings.

  • Floral Tote Bag: Transform a simple bag into a statement piece by attaching your crochet flowers as striking embellishments—perfect for picnics or shopping trips.

  • Delightful Hair Clips: Make hair accessories that bloom by sewing crochet flowers onto clips, bringing a playful vibe to everyday hairstyles.

  • Vibrant Greeting Cards: Use your crochet flowers to grace handmade cards, adding a personal touch that celebrates every occasion with your treasured craftsmanship.

Care Instructions for Crochet Flowers

Machine Washing: Use a gentle cycle with cold water to protect the delicate stitches and avoid any pilling while washing your crochet flowers.

Hand Washing: For delicate care, hand wash in lukewarm water with mild soap, gently agitating to remove dirt, then rinse thoroughly without twisting.

Drying/Blocking: Lay your crochet flowers flat on a clean towel to dry, reshaping gently. You may also block them to enhance their petal structure and showcase their beauty.

Storage: When storing your finished crochet flowers, place them in a cool, dry area away from direct sunlight to maintain their vibrant colors and soft texture.

Sweet Blooms: Crochet Flower Motif FAQs

Can I use a different type of yarn for these crochet flowers?
Absolutely! While worsted weight acrylic or cotton yarn works best, you can swap in other yarn types. Just be mindful of gauge, as using a different weight may result in larger or smaller flowers. I suggest doing a small test flower to ensure you’re happy with the texture and final look.

How do I adjust the size of my crochet flowers?
If you're aiming for bigger or smaller flowers, simply use a thicker or thinner yarn and adjust your hook size accordingly. For instance, a bulky yarn and a corresponding larger hook will yield a more substantial flower. Alternatively, you can add or remove rows of petals for a customized look!

Why are my crochet flowers curling up?
Don’t panic! Curling can occur if your stitches are too tight or if you’re not blocking your finished work. Make sure your tension is even and practicing blocking techniques can help flatten your flowers beautifully after finishing.

How do I fix dropped stitches in my crochet flowers?
It’s an easy fix! If you notice a dropped stitch, simply grab your crochet hook and carefully pull it back up through the last completed stitch. You may need to redo a few stitches if it creates a gap, but keep calm—the beauty of crochet is in the process.

What's the best hook size to use for these flowers?
I recommend using a 4.0 mm (G-6) crochet hook for this pattern. It helps create that lovely drape and definition you’re looking for in the petals. If you prefer a tighter or looser gauge, feel free to experiment with hooks one size up or down!

How can I ensure my petals look uniform?
Counting your stitches is essential! Make sure to count at the end of every round to keep track. If you find your petals are not coming out as expected, consider re-evaluating your tension or doing a small swatch before creating your flowers. Happy crocheting!
Filed Under: Uncategorized

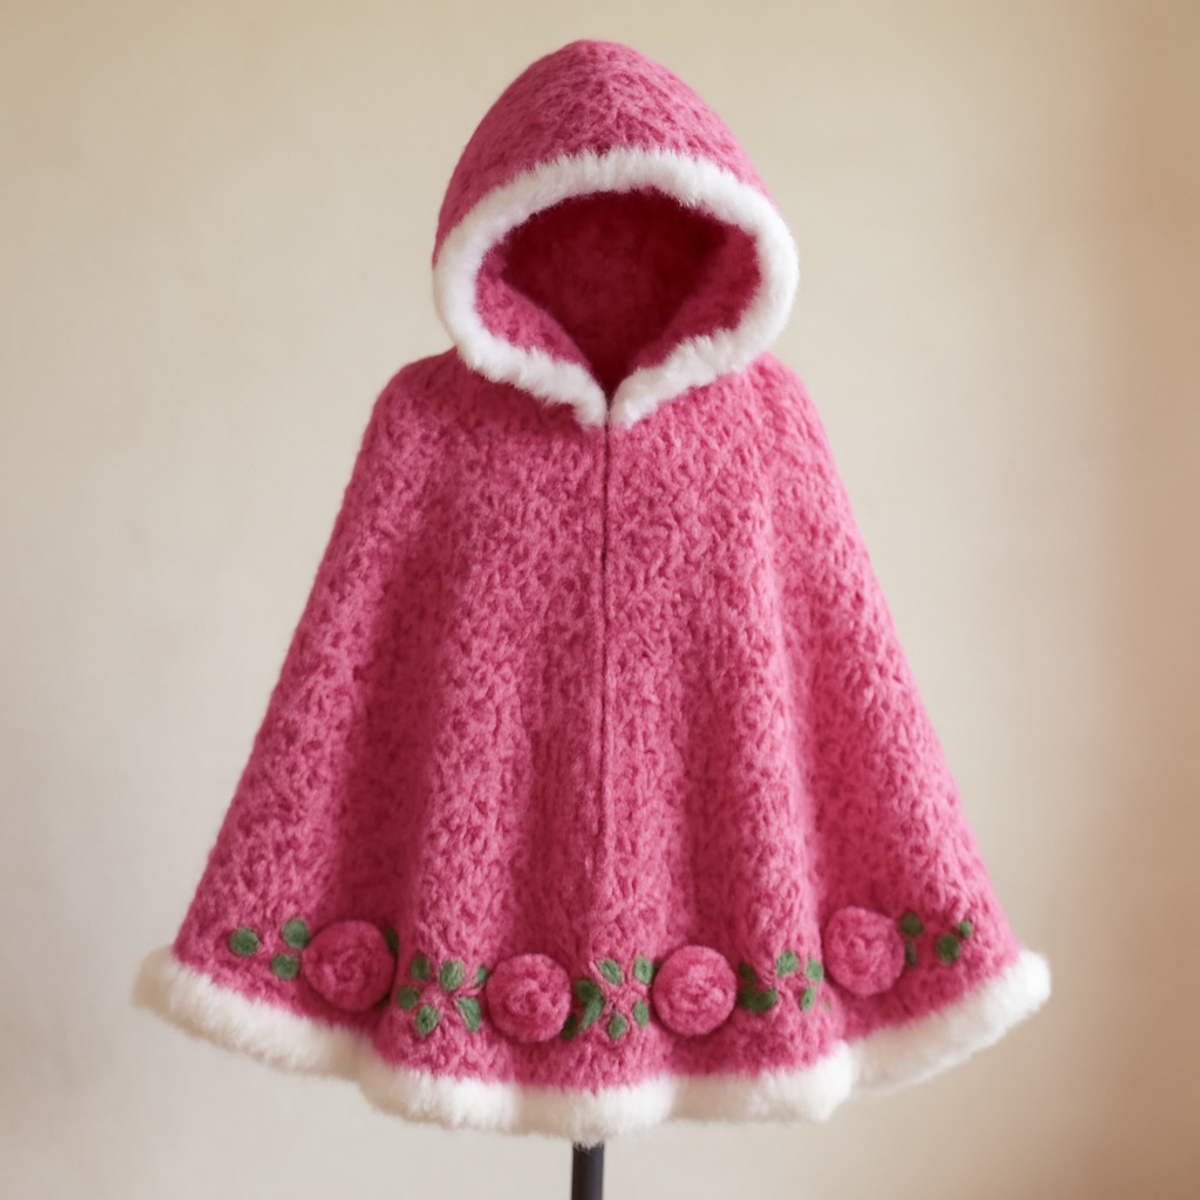
Enchanting Crochet Hooded Rose Cape for Cozy Layers

August 23, 2026 by Publisher Leave a Comment

Enchanting Crochet Hooded Rose Cape for Cozy Layers

As I tucked myself into my favorite crochet nook, I couldn’t help but dream of the whimsical beauty of a crochet hooded rose cape. This enchanting project takes the artistry of crochet to new heights, blending intricate lacework and floral elements that cater to the adventurous spirits among us. While it has a delightful floral theme, this cape’s true magic lies in its versatility—it effortlessly layers over casual wear, making it perfect for any occasion. Plus, it allows you to combine various techniques, ensuring you gain skills while creating a beautiful accessory. With its soft texture and elegant drape, this piece is bound to elevate your crochet game. Are you ready to bring a touch of floral charm to your wardrobe? Let’s dive into the pattern!

Crochet Hooded Rose Cape Materials & Tools

  • Worsted Weight Pink Yarn – Approximately 800-1000 grams will provide a beautiful base for this magical cape.
  • Worsted Weight White Yarn – About 200-300 grams is suggested for the cozy faux fur border, adding a touch of elegance.
  • 6.0mm (J) Crochet Hook – Ideal for creating intricate stitches and ensuring a comfortable drape for your crochet hooded rose cape.
  • Yarn Needle – Essential for weaving in ends and sewing on those lovely rose flowers.
  • Scissors – Handy for trimming yarn and finishing off your masterpiece.
  • Optional: Buttons – Enhance the design with decorative buttons for added flair, which can personalize your capes’ whimsical look.

Why Choose This Crochet Hooded Rose Cape?

Versatile Design: This stunning cape easily transitions from casual outings to elegant gatherings, making it a must-have addition to your wardrobe.

Intricate Techniques: Engage your skills with the combination of lacework and flower-making, providing a satisfying challenge for intermediate crocheters.

Textural Delight: The blend of airy lace and plush faux fur creates a beautiful contrast, ensuring you stay warm without sacrificing style.

Personalization Opportunities: With options to modify colors and embellishments, you can create a unique cape that reflects your personal aesthetic.

Layering Essential: This cozy piece is perfect for layering, adding a touch of whimsy to any outfit while keeping you comfortable.

Gauge & Sizing Notes

Don't skip the gauge swatch! Checking your tension is crucial for ensuring your crochet hooded rose cape fits beautifully and drapes elegantly. Aim for a general guideline of approximately 4×4 inch (10×10 cm) square = 14 double crochets by 8 rows, but remember, your unique tension will affect the outcome. If you'd like to adjust the size, you can increase your starting chain in multiples of 80 to expand the width or decrease it to make the cape fit more snugly. If your tension swatch is too small, simply try going up a hook size for a looser, more comfortable gauge, or down a hook size if it's too large. Happy crocheting!

Step-by-Step Pattern for Crochet Hooded Rose Cape

Row 1: Foundation Chain
Start by chaining 80 stitches; this will form the foundation of your crochet hooded rose cape. Ensure your chains are not too tight to allow for easy stitching in the next rows. Join with a slip stitch (sl st) to form a circle, being careful not to twist your chain. This initial round sets the base for the following increases and lacework.

Row 2: Increase Round
Chain 3 (counts as the first double crochet, dc), then work 1 dc in the same stitch (inc). Next, 1 dc in the next stitch, 2 dc in the following stitch (inc). Repeat this sequence around the circle to add volume, leading to a total of 120 stitches (120 sts) at the end of this round. Your work should start to flair out slightly.

Row 3: Establishing Lace Pattern
Chain 3, skip 2 stitches, and 1 dc in the next stitch, chain 2, 1 dc in the same stitch. Repeat this pattern across the round. This establishes the first row of the lace pattern for your hooded rose cape, and will result in 40 shell-like groups. You should also notice open spaces forming for the lace effect.

Row 4: Continue Lace Sequence
For this round, chain 3 and work 1 dc into the first chain space from the previous round. Then, chain 2, 1 dc in the next chain space; continue this around. This round helps to further define the lacework, ensuring an airy and floral look to your cape. At the end of this round, you will still maintain 120 stitches (120 sts).

Row 5: Repeat Lace Rows
Repeat Rows 3 and 4 for a total of three times, building the beautiful lace texture in your crochet hooded rose cape. By now, you should see the intricate floral designs taking shape, with each layer accentuating the open stitches. Your work should feel comfortable and flowing, beginning to resemble the desired garment.

Step 6: Body Length
Continue to crochet in rounds without additional increases for the next 12 rows, maintaining the established lace pattern. This will create the body of the cape. Focus on maintaining even tension in your stitches and check that the lace pattern aligns properly as you progress. Your work should now begin to drape elegantly.

Step 7: Shaping the Hood
To create the hood, chain 60 and join with a sl st to form a circle. Begin working in double crochet (dc) for the next 12 rounds, increasing every fifth stitch to shape the hood. This will add volume and allow the hood to comfortably frame the face. You should see the hood start to take form beautifully.

Step 8: Faux Fur Border
With your white yarn, attach at the edge of the hood and work 1 sc in each stitch around, creating a cozy faux fur border. This trim adds elegance and texture to your crochet hooded rose cape, serving as a perfect contrast to the lace body. At the end of this round, make sure to end on a clean stitch count that fits the shape of the hood.

Step 9: Rose Flowers
To create the roses, start with a magic ring and work 5 dc into the ring. Pull tight to close the circle. For the second round, do (1 dc, chain 1, 1 dc) in each stitch around, creating petals. Assemble and sew the rose flowers onto the hem of your cape, arranging them to mimic a natural floral design.

Step 10: Final Finishing Touches
Lastly, add 1 sc along the edges of the cape to create a neat finish. Weave in all loose ends using your yarn needle for a polished look. If desired, attach buttons or other embellishments for a personal touch. With each detail meticulously crafted, your whimsical crochet hooded rose cape is now complete and ready for wear!

What to Pair with the Crochet Hooded Rose Cape?

Creating a matching set can add an enchanting touch to your collection of cozy layers, like a delightful adventure waiting to unfold.

  • Floral Crochet Beanie: Use the leftover pink yarn to craft a sweet beanie, adorned with tiny rose accents for a charming unified look. This practical accessory ensures warmth for your head while embodying the same floral spirit as your cape.

  • Rose-Embellished Fingerless Gloves: A perfect match, these gloves keep your hands cozy, allowing for artistry in the chilly air. Each mini rose can accentuate the gloves while echoing the beautiful details of your crochet hooded rose cape.

  • Layered Shawl: With its luxurious drape, a shawl made from coordinating yarn adds extra warmth. Its flowing style complements the cape beautifully, perfect for those breezy evenings outdoors.

  • Charming Crochet Scarf: A long scarf pairs perfectly with the cape, lending an extra touch of softness. Create it from the same yarn colors to maintain a cohesive look, ensuring you stay stylish and snug.

  • Matching Rose Brooch: Handcraft a small brooch from the same floral theme, which can be pinned to the cape or any other outfit. This tiny embellishment adds a personal flair and a sweet nod to the heartwarming design.

Expert Tips for Your Crochet Hooded Rose Cape

  • Maintain Even Tension: Consistent tension is key for a beautiful drape. Practice getting comfortable with your yarn and hook to avoid uneven stitches and puckered fabric.

  • Use Stitch Markers: Track rounds or crucial increases easily by placing stitch markers at the beginning of each round. This will prevent losing count and help you stay on track with the lace pattern.

  • Block Before Assembly: Take the time to block each piece gently before sewing them together. This enhances the final shape and helps the lace texture stand out beautifully.

  • Secure Faux Fur Edges: When adding the faux fur border, ensure you keep your stitches clean and close together, as loose stitches can cause the fur trim to sag.

  • Double-Check Your Rose Attachments: As you sew on your roses, carefully arrange them to ensure an appealing layout. Pay attention to how they overlap to mimic natural foliage without looking disorganized.

  • Final Finishing Touches: Weaving in yarn ends thoroughly will provide a polished look to your crochet hooded rose cape and prevent any lingering loose threads.

Crochet Hooded Rose Cape Variations

Embrace your creativity by customizing the crochet hooded rose cape to make it truly your own!

  • Yarn Weight Swap: Choose lighter yarn for a breezy summer version, altering the gauge for optimal drape.

  • Color Play: Experiment with pastel hues like mint or peach for unique roses—see how different shades transform the overall look!

  • Fiber Alternatives: Opt for cotton yarn for a breathable summer piece, perfect for those warmer days ahead.

  • Fringe Charm: Add fringe along the edges for a boho vibe. This simple detail can bring a playful twist to your final design.

  • Size Adjustments: For a more snug fit, decrease the starting chain and corresponding rounds. Play with measurements to find your perfect size!

  • Texture Tweaks: Introduce a ribbed border instead of faux fur for a modern twist—this change will give your cape a fresh, textured edge.

  • Beaded Embellishments: Stitch on beads in the center of your roses for a touch of sparkle. It adds glamour without overwhelming the floral theme.

  • Bold Contrast Trim: Use a bright hue for the faux fur border, making it pop against the main color of the cape. This will create an eye-catching focal point!

Care Instructions for Crochet Hooded Rose Cape

  • Hand Washing: Gently wash your crochet hooded rose cape in cold water using a mild detergent. Avoid vigorous agitation to prevent any potential felting or pilling, keeping it looking pristine.

  • Drying/Blocking: After washing, lay the cape flat on a clean towel to dry. Reshape it while damp to maintain the beautiful lace and floral designs, allowing it to air dry completely for best results.

  • Storage: When not in use, store your cape folded in a cool, dry place. Avoid hanging it to prevent stretching, so it maintains its elegant drape and structure.

  • Avoid Direct Sunlight: Always store your crochet hooded rose cape away from direct sunlight as UV rays can fade colors over time, keeping your whimsical creation vibrantly beautiful.

Whimsical Crochet Rose Hooded Cape FAQs

Can I substitute the pink yarn for a different type, like cotton?
Absolutely! While the pattern recommends worsted weight pink yarn, you can definitely use cotton yarn, just make sure it's in a similar weight category. Keep in mind that cotton has less elasticity than acrylic, which may affect the drape and texture of your crochet hooded rose cape, but it can create a lovely, breathable fabric!

How can I adjust the size of the cape for a more fitted look?
Don’t panic! To make the cape a bit smaller, you can reduce the initial chain to 70 or 75 stitches. Alternatively, if you want it to be a bit larger, increasing the chain to 85 or 90 stitches will work nicely while maintaining the lace pattern. Remember to keep track of rounds to ensure the proportions remain balanced.

Why is my crochet work curling at the edges?
Curling can be common, especially with lace patterns. It's often due to tension differences. I recommend checking your gauge first! If your work still curls, consider blocking it. Gently stretching and pinning the finished piece while damp can help even it out and enhance the lace effect.

What size hook should I use if I want a tighter or looser gauge?
For a tighter gauge, you could try using a slightly smaller hook, like a 5.5 mm. For a looser gauge, go up to a 6.5 mm. Just remember, changing your hook size will alter the final drape of your crochet hooded rose cape, so keep that in mind as you make adjustments!

How do I fix dropped stitches in my lacework?
It's an easy fix! Simply use your yarn needle to carefully weave the yarn back into the work, and then secure it in place. If you notice a dropped stitch mid-section, gently pull on the surrounding stitches to reconfigure the lace pattern for a nice finish. If needed, you can also crochet a small chain stitch to replace the dropped part.

What if I want to add more floral embellishments?
Feel free to get creative! Adding more roses or even leaves can enhance the charm of your crochet hooded rose cape. You can make smaller or larger roses in varying colors for a more dramatic effect. Just ensure they are securely attached, so they won’t come loose when wearing your beautiful creation!

Filed Under: Uncategorized

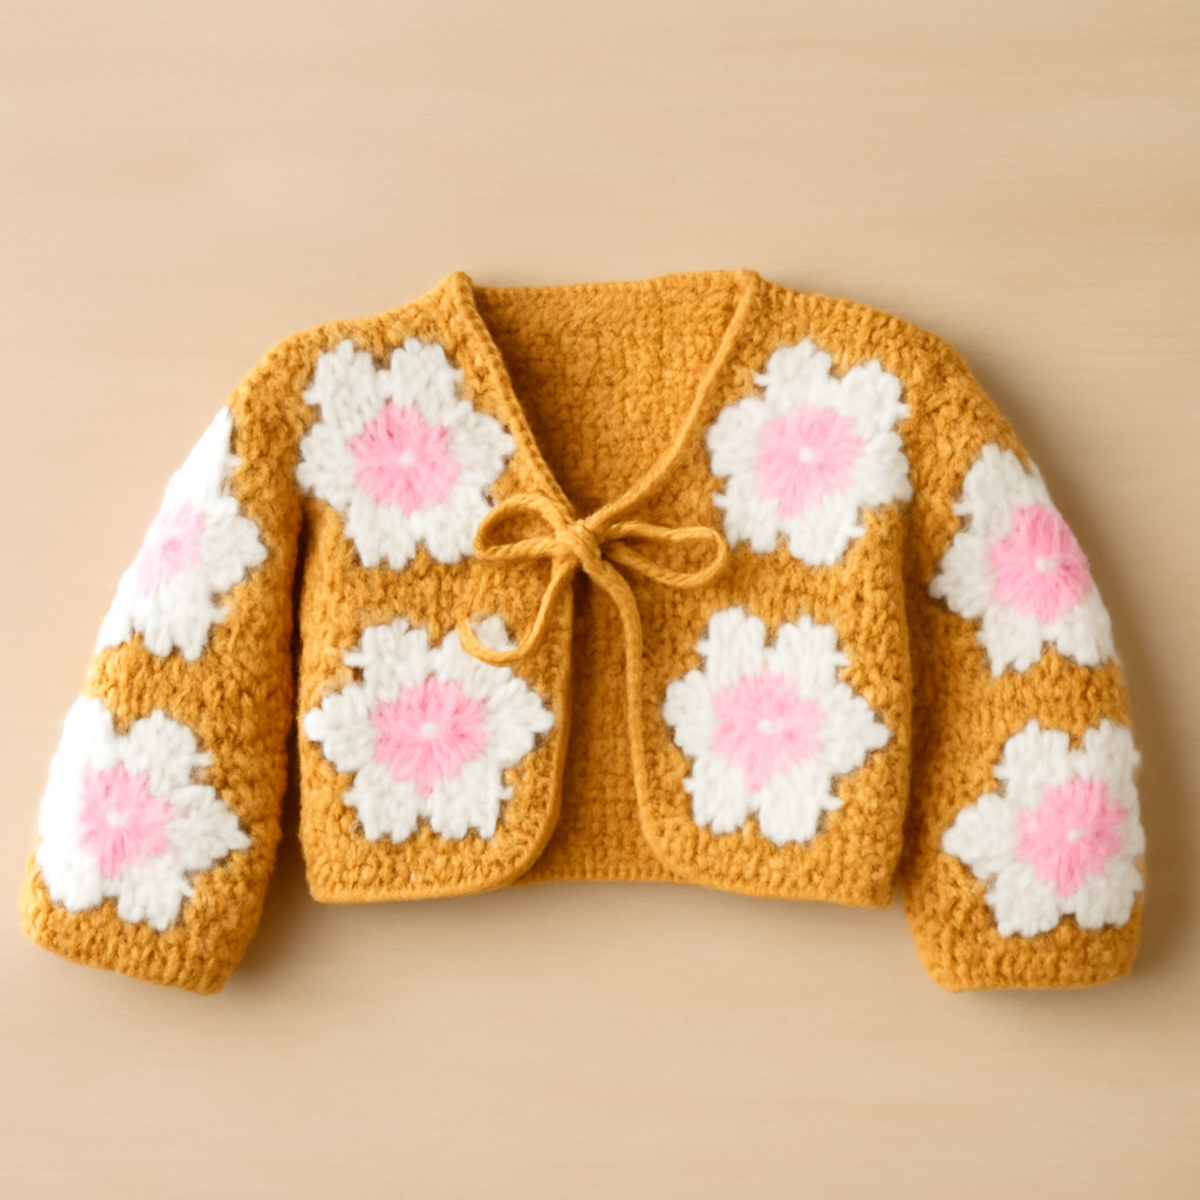
Whimsical Crochet Baby Cardigan for Cozy Playdates

August 23, 2026 by Publisher Leave a Comment

Whimsical Crochet Baby Cardigan for Cozy Playdates

As I wrapped my little one in love, I couldn't help but smile at how a few simple stitches could transform into something so whimsical. Meet the “Floral Delight Baby Cardigan”—a charming crochet baby cardigan perfect for turning heads and warming hearts. With its playful floral motifs and cozy texture, this versatile piece is not just an accessory but an essential addition to any baby’s wardrobe. Whether it’s a sunny outing or snuggly indoor play, this cardigan brings both style and comfort to the forefront. It’s a delightful stash-buster that works up quickly, making it a fabulous gift for baby showers or birthdays. Are you ready to bring some joy into your crochet projects? Let’s dive into the fun of creating this beautiful cardigan together!

Floral Delight Baby Cardigan Materials & Tools

  • Medium Weight Yarn – Approximately 300-400 yards of an acrylic or cotton blend will provide both softness and durability, perfect for a cozy crochet baby cardigan.
  • 5.5 mm (I-9) Hook – This size is ideal for creating the body of the cardigan; a 6 mm (J-10) hook can also be used for a looser drape.
  • Stitch Markers – These will help keep track of rounds, especially handy for maintaining your stitch count during flower motif creation.
  • Safety Eyes (optional) – If you'd like to add a playful touch, these can be sewn onto flower motifs or other decorative elements.
  • Ribbon or Cord (optional) – For a lovely front tie closure, choose a material that complements your yarn’s color palette.

Why will you adore this cardigan?

Whimsical design, this cardigan combines playful floral motifs with a cozy silhouette, making it perfect for everyday adventures. Beginner-friendly, the pattern is simple enough for new crocheters to tackle while offering enough charm to delight intermediate crafters. Versatile wear, dressing up or down for any occasion is a breeze, ensuring your little one remains stylish year-round. Quick to make, this project serves as a splendid stash-buster, allowing you to use leftover yarn and whip up gifts in no time. Loveably comfy, the soft texture and relaxed drape keep babies snug yet free to wiggle and play!

Gauge & Sizing Notes

Don't skip the gauge swatch! It's essential for ensuring that your crochet baby cardigan fits your little one just right. As a general guideline, aim for a tension swatch that measures 4×4 inches (10×10 cm) with about 16 double crochets by 10 rows. If your swatch is smaller than this, consider going up a hook size; if it's larger, try a smaller hook. To adjust the size of your floral delight baby cardigan, increase your starting chain in multiples of 4 for width or add more rows for length, ensuring a cozy fit that keeps your baby snug and stylish. Happy crocheting!

Step-by-Step Pattern for Floral Delight Baby Cardigan

Row 1: Foundation Chain
Start with a foundation chain of 50-60 chains, depending on desired width for the baby cardigan. Make sure your chain is loose to ensure a comfy drape; this is essential for a lovely start. Your work should lay flat and measure approximately 12-14 inches wide.

Row 2: Begin the Body
In the second chain from the hook, work 1 hdc (half double crochet) in each chain across. Turn your work, and you should have 49-59 hdc for this row. This establishes the width of the cardigan body, and you’ll notice it starts to feel warm and cozy.

Row 3: Continue Body Stitches
Ch 2 (counts as 1 dc), then in the same hdc, work 1 dc. Continue with 1 dc in each hdc across the row. Turn your work; at the end of this row, you should have 49-59 dc. Your fabric should feel softer and start to puff up slightly.

Row 4: Add Texture
Ch 1 and work 1 sc (single crochet) in the first dc. Skip the next dc, work 5 dc in the next dc (this creates a shell), skip the next dc, sc in the next dc. Repeat from * to * across the row. You should end with a sc in the last dc for a total of 24-29 shells, creating beautiful texture.

Row 5: Building on Shells
Ch 2, turn, and work 1 dc in the sc of the previous row. For each shell, work 1 dc in the top of the shell (5 dc in each) and 1 sc in the next sc. Continue until you reach the end, ensuring balance with a total of about 74-87 stitches which adds lovely continuity to the body.

Row 6: Create Armholes
To form armholes, ch 1, sc in the first 15-20 stitches, ch 20 (for the armhole), skip the next 20 stitches, sc in the next set of 15-20 stitches. Turn your work; this creates openings for the sleeves. Ensure the transitions are smooth and balanced on both sides.

Sleeve Round 1: Initial Sleeve Rows
With the sleeve yarn color, join into the armhole ch with a slip stitch. Work in rounds, beginning with ch 2, and create 20 dc around the armhole. Mark the beginning of the round; this is now the start for your sleeve. Your sleeve should appear slightly gathered as you crochet.

Sleeve Round 2: Add Length
Continue working in rounds, using dc. Every fifth round, incorporate an inc (increase) by adding an additional dc in one stitch (total of 24-30 stitches after this increase). Your sleeve should start to take shape and feel cozy around the arm.

Sleeve Round 3: Finishing Up
After reaching the desired length (approximately 6-8 inches), sl st to finish the round. Fasten off, leaving a long tail for weaving. Your sleeve should be light, airy, and comfortably snug for movement, enhancing the whimsical look of the floral baby cardigan.

Step 3: Assembly
To finish the floral delight baby cardigan, align the body and sleeves, using a sl st to attach. Leave openings for the armholes, ensuring a gentle curve to the body. Weave in loose ends for a clean finish, and your cardigan should feel soft and ready for your little one.

Step 4: Add Front Tie Closure
For the front tie, create a cord of ch 50-60, depending on your preference for length. Attach to the bottom of the front opening using sl st. This charming touch allows you to close the cardigan beautifully, blending function and design for a lovely finish.

Step 5: Border Edging
Finally, add a border by working one round of sc around the entire cardigan. Make sure that each corner is smooth, adding an extra sc to create a lovely trim. Your floral delight baby cardigan is now complete, ready to enjoy all the cuddly moments!

Crochet Baby Cardigan Variations

Explore delightful ways to make this crochet baby cardigan uniquely yours with these fun twists and swaps.

  • Yarn Weight Swaps: Switch to a lighter yarn for a breezy spring look, or use bulkier yarn for added warmth during chilly days.
  • Fiber Alternatives: Opt for cotton for breathability or a soft acrylic blend for easy care, tailoring the cardigan to your needs.
  • Color-Blocking: Experiment with bold color blocks or gradient hues, giving each cardigan a unique sunset or rainbow vibe.
  • Seasonal Motifs: Fill your cardigan with seasonal motifs—think snowflakes for winter or butterflies for summer—keeping it engaging year-round.
  • Sizing Adjustments: Add more rows or increase the foundation chain to create a cardigan for toddlers or older babies, accommodating their growth.
  • Texture Enhancements: Incorporate fringes or pom-poms on edges for playful accents, adding dimension to your cozy creation.
  • Decorative Borders: Finish with a scalloped or shell stitch border for a touch of whimsy, making your cardigan stand out in any baby’s wardrobe.
  • Fun Fasteners: Replace the ribbon tie with wooden buttons or cute clasps, putting a charming spin on the front closure.

Care Instructions for Floral Delight Baby Cardigan

Machine Washing: Use cold water on a delicate cycle to gently wash your crochet baby cardigan, preventing any unwanted agitation that could lead to felting or pilling.

Hand Washing: For the best care, hand wash your cardigan in lukewarm water with a mild detergent. Gently knead the fabric and avoid twisting to preserve its shape and structure.

Drying/Blocking: Lay the cardigan flat on a clean, dry towel to air dry. This method helps retain the relaxed drape intended for your floral delight baby cardigan without distorting its shape.

Storage: Store in a cool, dry place away from direct sunlight. Avoid folding to minimize creasing; instead, hang it or lay it flat to keep those lovely stitches intact.

What to Pair with the Floral Delight Baby Cardigan?

Elevate your crafting journey by weaving a delightful set that embodies warmth and charm for your little one.

  • Matching Floral Booties: Adorn tiny feet with cozy booties featuring the same flower motifs, making each step as whimsical as the cardigan.
  • Charming Baby Hat: Create a soft hat embellished with floral or granny square accents, ensuring your baby stays snug and stylish. Wrap that little noggin in love!
  • Cozy Baby Blanket: Crochet a pastel or variegated baby blanket to complement the cardigan, perfect for cuddly moments or pram outings.
  • Festive Headband: Whip up a matching headband that celebrates the whimsical floral theme, ensuring a complete and adorable outfit.
  • Drop-Stitch Sweater: For those who wish to extend their crochet baby cardigan journey, consider a drop-stitch sweater that carries the same playful design here too!

Expert Tips for Crochet Baby Cardigan

  • Keep Tension Even: Maintain a loose grip on your yarn for the first few rows to ensure a nice drape and avoid pulling your stitches too tight.

  • Count Often: Frequently count your stitches, especially after creating flower motifs, to prevent any accidental omissions that could disrupt your pattern.

  • Secure Ends: Weave in loose ends carefully, so they don’t come undone over time. A clean finish is essential for a polished crochet baby cardigan.

  • Test for Gauge: Before starting in earnest, consider making a small gauge swatch to perfect your tension, especially when adapting sizes for older children.

  • Block for Shape: If using cotton yarn, block the finished cardigan to enhance stitch definition and achieve a beautifully polished look that makes your work shine.

Floral Delight Baby Cardigan FAQs

Can I substitute yarn for this crochet baby cardigan?
Absolutely! While the pattern calls for a medium-weight (worsted) yarn, you can substitute acrylic with cotton, or even a bamboo blend. Just remember to check your gauge to ensure the cardigan will fit!

How do I make the cardigan bigger or smaller?
Don't panic! To adjust the size, simply add or reduce the number of foundation chains. For a larger size, increase it by 10-20 chains or add extra rows for length. Just keep an eye on your stitch count to maintain balance throughout the design.

Why is my work curling at the edges?
Curling can be frustrating, but it's often due to tight tension. I recommend checking your tension and trying to keep your stitches a bit looser, especially in the initial rows. Blocking the finished piece can also help flatten out those pesky edges.

What hook size should I be using for this pattern?
The suggested hook size is a 5.5 mm (I-9) or 6 mm (J-10). If you're aiming for a tighter fabric, go with the smaller hook. For a looser drape and a more relaxed feel, the larger hook is a great option!

How do I fix dropped stitches in my crochet work?
It's an easy fix! Simply locate the dropped stitch and use your crochet hook to pull the working yarn through the stitch above it. Then, continue crocheting as normal. If you're uncertain, you may want to go back a few rows to maintain the integrity of the pattern.

Can I use different flower motifs for the cardigan?
Absolutely! You can get creative with your floral motifs to suit different seasons or personal styles. Tulips for spring or sunflowers for summer would look delightful! Just ensure they fit within the overall aesthetic of the cardigan.

Filed Under: Uncategorized

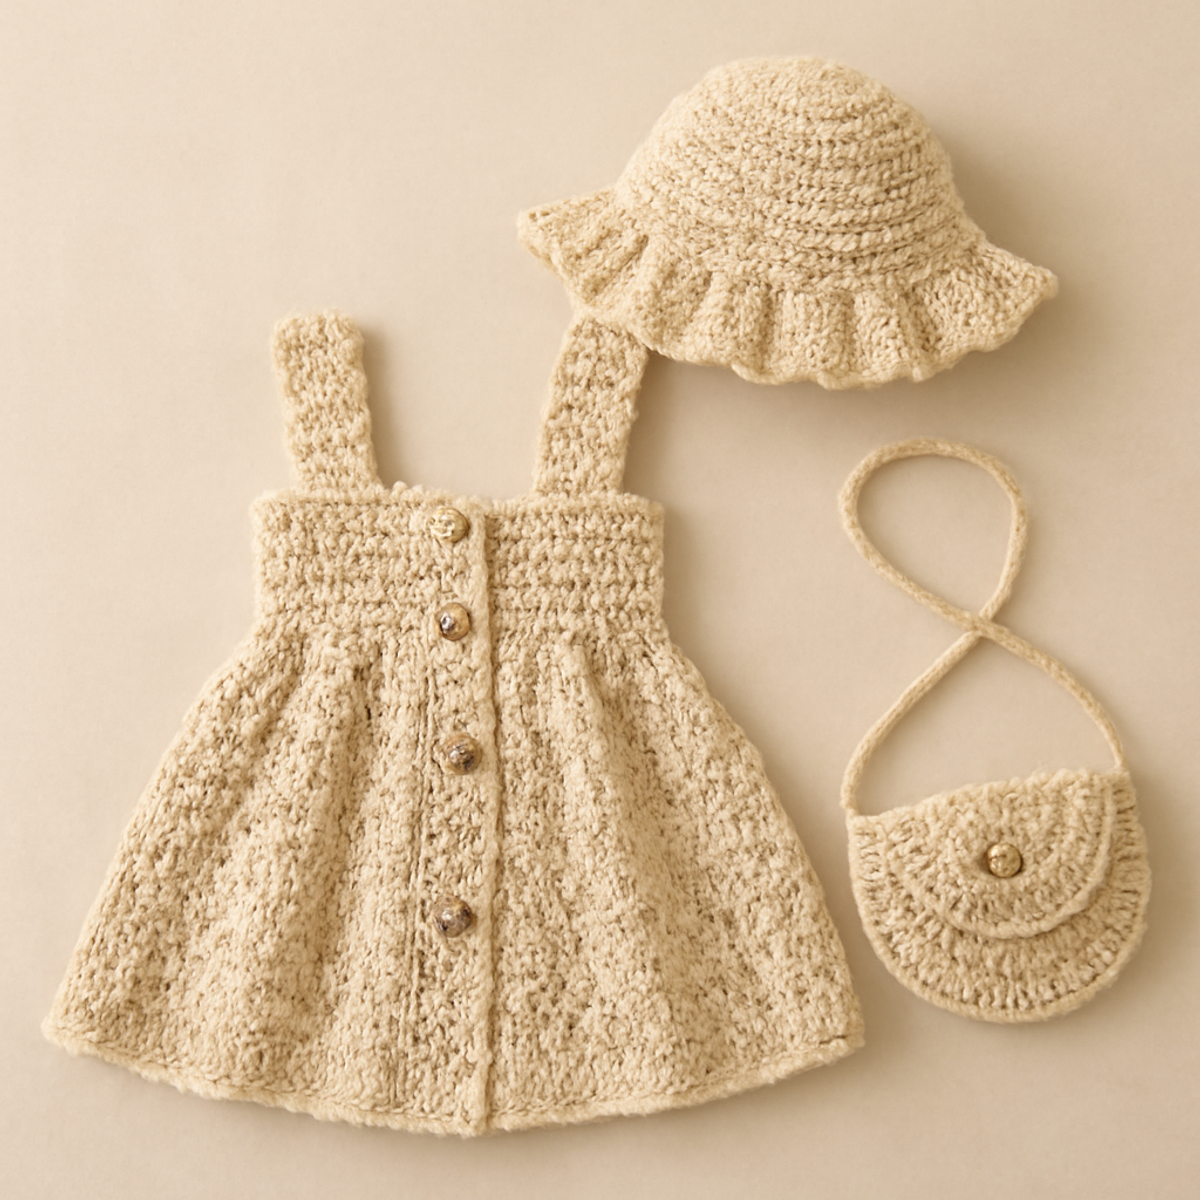
Charming Crochet Baby Dress Set with Hat & Bag for Summer

August 23, 2026 by Publisher Leave a Comment

Charming Crochet Baby Dress Set with Hat & Bag for Summer

As I nestled into my favorite chair with a cup of tea, I couldn't help but feel the excitement bubbling up at the thought of crafting a charming crochet baby dress set. This "Sweet Summer Baby Dress and Accessories Set" captures the whimsy and joy that comes with dressing little ones for sunny days. Not only does this delightful ensemble include a lovely dress, a coordinating sun hat, and a small handbag, but it also offers a chance to showcase your creativity by mixing yarn colors and textures. Perfect for those bright summer outings, this project is designed for intermediate crafters looking to elevate their crochet skills. You'll love how quickly it works up, making it an ideal treat for the special little fashionista in your life. Ready to bring this adorable set to life? Let’s dive in!

Crochet Baby Dress Set Materials & Tools

  • Yarn

    • Medium Weight (Worsted Weight) Yarn – Approximately 350-450 yards total, preferably cotton or a cotton blend for breathability.
  • Tools & Notions

    • 5.0mm (H) Hook or 5.5mm (I) Hook – Choose based on your stitch definition and personal tension preferences.
    • Wooden Buttons – A charming choice for the dress closure, typically 1-2 for this project.
    • Stitch Markers – Helpful for organizing rounds and keeping track of your stitches throughout the crochet baby dress set.

Why Choose This Crochet Baby Dress Set?

Uniqueness: This charming set combines a dress, hat, and bag, making it a standout piece for summer outings and special occasions.
Intermediate Skills: Perfect for those looking to refine their crochet techniques with delightful stitches like cluster and bobble.
Personalization: Use your favorite yarn colors, allowing you to create a one-of-a-kind gift that reflects your style.
Quick Project: Enjoy the satisfaction of completing this ensemble in a reasonable time frame, perfect for last-minute gifts.
Comfort & Style: Designed with light, breathable yarn, your little one will be comfortable while looking adorable.
Versatile Look: Dress it up or down; this set is equally charming for casual playdates or family gatherings!

Gauge & Sizing Notes

Don't skip the gauge swatch! Ensuring that your tension is correct for the crochet baby dress set will make a world of difference in achieving the desired fit and look for your little one. Aim for a tension swatch that measures 4×4 inches (10×10 cm), which typically corresponds to a balanced stitch pattern in this project. If you're looking to adjust the size of the dress, remember to increase your starting chain in multiples of 6 + 2 for width, or modify the rows accordingly for length. If your gauge is too tight, simply try using a larger hook size to achieve the perfect fit for your charming crochet baby dress set.

Step-by-Step Pattern for Sweet Summer Baby Dress and Accessories Set

Row 1: Bodice Foundation
With your chosen yarn and H (5 mm) hook, create a foundation chain of 42 ch. Join the last ch to the first with a sl st, forming a ring. Work in rounds, starting with 1 ch, then make 42 sc around the ring. Your work should feel snug yet flexible (42 sts).

Row 2: Begin the Bodice
For this row, 1 ch, then hdc in each stitch around. This will give a lovely drape to the bodice, making it comfy for your little one. Be sure to keep your tension even; you'll complete the round with 42 hdc (42 sts).

Row 3: Shaping the Bodice
Continue with the bodice by working an additional round of 1 ch, then *dc in the next 5 stitches, inc in the next stitch; repeat from * around. This strategically adds width and shape to your crochet baby dress set (49 sts).

Row 4: Establishing the Armholes
1 ch, then hdc in the next 8 stitches. Drop the yarn and sl st over the next 5 stitches to create the armhole, then continue with hdc in the next 8 stitches, leaving a gap for the second armhole. End with a sl st (42 sts total).

Row 5: Creating the Skirt Base
Start the skirt by chaining 3 (counts as first dc), then dc in the same st. In the next st, work 2 dc (inc), *sk 1 st, then work 2 dc in the next; repeat from * around. This adds the flared shape to the skirt. Join with a sl st (63 sts).

Row 6: Textured Skirt Pattern
1 ch, then *cluster (3 dc together) in the next stitch, skip 1; repeat from * until the end. This cluster stitch creates lovely texture, making the dress special. Join with a sl st for your round completion (31 clusters).

Row 7: Bodice Ruffle
Switch to a lighter yarn (optional) and hdc around the previous round to create a delicate ruffle. Work 1 hdc in each cluster and 1 hdc in the spaces between. Continue around smoothly without pulling too tight (63 sts).

Row 8: Finishing the Skirt
For the final row of the skirt, switch back to your main color if desired. Chain 1, then sc into each st around for a clean finish. Your skirt should now have a neat, gathered edge that flows beautifully (63 sts).

Step 1: Straps
To create the dress straps, make a chain of 25. Work 1 sc in each ch across. Finish off and leave a long tail for sewing. Repeat this to make two straps. Attach them to the front of the bodice for the final touch (2 straps).

Step 2: Sun Hat Crown
With the same yarn, create a foundation of 4 ch and join into a ring. Work 8 sc in the ring. Join and change to working in rounds with dc for 4 rounds, increasing evenly by adding stitches to form the crown’s shape, including 16 sts in total (16 sts).

Step 3: Hat Brim
To give the sun hat an adorable brim, make 1 ch, then *dc in the next, inc in the next; repeat from * around. This will give the hat a lovely wide brim for sun protection. Your round should finish with a total of 24 stitches (24 sts).

Step 4: Handbag Construction
Start with a foundation of 12 ch. Work sc into each chain across for 5 rows. Fold the rectangle in half, and use sc to join the two sides, leaving the top open for a cozy little bag (5 rows).

Step 5: Finishing Touches
Add a button closure to the handbag and the dress. Sew on your chosen buttons, and secure straps at the recommended points for the best look. Don’t forget to block your “Sweet Summer Baby Dress and Accessories Set” for that polished finish!

Expert Tips for Crochet Baby Dress Set

Tension Matters: Maintain consistent tension throughout your project to ensure the bodice fits snugly. Regularly check your stitches against a gauge swatch.

Use Stitch Markers: Place stitch markers to indicate the beginning of rounds or important stitch changes. This will help avoid confusion and keep your stitch count accurate.

Count Your Stitches: After each round, count your stitches. This simple step can help you catch any errors early in your work on the crochet baby dress set.

Blocking is Key: Don't skip blocking your finished pieces; it'll enhance your stitch definition and help maintain the lovely shape of your dress, hat, and bag.

Securely Attach Straps: Take your time when sewing on straps. Ensure they are securely attached to avoid any mishaps when dressing your little one.

What to Pair with Sweet Summer Baby Dress Set

Imagine the perfect sunny day, where your little one twirls in a charming outfit crafted with love and imagination.

  • Matching Sunbonnet: Create a delightful sunbonnet to shield delicate eyes from the summer sun while adding extra charm.

  • Adorable Booties: Whip up a pair of cute booties in the same yarn, ensuring little toes are cozy and trendy.

  • Playful Cardigan: A lightweight cardigan in complementary colors can add warmth for cooler summer evenings and make the outfit even cozier.

  • Charming Baby Blanket: Craft a matching baby blanket to wrap around during outings, giving an extra layer of comfort and style.

  • Personalized Hair Clips: Add a whimsical touch with handcrafted hair clips using leftover yarn, perfectly aligning with the crochet baby dress set theme.

Care Instructions for Crochet Baby Dress Set

Machine Washing: Use cold water on a gentle cycle to clean your crochet baby dress set. This helps prevent any felting or pilling while maintaining its lovely appearance.

Hand Washing: If preferred, gently hand wash the pieces in cold water with mild detergent. Avoid agitating too much to preserve the delicate stitches and texture.

Drying/Blocking: Lay flat to dry on a clean towel or blocking mat. This method will ensure your finished set retains its shape and showcases those beautiful stitches.

Storage: When not in use, store the set in a cool, dry place. Avoid hanging to prevent stretching and maintain the structure of your crochet baby dress set.

Variations & Substitutions for Crochet Baby Dress Set

Feel free to explore your creativity and make this crochet baby dress set uniquely yours!

  • Color Choices: Opt for bright, vibrant colors like yellow and coral to create a cheerful summer look. Your color palette can evoke sunny days and whimsical vibes.

  • Yarn Substitutions: Try a cotton blend for added softness or a lightweight acrylic for a splash of versatility. Each material will lend a different feel—soft and snug versus airy and playful.

  • Length Adjustments: Shorten the dress for a fun tunic style or add length for a more formal gown. Depending on the occasion, you can customize it to suit playful days or special celebrations beautifully.

  • Textured Embellishments: Consider adding decorative flowers, patches, or embellishments to the bodice. A touch of creativity will transform your set into a cherished keepsake.

  • Size Variations: To fit older children, simply add a few extra rounds to the dress and customize the length of the straps. This adjustment can invite playful exploration for many more adventures.

  • Fringed Hat: Adding fringe to the brim of the sun hat can enhance whimsy and playfulness. A simple touch can make your set stand out in a delightful way.

  • Matching Accessories: Create tiny booties or hair accessories to round out the ensemble. These additional pieces can make your gift even more thoughtful and well-coordinated.

  • Button Variations: Swap out wooden buttons for colorful, oversized options to add character and flair. An unexpected touch can bring a delightful surprise to your finished piece!

Sweet Summer Baby Dress and Accessories Set FAQs

Can I substitute the yarn with a different type?
Absolutely! While the recommended yarn is a medium weight cotton or cotton blend for breathability, you can certainly use a different yarn like acrylic. Just ensure it has a similar weight to maintain the intended fit and drape of your crochet baby dress set. A cotton blend in pastel colors could also provide a delightful finish!

How do I adjust the size of the dress for a larger baby?
No problem! To make the dress larger, you can add additional chains to your foundation chain to increase the bodice circumference. Additionally, when creating the skirt, simply continue working extra rounds or increasing stitches as needed to achieve the desired length. Just be sure to maintain your stitch count for the bodice shaping to keep the fit snug.

Why is my work curling at the edges?
Don’t panic! Curling can often happen when the tension is too tight or if the stitches are too loose. Make sure to check your tension while working, and try switching to a larger hook size for a looser stitch definition. Also, consider blocking your pieces after finishing; it can help flatten and shape your crochet baby dress set beautifully!

How do I fix dropped stitches?
It's an easy fix! When you spot a dropped stitch, use a crochet hook to pull the dropped stitch back up to the correct row. Then, carefully rework any nearby stitches as needed to blend them back into the pattern. If you're unsure, take a moment to refer back to the pattern for guidance on stitch counts.

What hook size should I use for this pattern?
Based on the pattern specifics, I recommend starting with a size H (5.0 mm) or I (5.5 mm) hook. The choice may depend on your personal tension and the overall look you want for your crochet baby dress set. Some crocheters prefer a looser stitch with a larger hook, so feel free to experiment a bit!

How can I add embellishments without ruining the structure?
Great question! You can add embellishments like flowers or patches after you’ve blocked the dress and secured its shape. Use a simple stitch to attach them without pulling too tightly, ensuring that they lie flat against the fabric. This way, your crochet baby dress set stays lovely and structured while showcasing your creativity!

Filed Under: Uncategorized

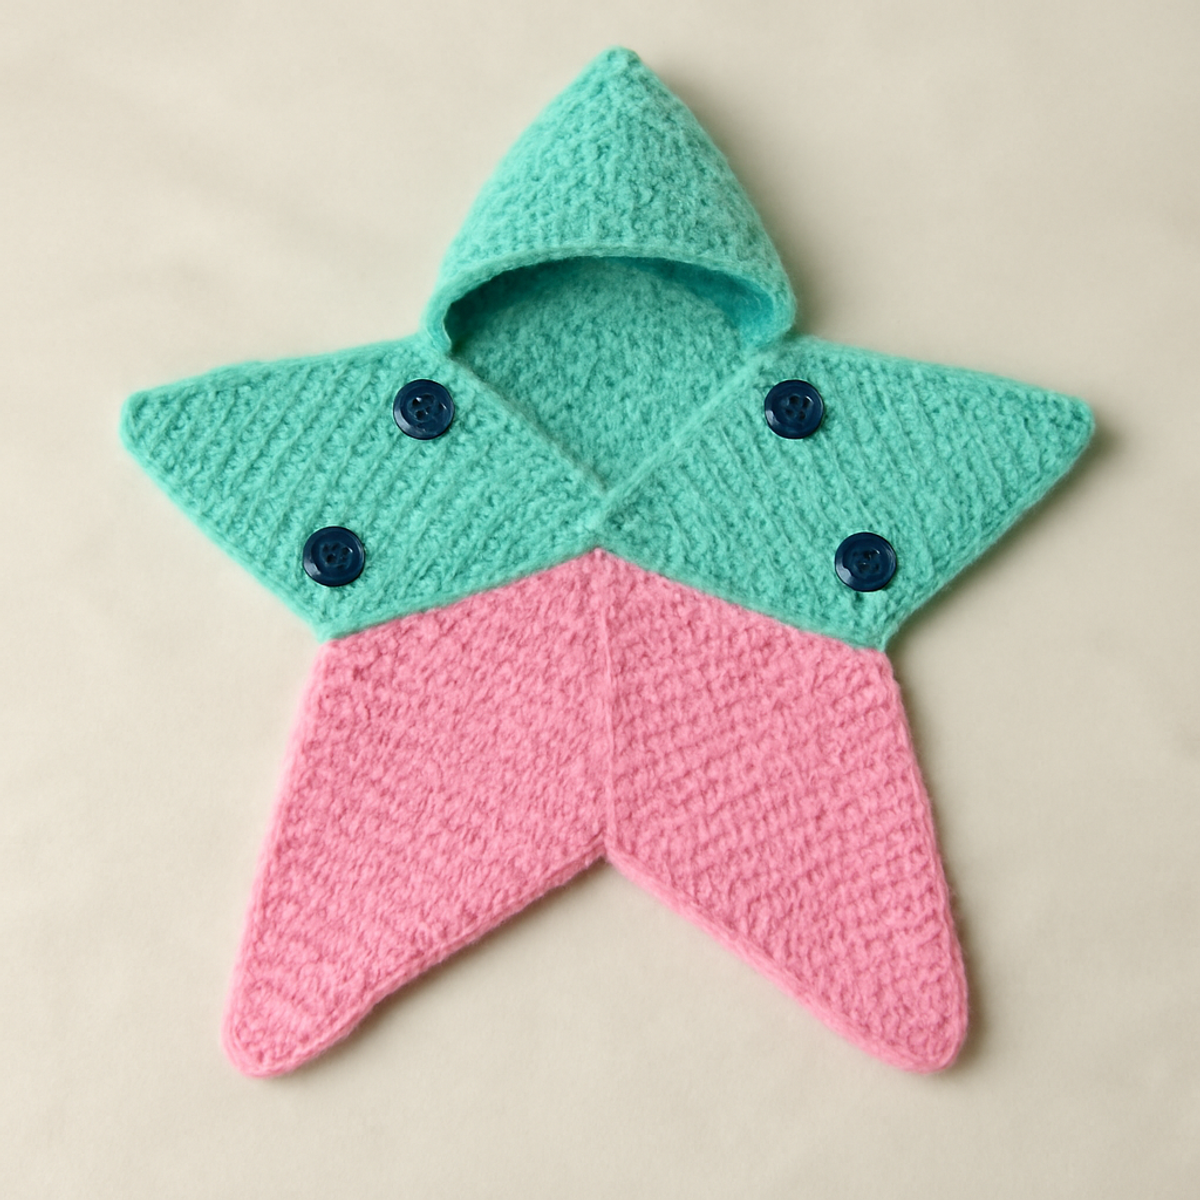
Cozy Star Baby Wrap: A Whimsical Crochet Delight

August 23, 2026 by Publisher Leave a Comment

Cozy Star Baby Wrap: A Whimsical Crochet Delight

As I snuggled my little one in a cozy blanket, I realized the joy of seeing their tiniest moments wrapped in love. The Starry Nights Crocheted Baby Wrap captures that essence perfectly with its charming star shape, designed not just for warmth, but to sprinkle a touch of whimsy into baby attire. This delightful star baby wrap works up quickly, making it an ideal project for those looking to create heartfelt gifts or cozy outerwear for colder days. With a soft and breathable medium-weight yarn, it ensures that your little star stays snug and comfortable while looking adorable! Ready to infuse your yarn stash with a sprinkle of magic? Let’s dive into this enchanting pattern together!

Star Baby Wrap Materials & Tools

  • Medium-Weight Yarn – Approximately 300-400 yards should suffice for this snug and soft star baby wrap.
  • 4.5 mm to 5.5 mm (G-H) Hook – Ideal for creating a tighter stitch that provides warmth without sacrificing comfort.
  • Pair of Buttons – Two buttons are recommended for each wrap to ensure easy closure and a charming finish.
  • Stitch Marker – A handy tool for keeping track of your stitches as you create this whimsical design.

Why Choose This Star Baby Wrap?

Whimsical Design: The enchanting star shape makes this wrap not only functional but also a captivating addition to any baby's wardrobe.
Quick to Crochet: This delightful star baby wrap works up rapidly, perfect for those last-minute gift needs or cozy outerwear for cool days.
Soft & Breathable Texture: Crafted from medium-weight yarn, it ensures a gentle caress on your baby's skin, providing both warmth and comfort without bulkiness.
Unique Customization Ideas: Personalize your wrap with various colors or embellishments, allowing you to create a special piece that's uniquely yours.
Practical & Adorable: Not just a pretty face, this wrap also features button closures for easy use, ensuring your little starlight stays snug during outings.
Perfect Fit: With dimensions designed for infants, this wrap wraps your baby securely while allowing freedom of movement, making it an instant favorite for parents.

Gauge & Sizing Notes

Don't skip the gauge swatch! Ensuring your tension is accurate when crafting the Starry Nights Crocheted Baby Wrap is crucial for achieving the cozy fit you desire. While an exact gauge measurement isn't specified, it's generally recommended to aim for a tension swatch that measures 4×4 inches (10×10 cm) in a pattern of your choice to get a feel for your stitches. To make this adorable star baby wrap larger or smaller, adjust your starting chain in multiples of 6 for the width of the star's base. If your swatch is too tight, simply try a larger hook size to obtain the perfect drape for your little star!

Step-by-Step Pattern for star baby wrap

Row 1: Starting the Star Base
Begin your star baby wrap by creating a magic ring. Inside the ring, chain 3 (counts as your first dc), then work 11 dc into the ring. Pull the ring tight, and join with a sl st to the top of your starting chain. You should have a total of 12 stitches—your work should form a small circle.

Row 2: Forming the Points
For Row 2, ch 2 (counts as hdc), and in the first st, hdc, then ch 2 and sl st back into the same st to form a point. In each of the next 11 sts, repeat this pattern (hdc, ch 2, sl st) until you end up with 12 points around your star. Your work should now look like it's starting to resemble a star shape.

Row 3: Creating the Star’s Body
Next, work into the star points for Row 3. Ch 1, and in each ch-2 space from the last row, work 2 sc. This will create the base of the star body. After completing this round, you'll have a total of 24 stitches. Your star should begin to expand and take on a fuller form.

Row 4: Expanding the Body
Now, for Row 4, ch 1, and in the first st, sc, then in the next st, 2 sc. Continue this pattern (1 sc in the next st, 2 sc in the following st) around the entire round. You should have a total of 36 stitches by the end. The star baby wrap will appear wider, preparing for the comforting layers.

Row 5: Building the Wrap
For Row 5, ch 1, and work 1 sc in each st around for a total of 36 sc. This will help to even out the previous increases and create a smoother edge. As you work, your wrap should feel cozy and robust, ideal for snuggling.

Row 6: Shaping the Edges
In Row 6, repeat the same as Row 5 (1 sc in each st), maintaining the stitch count at 36. This will add more height to the star baby wrap, giving it the necessary snugness while remaining lightweight for your little one. Make sure to maintain an even tension as you crochet.

Row 7: Adding the Hood
To create the hood, change to hdc in Row 7. Ch 2, then hdc in each of the next 4 sts, creating a gradual slope. At this point, your wrap should start to show a distinct shape, forming the upper section for the star baby wrap.

Row 8: Forming the Hood Taper
For Row 8, continue with hdc in the first 3 sts, then hdc2tog in the next to start tapering the hood. Repeat this around the row until you have 24 stitches remaining. At this point, your work should be narrowing toward the top point of the hood.

Row 9: Securing the Hood
In the final round for the hood, work 1 hdc in each remaining st to finish shaping the hood, totaling 12 hdc. After this round, your star baby wrap will have a completed point for the hood, sealing the star's whimsical design.

Step 10: Adding Button Closures
Finally, create buttonholes—work 2 sc in the next st, ch 2, then skip 2 sts and 1 sc in the next. Repeat around for a total of 2 buttonholes. Fasten off and secure your yarn ends. The star baby wrap is now ready for some adorable button embellishments!

Care Instructions for Star Baby Wrap

Machine Washing: Use cold water and a gentle cycle to keep your star baby wrap looking fresh and vibrant while avoiding felting or pilling.

Hand Washing: If preferred, hand wash in lukewarm water with mild detergent, gently pressing out dirt without agitating to preserve the shape and texture.

Drying/Blocking: Lay flat to dry in a shaded area, reshaping the star points as necessary. This helps maintain the integrity of your wrap’s whimsical design.

Storage: Store your star baby wrap in a cool, dry place; consider using breathable storage bags to protect it from dust while ensuring airflow.

What to Pair with Starry Nights Crocheted Baby Wrap

Creating cozy, coordinating accessories will make your crafting experience even more delightful and keep your little one stylishly snug.

  • Starry Hat: A charming matching hat adds an extra layer of warmth for your baby, perfect for chilly outings. Craft one in the same yarn for a seamless look!

  • Whimsical Booties: Keep tiny toes warm with adorable booties that share the same enchanting star motif, bringing together the whole outfit.

  • Soft Security Blanket: A mini blanket in a coordinating color can provide comfort during travels, wrapping your little star in soothing softness.

  • Dreamcatcher Mobile: Complement the baby wrap's aesthetic by crafting a playful mobile to hang over the crib, enhancing the nursery's charm.

  • Cozy Cardigan: Create a lightweight cardigan that matches the star baby wrap, offering versatility and warmth for chilly days ahead.

Variations for Your Star Baby Wrap

Embrace the journey of creativity with these delightful twists on your star baby wrap pattern!

  • Color Options: Choose vibrant hues like sunny yellow, mint green, or soft lavender for a playful, gender-neutral flair.
    Bright and cheerful, these colors can transform the wrap into a captivating piece for any nursery or outing.

  • Fiber Alternatives: Experiment with cotton or bamboo yarn for a cooler, breathable option, perfect for warmer days.
    These materials add a gentle touch against the skin, ensuring comfort for your little starlight.

  • Larger Size: Adjust the pattern by adding extra rounds, allowing for a cozy wrap that fits toddlers too!
    This way, your design can grow with baby, providing comfort beyond the infant stage.

  • Appliqué Elements: Add cute star or moon appliqués for a delightful personal touch that brings each piece to life.
    These little embellishments can spark joy and create cherished memories wrapped in love.

  • Texture Boost: Incorporate a fluffy border or pom-poms around the edges for an extra tactile element.
    These modifications add playful texture and visual interest while enhancing the overall charm of the wrap.

  • Mixed Yarn Weights: Try combining a lighter weight yarn with a medium-weight main body for added dimension.
    This unique blend creates an enchanting visual experience while remaining snug and ideal for little ones.

  • Fringe Accent: Fringe on the corners can add a whimsical touch, enhancing the star's whimsical aesthetic.
    It's an unexpected detail that brings character and charm, making each wrap truly one of a kind.

  • Button Variations: Experiment with decorative buttons that reflect your child's personality or nursery theme.
    These charming closures can turn a functional element into a striking focal point of the design.

Expert Tips for the Star Baby Wrap

  • Consistent Tension: Maintain even grip throughout your crochet journey. This is crucial, especially when transitioning from the circular base to the body of the wrap, to avoid uneven sizing.

  • Stitch Markers are Key: Place a stitch marker after every ten stitches to help keep track of your count. This simple tool prevents the most common mistake of losing track of your stitches.

  • Block for Perfection: Blocking your finished star baby wrap enhances its shape. This step ensures the points are defined and the overall structure is polished and professional.

  • Count Twice, Crochet Once: Before moving on to the next row, double-check your stitch count. This habit can save you from unraveling sections if mistakes are spotted later in the project.

  • Finish with Care: When securing your yarn ends, take extra time to weave them in thoroughly. This prevents unraveling and provides a clean finish for this whimsical wrap.

Starry Nights Crocheted Baby Wrap FAQs

Can I use a different type of yarn for the star baby wrap?
Absolutely! While a medium-weight yarn like cotton-blend or acrylic is recommended for softness and breathability, you can certainly experiment with other fibers such as bamboo or wool. Just ensure the replacement yarn has a similar weight, as this will help maintain the drape and fit of the wrap.

How can I adjust the sizing of the star baby wrap?
If you'd like to make a larger version of the star baby wrap for toddlers, consider increasing your starting chain before forming the base. Just keep in mind to maintain the symmetry by adding additional stitches in the points and body as you go. Alternatively, you could simply use a thicker yarn and a larger hook to achieve a greater size.

What should I do if my work is curling at the edges?
Don't panic! If your crochet work is curling, it may be due to tension issues. I recommend checking your tension as you crochet, especially when moving from the circular base to the body. You can also try blocking your finished star baby wrap to help flatten out any curls—this will define those lovely star points!

How do I fix a dropped stitch in my star baby wrap?
It's an easy fix! If you find a dropped stitch, use a crochet hook to re-insert the stitch back into the row you were working on. Gently pull the surrounding stitches to accommodate, and if necessary, secure it using a slip stitch to ensure it won't budge. This will keep your cozy creation looking flawless!

What crochet hook size should I use for the star baby wrap?
You’ll want to use a crochet hook between 4.5 mm to 5.5 mm (US sizes G-H) for this star baby wrap. This size is ideal for creating tight stitches that provide warmth without making the fabric too stiff. Always check your gauge, as this can help ensure a snug fit for your little one!

How can I ensure uniform stitch tension throughout the project?
To maintain consistent tension, be sure to keep an even grip on your yarn and hook. Taking breaks and stretching your hands can also help, along with regularly checking your stitch count with a marker. Keeping these practices in mind will create a beautifully crafted star baby wrap!

Filed Under: Uncategorized

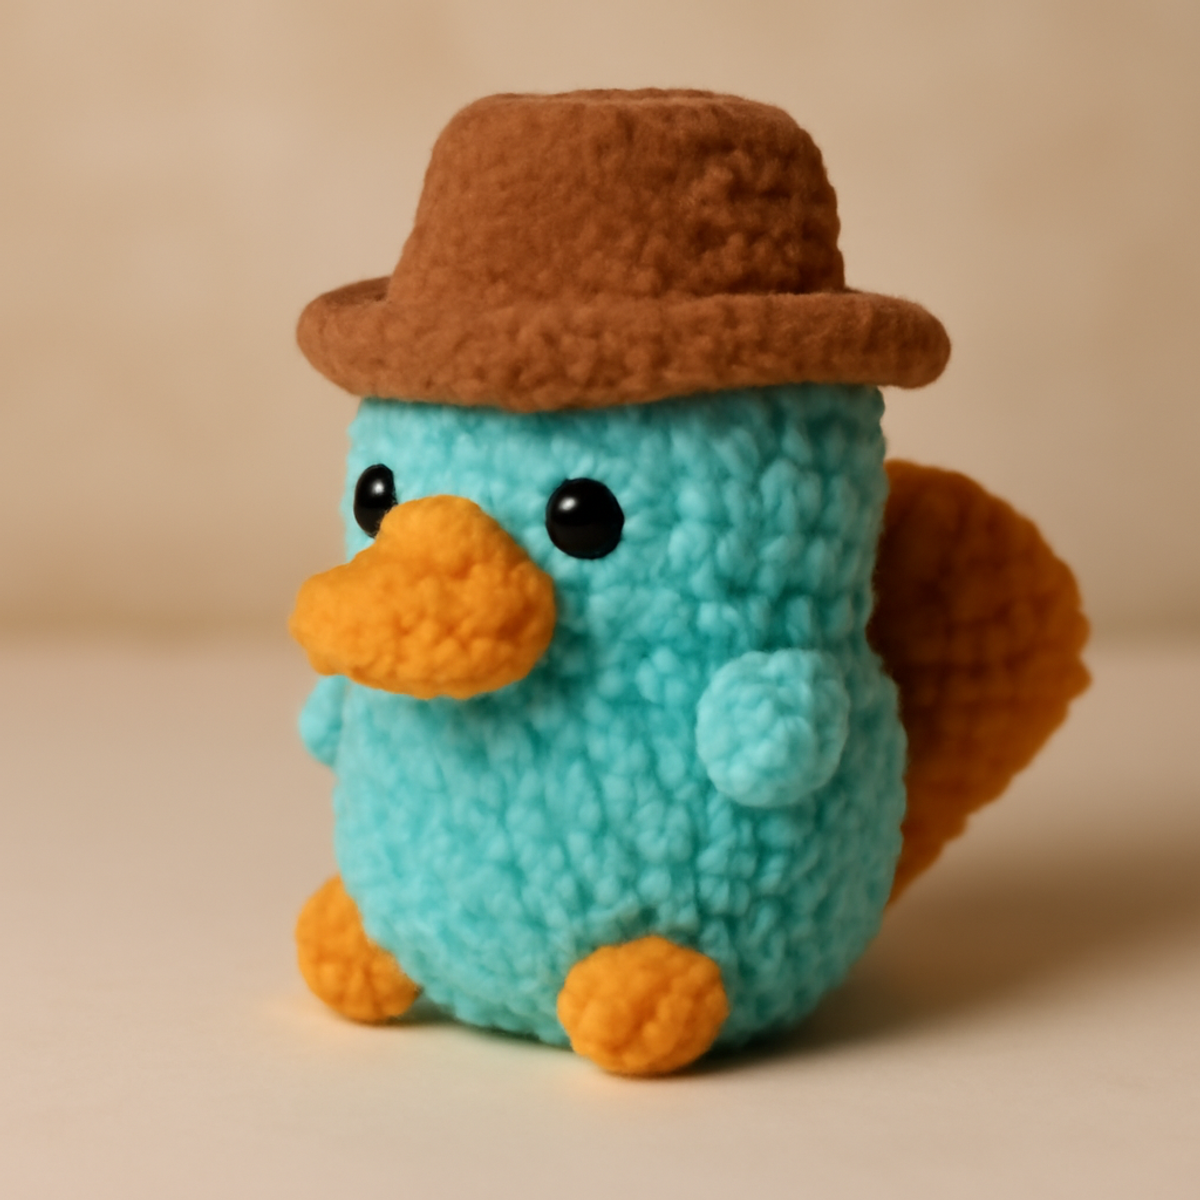
Adorable Crochet Platypus: A Cozy Amigurumi Project

August 23, 2026 by Publisher Leave a Comment

Adorable Crochet Platypus: A Cozy Amigurumi Project

As I sat nestled in my favorite corner, the soft plush yarn slipped through my fingers, igniting a wave of warmth and excitement. Today, I’m thrilled to introduce you to my latest project: the crochet platypus! This whimsical crochet platypus doll is not just a delightfully charming toy; it's also a perfect keepsake to showcase your crochet skills. With its inviting textures and vibrant hues, this pattern offers a fantastic way to spark joy in children’s play or add a playful pop to your decor. Plus, it’s an approachable project for motivated beginners while giving intermediates a lovely canvas for creativity. So, grab your hook, and let’s dive into creating this adorable, huggable friend that’s sure to make lasting memories!

Crochet Platypus Materials & Tools

  • Bulky Plush Yarn – Use approximately 200-300 yards in vibrant colors like turquoise, orange, and brown for a stunning look.
  • 5.0mm (H) Crochet Hook – This size helps achieve the soft texture necessary for your delightful crochet platypus.
  • Safety Eyes – Select eyes that are safe for children, adding character and charm to your cuddly creation.
  • Yarn Needle – Essential for weaving in ends securely and sewing pieces together for a polished finish.
  • Stitch Marker – Useful for keeping track of rounds and ensuring the round shape of your platypus stays on point.

Dive into your crochet adventure, and let this cute platypus inspire your creativity!

Why Choose This Crochet Platypus?

Whimsical design: The playful look of this crochet platypus will captivate both kids and adults alike, turning heads wherever it’s displayed.
Soft texture: Crafted from plush yarn, the delectable feel makes it a perfect cuddle companion that enhances any decor's coziness.
Great for gifting: This doll serves as a thoughtful gift or keepsake, allowing you to share your love of crochet with friends and family.
Creative expression: Each creation can be uniquely customized in colors and embellishments, letting your personality shine through this charming project.

How to Check Your Gauge for Crochet Platypus

Don't skip the gauge swatch! Checking your tension is crucial for creating a perfectly proportional crochet platypus. While an exact gauge may vary depending on your yarn choice and hook size, aim for a standard guideline of approximately 4×4 inches (10×10 cm), which should give you about 14 single crochets by 8 rows. To adjust the size, simply increase your starting chain in multiples of 6 to make your doll wider or taller as desired. If your tension doesn't match, don’t worry! If your swatch is too small, try going up a hook size or work a bit looser to achieve the perfect fit for your whimsical creation. Happy crocheting!

Step-by-Step Pattern for Crochet Platypus

Row 1: Start Body
Begin by making a magic ring. In the ring, crochet 6 single crochets (sc) to form the base of the body (6 sts). Pull the magic ring tightly to close. Your work should now resemble a small circle, ready for further rounds.

Row 2: Increase Rounds
In the next round, work 2 single crochets (sc) in each stitch around (12 sts). This row will begin to form the rounded shape of your crochet platypus. After this round, your pieced work should start to appear fuller and rounder.

Row 3: Continue Increases
For this round, crochet 1 single crochet (sc) in the first stitch, then increase (2 sc in the next stitch). Repeat this pattern around (18 sts). As you progress, you'll notice the body expanding, creating a more substantial form for your platypus.

Row 4: More Increases
This round will be similar: sc in the first two stitches, then increase (2 sc in the next stitch). Continue this to the end of the round (24 sts). Your crochet platypus should be taking on a lovely, plump shape at this stage.

Row 5: Even Rounds
For the next round, simply work 1 single crochet (sc) in each stitch around (24 sts). This round will help stabilize your shape and give it some height. Your piece should feel solid as the round completes.

Row 6: Decrease to Shape
To shape the head, start decreasing: work 1 sc in the first two stitches, then decrease (sc 2 together). Repeat until the end of the round (18 sts). This step will help define the transition to the platypus's head.

Row 7: Continue Decreases
Continue shaping by sc in the first stitch, then decreasing (sc 2 together). Repeat around (12 sts). Your work will start tapering off as the head forms, drawing closer to what will soon become the finishing details of your adorable doll.

Row 8: Final Decrease Round
For this round, work 1 sc in the first stitch, then decrease (sc 2 together) until you finish (6 sts). At this point, the body of your crochet platypus should be small and rounded, appearing snug and ready for filling.

Row 9: Fasten Off
Cut the yarn with a long tail, then pull through the remaining stitches to close. Assemble the body by stuffing it lightly with fiberfill for a plush effect. Your completed body should feel soft and ready for embellishments.

Step 1: Beak Construction
Using orange yarn, attach it to one end of the body, crocheting 6 sc in a new magic ring and closing (6 sts). This small round will form the beak of your platypus, showcasing its iconic feature.

Step 2: Beak Shaping
In the next round, crochet 2 sc in each stitch around (12 sts). You should see your beak gain some size, extending outward just enough to add character while ensuring it remains proportionate to the body.

Step 3: Attach Beak
Slip stitch to the first sc to finish the beak, then fasten off and weave in ends. Carefully position the beak on the body, ensuring it’s centered to maintain the cute look of your crochet platypus.

Step 4: Making the Feet
To create the feet, start with a magic ring and crochet 4 sc (4 sts). This enables the cute webbed structure. Pull the magic ring tight and prepare for the next round to create the recognizable feet of your platypus.

Step 5: Shape the Feet
Next, work 2 sc in each stitch around (8 sts), providing a fuller base. The feet should start to flat out a bit, signaling that they are taking on the wide webbed look you want.

Step 6: Finish and Attach Feet
Slip stitch to close the round, fasten off, and leave a long tail for attachment. Securely sew the four feet onto the bottom of the body, ensuring they’re evenly arranged to help your platypus stand proudly.

Step 7: Crocheting the Hat
Using brown yarn, start with a magic ring and crochet 8 hdc into the ring (8 sts). This will be the base of your charming hat. The round will be rounded and ready for the next steps towards creating a delightful touch for your crochet platypus.

Step 8: Create Hat Brim
For the next round, work 2 hdc in each stitch around (16 sts). Your hat will easily start to form a more defined shape, giving it the adorable flair that sets your platypus apart from the typical amigurumi style.

Step 9: Final Hat Shape
Continue with 1 hdc in each stitch around (16 sts) to secure the structure. As you finish, your hat should be looking cozy and whimsical, perfectly complementing the cute character of your crochet platypus.

Step 10: Assembly
Finally, securely attach the eyes, position the hat atop the head, and sew all pieces together tightly. Ensure your charming platypus has a friendly face, and weave in any loose ends. Your delightful crochet platypus is ready to brighten someone’s day!

Variations & Substitutions for Crochet Platypus

Feel free to explore your creativity with this delightful crochet pattern, enhancing your platypus with unique touches!

  • Yarn Substitutions: Choose lighter yarn for a smaller platypus. A DK weight yarn can create a keychain-friendly version!

  • Fiber Variety: Swap plush yarn for cotton for a summer-friendly version. The crisp texture offers a whole new look for your cutie.

  • Color Play: Experiment with ombre shades or a color-blocked body for a vibrant twist. Each careful color change adds a playful flair to the design.

  • Size Adjustment: Change hook size or yarn weight for varying sizes. A smaller hook with thin yarn creates a miniature platypus that’s perfect for gifting!

  • Textural Surprise: Enhance tactile elements by adding a textured border around the beak. A small contrasting stitch can turn simple into striking.

  • Embellishments: Adorn your platypus with a tiny scarf or a bowtie instead of a hat. Add personality that reflects the charm of its owner!

  • Facial Expressions: Mix and match eyes and mouth stitch styles for expressive faces. A smiley or frowning platypus can evoke different emotions in your creation.

  • Pom-Pom Decor: Attach a fluffy pom-pom to the hat—or make a removable one. This tiny detail can transform your platypus into a seasonal friend!

Expert Tips for Crochet Platypus

  • Tighten Up: Keep your magic ring snug to prevent gaps. A loose ring can lead to a floppy base and impact your crochet platypus's overall shape.

  • Check Count Frequently: Regularly verify your stitch count to maintain symmetry. A simple discrepancy can lead to an uneven body, so take a moment to count!

  • Finish Neatly: Weave in your ends carefully; this not only tidies up your doll but also ensures durability, especially in children’s play.

  • Stuff Wisely: Use a light hand when stuffing your platypus. Overstuffing can distort its shape, while understuffing can lead to a saggy look.

  • Safety First: Be sure your safety eyes are properly secured. A loose eye can compromise the charm and safety of your finished crochet platypus.

What to Pair with Whimsical Crochet Platypus Doll

As you create your charming crochet platypus, consider crafting delightful companions to enrich your cozy collection.

  • Cozy Crochet Blanket: A soft blanket in matching colors adds a vibrant backdrop for your platypus, enhancing its charm and coziness. Imagine snuggling under the beautiful hues, making playtime even more enjoyable!

  • Colorful Crochet Hat: A playful hat, perhaps in contrasting colors, can add a whimsical touch to the platypus. This accessory will elevate its cuteness, making it a perfect gift idea for little ones.

  • Amigurumi Friends: Why not crochet a few more cute animals? A frog or a bunny can create a delightful ensemble, bringing a sense of adventure to imaginative play.

  • Plush Crochet Pillow: Pair your platypus with a plush, textured pillow for a cozy nook. This creative combination creates a warm space that invites cuddles and relaxation at any time.

  • Decorative Crochet Baskets: Craft colorful crochet baskets to hold toys or yarn, keeping your space tidy while complementing your platypus decoratively. These baskets can add delightful warmth to any room.

How to Wash and Care for Your Crochet Platypus

  • Machine Washing: Use cold water and a gentle cycle to prevent any felting or damage to the soft texture of your crochet platypus. Always place it inside a mesh laundry bag for extra protection.

  • Hand Washing: For a more delicate approach, soak your crochet platypus in lukewarm water with mild detergent. Gently agitate it to clean, ensuring you avoid any rough handling to keep the plush texture intact.

  • Drying/Blocking: Lay your platypus flat on a clean, dry towel to retain its shape and softness. Avoid hanging it, as this may distort its cuddly form. Allow it to air dry completely before displaying or gifting.

  • Storage: Keep your finished crochet platypus in a cool, dry place away from direct sunlight to preserve its vibrant colors and soft fibers. A breathable storage bin or cotton bag will help maintain its cozy charm.

Whimsical Crochet Platypus Doll FAQs

Can I use a different type of yarn for my crochet platypus?
Absolutely! You can swap bulky plush yarn for another yarn category, like a medium-weight (category 4) acrylic or cotton. Just keep in mind that the feel and drape will be different, so your finished doll may have a firmer texture. Adjust your hook size to suit the new yarn for the best results!

How can I make my crochet platypus bigger or smaller?
To size up, use a thicker yarn or increase your hook size. For a smaller version, opt for a lighter yarn and a smaller hook. Don't forget to adjust your stitch counts accordingly and check your gauge—this ensures your new size turns out just right!

Why is my work curling at the edges?
Don't panic! Curling can happen, especially with plush yarn. Try to adjust your tension; if it’s too tight, the fabric can warp. You may also consider using a larger hook to create a looser fabric. If problems persist, blocking the piece before assembly can help smooth everything out nicely.

How do I fix dropped stitches in my crochet platypus?
It’s an easy fix! Simply use a yarn needle to pick up the dropped stitch, and re-insert it into the last completed round. Be sure your tension is consistent as you continue to avoid this issue when crocheting future rounds!

What size hook is recommended for my crochet platypus?
For this project, I recommend a 5.0 mm (US H-8) hook. This size works beautifully with bulky plush yarn, allowing for the soft texture that makes your platypus cuddly. If you find your stitches too tight or loose, don't hesitate to experiment with a half or whole size up or down.

Can I make changes to the facial expression of my crochet platypus?
Absolutely! Changing the mouth shape or using movable safety eyes can completely alter your platypus's expression. Have fun experimenting with different placements and stitches to create a personality that reflects your creativity!

Filed Under: Uncategorized

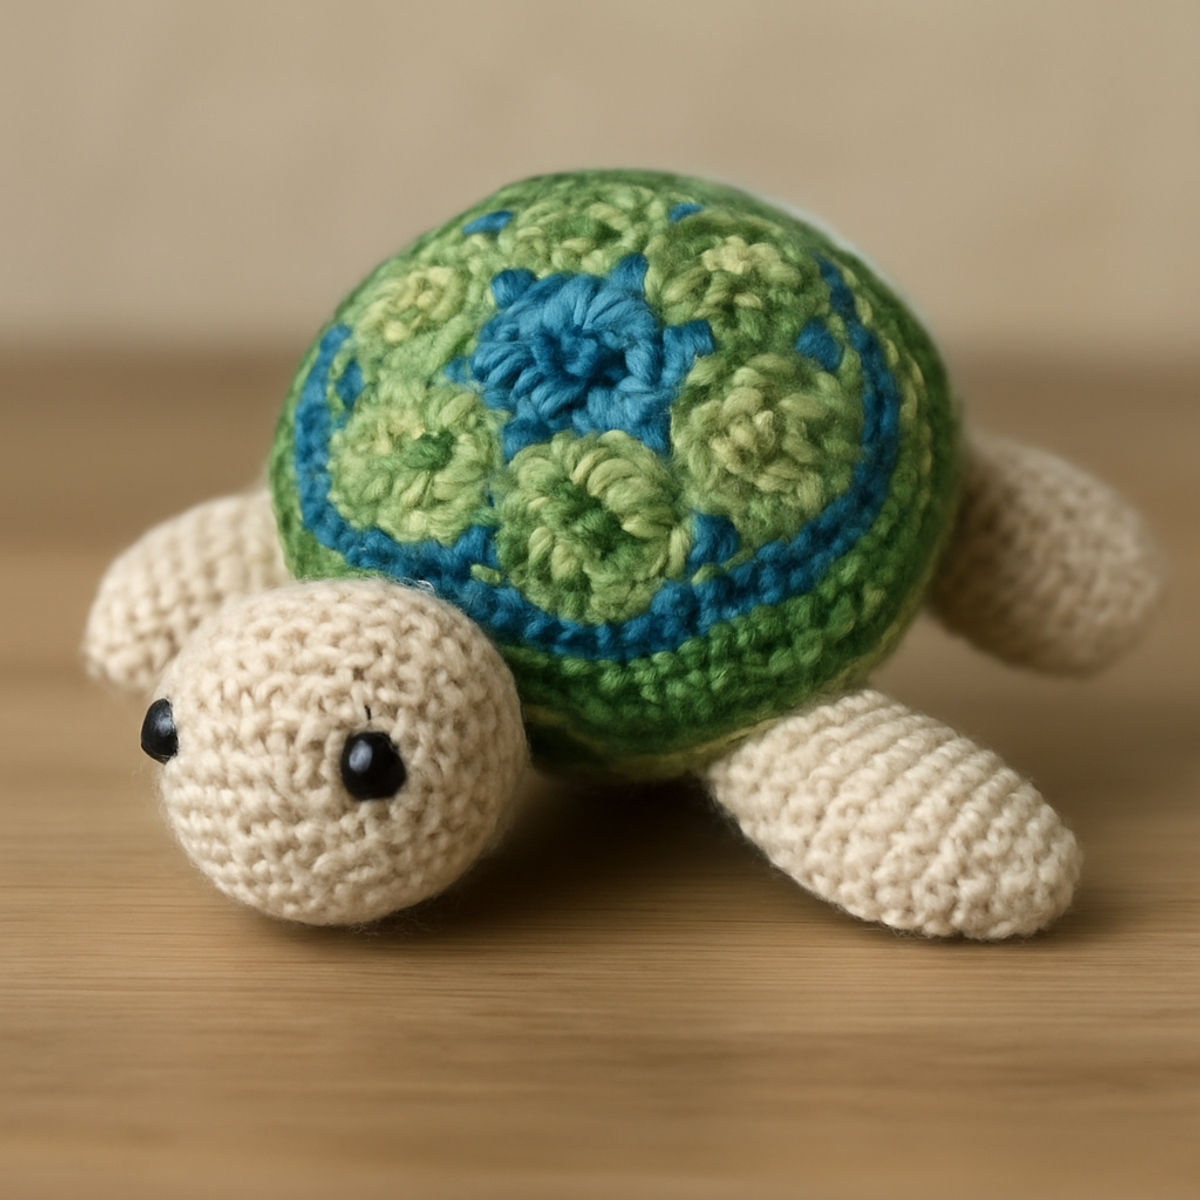
Adorable Crochet Sea Turtle Amigurumi: A Cozy Project

August 23, 2026 by Publisher Leave a Comment

Adorable Crochet Sea Turtle Amigurumi: A Cozy Project

As I sat on my porch, I couldn't help but smile at the idea of crafting a delightful crochet sea turtle to brighten my days. This charming little amigurumi is perfect for those moments when you not only want to practice your crochet skills but also create something truly special. With its textured shell and vibrant colors, this project is more than just a cute decor item; it has the potential to become a cherished keepsake or a lovely gift for a child. It strikes the perfect balance of being enjoyable for intermediate crafters while offering simple techniques that any yarn enthusiast can master. So, are you ready to dive into this adorable journey and bring your very own crochet sea turtle to life? Let's get started!

Crochet Sea Turtle Materials & Tools

  • Worsted Weight Yarn – Approximately 150-200 yards is ideal to create this vibrant crochet sea turtle.
  • 5.0mm (H) Hook – This size is recommended for achieving the perfect tension and tight stitches.
  • Black Safety Eyes – Use these to add charming detailing to your turtle’s face, ensuring they are securely attached.
  • Fiberfill Stuffing – Essential for giving your amigurumi sweet shape and plushness.
  • Stitch Marker – Handy for keeping track of rounds as you craft your turtle’s body and flippers.

Get ready to make your very own crochet sea turtle that is sure to bring a smile!

Why create a crochet sea turtle?

Charming Design: This crochet sea turtle features an intricate shell design that’s sure to impress. Textured Shell: The use of popcorn stitches brings a delightful texture, making it visually stunning and fun to touch. Easy Techniques: It wonderfully combines intermediate skills with basic techniques, ensuring that every crafter can enjoy the process. Whimsical Appeal: Perfect as a gift or unique home decor, this turtle adds a playful touch to any space. Personalization Options: Tailor the colors to your style, allowing countless variations to suit everyone’s taste. Explore your creativity and let this little turtle bring joy to your crochet adventures!

How to Check Your Gauge for Crochet Sea Turtle

Don't skip the gauge swatch! For the adorable crochet sea turtle, ensuring the correct tension is vital for achieving a cuddly and proportionate finished piece. Aim for a general guideline of approximately 4×4 inches (10×10 cm) to see around 14 single crochets by 16 rows; however, checking your specific gauge is always best. If your swatch is too small, simply go up a hook size to loosen your stitches. To make this charming turtle bigger, adjust your starting round or stitches in multiples of 6 to expand the body and shell comfortably. Remember, a little attention to gauge now will lead to a beautifully crafted crochet sea turtle you'll cherish!

Step-by-Step Pattern for crochet sea turtle

Round 1: Starting the Body
Begin by making a magic ring, then work 6 sc into the ring (6 sts). Pull the ring tight to close. When finished, you should see a small circle forming at the center of your work.

Round 2: Increase
Work 2 sc in each stitch around (12 sts). After this round, your circle should start to take shape, and it should feel slightly raised as the stitches build upon each other.

Round 3: More Increases
Next, crochet 1 sc in the first stitch, then 2 sc in the next stitch; repeat this pattern around (18 sts). Your circle should now appear larger, and it should have a lovely rounded shape.

Round 4: Continue Increasing
In this round, sc in the next 2 stitches, then inc in the next stitch; repeat around (24 sts). You will notice your work beginning to cup gently as you create the base for your turtle.

Round 5: Adding Height
Now, work 3 sc in the next stitch, then sc in the next 3 stitches; repeat around (30 sts). Your crochet sea turtle body will begin to rise and take on a more three-dimensional form.

Rounds 6-10: Body Height
For the next five rounds, sc in each stitch around (30 sts). Your progress will lead to a nice height for the turtle’s body, giving it a soft, plush texture.

Round 11: Begin Decreasing
Now, sc in the next 3 stitches and then dec (single crochet two stitches together); repeat (24 sts). At this stage, your turtle should start to feel compact while maintaining its lovely round shape.

Round 12: Continue to Shape
Work sc in the next 2 stitches, then dec; repeat around (18 sts). Your crochet sea turtle will begin to close up, so be sure to check for any holes or gaps as you go.

Round 13: Final Decreases
In this round, sc in the next stitch, then dec; repeat (12 sts). This will leave you with a tighter opening, and your turtle's body will look almost complete.

Finish and Stuff the Body
Cut the yarn, leaving a long tail for closing. Stuff your turtle's body with fiberfill, ensuring it's firm but not overstuffed for a soft finish. At this point, you can feel the shape of your turtle forming beautifully.

Step 1: Crocheting the Flippers
Start another magic ring, then work 5 sc into the ring (5 sts). Tighten the ring and continue to round 2. As you work, note the small size you want for the flippers, creating a contrast to the turtle's body.

Step 2: Flipper Increases
In this round, work 2 sc in each stitch around (10 sts). Your flippers will begin to take shape, resembling small paddles.

Step 3: Flipper Length
Next, sc in each stitch around for 4 rounds (10 sts per round). Each flipper will start to lengthen slightly, providing enough reach for the turtle's swimming motion.

Step 4: Finish the Flippers
To close, work a dec around (5 sts); cut your yarn, leaving a long tail for attaching later. Your flippers should feel plush and soft, ready to attach to the body.

Step 1: Crocheting the Shell
Use a new color to begin crocheting the shell. Make a magic ring and work 8 dc into the ring (8 sts). This will be the base of the turtle's textured shell.

Step 2: Shell Increases
Now, work 2 dc in each stitch around (16 sts). You'll notice the shell starting to form, creating a beautiful texture.

Step 3: Popcorn Stitch Row
Next, to achieve the popcorn stitches, work 4 dc into the same stitch, then drop the loop from your hook. Pull the working yarn through the first dc to create the popcorn. Chain 1 to secure, then skip one stitch and repeat around.

Final Shell Rounds
Continue to alternate between single crochet and intricate popcorn stitches, following your chosen design for 4 more rounds. Your turtle's shell will become thick and delightful, ready to contrast beautifully against the body.

Assembly: Putting It All Together
Position the flippers and head to your liking on the body before sewing in place with the long tails. Make sure everything is securely attached for optimal cuddly charm.

Finishing Touches
Weave in or trim any remaining yarn tails. Add safety eyes onto the face, ensuring they are snugly attached contrary to the stuffing, enhancing the playfulness of your crochet sea turtle.

Optional Edging
For a final touch, you may choose to crochet a scalloped edge around the base or around the shell for additional charm and definition. Your delightful crochet sea turtle amigurumi is now complete and ready to bring joy to any space!

Expert Tips for Crochet Sea Turtle

  • Tight Stitches: Maintain consistent tension throughout your work to prevent gaps in your crochet sea turtle. Loose stitches can lead to an uneven finish.

  • Count Stitches: Regularly count your stitches after each round. It’s easy to lose track, especially during increases; staying mindful helps maintain the correct shape.

  • Secure Safety Eyes: When adding safety eyes, ensure they're snug against the fabric to avoid any choking hazards for children. This is crucial for a safe, playful toy.

  • Stuff Firmly: Stuff your turtle's body firmly but not overly stuffed to ensure it keeps its shape while remaining cuddly. Test the texture before sealing the opening.

  • Finishing Touches: Weave in all yarn tails securely and trim excess to avoid unraveling. A neat finish greatly enhances the overall appearance of your crochet sea turtle.

Crochet Sea Turtle Variations & Substitutions

Create your own twist on this charming crochet sea turtle by exploring various customization options!

  • Color Swaps: Experiment with vibrant or pastel shades for a whimsical design. Your sea turtle can reflect your personality or seasonal themes.

  • Yarn Alternatives: Consider using a cotton blend for a more breathable finish or a super bulky yarn for a chunky version that's quick to create.

  • Different Sizes: Upgrading to a larger hook or thicker yarn can yield a delightful giant sea turtle, ideal for decorative purposes or as a playful gift for children.

  • Texture Modifications: Add charming details like a pom-pom on the turtle's head or embellish the shell with decorative stitches. These small touches make a big impact!

  • Flipper Techniques: Try making the flippers with a contrasting color or different stitch pattern, like half double crochet, for a unique look.

  • Color Blocking: Crochet sections of different colors into the shell, creating a mosaic effect that brings a splash of joy to your amigurumi.

  • Keychain Version: Scale down your design to create a sweet keychain or bag charm. This functional piece showcases your skills while remaining practical.

  • Playful Accessories: Attach small flowers or a tiny hat to your sea turtle for an added layer of charm. These accessories can truly customize your piece!

How to Wash and Care for Your Crochet Sea Turtle

  • Machine Washing: Use cold water on a gentle cycle to protect the texture of your crochet sea turtle. It’s a great option for easy cleaning, but always check for any loose embellishments first.

  • Hand Washing: If you prefer a more delicate approach, hand wash in cold water with mild detergent. Gently immerse your crochet sea turtle and avoid agitation to prevent felting or pilling.

  • Drying/Blocking: Lay your sea turtle flat on a clean towel to air dry, reshaping as needed. This helps maintain its adorable form and ensures it looks its best for years to come.

  • Storage: Store your crochet sea turtle in a cool, dry place away from direct sunlight to prevent fading. A breathable bag or box will keep it dust-free and ready for display!

What to Pair with the Charming Crochet Sea Turtle Amigurumi

Imagine the joy of creating a whole ocean of whimsical treasures to complement your adorable crochet sea turtle!

  • Colorful Coral Reef: Create vibrant coral pieces to surround your turtle, adding a playful underwater vibe that delights the senses. With varied textures and hues, each coral piece can be a unique expression of your creativity.

  • Seashell Keychains: Craft small seashell amigurumi as delightful keychains, perfect for a beach-themed gift set. They can be made with leftover yarn, making it a fun and resourceful addition!

  • Mini Crabby Friend: Pair your turtle with a cheerful crab amigurumi, featuring claws that can be playfully posed. This duo will bring a charming seaside scene to life, igniting smiles wherever they're displayed.

  • Ocean Wave Blanket: Create a cozy blanket using wave patterns in ocean-inspired colors. Not only will it harmonize with your turtle, but it also offers a comforting embrace during your crafting sessions.

  • Matching Whale Plushie: Design a sweet whale plushie as a companion piece, making your crochet sea turtle feel right at home. This larger project will challenge your skills while keeping the playful theme going!

Charming Crochet Sea Turtle Amigurumi FAQs

Can I substitute yarn for the crochet sea turtle project?
Absolutely! While the original pattern suggests worsted weight yarn, you can swap it for a similar medium weight yarn, including cotton blends or bamboo yarn for a different texture. Just make sure to check your gauge, as changing yarn types may affect the final size of your sea turtle.

How do I make the crochet sea turtle bigger or smaller?
Don't panic! To adjust the size, simply change your hook size to a larger or smaller one. You can also add more rounds to the body and shell during construction. Just ensure you maintain tight stitches to keep the shape intact.

Why is my crochet sea turtle work curling?
If your piece is curling, it might be due to tight stitches or an insufficient number of rounds in your increases. I recommend checking your tension and counting your stitches after each round to make sure you’re on track, as this will help give your turtle the lovely rounded shape it deserves.

How do I fix dropped stitches in the crochet sea turtle?
It's an easy fix! If you notice a dropped stitch, simply find the loop and pull it back up to where it belongs. You can gently work it into the surrounding stitches. For future projects, keeping a close eye on your stitch count and tension while crocheting can help avoid this.

What hook size should I use for the crochet sea turtle?
For this lovely crochet sea turtle, a size H (5.0 mm) hook is recommended. This size works perfectly for achieving the right balance of tension and softness, allowing you to craft a vibrant and plush turtle that's oh-so-huggable!

What if my turtle looks misshapen after stuffing?
If your sea turtle isn’t looking quite right, it could be a stuffing issue. Make sure you’re stuffing it evenly and not overfilling it to the point of stretching the fabric. If there are misshapen areas, feel free to adjust the stuffing or even add a little bit more to give it the rounded look you want!

Filed Under: Uncategorized

Charming Mushroom Mouse Crochet: Whimsical Amigurumi Fun

August 23, 2026 by Publisher Leave a Comment

Charming Mushroom Mouse Crochet: Whimsical Amigurumi Fun

As I scrolled through my yarn stash, a delightful thought sparked in my mind: a whimsical Mushroom Mouse crochet project that could bring smiles to anyone who sees it. This amigurumi creation not only captures the enchanting spirit of woodland critters but also offers a cozy sense of satisfaction as you stitch each adorable detail. With its vibrant color palette and charming design, this mushroom mouse crochet project is perfect for both seasoned crafters and beginners eager to embrace their creativity. Beyond its cute aesthetic, you'll love how quickly it comes together and the endless opportunities for personalization, letting your unique style shine through. So, let’s dive into the magic of crochet and create something truly whimsical together!

Mushroom Mouse Crochet Materials & Tools

Note: Gather these essential supplies to embark on your delightful Mushroom Mouse crochet journey!

Yarn

  • Plush or Chenille Yarn – This yarn offers a soft, cuddly finish that's perfect for amigurumi.
  • Medium Weight Beige Yarn – Use for the main body, providing a lovely base color.
  • Light Pink Yarn – Perfect for accent details, bringing a touch of charm.
  • Vibrant Red Yarn – Ideal for the mushroom hat, making it pop with fun color.
  • White Yarn – Great for spots on the mushroom, adding finishing touches to the design.

Tools & Notions

  • 4.0 mm (G/6) Crochet Hook – This size is ideal for the desired stitch tightness and structure.
  • 12 mm Safety Eyes – These give your mouse its adorable, animated look.
  • Polyester Stuffing – Necessary for filling your mouse, ensuring it's plush and huggable.
  • Yarn Needle – Essential for assembly and finishing touches, helping to weave in those ends.
  • Scissors – A must-have for trimming yarn as you work on this delightful project.

Why Make a Mushroom Mouse Crochet?

Adorable Aesthetic: The Mushroom Mouse blends whimsical charm with its playful design, making it a delightful addition to any handmade collection.

Quick Project: With simple crochet techniques, this pattern allows beginners to finish their creation quickly, providing instant satisfaction.

Textural Appeal: Using plush yarn creates a soft, huggable texture that adds tactile joy, perfect for cuddling or display.

Customizable Colors: You can easily switch up the color palette to match your decor or personal taste, offering endless creative possibilities.

Nature-Inspired Theme: The combination of the mouse and mushroom motifs embraces a charming woodland vibe, appealing to nature lovers and crafters alike.

Gauge & Sizing Notes

Don't skip the gauge swatch! Checking your tension is vital for ensuring your Mushroom Mouse crochet project turns out just right. While an exact gauge measurement isn't specified, a general guideline for amigurumi is to aim for about 5-6 single crochets per inch (2.5 cm) to achieve a plushy density. If your swatch size differs, you can easily adjust your design; for instance, to make your mouse larger, increase your starting chain in multiples of 6. If your tension is too tight, consider going up a hook size to achieve that perfect look. Happy crafting as you bring your whimsical Mushroom Mouse to life!

Step-by-Step Pattern for Mushroom Mouse Crochet

Row 1: Head Creation
Start with a magic ring and work 6 sc into the ring (6 sts). Pull the magic ring tight to close. In the next round, inc in each stitch around, creating a total of 12 sts (your work should start to cup slightly). Continue increasing by working (sc in 1, inc) around for the next round (18 sts).

Row 2: Face Shaping
For Round 3, work (sc in 2, inc) around (24 sts). In Round 4, work (sc in 3, inc) around (30 sts), which helps in shaping the mouse's face. Keep crocheting until the head measures about 3 inches in height. You'll notice the shape becoming rounded and plush.

Row 3: Begin the Body
Switch colors to medium weight beige yarn for the body. Start the body by working in continuous rounds from the head. Round 1 should consist of (sc in 4, inc) around (36 sts). This technique enlarges the body and sets a stable foundation for the mouse.

Row 4: Body Expansion
In the next round, work (sc in 5, inc) around (42 sts). Continue for two additional rounds of sc without increases (42 sts). Your body should feel full and plush, with soft curves hinting at the mouse shape. It should now extend approximately 4 inches from the base of the head.

Row 5: Arms and Legs
To create the arms, start with a magic ring in light pink yarn and work 6 sc into the ring (6 sts). In the next round, inc in each stitch (12 sts). Work 4 more rounds of sc (12 sts each), resulting in a small, rounded shape. Make two arms the same way, and they should measure about 2 inches long.

Row 6: Ears Formation
For the ears, use the same magic ring technique in light pink. Work 6 sc into the ring (6 sts). In the next round, work (sc in 2, inc) around (9 sts). For shaping, crochet 3 more rounds of sc (9 sts each), allowing the ear to flatten slightly and create a whimsical ear shape.

Row 7: Tail Development
Next, make the tail using beige yarn. Create a long chain of 12, and then work 1 sc in each chain back towards the start, totaling 12 sc (12 sts). To create a more dynamic tail, you can make this section longer for more character or shorter if preferred.

Row 8: Mushroom Hat Start
To create the mushroom hat, begin with a magic ring and work 6 sc into the ring (6 sts). In the next round, inc in each (12 sts). Round 3 consists of (sc in 1, inc) around (18 sts), providing a base for the hat's structure which gives it a whimsical look.

Row 9: Mushroom Cap Shaping
Continue expanding the cap with (sc in 2, inc) around for Round 4 (24 sts). Switch to vibrant red yarn and work 2 more rounds of sc (24 sts each) before switching to white yarn. Create spots using a simple slip stitch technique to add decorative touches around the top.

Step 10: Assembly
Begin assembling your mushroom mouse crochet. Start by sewing the head to the body using a yarn needle and secure with tight stitches. Attach arms on either side and position the ears on top of the head. Finally, sew the tail at the back, ensuring everything is balanced and proportional.

Step 11: Final Touches
To complete the mushroom mouse crochet, securely attach the safety eyes at a distance that feels right, create rosy cheeks with blush, and affix the mushroom hat on top. Weave in any loose ends with your needle and trim as necessary, ensuring a polished finish for your delightful creation!

How to Wash and Care for Your Mushroom Mouse Crochet

Machine Washing: Use a gentle cycle in cold water to prevent any felting or distortion. Place your mushroom mouse crochet in a mesh laundry bag for extra protection.

Hand Washing: For a more delicate approach, hand wash in cold water with mild detergent. Gently squeeze the mouse to clean without vigorous agitation, preserving its shape and texture.

Drying/Blocking: Lay flat to dry on a clean towel, reshaping the mouse as needed. Avoid hanging to prevent stretching, ensuring it maintains its delightful form.

Storage: Store your mushroom mouse crochet in a cool, dry place. Keep it away from direct sunlight to protect its vibrant colors and ensure it remains a cherished part of your collection.

Helpful Tricks for Mushroom Mouse Crochet

  • Consistent Tension: Maintaining even tension throughout your stitches ensures that the parts fit snugly together, creating a polished final product.

  • Count Frequently: Regularly count your stitches, especially during the body and hat construction, to avoid misalignment that can disrupt your whimsical design.

  • Use Stitch Markers: Place stitch markers at the start of new rounds. This helps keep track of your progress and prevents accidentally losing count or dropping the first stitch.

  • Blocking Techniques: Employ blocking to shape the mushroom hat precisely, allowing it to maintain its structure and enhance the overall aesthetic of your mushroom mouse crochet.

  • Ending Ends Neatly: Weave in loose ends meticulously at the back of your work. This not only secures your pieces but also maintains a tidy appearance for your adorable creation.

Mushroom Mouse Crochet Variations

Embrace your creativity with delightful twists to personalize your crochet project!

  • Color Palette Shift: Experiment with pastel hues for a soft look or vibrant shades for a playful vibe. Each color choice can tell a unique story.

  • Yarn Substitutions: Swap plush yarn for cotton to create a sturdier, more structured mouse. This change offers a completely different texture and appearance.

  • Size Adjustments: Use a larger crochet hook or bulkier yarn to create a bigger mushroom mouse for added visual impact. Imagine a giant, whimsical companion to cuddle!

  • Textures & Details: Add a fluffy pom-pom on top of the mushroom hat for fun flair. The extra dimension will enhance its playful character.

  • Different Accents: Instead of light pink, try using a bold color for the accents to make the mouse pop against its main body. It gives a more modern twist to the design.

  • Fringe Tail: Create a fringe effect at the end of the tail to add movement and a whimsical touch. It’s perfect for creating a sense of playfulness.

  • Dynamic Assembly: Incorporate other woodland elements, like tiny felt flowers or acorns, to decorate the hands or body. This additional detail can transform your mushroom mouse into a woodland scene.

  • Custom Features: Personalize the eyes by using buttons or unique beads instead of safety eyes, giving each mouse a distinct personality that shines.

What to Pair with Mushroom Mouse Crochet?

Imagine the joy of creating not just one delightful piece, but a charming set that enhances your crafting adventure.

  • Mini Mushroom Friends: Create tiny mushroom companions for your mouse using similar yarn colors; they make cute decorations or gifts!

  • Whimsical Blanket: A cozy throw crocheted in the same tones can be a lovely backdrop for your mouse's adventures, perfect for snuggling up with.

  • Adorable Acorn Keychain: Craft a quick acorn keychain that mirrors the one in your mouse’s paws, combining practicality with charm.

  • Forest-Themed Wall Art: Use crochet techniques to make tiny wall hangings featuring mushrooms or woodland creatures, beautifully connecting with your mushroom mouse.

  • Matching Plushie Set: Design a collection of small critters using the same plush yarn to create a playful theme, enhancing the whimsical feel of your projects.

Mushroom Mouse Crochet FAQs

Can I use a different type of yarn for the Mushroom Mouse crochet?
Absolutely! While plush or chenille yarn is ideal for softness, you can substitute it with cotton or acrylic yarn depending on the texture you prefer. Keep in mind that the overall feel and weight of the final product may change, so it's a good idea to check your gauge.

How can I adjust the size of my Mushroom Mouse crochet?
Don't panic! Simply alter the size of your hook or yarn weight. For a larger mouse, try using a thicker yarn and a corresponding larger hook. Conversely, to make a smaller mouse, opt for a lighter weight yarn with a smaller hook. Just remember to keep your stitch count consistent to maintain the shape.

Why is my Mushroom Mouse crochet work curling?
This can be a common issue! Curling often occurs when your stitches are too tight or not consistent. I recommend checking your tension and ensuring you're not pulling the yarn too tightly. If the curling persists, try blocking your pieces after completing the project for a smoother finish.

How do I fix dropped stitches in my Mushroom Mouse crochet?
It's an easy fix! If you notice a dropped stitch, don't panic. Simply use your yarn needle or crochet hook to pull the yarn back through the loop, and then secure it by working a few stitches over it. Be sure to double-check your work regularly while you’re stitching to catch any mistakes early!

What crochet hook size should I use for my Mushroom Mouse?
The suggested size for this project is a 4.0 mm (G/6) crochet hook, which works well with medium weight yarn. However, feel free to adjust the hook size if you're using a different type or weight of yarn—just remember that this may affect the overall look and fit of your mouse!

Filed Under: Uncategorized

Charming Crochet Fish Keychain: Quick and Whimsical Delight

August 23, 2026 by Publisher Leave a Comment

Charming Crochet Fish Keychain: Quick and Whimsical Delight

As I sat with my favorite yarn in hand, I couldn’t help but feel inspired to create something whimsical and fun—a cozy project that would not only unleash my creativity but also brighten someone’s day. Enter the Charming Lavender Fish Keychain, a delightful crochet fish keychain that’s both functional and a piece of art in itself. This playful little project is perfect for crochet enthusiasts at a beginner to intermediate skill level, making it a wonderful way to show off your crochet skills while crafting a compact accessory that’s easy to carry. The vibrant lavender color adds a splash of joy to any keyring and makes it a delightful gift for your loved ones. So grab your hook, and let’s dive into this charming creation that promises to bring a wave of happiness into your crafting routine!

Charming Lavender Fish Keychain Materials & Tools

Yarn

  • Medium Weight Yarn – A soft lavender acrylic or cotton blend is perfect for this cozy crochet fish keychain. Aim for approximately 50-75 yards.

Tools & Notions

  • 4.0mm (G) Crochet Hook – This size is ideal for achieving the right stitch density for your fish’s body.
  • Small Black Safety Eye – This adds a whimsical charm to your fish; consider securing it with black thread.
  • Silver Keyring – Essential for attaching your fish to bags or keys, giving it that functional touch.

Feel free to let your creativity flow with this project that beautifully combines practicality and artistry!

Why Make a Crochet Fish Keychain?

Unique Artistry: This charming crochet fish keychain serves not just as a functional item but as a delightful piece of art that adds flair to everyday life.

Compact & Functional: Its small size, around 3-4 inches, makes it perfect for attaching to bags or keys, ensuring you always carry a bit of whimsy.

Vibrant Aesthetic: The soft lavender hue brightens any keyring, making it a joyous accessory for both adults and kids.

Easy to Customize: With options for color swaps and embellishments, you can tailor your fish to match personal styles or gifting needs.

Quick Project: Designed for beginners and intermediates alike, this keychain is a fast project that rewards you with quick satisfaction and a sense of achievement.

How to Check Your Gauge for Crochet Fish Keychain

Don't skip the gauge swatch! Ensuring your tension is spot on is crucial for the adorable proportions of your crochet fish keychain. Aim for a standard tension swatch of about 4×4 inches (10×10 cm), which typically translates to 18 single crochets by 20 rows. To create a larger fish keychain, you can adjust your starting chain in multiples of 6, or if you want to downsize, simply decrease this number. If you find your gauge is too tight, try using a larger hook size to give yourself that extra flexibility. Remember, achieving the right crochet gauge is the key to making sure your charming creation turns out just the way you envisioned!

Step-by-Step Pattern for Charming Lavender Fish Keychain

Row 1: Start the Body
Begin by creating a magic ring and work 6 single crochet (sc) into the ring. Pull the ring tight to close it. Your work should be a small circle. Continue to crochet in a spiral to form the fish's rounded body, ensuring the stitches are snug but not overly tight. (6 sts)

Row 2: Increase for Belly
In the next round, make 2 sc in each stitch around to create the fish's fullness. This will give it a lovely pear-like shape. Keep your crochet tight as you work to maintain a neat edge. At the end of this round, you should have a total of 12 stitches. (12 sts)

Row 3: Continue Body Shape
For the next round, work 1 sc in the first stitch, then 2 sc in the next stitch. Repeat this pattern around to further widen the fish’s body. You’ll notice your crochet fish keychain beginning to take shape with a subtle curvature that adds personality. (18 sts)

Row 4: Smooth the Body
In the following round, work evenly without increasing—just 1 sc in each of the 18 stitches. This round will maintain the body’s shape while making the crochet fish keychain even and smooth. At this point, your work should feel firm yet flexible. (18 sts)

Row 5: Forming the Tail
Begin working on the tail by chaining 6 and slip stitching (sl st) into the second chain from the hook. Then work 2 hdc (half double crochet) into the next chain, followed by 2 dc (double crochet) in the following chain. Finish with another sl st back to the body for stability. Your tail should look forked and playful.

Step 6: Attaching the Eye
Using a small black safety eye, position it on the front side of the fish's head. Secure it with a bit of black thread for extra safety, ensuring it’s snug and centered. This small detail will add personality to your crochet fish keychain and make it truly charming.

Step 7: Attaching the Keyring
To finalize your crochet fish keychain, use a slip stitch to attach the silver keyring at the top of the head. You can thread the keyring through a few stitches to secure it firmly. This ensures your charming creation is ready to accompany you everywhere.

Step 8: Finishing Touches
Finally, weave in any loose ends with a yarn needle. Optionally, lightly block your finished fish if preferred to enhance its shape, being careful not to over-stretch. Your completed crochet fish keychain is now ready to be admired and used!

How to Wash and Care for Your Crochet Fish Keychain

Machine Washing: Use a gentle cycle with cold water to keep your crochet fish keychain looking vibrant and prevent any felting. Avoid fabric softeners as they can affect the texture.

Hand Washing: For better care, gently hand wash your keychain in cool water with mild soap, ensuring to agitate minimally to maintain its shape and integrity.

Drying/Blocking: Lay the finished piece flat on a clean towel to dry, reshaping it if necessary. Avoid hanging, as this can stretch out the design of your crochet fish keychain.

Storage: Keep your crochet fish keychain in a cool, dry place away from direct sunlight to preserve its color. Avoid placing it in crowded spaces that may cause it to get squished.

What to Pair with the Charming Lavender Fish Keychain?

As you revel in the joy of crafting your crochet fish keychain, consider creating a matching ensemble that radiates playful charm and warmth.

  • Colorful Fish Coasters: These vibrant coasters enhance your crochet theme, perfect for adding a splash of color to your home.

  • Mini Ocean Scene: Craft tiny seaweed or coral pieces to pair with your fish, creating a darling underwater display for your keychain.

  • Whimsical Fish Bag Charm: Transform the same fish design into a lively bag charm to seamlessly match your keychain, making your accessories fun and cohesive.

  • Crochet Jellyfish Keychain: Dive into creating a jellyfish that shares the same yarn colors, providing a delightful contrast and harmony alongside your fish keychain.

Pairing these projects not only continues your crafting journey but also brings a delightful whimsical vibe to your collection!

Expert Tips

  • Consistent Tension: Keep a steady grip on your crochet hook to maintain even tension throughout your work; avoid pulling too tightly on the yarn.

  • Track Your Stitches: Use stitch markers when working in rounds to help you keep track of your increases and decreases, preventing confusion as you create your crochet fish keychain.

  • Close the Magic Ring: Ensure your magic ring is pulled tight before starting your first round to avoid any gaps that may affect the shape of your fish.

  • Finishing Techniques: Weave in loose ends securely to keep your work neat. If you’re blocking, lightly mist the piece and gently reshape without over-stretching.

  • Customization Awareness: When adding embellishments, remember that any additional weight can affect the drape, so choose your decorative elements wisely!

Crochet Fish Keychain Variations

Feel the joy of making this project your own by exploring fun twists and substitutions!

  • Color Swaps: Choose vibrant colors like sunny yellow or ocean blue for a whimsical touch. Personalized shades can truly reflect your unique personality.

  • Size Variations: Use a larger hook or heavier yarn to create a big fish for a keychain or a tiny version for a bag charm! Adjusting size can open up countless gifting possibilities.

  • Accessory Changes: Swap the silver keyring for a colorful lobster clasp or a sturdy clip, allowing for versatile attachment options for bags or zippers. It's an easy way to add functionality and flair!

  • Texture Modifications: Try adding a fluffy pom-pom at the tail or integrating charming fringe; these elements can create delightful textures and give your fish its own character.

  • Pattern Twists: Consider making a school of different fish by altering tail shapes and eye placements, creating a cohesive but varied collection of keychains. Each fish can tell its own story!

  • Decorative Elements: Embellish your fish with delightful sequins or hand-embroidered designs for an extra layer of whimsy. Tiny stars or waves can evoke a joyful maritime adventure.

  • Fiber Alternatives: Experiment with cotton or bamboo yarn for a new feel and added breathability, perfect for warmer weather projects. This option can enhance the overall drape and softness too!

  • Personalized Embellishments: Attach little charms or beads that resonate with your style, perhaps a starfish or a seashell, giving each keychain a unique personality. Let your creativity shine!

Charming Lavender Fish Keychain FAQs

Can I substitute yarn for the crochet fish keychain project?
Absolutely! While a medium-weight yarn in a soft lavender hue is recommended, feel free to experiment with yarn blends like cotton or even acrylic in different colors. Just keep an eye on your gauge to ensure your fish maintains its adorable shape.

What if my fish keychain is curling or not laying flat?
Don't panic! If your work is curling, it may be due to overly tight stitches. I recommend checking your tension and perhaps adjusting your hook size. If all else fails, lightly blocking your finished piece can help flatten it out nicely.

How can I make the crochet fish keychain larger or smaller?
To adjust the size of your fish, you can simply change your yarn weight or hook size. Using a heavier yarn and a larger hook will create a bigger fish. Conversely, opting for a lighter yarn with a smaller hook will yield a cuter, mini version of your keychain!

What should I do if I accidentally drop stitches while crocheting?
It’s an easy fix! If you notice dropped stitches, carefully pick them up with your hook and work them back into your rounds. If it feels overwhelming, use a stitch marker to indicate where you need to return.

Which crochet hook size is best for my fish keychain?
A size G (4.0 mm) crochet hook is recommended for this project. This size will help achieve the perfect stitch density, ensuring that your crochet fish keychain is both cute and structured!

How can I add embellishments without changing the overall look?
To maintain the charm of your crochet fish keychain, opt for lightweight embellishments like small sequins or embroidery. When adding details, be mindful of balance; too much weight can affect the drape and how well your fish holds its shape.

Filed Under: Uncategorized

Cheerful Crochet Sunflower Blanket for Cozy Spaces

August 22, 2026 by Publisher Leave a Comment

Cheerful Crochet Sunflower Blanket for Cozy Spaces

As I sat in my favorite nook, cradling a skein of vibrant yarn, the thought struck me: what if I could crochet a piece that embodies the lush beauty of nature? Enter the crochet sunflower blanket, a charming project that combines cheerful sunflowers and buzzing bees, perfect for brightening any space. Not only does this delightful blanket create a warm, inviting atmosphere, but it also challenges your skills and fosters a wonderful sense of accomplishment upon completion. Ideal for intermediate crocheters, it’s the perfect way to expand your repertoire while crafting a cozy accessory that feels like a hug. Plus, feeling the texture of worsted weight yarn gliding through your fingers is nothing short of therapeutic. So grab your hook, and let’s dive into this fun, nature-inspired adventure together!

Crochet Sunflower Blanket Materials & Tools

  • Worsted Weight Yarn – Approximately 1200-1500 yards of a blend of acrylic and cotton works best for this cozy blanket.
  • 5.0mm (H) Hook – Perfect for creating the needed stitch definition in this intermediate-level project.
  • Tapestry Needle – Essential for weaving in ends and finishing your blanket neatly.
  • Stitch Markers – Handy for keeping track of your motifs and ensuring uniformity across your squares.
  • Color Suggestions – Use light cream for the background, rich yellow for petals, dark brown for centers, and black and orange for bees to achieve that cheerful aesthetic.

This crochet sunflower blanket is not only a beautiful project to undertake, but it also offers a fantastic opportunity to enhance your skills. Happy crocheting!

Why Crochet the Sunflower Blanket?

Cheerful Design: This crochet sunflower blanket is bursting with vibrant motifs, creating a stunning focal point in any room. Skill Expansion: With its combination of stitches, this project is perfect for honing your technique and gaining confidence. Nature-Inspired Theme: Infused with sunflowers and bees, it brings an uplifting touch of the outdoors inside. Perfect Gift Idea: Wrap your loved ones in love with a thoughtful handmade gift that radiates warmth and joy. Cozy Texture: The blend of yarn results in a soft, huggable texture, making it ideal for snuggling on chilly evenings. Unique Variations: Personalize it with your choice of colors or embellishments, ensuring every blanket is one-of-a-kind!

Gauge & Sizing Notes

Don't skip the gauge swatch! Checking your tension is crucial for the crochet sunflower blanket to ensure that your squares turn out the same size, preventing frustration during assembly. A general guideline is to achieve a gauge of 4×4 inches (10×10 cm) with about 14 double crochets by 8 rows. If you want to make your blanket larger, simply adjust your starting chain in multiples of 6 for width, or increase the number of squares for length. If your tension is too tight, don’t worry—just try going up a hook size to get the perfect fit for your cozy crochet sunflower blanket.

Step-by-Step Pattern for Crochet Sunflower Blanket

Row 1: Starting the Squares
Begin by creating a slip knot and chaining 6. Join with a slip stitch to form a ring. Chain 3 (counts as 1 dc), then work 11 dc into the ring. Join with a sl st in the top of the first chain-3. Your center should be circular, with a total of 12 sts (12 sts).

Row 2: Creating the Petals
Chain 1 and work 2 sc in each dc around the circle (24 sc). This will give you the base for the flower's petals. Join with a sl st in the first sc to complete the round. Your work should start to feel fuller, forming the base of your sunflower.

Row 3: Forming Petals
Begin with a sl st to the next sc. Chain 5, then work a (dc, ch 2, dc) in the same sp to create a petal. Skip the next sc, and repeat the petal stitch in the next sc. Continue creating petals around the circle until you have 12 petals. Join with a sl st in the first petal's base (12 petals).

Row 4: Creating the Flower Center
For the center, join the dark brown yarn. Chain 1, then in the first petal’s base work 1 sc, 1 hdc, and 1 dc. This creates a raised effect. Work this into every petal base to form the flower center. You should have a lovely rounded center to the flower with 12 raised stitches.

Row 5: Creating Bee Square Base
To create the bee square, start again with a slip knot and chain 26. Work 1 dc in the 4th ch from the hook (this counts as the first dc) and then dc in each ch across to the end. Turn your work; you will have 24 dc total in this row (24 sts).

Row 6: Adding Stripes
In the next row, change colors to black for the bee stripes. Chain 3, then dc in the next 3 sts. Change to yellow; continue with 4 dc in the next 4 sts. Alternate back to black and continue this stripe pattern, finishing with a black stripe. Join your work and cut yarn, leaving an end for weaving (24 sts).

Step 7: Creating Bee Wings
For the bee wings, with white yarn, chain 4. Work 1 sc, 1 hdc, 1 dc in the 3rd ch from the hook. Chain 2, sl st into the same ch to create the wing shape. Repeat this process to make a second same wing. Attach both wings to the yellow sections of the bee square.

Step 8: Assembling the Blanket
After crocheting multiple flower and bee squares, lay them out in a grid pattern according to your design. Using a tapestry needle, whip stitch or sl st the squares together, ensuring that motifs align neatly. Take care to check your tension and align colors to maintain a harmonious look across the crochet sunflower blanket.

Step 9: Adding the Border
To finish your blanket, attach the cream yarn along any edge. Chain 1 and sc evenly around the perimeter, adding 3 sc in each corner to maintain shape. After completing the border, join with a sl st in the first sc. Your crochet sunflower blanket is now complete, providing a cozy, cheerful accent for any space!

Expert Tips for Crochet Sunflower Blanket

  • Consistent Tension: Keep your tension even throughout your squares to avoid puckering and ensure uniformity when joining them together.

  • Block Your Squares: Don’t skip blocking before assembly. This step helps achieve a neat finish and aligns the edges of your squares perfectly.

  • Count Carefully: Utilize a counting method, such as a row counter or a notepad, to keep track of stitches and rounds, particularly in busy designs like flowers and bees.

  • Check Petal Placement: When forming petals, ensure they are evenly spaced around the circle to create a balanced and beautiful flower.

  • Secure Your Ends: Weave in all ends thoroughly after finishing each square to prevent unraveling, especially in areas with multiple color changes in your crochet sunflower blanket.

What to Make after Sunflower & Bee Crochet Blanket

As you bask in the satisfaction of your cheerful crochet sunflower blanket, let’s explore some delightful pairings that will enhance your cozy home decor.

  • Bee-Themed Pillow: Complement your blanket with a matching pillow featuring playful bee motifs to create a coordinated look on your sofa.
    Crafting this pillow can be a soothing project, with the soft yarn echoing the blanket’s warmth.

  • Sunflower Coasters: Whip up some cheerful sunflower-shaped coasters to protect your surfaces while adding a fun splash of color.
    These tiny creations pull the theme together beautifully, making your space both inviting and functional.

  • Crochet Tote Bag: Create a tote bag with sunflower and bee appliqués—perfect for trips to the farmer's market or beach outings.
    Not only practical, but this tote also showcases your artistic flair while coordinating perfectly with your floral theme.

  • Matching Bee Mittens: Keep your hands warm with mittens that feature delightful bee designs, perfect for chilly days spent outdoors.
    This pairing adds a whimsical touch to your outfit while creating a cohesive look when you’re out and about.

  • Decorative Wall Hanging: Design a wall hanging with crochet sunflowers and bees to bring your nature-inspired theme into vertical spaces.
    This unique piece will radiate warmth and personality, inviting nature's charm into your home.

Embrace the joy of crochet by creating these thoughtfully curated projects that harmoniously pair with your sunflower and bee blanket!

Care Instructions for Crochet Sunflower Blanket

  • Machine Washing: Use a gentle cycle with cold water to prevent any felting or pilling of the yarn. Ensure the crochet sunflower blanket is turned inside out to protect the motifs.

  • Hand Washing: For extra care, hand wash in cold water using a mild detergent. Gently swish the blanket without agitating to maintain its beautiful texture.

  • Drying/Blocking: Lay flat on a clean surface to air dry, reshaping as needed. Avoid hanging, as this can stretch the fabric; proper blocking helps maintain the blanket’s vibrant shapes.

  • Storage: Store your blanket in a cool, dry place away from direct sunlight to prevent fading. Consider folding it neatly or storing it in a breathable bag.

Crochet Sunflower Blanket Variations

Let your creativity bloom by customizing your crochet blanket with these delightful twists!

  • Yarn Weight Swaps: Use a lighter yarn for a delicate look, or opt for chunky yarn for a snugglier feel.

  • Color Block Magic: Play with pastel color schemes, like soft pinks and blues, for a dreamy, whimsical take on the design.

  • Size Adjustments: Alter the dimensions of your squares for a larger lap throw or a miniature version for a baby blanket.

  • Cotton vs. Acrylic: Consider using 100% cotton for a breathable, summer-friendly throw, perfect for picnics or warm days.

  • Embellished Details: Add embroidered elements like little ladybugs or flowers for extra character and a handmade touch.

  • Texture Play: Incorporate fringe along the edges for a playful finish, or craft pom-poms from leftover yarn for a fun accent.

  • Gradient Sunflowers: Try a stunning gradient yarn that transitions from vibrant yellow to a rich burnt orange for a sun-kissed effect.

  • Border Variations: Experiment with different border stitches, such as shell or crab stitch, to give your blanket a unique framed look.

Crochet Sunflower Blanket FAQs

Can I use a different yarn weight for the crochet sunflower blanket?
Absolutely! If you'd like to use a different yarn weight, just be aware that you may need to adjust your hook size and the overall stitch count. If you go thicker, your blanket will be cozier but may turn out smaller, while thinner yarn may require more yardage but will give a lighter feel.

How do I make my crochet sunflower blanket bigger or smaller?
It's simple! To increase size, just create more squares and join them in a larger configuration. For a smaller blanket, reduce the number of squares or use smaller squares. Always remember to adjust the border accordingly to maintain balance and structure.

Why is my work curling at the edges of the squares?
Don't panic! This is often a result of too tight tension or not using enough stitches around the edges. Check your tension and ensure you’re following the stitch counts accurately. If it persists, try blocking your squares, as this can help them lay flat!

What hook size should I use for the crochet sunflower blanket?
I recommend using a size H (5.0 mm) crochet hook, as it works perfectly with worsted weight yarn to create the detailed stitches in your sunflower and bee motifs. If you find your squares are too tight or too loose, feel free to adjust the hook size slightly for a better fit.

Can I add other motifs to the crochet sunflower blanket?
Of course! Adding different motifs can bring your unique touch to the blanket. Just ensure any new designs have similar stitch counts and dimensions to maintain uniformity with your sunflowers and bees.

What do I do if I drop a stitch while crocheting?
It's an easy fix! Simply pick up the dropped stitch by inserting your hook back into the stitch and pulling the working yarn through. You can also place a stitch marker to secure the area until you get back to it. Stay calm, and keep crocheting!

Filed Under: Uncategorized

  • « Previous Page
  • 1
  • …
  • 23
  • 24
  • 25
  • 26
  • 27
  • …
  • 41
  • Next Page »

Recent Posts

  • Chic Crochet Watch Band Pattern: Scalloped Elegance
  • Vibrant Crochet Granny Square: A Floral Delight to Create
  • Pocket Otter Crochet: Your Adorable Amigurumi Companion
  • Cozy Up with This Festive Crochet Tree Cozy Pattern
  • Chic Crochet Babydoll Dress: A Timeless Pattern for Spring

Recent Comments

No comments to show.
Fast Crochet Patterns Logo

Welcome to Fast Crochet Patterns, your curated editorial blog for modern, handmade aesthetics. Discover an elegant collection of contemporary designs and carefully crafted tutorials—where every beautiful pattern is completely free to inspire your next creation.

Join the Studio

Subscribe for our latest free patterns and warm, minimal crochet inspiration delivered to your inbox.


Collections

  • Accessories
  • Amigurumi
  • Baby
  • Bags

More Patterns

  • Cardigan
  • Dress
  • Flowers
  • Granny Square

Information

  • About
  • Contact
  • Privacy Policy
  • Terms Of Use
  • Disclaimer

© 2026 Fast Crochet Patterns. All rights reserved.