
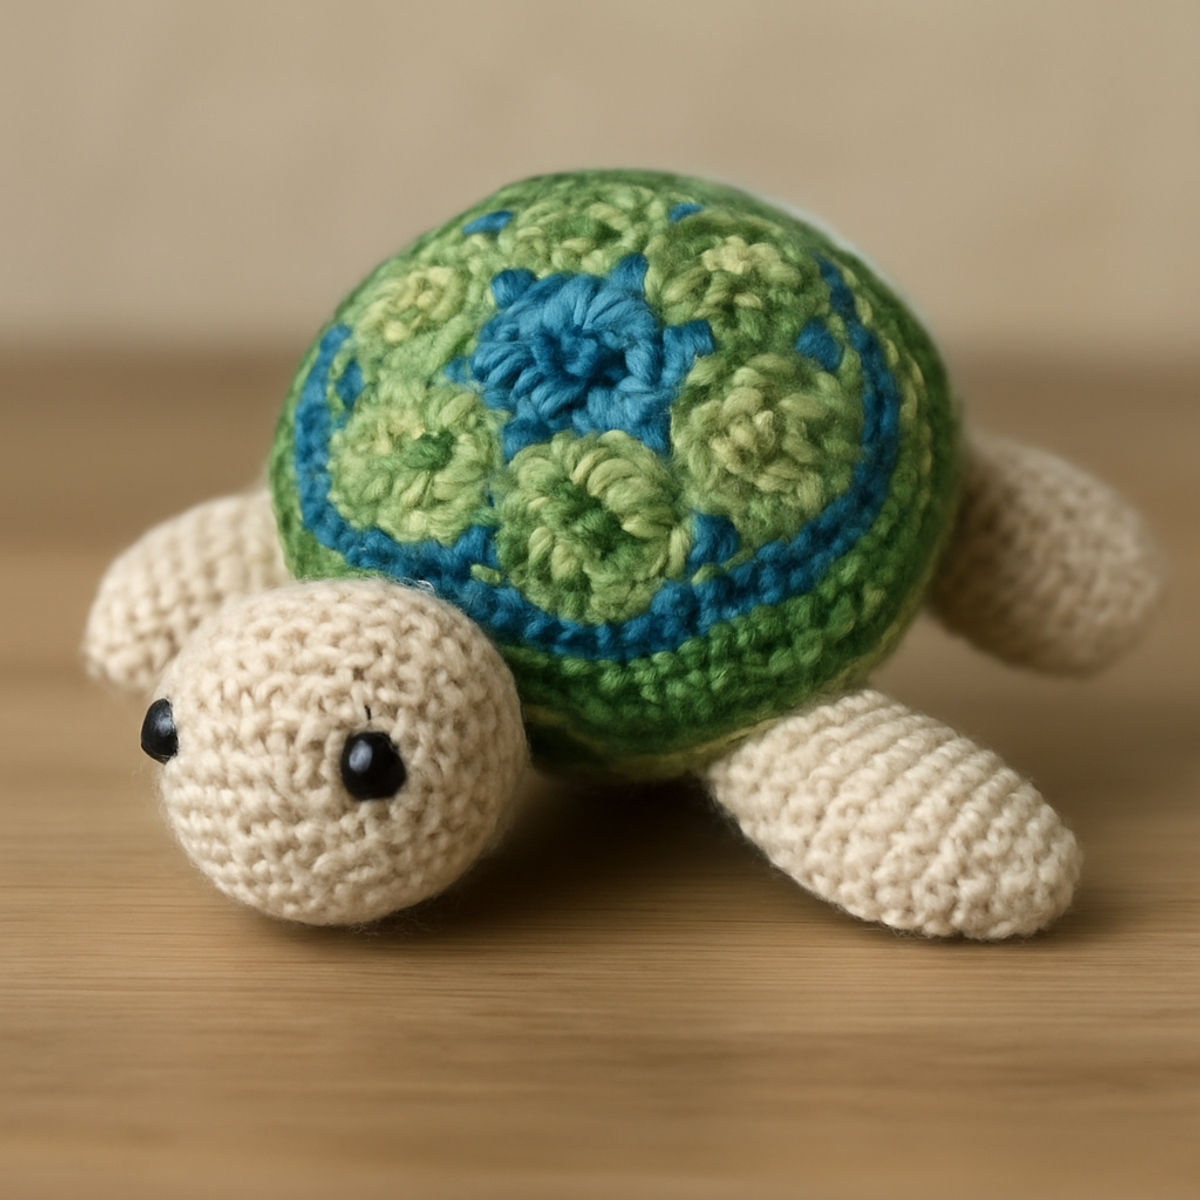
As I sat on my porch, I couldn't help but smile at the idea of crafting a delightful crochet sea turtle to brighten my days. This charming little amigurumi is perfect for those moments when you not only want to practice your crochet skills but also create something truly special. With its textured shell and vibrant colors, this project is more than just a cute decor item; it has the potential to become a cherished keepsake or a lovely gift for a child. It strikes the perfect balance of being enjoyable for intermediate crafters while offering simple techniques that any yarn enthusiast can master. So, are you ready to dive into this adorable journey and bring your very own crochet sea turtle to life? Let's get started!
Crochet Sea Turtle Materials & Tools
- Worsted Weight Yarn – Approximately 150-200 yards is ideal to create this vibrant crochet sea turtle.
- 5.0mm (H) Hook – This size is recommended for achieving the perfect tension and tight stitches.
- Black Safety Eyes – Use these to add charming detailing to your turtle’s face, ensuring they are securely attached.
- Fiberfill Stuffing – Essential for giving your amigurumi sweet shape and plushness.
- Stitch Marker – Handy for keeping track of rounds as you craft your turtle’s body and flippers.
Get ready to make your very own crochet sea turtle that is sure to bring a smile!
Why create a crochet sea turtle?
Charming Design: This crochet sea turtle features an intricate shell design that’s sure to impress. Textured Shell: The use of popcorn stitches brings a delightful texture, making it visually stunning and fun to touch. Easy Techniques: It wonderfully combines intermediate skills with basic techniques, ensuring that every crafter can enjoy the process. Whimsical Appeal: Perfect as a gift or unique home decor, this turtle adds a playful touch to any space. Personalization Options: Tailor the colors to your style, allowing countless variations to suit everyone’s taste. Explore your creativity and let this little turtle bring joy to your crochet adventures!
How to Check Your Gauge for Crochet Sea Turtle
Don't skip the gauge swatch! For the adorable crochet sea turtle, ensuring the correct tension is vital for achieving a cuddly and proportionate finished piece. Aim for a general guideline of approximately 4×4 inches (10×10 cm) to see around 14 single crochets by 16 rows; however, checking your specific gauge is always best. If your swatch is too small, simply go up a hook size to loosen your stitches. To make this charming turtle bigger, adjust your starting round or stitches in multiples of 6 to expand the body and shell comfortably. Remember, a little attention to gauge now will lead to a beautifully crafted crochet sea turtle you'll cherish!
Step-by-Step Pattern for crochet sea turtle
Round 1: Starting the Body
Begin by making a magic ring, then work 6 sc into the ring (6 sts). Pull the ring tight to close. When finished, you should see a small circle forming at the center of your work.
Round 2: Increase
Work 2 sc in each stitch around (12 sts). After this round, your circle should start to take shape, and it should feel slightly raised as the stitches build upon each other.
Round 3: More Increases
Next, crochet 1 sc in the first stitch, then 2 sc in the next stitch; repeat this pattern around (18 sts). Your circle should now appear larger, and it should have a lovely rounded shape.
Round 4: Continue Increasing
In this round, sc in the next 2 stitches, then inc in the next stitch; repeat around (24 sts). You will notice your work beginning to cup gently as you create the base for your turtle.
Round 5: Adding Height
Now, work 3 sc in the next stitch, then sc in the next 3 stitches; repeat around (30 sts). Your crochet sea turtle body will begin to rise and take on a more three-dimensional form.
Rounds 6-10: Body Height
For the next five rounds, sc in each stitch around (30 sts). Your progress will lead to a nice height for the turtle’s body, giving it a soft, plush texture.
Round 11: Begin Decreasing
Now, sc in the next 3 stitches and then dec (single crochet two stitches together); repeat (24 sts). At this stage, your turtle should start to feel compact while maintaining its lovely round shape.
Round 12: Continue to Shape
Work sc in the next 2 stitches, then dec; repeat around (18 sts). Your crochet sea turtle will begin to close up, so be sure to check for any holes or gaps as you go.
Round 13: Final Decreases
In this round, sc in the next stitch, then dec; repeat (12 sts). This will leave you with a tighter opening, and your turtle's body will look almost complete.
Finish and Stuff the Body
Cut the yarn, leaving a long tail for closing. Stuff your turtle's body with fiberfill, ensuring it's firm but not overstuffed for a soft finish. At this point, you can feel the shape of your turtle forming beautifully.
Step 1: Crocheting the Flippers
Start another magic ring, then work 5 sc into the ring (5 sts). Tighten the ring and continue to round 2. As you work, note the small size you want for the flippers, creating a contrast to the turtle's body.
Step 2: Flipper Increases
In this round, work 2 sc in each stitch around (10 sts). Your flippers will begin to take shape, resembling small paddles.
Step 3: Flipper Length
Next, sc in each stitch around for 4 rounds (10 sts per round). Each flipper will start to lengthen slightly, providing enough reach for the turtle's swimming motion.
Step 4: Finish the Flippers
To close, work a dec around (5 sts); cut your yarn, leaving a long tail for attaching later. Your flippers should feel plush and soft, ready to attach to the body.
Step 1: Crocheting the Shell
Use a new color to begin crocheting the shell. Make a magic ring and work 8 dc into the ring (8 sts). This will be the base of the turtle's textured shell.
Step 2: Shell Increases
Now, work 2 dc in each stitch around (16 sts). You'll notice the shell starting to form, creating a beautiful texture.
Step 3: Popcorn Stitch Row
Next, to achieve the popcorn stitches, work 4 dc into the same stitch, then drop the loop from your hook. Pull the working yarn through the first dc to create the popcorn. Chain 1 to secure, then skip one stitch and repeat around.
Final Shell Rounds
Continue to alternate between single crochet and intricate popcorn stitches, following your chosen design for 4 more rounds. Your turtle's shell will become thick and delightful, ready to contrast beautifully against the body.
Assembly: Putting It All Together
Position the flippers and head to your liking on the body before sewing in place with the long tails. Make sure everything is securely attached for optimal cuddly charm.
Finishing Touches
Weave in or trim any remaining yarn tails. Add safety eyes onto the face, ensuring they are snugly attached contrary to the stuffing, enhancing the playfulness of your crochet sea turtle.
Optional Edging
For a final touch, you may choose to crochet a scalloped edge around the base or around the shell for additional charm and definition. Your delightful crochet sea turtle amigurumi is now complete and ready to bring joy to any space!
Expert Tips for Crochet Sea Turtle
-
Tight Stitches: Maintain consistent tension throughout your work to prevent gaps in your crochet sea turtle. Loose stitches can lead to an uneven finish.
-
Count Stitches: Regularly count your stitches after each round. It’s easy to lose track, especially during increases; staying mindful helps maintain the correct shape.
-
Secure Safety Eyes: When adding safety eyes, ensure they're snug against the fabric to avoid any choking hazards for children. This is crucial for a safe, playful toy.
-
Stuff Firmly: Stuff your turtle's body firmly but not overly stuffed to ensure it keeps its shape while remaining cuddly. Test the texture before sealing the opening.
-
Finishing Touches: Weave in all yarn tails securely and trim excess to avoid unraveling. A neat finish greatly enhances the overall appearance of your crochet sea turtle.
Crochet Sea Turtle Variations & Substitutions
Create your own twist on this charming crochet sea turtle by exploring various customization options!
-
Color Swaps: Experiment with vibrant or pastel shades for a whimsical design. Your sea turtle can reflect your personality or seasonal themes.
-
Yarn Alternatives: Consider using a cotton blend for a more breathable finish or a super bulky yarn for a chunky version that's quick to create.
-
Different Sizes: Upgrading to a larger hook or thicker yarn can yield a delightful giant sea turtle, ideal for decorative purposes or as a playful gift for children.
-
Texture Modifications: Add charming details like a pom-pom on the turtle's head or embellish the shell with decorative stitches. These small touches make a big impact!
-
Flipper Techniques: Try making the flippers with a contrasting color or different stitch pattern, like half double crochet, for a unique look.
-
Color Blocking: Crochet sections of different colors into the shell, creating a mosaic effect that brings a splash of joy to your amigurumi.
-
Keychain Version: Scale down your design to create a sweet keychain or bag charm. This functional piece showcases your skills while remaining practical.
-
Playful Accessories: Attach small flowers or a tiny hat to your sea turtle for an added layer of charm. These accessories can truly customize your piece!
How to Wash and Care for Your Crochet Sea Turtle
-
Machine Washing: Use cold water on a gentle cycle to protect the texture of your crochet sea turtle. It’s a great option for easy cleaning, but always check for any loose embellishments first.
-
Hand Washing: If you prefer a more delicate approach, hand wash in cold water with mild detergent. Gently immerse your crochet sea turtle and avoid agitation to prevent felting or pilling.
-
Drying/Blocking: Lay your sea turtle flat on a clean towel to air dry, reshaping as needed. This helps maintain its adorable form and ensures it looks its best for years to come.
-
Storage: Store your crochet sea turtle in a cool, dry place away from direct sunlight to prevent fading. A breathable bag or box will keep it dust-free and ready for display!
What to Pair with the Charming Crochet Sea Turtle Amigurumi
Imagine the joy of creating a whole ocean of whimsical treasures to complement your adorable crochet sea turtle!
-
Colorful Coral Reef: Create vibrant coral pieces to surround your turtle, adding a playful underwater vibe that delights the senses. With varied textures and hues, each coral piece can be a unique expression of your creativity.
-
Seashell Keychains: Craft small seashell amigurumi as delightful keychains, perfect for a beach-themed gift set. They can be made with leftover yarn, making it a fun and resourceful addition!
-
Mini Crabby Friend: Pair your turtle with a cheerful crab amigurumi, featuring claws that can be playfully posed. This duo will bring a charming seaside scene to life, igniting smiles wherever they're displayed.
-
Ocean Wave Blanket: Create a cozy blanket using wave patterns in ocean-inspired colors. Not only will it harmonize with your turtle, but it also offers a comforting embrace during your crafting sessions.
-
Matching Whale Plushie: Design a sweet whale plushie as a companion piece, making your crochet sea turtle feel right at home. This larger project will challenge your skills while keeping the playful theme going!
Charming Crochet Sea Turtle Amigurumi FAQs
Can I substitute yarn for the crochet sea turtle project?
Absolutely! While the original pattern suggests worsted weight yarn, you can swap it for a similar medium weight yarn, including cotton blends or bamboo yarn for a different texture. Just make sure to check your gauge, as changing yarn types may affect the final size of your sea turtle.
How do I make the crochet sea turtle bigger or smaller?
Don't panic! To adjust the size, simply change your hook size to a larger or smaller one. You can also add more rounds to the body and shell during construction. Just ensure you maintain tight stitches to keep the shape intact.
Why is my crochet sea turtle work curling?
If your piece is curling, it might be due to tight stitches or an insufficient number of rounds in your increases. I recommend checking your tension and counting your stitches after each round to make sure you’re on track, as this will help give your turtle the lovely rounded shape it deserves.
How do I fix dropped stitches in the crochet sea turtle?
It's an easy fix! If you notice a dropped stitch, simply find the loop and pull it back up to where it belongs. You can gently work it into the surrounding stitches. For future projects, keeping a close eye on your stitch count and tension while crocheting can help avoid this.
What hook size should I use for the crochet sea turtle?
For this lovely crochet sea turtle, a size H (5.0 mm) hook is recommended. This size works perfectly for achieving the right balance of tension and softness, allowing you to craft a vibrant and plush turtle that's oh-so-huggable!
What if my turtle looks misshapen after stuffing?
If your sea turtle isn’t looking quite right, it could be a stuffing issue. Make sure you’re stuffing it evenly and not overfilling it to the point of stretching the fabric. If there are misshapen areas, feel free to adjust the stuffing or even add a little bit more to give it the rounded look you want!

Leave a Reply