Fast Crochet Patterns

  • Home
  • Contact
  • Patterns
    • Amigurumi
    • Granny Square
    • Flowers
    • Baby
    • Dress
    • Bags
    • Cardigan
    • Accessories
menu icon
go to homepage
  • Home
  • Contact
  • Patterns
    • Amigurumi
    • Granny Square
    • Flowers
    • Baby
    • Dress
    • Bags
    • Cardigan
    • Accessories
search icon
Homepage link
  • Home
  • Contact
  • Patterns
    • Amigurumi
    • Granny Square
    • Flowers
    • Baby
    • Dress
    • Bags
    • Cardigan
    • Accessories
×

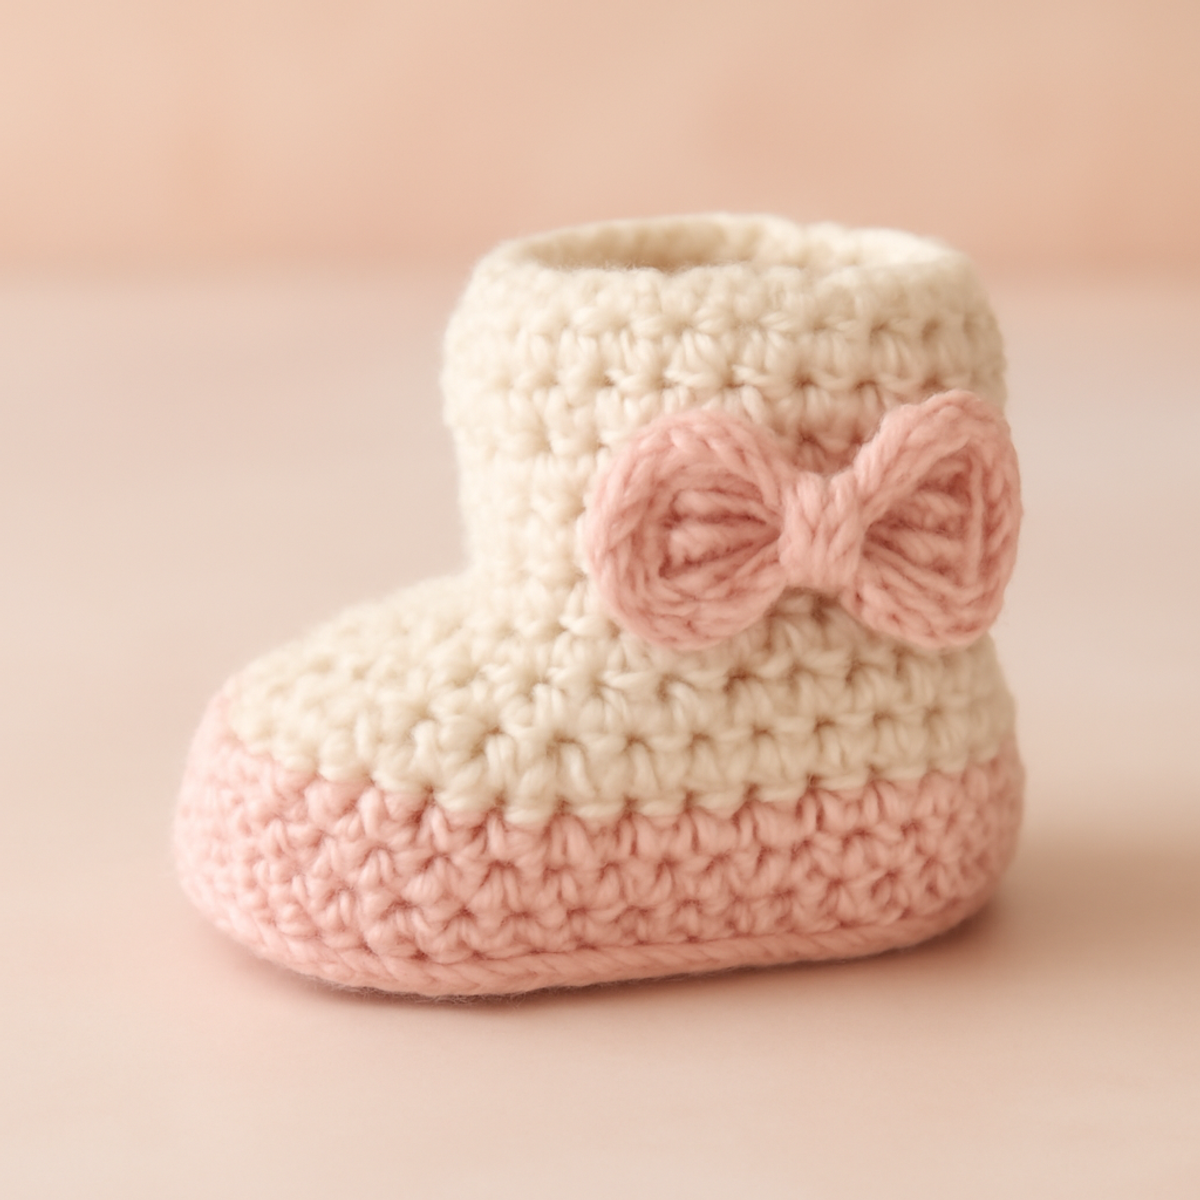
Cozy Baby Booties Crochet: Adorable & Easy for Beginners

August 22, 2026 by Publisher Leave a Comment

Cozy Baby Booties Crochet: Adorable & Easy for Beginners

There’s something truly heartwarming about the soft, cozy texture of baby booties crochet that gets me every time. As I sit with my favorite worsted weight yarn, I’m reminded of how these charming little accessories not only keep tiny feet snuggly warm but also add a delightful flair to any baby outfit. Whether you’re searching for the perfect baby shower gift or simply want to craft something special for a little one in your life, this beginner-friendly pattern is here to help. The best part? These booties are easily customizable in countless colors, allowing you to express your creativity while honing your crochet skills. Let’s dive in and create a pair of adorable baby booties that will surely be cherished keepsakes!

Baby Booties Crochet Materials & Tools

  • Worsted Weight Yarn – Approximately 100 yards of a soft acrylic or cotton blend to keep tiny feet cozy and comfortable.
  • 4.0mm (G) Hook – A standard size that works perfectly with worsted weight yarn for creating cute baby booties.
  • Yarn Needle – Essential for weaving in ends and ensuring a polished finish on your booties.
  • Scissors – Handy for cutting your yarn at the end of your project.
  • Embellishments (optional) – Consider buttons or decorative bows for an added touch of charm and personality to your booties!

Why Choose Crochet Baby Booties?

Charming Design: These baby booties are not just functional; their cute appearance makes them perfect for any occasion!

Beginner-Friendly: The pattern features simple stitches, making it accessible to crocheters at all skill levels.

Warm & Cozy: Crafted from soft yarn, they ensure comfort for delicate baby skin.

Customizable Colors: You can easily switch up colors to match any outfit or personal preference, making each pair unique.

Quick Project: Ideal for crafting on a whim, you can whip up a pair in no time, perfect for last-minute gifts!

Gauge & Sizing Notes

Don't skip the gauge swatch! Ensuring your crochet tension is just right is essential for creating the perfect baby booties. A general guideline to aim for is a tension swatch of 4×4 inches (10×10 cm) measuring around 12 single crochets by 10 rows, but be sure to check the specifics of your yarn and hook size for accuracy. If you find your swatch is too small, simply go up a hook size or adjust your tension. To customize the size of your baby booties, you can increase your starting chain in multiples of 6 to make them wider, or add extra rounds to increase their height. Happy crocheting!

Step-by-Step Pattern for baby booties crochet

Row 1: Start the Base
Begin by making a magic ring. Chain 1, then work 6 single crochets (sc) into the ring, pulling the ring tight to close it. Your work should resemble a small circle. This creates the foundation for the baby booties. At the end of this round, you should have 6 stitches (6 sts).

Row 2: Increase Round
In this round, work 2 single crochets in each stitch around to increase your stitch count effectively. This will bring your total to 12. As you work, the circle will start to widen, taking on a more defined shape for the base of the baby booties. Ensure you mark the beginning of the round for easy tracking. You should have 12 stitches at the end of this round (12 sts).

Row 3: Build Height
Continue to single crochet around for 3 additional rounds without any increases. This will help build the height of your baby booties, making them snug yet comfortable. As you crochet, your work should begin to cup slightly, forming the sides of your booties. After completing these rounds, you will maintain a stitch count of 12 stitches (12 sts).

Row 4: Create the Toe Shape
Now, it's time to shape the toe. Begin decreasing by working 1 single crochet, then single crochet 2 together (sc2tog) into the next stitch. Repeat this pattern around, focusing on maintaining a snug fit for the lovely baby booties. This section will help shape the front of the booties, creating a smooth contour for tiny toes. At the end of this round, you'll have 8 stitches (8 sts).

Row 5: Final Rounds
Next, single crochet around for 2 more rounds, ensuring that each stitch is worked into the top of the previous round. This will help finalize the body of the baby booties and give them a polished look. Keep your work consistent and watch as the booties begin to resemble the finished product. After these two rounds, your stitch count will remain 8 stitches (8 sts).

Step 6: Finishing Off
Once the rounds are complete, it’s time to finish off. Cut the yarn, leaving a long tail for weaving in, and pull the last stitch through the loop to secure it. Weave in all loose ends using your yarn needle. This important step ensures that your baby booties crochet project looks neat and tidy, ready to be gifted or worn by that special little one.

Step 7: Edging & Decoration
To complete your baby booties, add a decorative edging if desired. You can crochet a simple round of slip stitches (sl st) around the top opening for a clean finish. Additionally, consider creating a small bow with a contrasting color yarn for that charming touch. Secure it onto the front or side, adding a whimsical flair to your cozy creation!

Care Instructions for Baby Booties Crochet

Machine Washing: Use a gentle cycle with cold water to avoid agitation, which can lead to felting or pilling, keeping your baby booties looking lovely.

Hand Washing: For delicate care, soak the booties in cold water with mild detergent. Gently squeeze without rubbing, preserving the integrity of your stitches.

Drying/Blocking: Lay your booties flat on a clean, dry towel to air dry, shaping them to maintain their form. Avoid hanging, as this can distort their shape.

Storage: Store the finished baby booties crochet in a cool, dry place away from direct sunlight. Use a breathable bag to protect them from dust while maintaining airflow.

What to Pair with Charming Crochet Baby Booties

Creating a cozy ensemble is just as fun as making the booties themselves, so let your creativity flow with these delightful pairings.

  • Sweet Baby Blanket: A soft baby blanket brings comfort and warmth, perfectly complementing the booties with matching colors or patterns. Consider using the same yarn for a cohesive look!
  • Adorable Hat: A cute hat in the same color scheme completes a charming outfit, keeping little heads snug and stylish. Don't shy away from adding a playful pom-pom on top!
  • Knitted or Crocheted Toy: An equally soft toy can bring joy to the little one, serving as a delightful companion to the booties. Personalize it with features that match their adorable outfit.
  • Cozy Cardigan: Pairing baby booties with a lightweight cardigan creates a heartwarming outfit to keep babies warm through every season. A simple open stitch pattern can enhance the overall aesthetic!
  • Matching Boot Cuffs: Add an extra layer of charm with mini boot cuffs that echo the bootie’s design, ensuring a snug fit while maintaining their playful spirit. Make them in contrasting colors for a pop!

Expert Tips for Baby Booties

  • Consistent Tension: Keep your tension even throughout the project to ensure both booties look identical. Use a stitch marker to help track your rounds.

  • Count Carefully: Regularly check your stitch count after each round, especially after increases. This habit prevents size discrepancies that could occur if you lose count.

  • Secure Finishes: When finishing off your work, leave a long yarn tail for weaving in. Properly securing these ends is crucial to avoid unraveling over time.

  • Block for Shape: After completing the booties, lightly block them to enhance their shape and form. This step is particularly helpful for the cuffs, keeping them looking neat.

  • Customize with Embellishments: Feel free to add unique touches like small buttons or bows to personalize each pair of baby booties crochet. It adds charm and style!

baby booties crochet Variations & Substitutions

There’s no limit to your creativity when customizing these cozy baby booties crochet; let your imagination run wild!

  • Color Combinations: Opt for a vibrant color palette! Try mixing bright yellows and mint greens for a playful vibe that's perfect for any baby outfit.

  • Yarn Alternatives: If you prefer natural fibers, use organic cotton for a soft but eco-friendly option; its breathability is ideal for little ones.

  • Sizing Modifications: To create a pair that grows with the baby, add or substract rounds based on their age; a few extra stitches can turn a size from newborn to 3 months!

  • Textured Finish: Incorporate a raised stitch pattern like bobbles or puffs on the body of the booties, adding delightful texture that engages tiny fingers.

  • Cute Appliqués: Transform each bootie into a unique piece by adding small crocheted animals or flowers; just imagine the giggles they'll inspire!

  • Fringe Fun: Attach a soft fringe at the heel or cuff for a playful schtick! It's an unexpected twist that adds a fun, whimsical touch to the overall design.

  • Mixed Fiber: Create a unique combo by using a plush yarn for the cuff and a smoother yarn for the boot body, giving them a stylish contrast that elevates them!

  • Button Closure: Instead of a decorative bow, consider a button closure for easier wear; it's a practical touch that makes putting them on a breeze!

Charming Crochet Baby Booties FAQs

Can I use a different type of yarn instead of worsted weight?
Absolutely! While worsted weight yarn is recommended for these baby booties crochet, you can try other yarn types. Just keep in mind that using a lighter or heavier weight may alter the size and fit. If you're swapping for a different yarn, make sure to check your gauge and adjust your hook size if necessary.

How can I make the baby booties bigger or smaller?
Don't panic! To adjust the size, you can either add or reduce rounds in the base or the height sections of the pattern. If you want larger booties, simply increase the number of increase rounds. For smaller booties, consider decreasing the base rounds or using a smaller hook size.

Why is my work curling at the edges?
This is a common challenge! If your baby booties crochet is curling, it might be due to tight tension. So, I recommend checking your gauge to ensure your stitches are consistent. If it continues, consider adding a border with a slip stitch round or lightly blocking them after finishing to help shape the edges.

What hook size should I use with alternative yarns?
If you're choosing a different yarn than the recommended worsted weight, you might need to adjust your hook size accordingly. Always check the yarn label for recommendations. A good general rule is to use a hook that allows the yarn to drape well without creating holes, so feel free to experiment!

How do I fix dropped stitches in my booties?
It's an easy fix! If you've dropped a stitch, gently pull the yarn to bring the stitch back up. You can use a crochet hook to pull the yarn through and secure it with a knot. Alternatively, if the stitch is too far down, you can unravel a few rows and redo them. Just remember, slow and steady wins the race!

What if I run out of yarn before finishing the project?
If you find yourself running low on yarn, don't worry! You can switch to a coordinating color for the final section or use a complementary yarn for an added pop of creativity. Just be sure to join the new yarn neatly to keep everything looking polished!
Filed Under: Uncategorized

Whimsical Lavender Baby Dress: Crochet Pattern for Beginners

August 22, 2026 by Publisher Leave a Comment

Whimsical Lavender Baby Dress: Crochet Pattern for Beginners

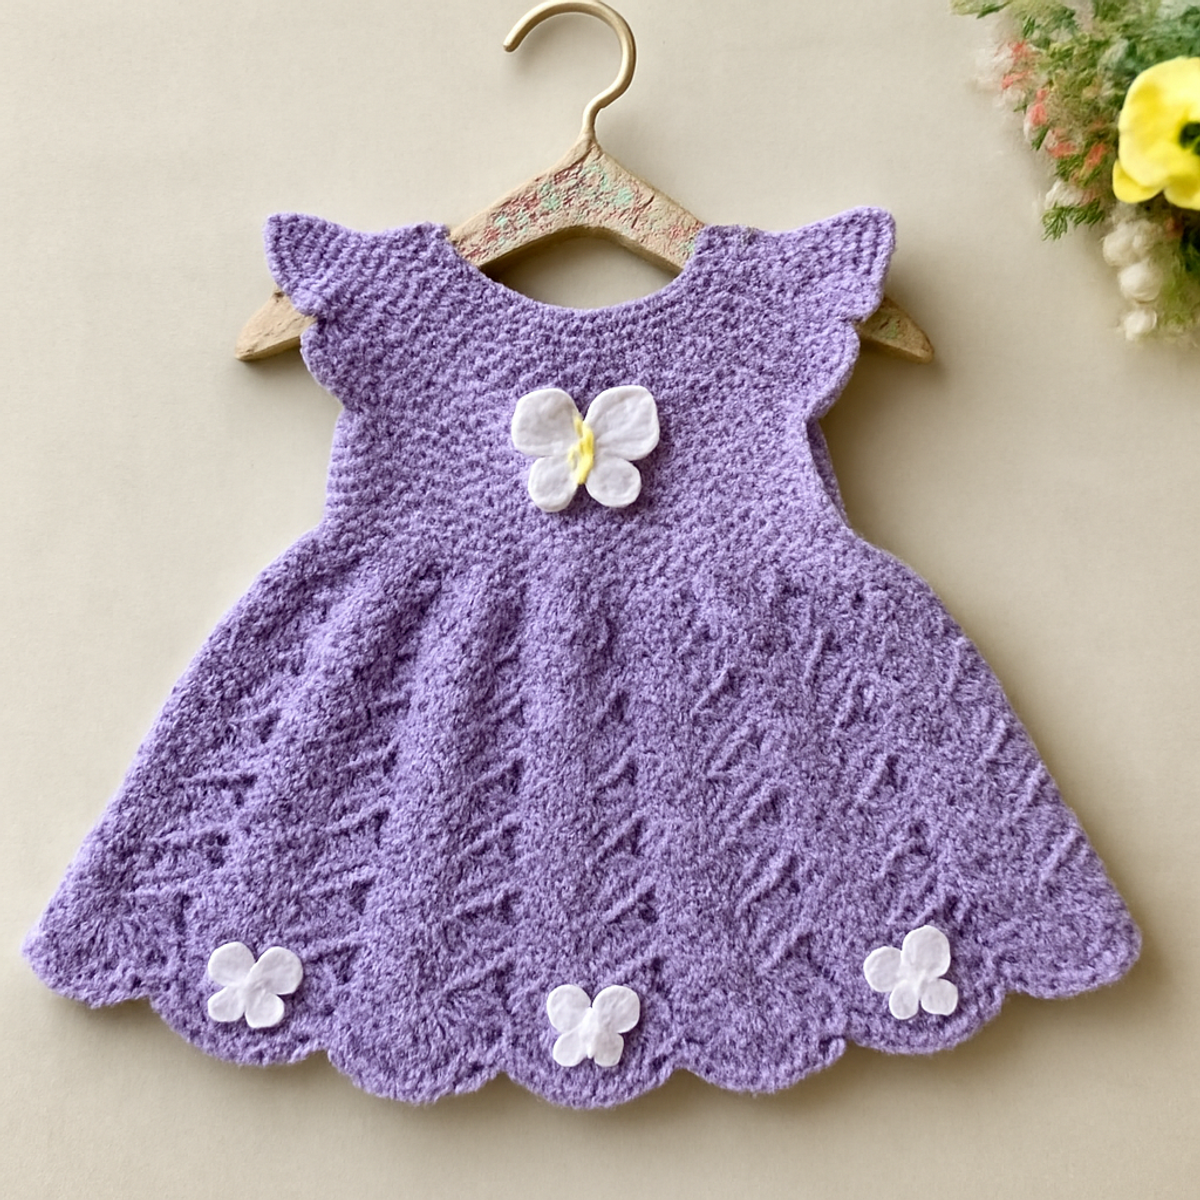
As I was flipping through my stash, a soft lavender yarn caught my eye, instantly transporting me to a garden filled with fluttering butterflies. This is how the enchanting Lavender Butterfly Baby Dress came to life, a whimsical crochet project that will add a sprinkle of charm to any little girl's wardrobe. Perfect for both special occasions and everyday wear, this delightful dress combines texture with thoughtful embellishments that make it stand out in a sea of conventional outfits. Not only is it a joy to create, but it also offers the unique advantage of being beginner-friendly, allowing crafters of all levels to infuse their love and personal touch into a lasting gift. So, are you ready to unleash your creativity and stitch up a magical dress that will surely be treasured?

Lavender Baby Dress Materials & Tools

  • Light Worsted Weight Yarn – Approximately 400-500 yards of a soft acrylic blend will make this dress comfortable and easy to care for.
  • 4.0mm (G/6 US) Hook – This size will help achieve the delicate details you'll see in the bodice and skirt.
  • Buttons – Choose a few cute buttons for closure, adding both functionality and charm.
  • Safety Eyes (Optional) – These can be used for butterfly appliqués, adding extra whimsy to your lavender baby dress.

Why Choose This Lavender Baby Dress?

Unique Design: This dress features an adorable butterfly theme that adds whimsy and charm to any ensemble, making it perfect for both everyday wear and special moments.
Beginner-Friendly: With its simple stitch combinations, this project is ideal for novice crocheters looking to dive into garment-making.
Elegant Texture: The use of textured stitches and a scalloped hem creates a stunning visual appeal that sets this dress apart from the ordinary.
Versatile Customization: Enjoy the freedom to personalize with color swaps and embellishments, allowing you to create a truly unique piece for that special little one.
Thoughtful Gift: Crafting this dress not only brings joy during creation but also offers a heartwarming gift for new parents, wrapped in love and creativity.

Gauge & Sizing Notes

Don't skip the gauge swatch! Checking your tension is essential for ensuring that your Lavender Butterfly Baby Dress fits perfectly and maintains the lovely shape you envision. Aim for a standard crochet gauge of a 4×4 inch (10×10 cm) square, which should yield approximately 12 double crochets by 8 rows; however, this can vary based on your yarn and hook size. If you find your tension doesn't match, try switching to a larger hook size to loosen up your stitches. To adjust the sizing of the dress, simply increase your starting chain in multiples of 4 plus 2 to accommodate any desired width, helping you create the perfect fit for your little one!

Step-by-Step Pattern for Lavender Butterfly Baby Dress

Row 1: Bodice Foundation Chain
Start by chaining 40–60 stitches, depending on the desired size. Join the last chain to the first with a sl st to form a ring, taking care not to twist the chain. This will create the foundation for your lavender baby dress. Your work should lay flat at this point.

Row 2: Single Crochet Bodice
Ch 1, work 1 sc in each ch around the ring (40–60 sts). Join with a sl st to the first sc to close the round. As you crochet, the texture will begin to take shape, giving you a solid base for the bodice.

Row 3: Increase for Armholes
Ch 1, work 1 sc in the first 10 stitches, then inc (2 sc in the next st) for the next 2 stitches. Repeat this pattern until you reach the end of the row, ensuring to finish with 45–65 sts. As you increase, there should be a gentle widening to accommodate armholes.

Row 4: Continue Single Crochet
Ch 1, work 1 sc in each st around the bodice (45–65 sts). Join with a sl st to the first sc. This step might make your bodice feel more secure as you build up the height presented in this lavender baby dress.

Row 5: Transition to Skirt
Ch 1, work 1 sc in each of the first 20 stitches. Now, ch 3, skip the next 2 stitches, and work a dc in the next stitch to create a scallop. Repeat this pattern of 1 sc in 20, then making a scallop until the end of the round. You should see lovely peaks forming with the scallops.

Round 6: Complete the Skirt
Ch 1, work 1 sc in each st where you made the scs before, then ch 3 between each scallop (including the last). Join with a sl st to the first sc. The lavender baby dress should now start to flow with the grace of your scalloped edge.

Round 7: Continue Skirt Rounds
Ch 1, work 1 sc in each st around and maintain the scallops from previous rows. Every second row can be a repeat of 1 sc in each st for a smooth texture, ensuring a soft drape (45–65 sts). Your design will begin to display delightful layers.

Round 8: Final Skirt Edging
Ch 1, work 2 dc in each ch 3 space of the scallops from the last round. This final round of embellishment will enhance the curve of the hem with richness and texture, offering a beautiful contrast to the bodice.

Step 9: Butterfly Appliqués
Using your chosen yarn, crochet small butterflies separately with 5 dc in a magic circle, chaining and pulling tight. Attach these delightful embellishments to the dress at desired spots using a sl st to secure them. They add charming whimsy to your lavender baby dress.

Step 10: Finishing Touches
To finish, work a shell stitch border around the hem of the dress by repeating (1 sc, ch 3, 1 sc) in each scallop. For closure, sew buttons to the back. Your lavender baby dress should now showcase stunning details ready for any little one's adventures!

Expert Tips for the Lavender Baby Dress

  • Maintain Tension: Consistent tension is key throughout the project. Check regularly to ensure the dress maintains its shape, especially around the scalloped edges.

  • Count Stitches: Always count your stitches as you go, particularly during increases. Losing track could lead to uneven bodice fit on your lavender baby dress.

  • Block Your Work: Taking time to block the finished piece allows the texture and details to truly shine. This enhances the scalloping and overall appearance of the dress.

  • Secure Appliqués: When attaching butterfly appliqués, ensure they're securely fastened. A few extra stitches will help them stay in place during wear and washing.

  • Check Fit Frequently: Regularly check the fit around the armholes during construction. This ensures a comfortable fit for babies, avoiding tightness around their delicate skin.

What to Pair with Lavender Butterfly Baby Dress?

Ready to craft a whimsical ensemble that complements the enchanting Lavender Butterfly Baby Dress?

  • Matching Butterfly Headband: Add a delightful headband with butterfly motifs, perfect for a coordinated look on special occasions or casual outings.
  • Soft Lavender Booties: Keep tiny toes warm with sweet booties that use the same yarn, ensuring a cohesive style throughout.
  • Coordinating Blanket: Crochet a lovely baby blanket in similar hues for cozy moments while enjoying the warmth of matching accessories.
  • Butterfly Appliqué Cardigan: Create a light cardigan adorned with butterfly appliqués that perfectly matches the dress, offering extra warmth and charm.
  • Adorable Diaper Cover: Craft a soft diaper cover in lavender to complete an adorable outfit that is both stylish and practical for little ones.

How to Wash and Care for Your Lavender Baby Dress

Machine Washing: Use cold water on a gentle cycle to avoid agitation that can cause felting or pilling. This will help maintain the whimsical butterfly details intact.

Hand Washing: For best results, gently hand wash in cold water with a mild detergent. Rinse thoroughly and avoid wringing out to preserve the delicate shape of your lavender baby dress.

Drying/Blocking: Lay flat to dry on a clean towel, reshaping as needed. Avoid hanging, as this can stretch out the fabric. Blocking helps enhance the scalloped hem and overall texture.

Storage: Store your lavender baby dress in a cool, dry place, ideally folded in a breathable bag to protect it from dust and moisture. This keeps the dress looking fresh for special occasions or everyday wear.

Lavender Baby Dress Variations & Substitutions

Embrace your inner artisan by personalizing this enchanting crochet pattern, making each creation uniquely delightful!

  • Color Swap: Choose pastel pink, mint green, or vibrant royal blue for a fresh twist on the classic lavender hue.
  • Yarn Type: Opt for a breathable cotton blend, perfect for a lightweight summer dress that remains comfortable in warm weather.
  • Size Adjustments: Add or reduce rows in both the bodice and skirt to create a dress tailored to different age ranges and sizes.
  • Texture Twist: Consider adding fringes along the hem or delicate lace accents to give this dress an eye-catching and unique finish.
  • Additional Embellishments: Incorporate small floral motifs or charming tiny pom-poms that dance along the hem for playful accents.
  • Mixed Yarns: Combine different yarn types in the butterflies or skirt to enhance texture and visual interest, creating a truly standout piece.
  • Length Modification: Adjust the length of the skirt by adding more rounds, crafting a lovely fuller look that flows beautifully.
  • Fun Closure Options: Swap traditional buttons for cute toggles or decorative pins that not only serve a functional purpose but add whimsical flair.

Lavender Butterfly Baby Dress FAQs

Can I substitute different yarns for the lavender baby dress?
Absolutely! While a soft acrylic blend is recommended for comfort, you can experiment with cotton yarn for breathability in warmer weather. Just be aware that using a different weight may affect your gauge and final measurements.

How do I adjust the size of the lavender baby dress?
You can make size adjustments by adding or reducing rows in both the bodice and skirt. For a larger size, simply increase your foundation chain. For a smaller size, reduce the number of initial stitches and keep an eye on your increases for armhole shaping.

Why is my work curling at the edges?
Don't panic! Curling can often happen when working with different stitch heights. I recommend checking your tension and ensuring that you’re using the correct number of stitches in each round. If it persists, blocking your finished piece can help smooth out those edges nicely!

What hook size should I use for the lavender baby dress?
A 4.0 mm (G/6 US) crochet hook is recommended for this pattern, as it creates the delicate details in the bodice and skirt. If you find your stitches are too tight or loose, consider going up or down a hook size to achieve the best fit and drape for your baby dress.

How do I fix dropped stitches in my project?
It’s an easy fix! Simply take a crochet hook and use it to pull the dropped stitch back up through the surrounding stitches. If you’ve lost multiple stitches, don't hesitate to frog a few rows back and redo those sections—sometimes, it’s faster than you think!

Can I add more embellishments to the lavender baby dress?
Of course! Adding more floral motifs or small pom-poms along the hem can give your dress a unique flair. Just ensure that any added items won't irritate the baby's skin, and sew them on securely to withstand wear.

Filed Under: Uncategorized

Sunflower Coaster: Quick & Easy Crochet Delight

August 22, 2026 by Publisher Leave a Comment

Sunflower Coaster: Quick & Easy Crochet Delight

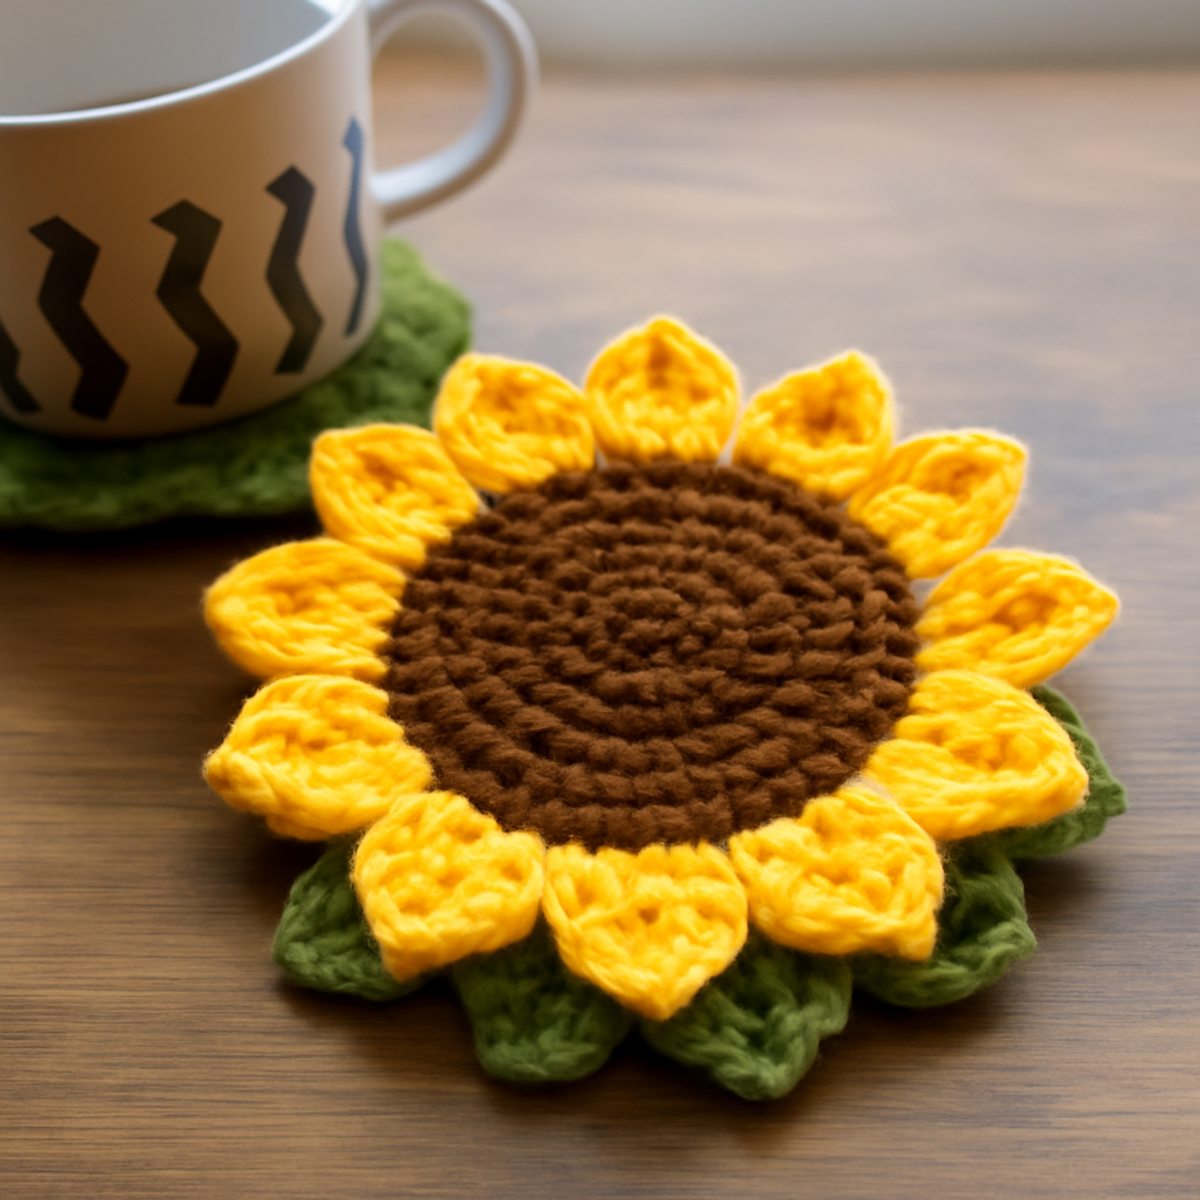
As I sat sipping my favorite tea, a sudden realization struck me—my beloved wooden table needed a pop of color! Enter the Easy Sunflower Coaster pattern, a delightful project that combines beauty with functionality. This cheerful crochet pattern is perfect for crafters of all skill levels, especially beginners and intermediates, allowing everyone to create vibrant coasters that not only protect surfaces from moisture but also add a touch of whimsy to any room. Working up quickly with just a few materials, these sunflower coasters are the ultimate way to use up your yarn stash while enjoying the creativity of crafting. So, grab your hook and let’s stitch up something that will brighten both your table and your heart!

Sunflower Coaster Materials & Tools

  • Yarn

    • Worsted Weight Yarn – Approximately 150-200 yards of yellow, brown, and green yarn for completing multiple sunflower coasters.
    • Cotton Blend or Acrylic – Ideal for easy washing and durability, making your coasters practical as well as beautiful.
  • Tools & Notions

    • 5.0mm (H-8) Hook – A perfect size for working with worsted weight yarn to ensure an enjoyable crochet experience.
    • Yarn Needle – Essential for weaving in ends and finishing your coasters neatly.
    • Optional Safety Eyes – Consider these if you'd like to incorporate any additional embellishments, adding an extra playful touch to your sunflower coaster design.

Why Choose the Sunflower Coaster?

Vibrant Aesthetic: These easy sunflower coasters feature bright colors that instantly uplift any space, making them ideal decor for your kitchen or living room.

Fun for All Levels: Perfect for crafters of all skills, this pattern provides a delightful challenge for beginners while still being enjoyable for the more experienced.

Quick & Easy: With a straightforward design, you'll have beautiful coasters finished in no time, ready to impress your guests or brighten up your own home.

Versatile Customization: Want a personal touch? Change colors or add unique embellishments like beads to make each coaster truly yours!

Functional Art: Combine beauty and practicality; these coasters protect your surfaces while adding a charming flair to your decor.

Gauge & Sizing Notes

Don't skip the gauge swatch! Checking your tension is crucial for ensuring your sunflower coaster turns out both functional and beautiful. A common crochet guideline suggests that your gauge should approximate a 4×4 inch (10×10 cm) swatch, typically yielding about 18 double crochets by 10 rows. If you want to make your sunflower coaster larger, simply increase your starting chain or round in multiples of 4. Conversely, if your swatch is too small, don’t worry! Just try going up a hook size to achieve that perfect tension. With these adjustments, you'll create stunning coasters that are sure to brighten your space!

Step-by-Step Pattern for sunflower coaster

Row 1: Center Circle
Start with a magic ring, ch 1, and work 6 sc into the ring to create the sunflower's center. Pull the ring tight and join with a sl st to the first sc. Your work should be a small, tight circle. (6 sts)

Row 2: Increase Round
Ch 1 and make 2 sc in each stitch around for a total of 12 stitches. Join with a sl st to the first sc, ensuring your work remains a flat circle. It should be slightly larger now. (12 sts)

Row 3: Smooth Edging
Ch 1, then work 1 sc in the first stitch, followed by 2 sc in the next. Repeat this pattern around, ensuring to join with a sl st at the end. Your center should appear fuller and rounder now. (18 sts)

Row 4: Begin Petals
Ch 3 (counts as 1 dc), then work 1 dc in the next stitch, followed by 2 dc in the next stitch. Repeat this pattern around, creating petals that lean away from the center. Join with a sl st, and your work should start to take on a flower appearance. (24 sts)

Row 5: Back to Petals
Ch 3, and work 2 dc into the first petal’s base; continue this for each of the remaining petals. This round will add height and fullness, making the petals vibrant. Join with a sl st to complete the round. (36 sts)

Step 6: Leaf Base
Switch to green yarn. Ch 1, sc in the next 4 stitches, then hdc in the next 2 stitches. Create a leaf shape by dc in the following two stitches, then sc in the last. This scalloped effect gives the coaster its charming finish. (6 sts)

Step 7: Final Edging
To complete your sunflower coaster, switch back to yellow and sc around the entire coaster to give it a neat finish and round it off. Join with a sl st, and your coaster should now feel complete and secure. This final border will elevate the overall look. (Any extra sts from edge join)

What to Pair with Sunshine Floral Coasters?

Crafting your vibrant sunflower coasters opens the door to a delightful crochet journey filled with color and creativity.

  • Cheerful Mug Rugs: Create matching mug rugs in rich colors to perfectly complement your coasters, adding a cozy touch beneath each cup. They'll keep those surfaces pristine while merrily tying your décor together.

  • Lovely Flower Pot Holders: Crocheting flower pot holders in similar hues can extend your sunny vibe beyond the table, brightening any corner of your home. Imagine vibrant blooms nestled in these cheerful containers!

  • Sunny Kitchen Dishcloths: Make some equally bright kitchen dishcloths to match your sunflower coasters, enhancing your workspace with practicality and charm. These quick projects not only are useful but also serve as striking décor.

  • Whimsical Table Runner: Consider a lively table runner featuring sunflower motifs that elegantly tie all the elements of your dining area. It creates a unified look that brings warmth and joy to every meal.

  • Adorable Crochet Basket: A crochet basket in coordinating yarns can add storage for miscellaneous items, while echoing the cheerful theme of your coasters. It's a wonderful way to keep your space tidy and bright!

How to Wash and Care for Your Sunflower Coaster

  • Machine Washing: Use cold water and a gentle cycle to avoid agitation; this helps prevent any potential felting or pilling, keeping your sunflower coaster looking fresh.

  • Hand Washing: For a more careful approach, hand wash in cold water with mild detergent. Gently squeeze to clean, then rinse thoroughly to ensure no soap residue remains.

  • Drying/Blocking: Lay flat to dry away from direct sunlight to maintain color vibrancy. If necessary, blocking can help reshape your sunflower coaster and remove any curling.

  • Storage: Keep your coasters stacked neatly in a cool, dry place, away from moisture, to preserve their quality and ensure they'll brighten your table for years to come.

Sunflower Coaster Customizations

Embrace your inner artist and transform these delightful sunflower coasters into unique pieces that reflect your style!

  • Yarn Weight Swap: Try using bulky yarn for a cozier feel. Thicker threads create a plush texture that adds warmth to your decor.

  • Fiber Alternatives: Switch to 100% cotton for a natural touch, offering increased absorbency and a rustic charm perfect for summer.

  • Color-Blocking Fun: Use two or three contrasting colors per coaster instead of the traditional palette. This creates a playful, modern aesthetic that captures attention.

  • Textured Stitches: Incorporate popcorn or bobble stitches into the petals for extra depth and visual intrigue. The playful textures will shimmer in the light, creating an eye-catching effect.

  • Size Variations: Scale your coasters down for tiny cup-sized ones or enlarge them to function as vibrant placemats. This versatility allows for creativity while accommodating different needs.

  • Embellishments: Add beads or tiny fabric flowers to the center for a whimsical touch. These little additions can enhance the overall charm and personalized feel of your coasters.

  • Fringe Finish: Consider adding a cute fringe to the edges for a bohemian vibe. The fluttering strands will inject a fun, eclectic flair into your crochet projects.

  • Layering Options: Create a layered effect by sewing multiple coasters into a single stunning piece, perfect for showcasing your craftsmanship in a statement decor item.

Expert Tips for Sunflower Coaster

  • Check Your Tension: Always test your tension before starting; if it's loose, adjust your crochet hook size to ensure consistency across all your sunflower coasters.

  • Count Regularly: Keep a close eye on your stitch count, especially when working on the petals—losing count can lead to uneven shapes that detract from your pretty flowers.

  • Block Your Coaster: After finishing, blocking your coasters may be necessary to set the shape and prevent any curling around the edges for a polished look.

  • Secure Ends: Don’t forget to weave in your yarn ends properly; this will enhance the durability and aesthetic finish of your sunflower coaster.

  • Scalloped Edge: When creating the leaf base, ensure that the scalloped effect is consistent for a uniform and beautiful finish, adding charm to your design.

Sunflower Coaster FAQs

Can I use different yarn types for my sunflower coaster?
Absolutely! While the pattern suggests a cotton or acrylic blend, you can experiment with different yarn types. Just keep in mind that using a heavier yarn may change the coaster’s shape and size, so always check gauge when substituting yarn.

How do I make my sunflower coaster bigger or smaller?
If you want a larger sunflower coaster, you can increase the number of stitches in each round before reaching the petal sections or simply add more rounds as needed. For a smaller coaster, consider using a thinner yarn or a smaller hook size to maintain the shape while reducing overall dimensions.

Why is my sunflower coaster curling at the edges?
Don’t panic! This is a common issue. Curling usually occurs due to tension; if your stitches are too tight, try loosening up a bit. Additionally, blocking your sunflower coaster after finishing can help set the shape and flatten those pesky edges for a polished finish.

How do I fix dropped stitches in my sunflower coaster?
It’s an easy fix! Take a crochet hook and carefully pick the dropped stitch back up, using the correct yarn from your work to secure it. You might need to adjust nearby stitches to maintain an even look, so take your time and don’t hesitate to undo a few stitches if needed for the best result.

What hook size should I use for my sunflower coaster?
For this pattern, a 5.0mm (H-8) crochet hook is recommended, as it works well with worsted weight yarn. However, if you find your stitches are coming out too tight or loose, feel free to try a different hook size until you find one that creates the perfect tension for your coasters.

Can I customize the colors of my sunflower coaster?
Absolutely, customization is half the fun! Feel free to play around with different color combinations. Pastels can create a softer look, or bright, bold colors can really make the sunflower pop. It’s your creation, so let your imagination run wild!

Filed Under: Uncategorized

Cheerful Sunflower Crochet Bag: Whimsical and Fun to Make

August 22, 2026 by Publisher Leave a Comment

Cheerful Sunflower Crochet Bag: Whimsical and Fun to Make

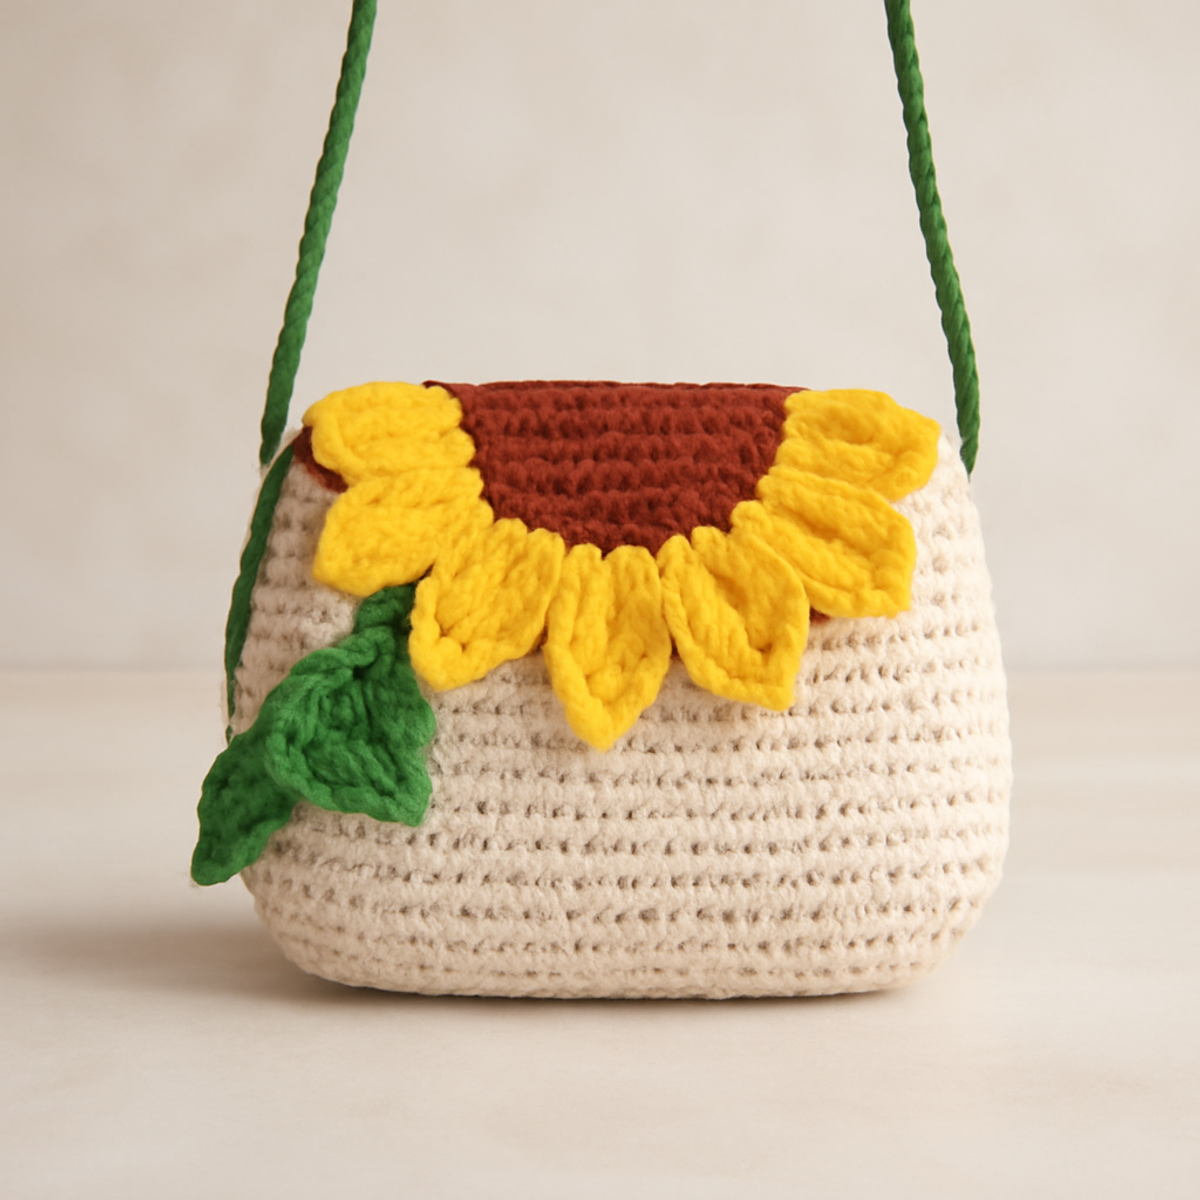
As I sift through my yarn stash, I am met with a vibrant assortment of colors that remind me of sunny days spent outdoors, and I can’t help but feel inspired to create something special. That’s where this sunflower crochet bag comes in! This delightful project is perfect for intermediate crocheters looking to elevate their skills and produce a standout accessory that is as functional as it is whimsical. With its playful design and nature-inspired theme, you’ll not only enjoy the process but also have a unique bag that brightens your wardrobe. The sunflower crochet bag is perfect for enhancing your color blending abilities and adding a personal touch to your outfits. It’s time to grab your hook and get ready to cultivate joy with each stitch!

Sunflower Crochet Bag Materials & Tools

  • Worsted Weight Yarn – You'll need three colors: approximately 200 yards of cream or soft beige for the body, 50 yards of bright yellow for the petals, and 30 yards of chocolate brown for the center.
  • Vibrant Green Yarn – About 40 yards will give life to your leaves in this sunflower crochet bag.
  • 5.0mm (H-8) Hook – This size is ideal for crafting the bag's structure and details.
  • Stitch Markers – Great for keeping track of your rows while you work on the playful sunflower motif.
  • Yarn Needle – Helpful for weaving in ends to give your bag a polished finish.
  • Optional Embellishments – Personalize your sunflower crochet bag with decorative buttons or beads that reflect your style!

Why Choose the Sunflower Crochet Bag?

Unique Design: This bag’s sunflower motif brings a touch of nature’s beauty into your everyday life, making it a delightful and eye-catching accessory.

Skill Enhancement: As you work through this pattern, you'll refine your color blending and shaping techniques, elevating your crochet skills to new heights.

Perfect for All Seasons: Whether for a sunny day at the park or a cozy coffee shop, this whimsical design fits any occasion seamlessly.

Versatile Usage: The compact yet spacious design allows you to carry all your essentials while still being easy to style with any outfit.

One-of-a-Kind Creation: With options to customize colors and sizes, you’re sure to craft a bag that reflects your personal flair, making it a truly unique piece in your collection!

Gauge & Sizing Notes

Don't skip the gauge swatch! Ensuring your tension is correct is essential for creating the perfect sunflower crochet bag that maintains its delightful shape. A common guideline is to aim for a tension swatch that measures 4×4 inches (10×10 cm) and results in approximately 14 half double crochets by 8 rows. If you desire to make this bag larger, increase your starting chain in multiples of 6 + 2 for each round. If you find your gauge is off, and your swatch is too small, simply go up a hook size to adjust your stitches. With these tips, your sunflower crochet bag will turn out beautifully!

Step-by-Step Pattern for Cheerful Sunflower Tote

Row 1: Create the Bag's Base
Begin your sunflower crochet bag by making a magic ring. Chain 2 (doesn't count as a stitch). Work 12 hdc in the ring, pull tight to close, and join with a sl st to the first hdc (12 sts). Your work should look like a small round disk.

Row 2: Increase for Body
Ch 2, hdc in the same st. (2 hdc in next st) repeat around, sl st to join (24 sts). At this stage, the base should expand beautifully, forming a larger circle that will support the bag's body.

Row 3: Continue to Build Height
Ch 2, hdc in each st around, sl st to finish (24 sts). You'll see the smooth sides start to rise, creating the foundation for your sunflower crochet bag to take shape.

Row 4: Add Texture
Ch 2, (hdc in next st, inc in next st) repeat around, sl st to join (36 sts). This increase will provide a structured yet flexible shape as you elevate the body of the bag further.

Row 5: Stabilize the Body
Ch 2, hdc in each st around, sl st to join (36 sts). The bag will feel sturdier now, so keep your tension consistent for the next rows in this sunflower crochet bag project.

Row 6: Constructing the Petals
Switch to yellow yarn. Ch 2, dc in the next st, dc in the following st, sl st in next st repeat around, joining after every third petal (12 petals total). The sunflower's cheerful shape begins to emerge beautifully as you gather the petals.

Row 7: Forming the Center
Change to chocolate brown yarn. Ch 1, sc in each petal base (12 sc). Your sunflower crochet bag will now feature a delightful contrast as the darker center pops against the bright petals.

Row 8: Strap Creation
Ch 100 for the strap, then hdc in 4th ch from the hook and each ch across (97 hdc). This long strap will provide comfort and style, allowing you to wear your sunflower crochet bag with ease.

Step 9: Attach the Strap
With the body facing the right side, sl st to attach the strap at two opposite points of the bag's top (1 sl st at each side). Ensure it’s secure to hold your stunning creation with confidence.

Step 10: Final Touches
Weave in any yarn ends with a yarn needle and gently block your sunflower crochet bag to set its shape. Your hard work has paid off—embrace the beauty of your unique accessory!

What to Pair with Cheerful Sunflower Tote

As you bask in the joy of creating your sunflower crochet bag, consider crafting complementary pieces to enhance your collection.

  • Sunshine Scarf: A light scarf in sunny hues will perfectly echo the vivid colors of your tote. Wrap yourself in warmth that complements your cheerful accessory.

  • Petal Pouch: This small, zip-up bag can use the same color patterns, making it a fantastic companion for storing your essentials. It’ll add a fun, coordinated vibe to your outings!

  • Matching Coasters: Crochet coasters in sunflower shades can add charm to your home décor while sharing the same spirited design theme.

  • Leafy Keychain: Create a mini version of the bag with a cute keychain to keep your keys with a touch of whimsy. Each time you grab your keys, you'll be reminded of sunny days!

  • Little Flower Pins: Adorn your outfits and bags with small flower motifs using your leftover yarn. They make delightful accents that celebrate the joy of your sunflower crochet bag!

Embrace these project pairings, and let the creativity blossom!

Care Instructions for Sunflower Crochet Bag

  • Machine Washing: Use cold water and a gentle cycle if your sunflower crochet bag gets dirty. This helps minimize agitation, which can lead to unwanted felting or pilling.

  • Hand Washing: For best results, hand wash your bag in cold water with mild detergent. Gently squeeze out excess water without twisting or wringing to maintain its shape.

  • Drying/Blocking: Lay your sunflower crochet bag flat on a clean towel to dry, reshaping it as needed. This will help preserve its beautiful design and ensure it maintains its lovely form.

  • Storage: When not in use, store your bag in a cool, dry place. Avoid hanging it, as this may stretch the crochet; instead, keep it flat or folded to protect its structure.

Expert Tips for Your Sunflower Crochet Bag

  • Tension Matters: Keep your tension consistent throughout the project. This ensures even stitches and a neat appearance, especially in the petal sections of your sunflower crochet bag.

  • Count Regularly: Periodically check your stitch count after each round. Losing track can lead to extra or missing stitches, which can affect the final shape.

  • Secure Ends: When changing yarn colors, leave a long enough tail to weave in later. This will help secure the color transitions and prevent unraveling.

  • Blocking Benefits: Don’t skip blocking! Gently block your finished sunflower crochet bag to enhance its shape and texture, giving it that polished, professional look.

  • Enjoy the Journey: Remember to take breaks and enjoy the process. This cheerful sunflower crochet bag is an opportunity to express creativity and achieve a beautiful, functional piece!

Variations & Substitutions for Sunflower Crochet Bag

Unlock your creativity by customizing this delightful sunflower crochet bag to make it truly yours. Let your imagination bloom!

  • Yarn Weight Swap: Experiment with a lighter weight yarn to create a delicate summer bag that enhances the sunflower design's charm.

  • Fiber Alternatives: Use cotton yarn for a breathable option perfect for warm days. Its natural qualities will add both softness and strength to your bag.

  • Color-Blocking Fun: Combine multiple colors for the sunflower petals, like a mix of oranges and yellows, to create a vibrant, eye-catching statement.

  • Size Adjustment: Increase the base rows to craft a larger tote, transforming this bag into a perfect beach companion or a shopping essential.

  • Textured Flair: Add a soft fringe to the bag’s bottom for playfulness. This simple touch brings extra dimension and an artistic vibe to your creation.

  • Lined Interior: Consider adding a fabric lining for extra durability and a polished look. It offers support for heavier items and protects the stitches inside.

  • Different Strap Styles: Switch to a braided strap for a unique touch. This design not only adds flair but can also provide added comfort when carrying.

  • Embellishment Options: Personalize your sunflower crochet bag with buttons or beads around the center to enhance its whimsical character. Each addition tells your unique crafty story.

Cheerful Sunflower Tote FAQs

Can I substitute the yarn type for the sunflower crochet bag?
Absolutely! If you prefer to use cotton yarn, it can create a sturdier and more summer-appropriate bag. Just keep in mind that you might need to adjust your hook size slightly, as cotton yarn can sometimes be thinner than worsted acrylic.

How do I adjust the size of my sunflower crochet bag?
Don’t panic! To increase the size, simply add more rounds in the base before starting the body. You can also add additional stitches in each round of the body. If you want to make it smaller, reduce the number of rounds or stitches evenly to keep the proportions.

Why is my sunflower crochet bag curling at the edges?
This can occur if your tension is too tight or if you're using a hook that’s too small. I recommend checking your gauge first! If needed, you can block the bag gently after completing it to flatten and set the edges more smoothly.

What hook size should I use for my sunflower crochet bag?
A 5.0 mm (H-8) hook is recommended, as it achieves a nice balance between the stitches and the yarn's drape. However, if you notice too much tightness in your work, consider going up a half-size to achieve a more relaxed fabric.

How do I fix dropped stitches in my sunflower crochet bag?
Don’t worry! Just use a yarn needle to ‘weave’ the dropped stitch back into place. Pull the yarn through the loop of the stitch below and re-crochet the area if necessary to blend it back into your work. It’s an easy fix with a bit of patience!

Can I embellish my sunflower crochet bag with additional decorations?
Absolutely! Personalizing your sunflower crochet bag with buttons, beads, or even embroidery can make it uniquely yours. Just be sure to sew on any embellishments securely, especially if you plan to use the bag actively!

Filed Under: Uncategorized

Colorful African Flower Soccer Ball: A Fun Crochet Challenge

August 22, 2026 by Publisher Leave a Comment

Colorful African Flower Soccer Ball: A Fun Crochet Challenge

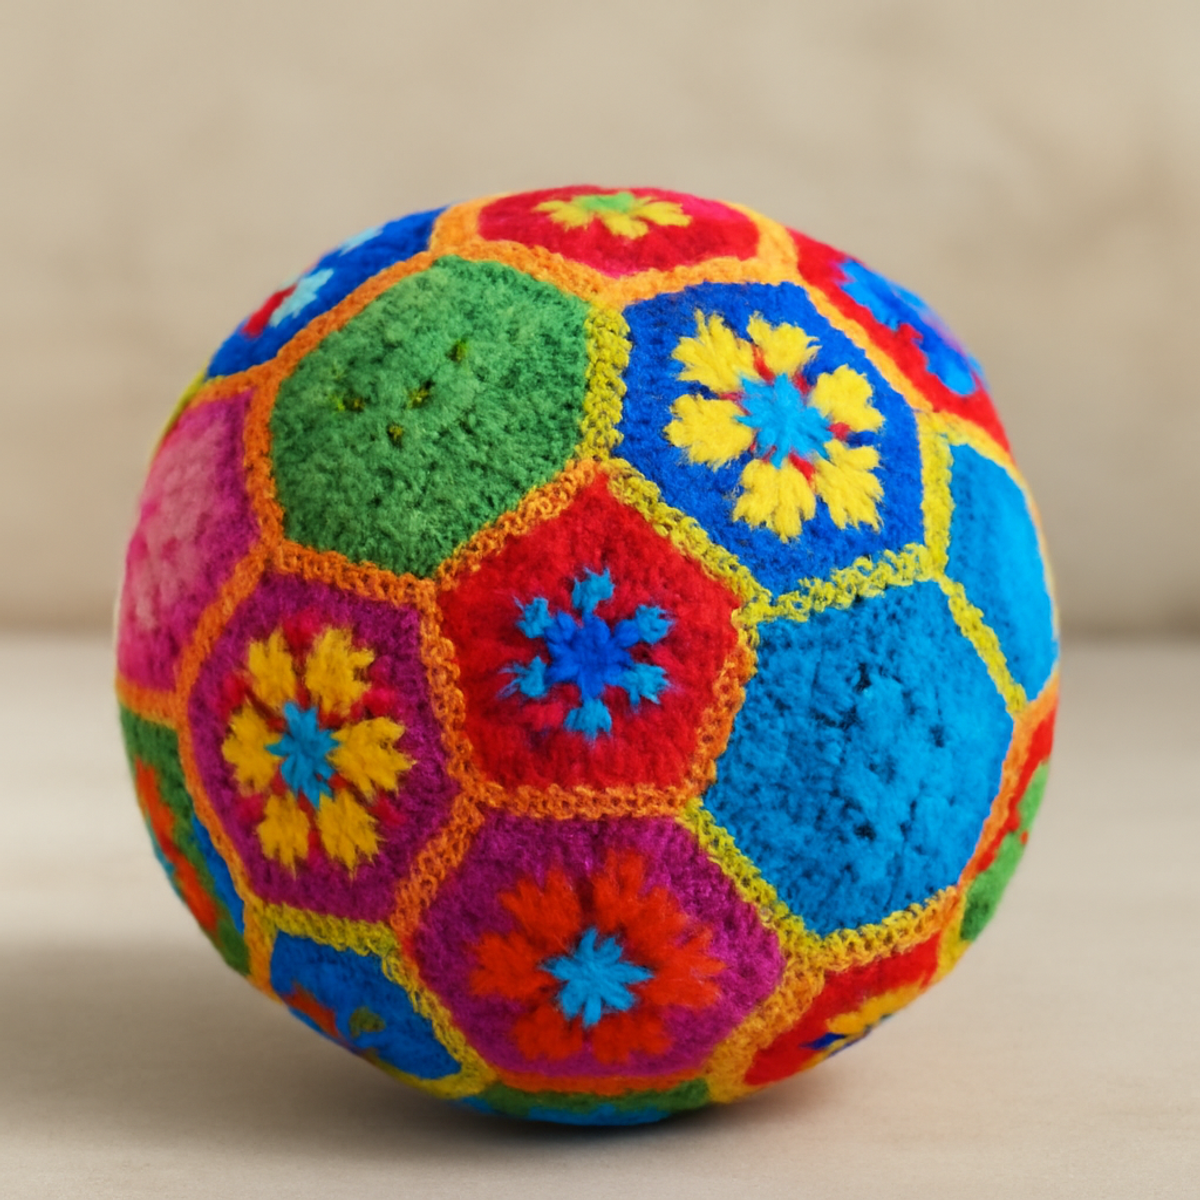
As I rolled the vibrant African Flower Soccer Ball across the living room floor, I couldn't help but smile at how a simple yarn creation morphed into a source of joy and playfulness. This stunning crochet project blends art with functionality, providing not just a delightful plaything for kids, but also a beautiful decorative piece to brighten any space. With its intricate floral designs and bold color palette, this African Flower Soccer Ball invites crafters to dive into an engaging experience that inspires creativity and showcases your skill. Perfect for those with a bit of crochet experience, this pattern offers a tasteful challenge that enables you to explore color combinations and various crochet techniques. So, grab your yarn and let the fun begin—your own one-of-a-kind soccer ball awaits!

African Flower Soccer Ball Materials & Tools

  • Worsted Weight Yarn – Approximately 500-600 yards of a blend of acrylic and cotton for durability and easy care.
  • 4.5mm (US size 7) Hook – Ideal for achieving the specific stitch tension needed to create a cohesive ball shape.
  • Safety Eyes (optional) – Add detail to your soccer ball for an enhanced design; these are not necessary but can add character.
  • Stitch Markers – Useful for keeping track of rounds while assembling the hexagons, ensuring precise construction.
  • Fiber Stuffing – For filling the ball, giving it that perfect plush and squishy texture.

Why will you love this soccer ball?

Unique Design: The African Flower Soccer Ball stands out with its eye-catching floral patterns, making it not just a toy but also a conversation piece.

Intermediate Skill Challenge: Ideal for those looking to improve, this project encourages you to hone techniques like joining motifs and working in the round.

Vibrant Color Palette: Experiment with bold colors to create a playful mix that reflects your style while bringing joy to those who see it.

Soft & Squishy Texture: With a puffy finish, the ball is perfect for both holding and kicking, ensuring endless fun for kids.

Versatile Aesthetic: Use customized yarn blends for different textures or sizes, letting your creativity flow and making this project uniquely yours.

Gauge & Sizing Notes

Don't skip the gauge swatch! Checking your tension is crucial for ensuring your african flower soccer ball turns out beautifully shaped and proportionate. A good starting guideline is to aim for a gauge of 4×4 inches (10×10 cm), which generally translates to about 14 double crochets by 8 rows in worsted weight yarn. If you're looking to adjust the size, increase your starting chain in multiples of 6 for a bigger ball or decrease it for a smaller version. If your tension doesn't match the gauge, simply go up a hook size for looser stitches or down a size if your swatch is too small. Happy crocheting!

Step-by-Step Pattern for african flower soccer ball

Row 1: Create the First Hexagon
Start with a magic circle and ch 3 (counts as first dc), then work 11 dc into the circle, join with a sl st to the top of the ch 3. Your work should form a round circle of 12 dc. Pull the magic circle tight, ensuring a secure start.

Row 2: Begin the Petals
Ch 1, then sc in the same st. Ch 2, skip next dc, sc in next dc; repeat from * to * around, ending with a slip stitch in the first sc. You should have 6 petal points emerging from the base round (6 ch-2 spaces).

Row 3: Form the Petal Detail
In the first ch-2 space, work (sc, hdc, 5 dc, hdc, sc) to create a petal. Repeat this in each ch-2 space around, joining with a sl st in the first sc. At this stage, your hexagon should display lovely, elevated petals, totaling 6 petals.

Row 4: Complete the Hexagon Edges
Ch 1, then sc in the same st. Ch 2, sc in next petal base; repeat from * to * around. Join with a sl st in the first sc. Your hexagon will now have 6 distinct arches where the petals meet the edges, creating a beautiful floral shape.

Row 5: Join Hexagons
Make additional hexagons (you’ll need approximately 12). To join, position two hexagons wrong sides together, with a sl st in the corresponding petal bases, working across edges to create a continuous flower pattern. Your project will resemble a blooming field through the hexagons.

Row 6: Shape the Sphere
Once all hexagons are joined together, fold the formation to connect edges, casting a spherical shape. Use sl st to seamlessly join edges together, keeping the hexagons aligned. The crude shape should start to resemble a ball, with a slight puffiness appearing.

Step 7: Final Assembly
Assemble by adding a round of sc along the edges of the sphere, working to draw in any excess fabric. This tightening will help solidify the shape and prepare it for stuffing. At this stage, ensure your work forms a cohesive sphere, closing gaps before adding stuffing.

Step 8: Stuff and Close
Fill the ball with fiber stuffing to your desired plushness. Once satisfied, continue with sc to close any remaining gaps, joining with sl st. Your african flower soccer ball should now feel full and ready for play, showcasing the beautiful floral motifs created throughout.

Variations & Substitutions for african flower soccer ball

Explore a world of creativity as you bring your vision to life with unique twists and swaps for your crochet soccer ball!

  • Yarn Substitutions: Opt for cotton yarn for a softer result, giving your ball a delightful, plush feel without sacrificing durability.

  • Color-blocked Options: Embrace modern aesthetics by alternating solid colors in your hexagons, creating a stunning, contemporary twist to the traditional design.

  • Larger Size: Increase your hook size and yarn weight to craft a bigger version of the ball, perfect for larger play areas or as a statement piece.

  • Texture Enhancements: Add pom-poms or tassels at the seams for playful accents. These fun details could bring an extra layer of whimsy to your creation!

  • Monochromatic Palette: Choose a single color scheme for a chic, sophisticated look. This lends a refined aesthetic that accentuates the intricate floral patterns beautifully.

  • Mix Fiber Types: Combine yarns, such as pairing wool with bamboo, for unique texture and warmth, making your ball not just a toy but an eye-catching decor item.

  • Fringe or Border: Experiment with fringe along the ball’s seams or a decorative border to accentuate the edges and add dimension, bringing an unexpected flair.

  • Safety Eyes: Include safety eyes to give your soccer ball a personality! Even the simplest addition can transform it into a charming companion for kids.

What to Pair with the African Flower Soccer Ball?

As you embrace the joy of creating your unique soccer ball, consider complementing it with these whimsical crochet projects that echo your vibrant spirit.

  • Colorful Hexagon Coaster: Use leftover yarn to craft matching coasters, enhancing your living space with playful accents. These versatile pieces will delight your guests!

  • Floral Pillow Cover: Create a pillow cover using the same flower motifs for a cozy decorative touch that perfectly complements your soccer ball.

  • Matching Backpack: A custom-made backpack featuring similar floral patterns will make for a splendid and practical accessory, perfect for carrying your crochet essentials.

  • Fun Playground Blanket: Crochet a lightweight blanket using the same bold colors, ideal for picnics or playdates, creating a perfect outdoor complement to the African Flower Soccer Ball.

  • Charming Keychain: Use scraps of yarn to design a whimsical keychain shaped like a flower, bringing a touch of your crochet artistry to your everyday accessories.

Care Instructions for African Flower Soccer Ball

Machine Washing: Use cold water on a gentle cycle to clean your African Flower Soccer Ball while preventing any felting or pilling.

Hand Washing: For a gentler approach, hand wash your ball in cool water with mild detergent, keeping agitation to a minimum to maintain its shape and texture.

Drying/Blocking: Lay the soccer ball flat on a clean towel to dry. Avoid hanging it, as this can distort its shape; instead, reshape gently while damp if needed.

Storage: Store your soccer ball in a cool, dry place, away from direct sunlight to prevent fading and maintain its vibrant colors and intricate designs.

Expert Tips for the Best Soccer Ball

  • Maintain Tension: Consistency is key! Ensure your yarn tension is even throughout your work to keep the african flower soccer ball from becoming misshapen.

  • Track Your Count: Utilize stitch markers to help keep track of rounds when joining hexagons. This prevents losing count and ensures cohesion in your design.

  • Secure Joints: When assembling, make sure your slip stitches are snug. Loose connections can lead to gaps or an uneven surface on your soccer ball.

  • Block Hexagons: After completing each hexagon, block them to achieve a uniform shape. This will help your ball appear polished and prevent any misshapen stitches.

  • Stuff Evenly: As you stuff your soccer ball, do it in small amounts. This allows you to achieve the desired plushness without over-filling, which could distort the shape.

Colorful African Flower Soccer Ball FAQs

Can I substitute the yarn? What if I want to use cotton instead of acrylic?
Absolutely! You can swap acrylic for cotton for a softer, more breathable texture in your African Flower Soccer Ball. However, keep in mind that cotton may change the structure slightly, so be sure to check your gauge for the best results.

How can I make the soccer ball bigger or smaller?
To adjust the size of your African Flower Soccer Ball, either use a larger hook for a bigger ball or a smaller hook for a more compact version. Additionally, you can increase or decrease the number of hexagons used, but keep the overall construction in mind to maintain the ball shape.

Why is my work curling at the edges?
Don't panic! Curling edges can happen when the tension is too tight. To fix this, try loosening up your stitches and ensuring you're using the recommended hook size. If you're still having trouble, blocking your hexagons after completing them can help reshape your work.

What if I drop a stitch while assembling my hexagons?
It's an easy fix—just carefully pick up the dropped stitch and bring it back to the current row with a slip stitch. If it's more complicated, you may want to weave in a small piece of yarn to secure that area and maintain the integrity of your African Flower Soccer Ball.

What hook size should I use if I want a tighter stitch?
If you prefer a tighter stitch for your African Flower Soccer Ball, consider going down a hook size, say to a 4.0mm (US size 6). Keep in mind this may lead to a denser ball; it may be less squishy, so check your yarn tension throughout the project.

Filed Under: Uncategorized

Charming Crochet Flower Square: A Colorful Craft Project

August 22, 2026 by Publisher Leave a Comment

Charming Crochet Flower Square: A Colorful Craft Project

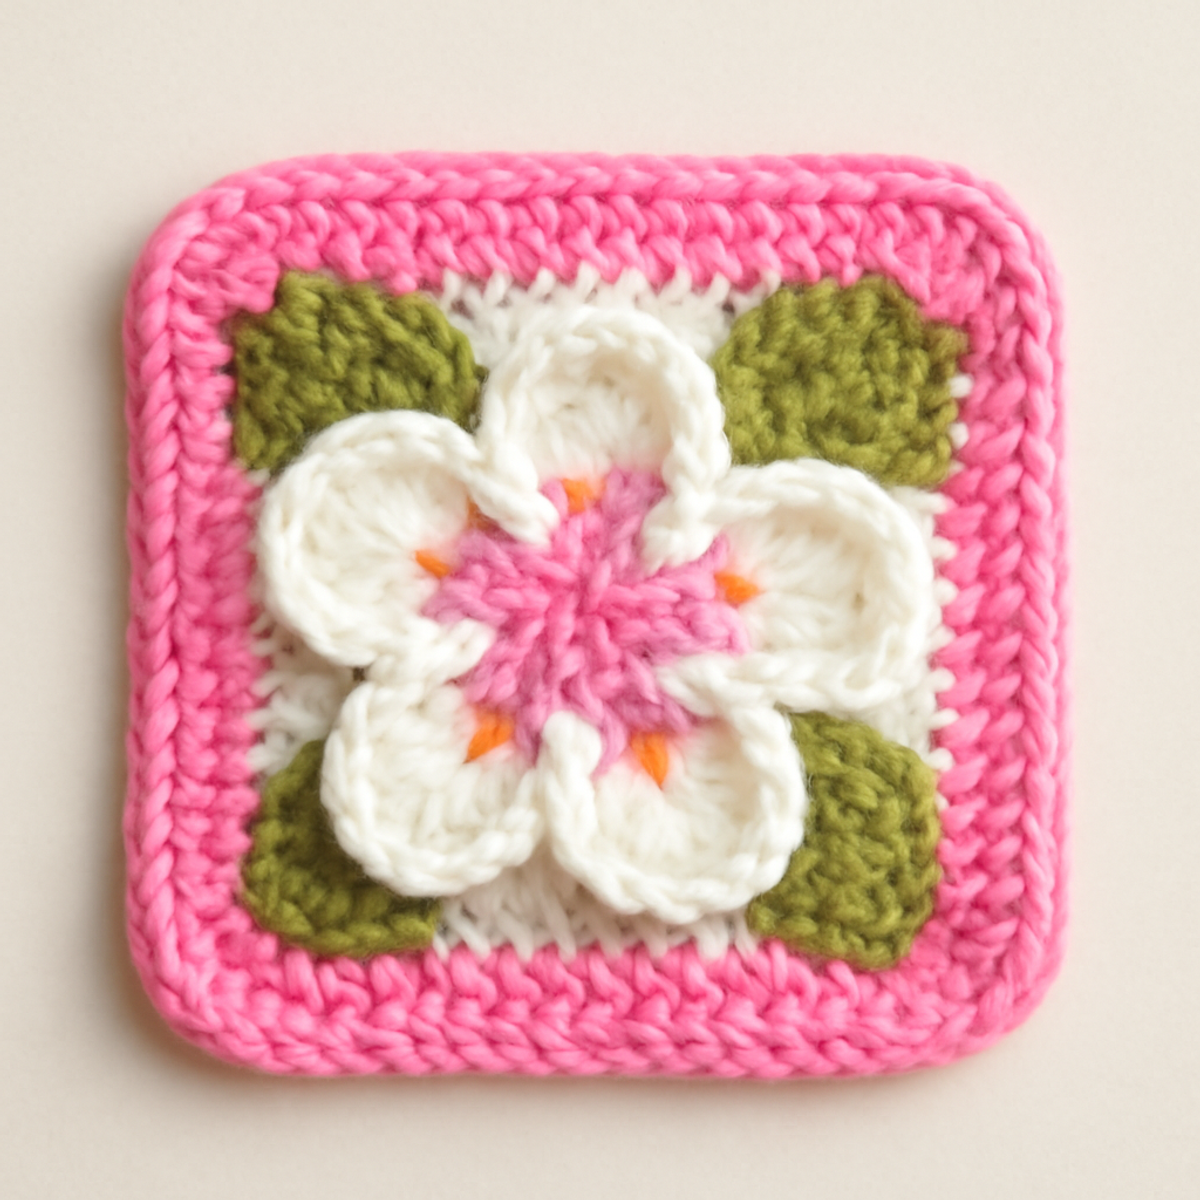
As I sit on my patio, surrounded by bright blooms, the thought of crafting my own vibrant floral creations sparks pure joy. This crochet flower square is not just a project; it's an invitation to bring spring's beauty right into your home. With its delightful textured flower and charming square design, this piece effortlessly transforms simple stitches into stunning décor. What’s even better? This intermediate-level pattern lets you dust off that yarn stash, making it perfect for those leftover bits we all have lying around. The combination of color and texture invites your inner artist to play, offering endless possibilities for customization. Whether you're crafting personalized gifts or adding a splash of vibrancy to your living space, you're bound to fall in love with this cozy creation. Are you ready to unfold the magic of crochet? Let’s dive in!

Crochet Flower Square Materials & Tools

  • Worsted Weight Yarn – You'll need approximately 100-150 yards total in three vibrant colors: white, pink, and green, ideally 100% cotton or a cotton blend for texture.
  • 4.0 mm (G6) Hook – This size is perfect for achieving the desired drape and definition in your crochet flower square.
  • Yarn Needle – Essential for weaving in ends; a blunt-tipped needle works best with cotton yarn.
  • Stitch Markers (optional) – Helpful for tracking rounds and ensuring a consistent shape throughout your project.

Why is this crochet flower square special?

Enchanting Aesthetic: The vibrant colors and playful design of this crochet flower square make it an eye-catching addition to any decor.

Textured Layers: With a textured flower that features multiple layers, this piece transforms basic crochet into a beautiful work of art.

Versatile Use: Perfect as an appliqué or a standalone motif, it's a fabulous way to elevate larger projects.

Easy Customization: You can easily adjust sizes or experiment with colors, making each square uniquely yours.

Stash-Friendly: This project is a fantastic way to use leftover yarn, keeping your crafting space tidy while creating something beautiful.

Gauge & Sizing Notes

Don't skip the gauge swatch! Checking your tension is vital for ensuring that your crochet flower square comes out the perfect size for your intended project. A standard crochet gauge to aim for is a 4×4 inch (10×10 cm) square with about 14 double crochets by 8 rows—but remember, this is a general guideline, so your results may vary. To customize the size, you can adjust the number of rounds or increase your starting chain in multiples of 4 if you're looking to make your square wider. If your swatch is too small, simply try going up a hook size, or if it's too large, switch to a smaller one. Happy crocheting!

Step-by-Step Pattern for crochet flower square

Row 1: Magic Ring & Center Flower
Begin with a magic ring (or adjustable loop). Chain 3 (counts as first dc), then work 11 double crochets (dc) into the ring to form the flower's center. Pull the tail to close the ring tightly. Join with a slip stitch (sl st) to the top of the initial chain 3. Your flower center should have a rounded shape with 12 stitches in total (12 sts).

Row 2: Flower Petals
Ch 3 (counts as first dc), then work into the same stitch: (dc, ch 2, dc)—this creates the first petal. Continue this pattern into each of the next 11 dc from the previous row to create a total of 12 petals. Join with a sl st to the top of the initial chain. Your work should begin to take on a floral shape with raised petals (12 petals).

Row 3: Flower Layering
For additional texture, sl st to the first ch 2 space of any petal. Now, chain 1 and make [(sc, hdc, dc in the same ch 2 space)] repeat for each petal. This will create a layered effect and provide a lovely finishing touch to the flower. Join with a sl st to the top of the first sc. The flower should appear fuller and beautifully textured.

Row 4: Square Base
To start the square, change yarn color to green. Ch 2 (counts as first hdc) and work 2 hdc in the same stitch. Continue with hdc across the next 10 stitches. In the last stitch, work 3 hdc to turn the corner. Work hdc across the other side, totaling 12 stitches. Join with sl st to the top of the chain. Your work should start forming a square shape (24 hdc).

Row 5: Side Edging
For this round, work in the same color. Ch 2 (counts as first hdc), then hdc in each stitch around, including the corners—work 3 hdc in each corner stitch. Join with a sl st to the top of the chain. Your square should begin to take on a solid and structured appearance, ready for a beautiful finish (36 hdc).

Step 6: Final Assembly
Attach the flower to the center of the square base by using sl st through the back loops of the square and the flower petals. Make sure the petals are evenly spaced around the center. After attaching, weave in all loose ends using your yarn needle. The final piece should display a delightful crochet flower square, adding charm to any décor.

Crochet Flower Square Variations

Embrace the joy of creativity by assembling a unique version of this crochet flower square that reflects your personal style!

  • Yarn Weight Change: Swap worsted yarn for lighter sport weight to craft a delicate version ideal for springtime decor.
  • Fiber Alternatives: Use acrylic yarn for a soft, easy-care option that still maintains the vibrant colors of your creative vision.
  • Color-Blocking: Create a stunning ombre effect by transitioning between colors in each round for a modern, eye-catching twist.
  • Custom Sizing: Adjust the number of rounds to create larger squares; just be mindful to keep the stitch count consistent throughout.
  • Textured Additions: Add a playful pom-pom to the flower center or fringe to enhance the tactile quality—perfect for adding charm!
  • Beaded Accents: Incorporate beads or buttons in the flower center for a delightful pop of detail that transforms the look entirely.
  • Seasonal Inspiration: Experiment with seasonal palettes—perhaps deep reds and greens for winter or pastel hues for a springtime theme.
  • Mixed Techniques: Combine this square with a granny square pattern for a delightful patchwork effect, turning it into a blanket or bag!

Let your creativity blossom! Each variation allows you to make your crochet flower square truly your own while celebrating the art of crafting.

Expert Tips for Crochet Flower Square

  • Consistent Tension: Maintaining even tension throughout your work, especially around the flower petals, creates a uniform look and texture.

  • Regular Counting: To avoid misplacement, count your stitches often, particularly in the square base, to keep dimensions accurate.

  • Secure Color Changes: When you switch colors, make sure to weave in ends thoroughly to prevent unraveling, ensuring a neat finish for your crochet flower square.

  • Blocking Benefits: Consider blocking your finished piece. This will help define shapes and smooth out any uneven edges for a polished appearance.

  • Join Method: When attaching the flower to the square, use slip stitches through the back loops for a clean and seamless connection.

What to Pair with Blossoming Beauty: Crochet Flower Square

Crafting a coordinated collection of crochet treasures is a delightful way to enhance your spring-inspired décor and celebrate your creativity.

  • Charming Coasters: Create a set of coasters using the same colors to protect your surfaces with playful patterns that echo your flower square's charm.
  • Delicate Wall Hanging: Use your crochet flower squares as colorful motifs in a wall hanging, adding depth and whimsy to your home.
  • Vibrant Keychains: Transform leftover flower squares into adorable keychains, perfect for adding a splash of color to your everyday essentials.
  • Breezy Throw Pillow Covers: Craft pillow covers using multiple flower squares for a soft, seasonal touch that warms up your living space.
  • Cheerful Scrunchies: Make matching hair scrunchies from the same yarn, lending a charming touch to your hair while enhancing your spring look.

How to Wash and Care for Your Crochet Flower Square

Machine Washing: Use cold water on a gentle cycle when washing your crochet flower square to prevent any felting or pilling.

Hand Washing: For best results, hand wash in cool water with mild detergent, gently squeezing the piece without agitation to preserve its texture and shape.

Drying/Blocking: Lay your crochet flower square flat to dry, ideally on a clean towel, and consider blocking it to maintain the intricate shapes and definitions you’ve crafted.

Storage: When storing, keep your crochet flower square in a cool, dry place, preferably folded or laid flat, to avoid any deformation or damage to the delicate embellishments.

Blossoming Beauty: Crochet Flower Square FAQs

Can I substitute yarn for this crochet flower square?
Absolutely! While the pattern suggests 100% cotton yarn, you can opt for a cotton-blend or even acrylic yarn in worsted weight. Keep in mind that cotton offers more structure and drape, while acrylic may make the finished piece softer. Just be sure to check your gauge if you change yarn types!

How can I make my crochet flower square bigger or smaller?
To adjust the size of your crochet flower square, simply add or reduce the number of rounds in both the flower and the square base sections. If you want a larger square, consider adding more rounds, but maintain the stitch count per round for evenness. If making smaller, reducing rounds will help, and remember to keep counting your stitches!

Why is my flower square curling up at the edges?
Don't panic! Curling often happens if your tension is too tight, especially in the square base. I recommend checking your tension as you work. If it’s still curling after completing your square, a gentle blocking will help flatten it out, creating that lovely defined shape you want.

What size hook should I use for this crochet flower square?
The pattern recommends a 4.0 mm (G6) crochet hook. This size is perfect for achieving the right drape and stitch definition for the flower and square. If you find your work is too tight or too loose, you could try going up or down a hook size, respectively.

How do I fix dropped stitches in my crochet flower square?
It’s an easy fix! Simply identify the dropped stitch, use your crochet hook to gently pull the yarn through the stitches below it, and secure it back into place. If you’ve created a few rows since the drop, you might need to frog back to the last complete row and rework it. Remember, it's part of the crafting journey!

Can I incorporate more colors into my crochet flower square?
Absolutely! You can play with colors as much as you like. Consider using variegated yarn for the flower petals or even adding stripes to the square base. It’s a fantastic way to personalize your piece and make each crochet flower square unique!

Filed Under: Uncategorized

Charming Crochet Baby Shoes for Sweet Little Feet

August 22, 2026 by Publisher Leave a Comment

Charming Crochet Baby Shoes for Sweet Little Feet

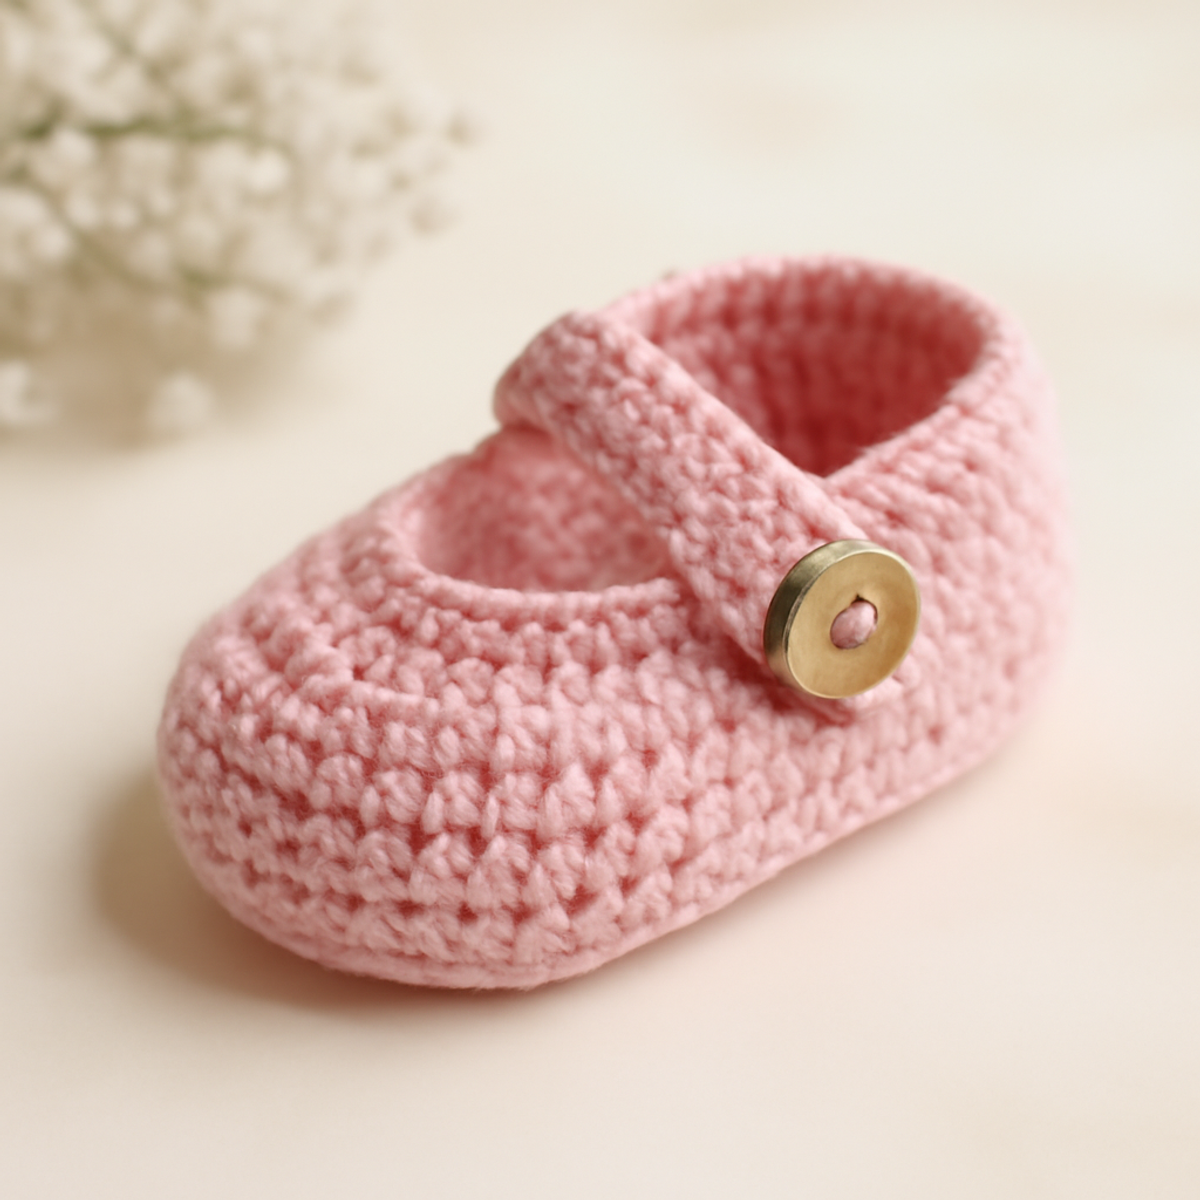
As I sat with my yarn and hook, the soft, delicate texture of light pink baby yarn whispered possibilities for crafting something special. This crochet baby shoes pattern, aptly named "Sweet Crocheted Baby Feet," is a delightful way to blend beauty with practicality for our tiniest loved ones. Ideal for intermediate crocheters, it invites you to explore various stitch techniques while creating charming footwear that’s perfect for any occasion. One of the standout benefits of this project is its customizable nature; you can tweak colors and embellishments to fit themes and personal styles. Plus, these little shoes make for a thoughtful gift that carries the warmth of handmade care. So, grab your favorite yarn and let's dive into this cozy project that promises to bring joy both in the making and the giving!

Crochet Baby Shoes Materials & Tools

  • DK Weight Baby Yarn – Approximately 150 yards in a soft light pink color ensures comfort and durability for little feet.
  • 3.0 mm (C/2) Hook – This size is recommended to achieve a beautiful stitch definition that works well with the crochet baby shoes design.
  • Scissors – Essential for trimming any loose ends and finishing your project tidily.
  • Stitch Marker – Helpful for keeping track of your rounds and maintaining even tension as you crochet.
  • Button (optional) – A charming addition to secure the shoe strap, adding a lovely finishing touch!

Why not create these adorable shoes?

Timeless Design: The classic and charming aesthetic of these crochet baby shoes makes them a perfect addition to any baby outfit, suitable for both everyday wear and special occasions.

Craftsmanship: By utilizing a blend of single and half double crochet stitches, you’ll not only enhance your skills but also achieve a beautifully structured finish.

Personal Touch: With the power to customize colors and textures, these shoes easily reflect your unique style or match any theme, making each pair one-of-a-kind.

Thoughtful Gift: Crafted with care, these shoes make for a meaningful gift that showcases the love and effort of handmade artistry.

Soft & Comfortable: Designed specifically for sensitive baby skin, the soft drape and texture ensure comfort while looking irresistibly cute!

Gauge & Sizing Notes

Don't skip the gauge swatch when making these sweet crochet baby shoes! Checking your tension is essential to ensure a perfect fit for those tiny feet. For reference, a standard gauge for this project is approximately 4×4 inches (10×10 cm), which should yield 14 single crochets and 12 rows. If you find your swatch isn’t matching this, consider adjusting your hook size; if your tension is tight, going up a hook size may help! To customize the size of your crochet baby shoes, increase your starting chain by multiples of 2 for a snugger fit, or decrease for a looser fit. Happy crocheting!

Step-by-Step Pattern for Sweet Crocheted Baby Feet

Row 1: Foundation Chain and Base
Begin by making a foundation chain of 15 stitches (ch 15). Starting in the second chain from the hook, work a single crochet (sc) in each chain across, resulting in 14 stitches. This forms the base of your crochet baby shoes. Your work should lay flat and even, ready to be shaped.

Row 2: Shaping the Sole
Chain 1, then turn your work. In this row, crochet 1 sc in the first stitch, then perform 2 sc in the next stitch (inc), followed by 1 sc in the next 11 stitches. Finally, work another increase (inc) in the last stitch. You should have 16 stitches at the end of this round, with a gentle curve forming as the sole begins to take shape.

Row 3: Continuing the Sole
Chain 1 and turn your work. For this row, work 1 sc in the first stitch, then 1 hdc (half double crochet) in the next 2 stitches. Next, continue with 1 sc in the next 10 stitches before increasing (inc) in the last 2 stitches. You should have 18 stitches total now, which will help define the shape of the crochet baby shoes further.

Row 4: Finalizing the Sole
Chain 1, turn your work, and complete this row with 1 sc in each of the first 6 stitches, followed by 1 hdc in the next 6 stitches. End the row with 1 sc in the last 6 stitches. Your work should feel more rounded, maintaining a cozy base for your project with a stitch count of 24 stitches.

Step 5: Creating the Upper
To start the upper part of your crochet baby shoes, chain 1 and turn. Crochet 1 sc in the first 6 stitches, followed by 2 hdc in the next stitch (inc), then 1 hdc in the next 6 stitches, and finish with another increase (inc) in the last stitch. Now you have 28 stitches, creating the structure for the shoe's upper part.

Step 6: Additional Shaping for the Upper
Chain 1, turn your work. This row will consist of 1 sc in the first 8 stitches, followed by 1 hdc in the next 10 stitches, and 1 sc in the last 10 stitches. You should maintain the rounded shape, with the total stitch count at 38, ensuring the upper portion fits snugly.

Step 7: Forming the Strap
Chain 1, turn, and work 1 sc in the first 10 stitches, then skip the next 5 stitches and chain 5 for the strap. Work a sl st back into the shoe at the same height as your strap. Crochet 1 sc in the remaining stitches of the row, resulting in a total of 43 stitches, creating a lovely cross-strap.

Step 8: Finishing Touches
To complete your crochet baby shoes, work a final round of 1 sc in each stitch around, ensuring that the strap is secure and the edges are neat. As you finish, you’ll be counting an even stitch count, allowing the shoes to keep their shape beautifully while being soft against baby’s feet.

Step 9: Assembly
To assemble, align the sole with the upper and slip stitch them together. Ensure the strap is positioned where it best fits. Secure it with a few stitches and embellish the strap with a button if desired. Your delightful crochet baby shoes are now ready for little feet, radiating warmth and care!

What to Pair with Sweet Crocheted Baby Feet?

As you wrap up your lovely crochet baby shoes, why not elevate your crafting journey with a delightful accompanying project?

  • Adorable Baby Booties: Create a matching pair of booties that mirror the charm of your shoes, perfect for cozy gatherings or sleepovers. They’re a sweet extension of your crochet baby shoes in style and comfort.

  • Charming Baby Blanket: Design a soft, pastel blanket with complementary colors that makes for a cozy addition to any baby’s nursery, enhancing the aesthetic of your footwear.

  • Whimsical Hat: Crochet a cute little hat adorned with the same stitches or colors as your baby shoes, ensuring your little one is stylish and snug during outings.

  • Cute Mini Purse: Craft a tiny purse that mimics the textures and shades of your baby shoes for a lovely accessory. Perfect for holding little treasures or playthings!

  • Matching Mittens: Pair your crocheted baby shoes with cozy mittens that keep their tiny hands warm, making the perfect handmade gift for chilly days or special occasions.

Crochet Baby Shoes: Customize Your Pair

Embrace the joy of personalization and make these adorable shoes truly yours with a few simple twists and turns.

  • Yarn Color Changes: Switch out the soft pink for mint green or lavender to create a fresh look that matches any outfit. Each pastel hue can give the shoes a completely new feel!

  • Texture Variations: Opt for cotton yarn instead of acrylic for a breathable, lightweight option that’s perfect for warmer weather. The resulting texture will feel nice against baby’s skin.

  • Weight Adjustments: Experiment with sport weight yarn to achieve a slightly larger size or sport a chunkier vibe. This can add a trendy twist while still being baby-friendly.

  • Size Tweaks: Alter the foundation chain length to create matching shoes for a toddler or customize for different ages. Total flexibility means you can make shoes for siblings too!

  • Embellishment Magic: Add charming embellishments like crocheted flowers or adorable animal appliqués for a unique touch. These little details can add personality to each pair.

  • Strap Adjustments: Modify the position of the strap or change the width for a snug or looser fit. This slight variation ensures comfort as your little one grows!

  • Pom-Pom Fun: For a playful look, attach a fluffy pom-pom to the strap. This whimsical addition can elevate the style, perfect for celebrating special occasions.

  • Fringed Edges: Consider giving your shoes a trendy fringe around the edges. This adds a touch of boho flair while making your creation stand out!

Care Instructions for Crochet Baby Shoes

  • Machine Washing: Use a gentle cycle with cold water to prevent any shrinkage or damage to your crochet baby shoes. Avoid washing with rough fabrics to protect their delicate texture.

  • Hand Washing: For extra care, hand wash using lukewarm water and a mild detergent. Gently swish and rinse without agitation to prevent felting or pilling from occurring.

  • Drying/Blocking: Lay your shoes flat to dry on a clean towel, reshaping them to maintain their lovely form. Avoid hanging to prevent stretching and ensure they hold their charming structure beautifully.

  • Storage: Keep your crochet baby shoes in a cool, dry place away from direct sunlight. Consider storing them in a breathable bag to prevent dust and maintain their delightful appearance.

Expert Tips for Crochet Baby Shoes

  • Even Tension: Keep your tension consistent while crocheting, especially with single crochet stitches. This ensures a snug fit for your adorable crochet baby shoes.

  • Count Your Stitches: Regularly count your stitches as you work to avoid losing track. Common mistakes often happen when increases or decreases aren't accounted for properly.

  • Measure Often: Periodically measure your progress against a baby’s foot. This confirms the size is just right, ensuring comfort and style.

  • Block Your Work: After finishing, consider blocking the baby shoes. This process enhances their shape and texture, making them look professionally crafted.

  • Secure Finishing: When assembling, ensure the upper and sole are securely stitched together. This adds durability, letting your lovely shoes withstand little adventures!

Sweet Crocheted Baby Feet FAQs

Can I use a different yarn than DK weight for these crochet baby shoes?
Absolutely! While DK weight yarn is recommended for the right softness and durability, you can experiment with yarns like sport or even cotton. Just keep in mind that using different yarn weights may change the overall size and texture of the finished shoes, so be sure to check your gauge.

How can I adjust the size of the crochet baby shoes if I need them bigger or smaller?
Don't panic! To make the shoes larger or smaller, you can adjust the foundation chain length. For a bigger size, simply add more chains, and for a smaller fit, reduce the number of chains. It's essential to periodically measure against a baby’s foot to ensure the fit is just right.

Why is my work curling at the edges while making these baby shoes?
This can happen if the tension is too tight or if the stitches are uneven. I recommend checking your tension and ensuring that you’re working consistently with each stitch. Blocking the finished pieces can also help smooth out any curl, making your shoes look neat and lovely.

What size crochet hook should I use for this pattern?
For the Sweet Crocheted Baby Feet, a 3.0 mm (C/2) crochet hook is suggested. This size allows you to achieve the perfect stitch definition needed for the intricate details of the pattern. If you find that your stitches are too tight or loose, consider adjusting the hook size accordingly.

How do I fix dropped stitches in my crochet baby shoes?
It's an easy fix! Simply pick up the dropped stitch by pulling the yarn through to recreate the loop. Using a crochet hook, you can carefully chain back up and integrate it into the surrounding stitches. If you’re unsure, always remember to ask for help from fellow crafters, as we all face this issue sometimes!

Can I personalize my crochet baby shoes with decorations?
Absolutely! Personalization is one of the most charming aspects of this project. You can add buttons, flowers, or even little animal motifs to make each pair unique. Just be sure that whatever embellishments you choose are safe and securely attached for the little one’s comfort.

Filed Under: Uncategorized

Cozy Crochet Baby Romper: A Beginner-Friendly Delight

August 22, 2026 by Publisher Leave a Comment

Cozy Crochet Baby Romper: A Beginner-Friendly Delight

As I sat in my cozy corner, yarn in hand, I couldn’t help but feel the warm anticipation of creating something special. This crochet baby romper is more than just a simple garment—it's a heartwarming blend of practicality and charm, perfect for adorning your little ones in style. With its beginner-friendly design, this romper not only allows you to express your creativity through customizable colors and unique additions like buttons but also serves as a functional piece for playdates and family gatherings alike. Imagine the joy of crafting a cozy and stylish outfit that wraps your baby in comfort while showcasing your love for handmade treasures. Ready to bring this adorable crochet baby romper to life? Let’s dive into those stitches!

Crochet Baby Romper Materials & Tools

  • Yarn

    • Worsted Weight Yarn – This versatile yarn is perfect for a cozy feel and is widely available.
    • Acrylic or Cotton Blend – Choose a soft fiber type that is easy to care for and gentle against a baby’s skin.
  • Hook

    • 4.0 mm (G/6) Crochet Hook – This hook size is essential for achieving the proper gauge for your crochet baby romper.
  • Notions

    • 4 Buttons (15-18 mm) – Select fun buttons to add a touch of personality to your romper and make dressing easier.
    • Yarn Needle – Use this for weaving in the ends, ensuring a neat finish for your project.
    • Scissors – Handy for trimming yarn as you work on this delightful romper.
  • Approximate Yardage

    • Expect to use around 150-200 yards of yarn, depending on the size you choose to make.

With these materials and tools, you're all set to embark on your journey to create a charming, customized crochet baby romper! Happy crocheting!

Why Choose This Crochet Baby Romper?

Beginner-Friendly: Perfect for those just starting their crochet journey, this romper features simple stitches and minimal assembly, ensuring a rewarding experience.

Versatile Use: Whether it's for cozy playtime or family gatherings, this romper combines comfort with style, making it a go-to piece in any baby’s wardrobe.

Customizable: Enjoy the freedom to select colors, yarn types, and decorative touches to create a unique outfit tailored specially for your little one.

Soft Texture: Crafted with a gentle drape, this romper provides just the right amount of coverage without overheating, ideal for any season.

Time-Efficient: With a manageable yardage of 150-200 yards, you can whip up this charming garment in no time, perfect for gifts or quick projects.

Gauge & Sizing Notes

Don't skip the gauge swatch! Ensuring your tension is just right with this crochet baby romper is critical for getting a perfect fit, as uneven stitches can impact how the garment wears. While an exact gauge may vary, a good rule of thumb is to aim for a tension swatch of about 4×4 inches (10×10 cm) made with a 4.0 mm (G/6) hook, resulting in a cozy, uniform fabric. If you want to adjust the sizing, simply change your starting chain by multiples of 2 to make the romper wider or narrower. If your swatch is too small, don't worry—simply go up a hook size and try again for that adorable crochet baby romper!

Step-by-Step Pattern for Crochet Baby Romper

Row 1: Back Panel Foundation
Start by chaining 31 (33, 35) stitches depending on the desired size. In the second chain from the hook, make a single crochet (sc), and then continue to sc in each chain across until you reach the end. Your work should lay flat and begin to take shape, with a total of 30 (32, 34) stitches at the end of this row.

Row 2: Establishing the Back Panel Shape
Ch 1 to begin Row 2, and turn your work. Sc in each stitch across to the end of the row. This row will help maintain the rectangular form of your crochet baby romper. At the end, you should have 30 (32, 34) sc again, and your work should feel sturdy and neat.

Row 3: Increasing for the Back Panel
For Row 3, begin with a ch 1 and turn your work. Sc in the first stitch, then make an increase (inc) by sc twice in the next stitch. Proceed to sc in each stitch until the last stitch where you will inc again. You should finish this row with 32 (34, 36) stitches, giving your panel a slight expansion.

Row 4: Continuing the Back Panel
Ch 1 and turn your work again. Sc in each stitch across, keeping the panel flat and even. The goal is to consistently add rows while preserving your desired shape. You will have 32 (34, 36) stitches at the end of this row, and your piece should start to feel thicker and more structured.

Row 5: Repeating Increases
Start Row 5 with a ch 1, turning as usual. Sc in the first stitch, then inc in the next, sc across until the last stitch, where you'll inc again. This row expands your panel further, bringing your total to 34 (36, 38) stitches, ensuring your work remains balanced and symmetrical.

Row 6 to 9: Completing the Back Panel
For Rows 6 through 9, start each row with a ch 1 and turn. Sc in each stitch across for a total of 34 (36, 38) stitches in each of these rows. These steps will build the body of your romper, creating a pleasing length that’s perfect for your crochet baby romper design.

Row 10: Shaping the Armholes
In Row 10, begin with a ch 1 and turn. Sc in the first 12 (13, 14) stitches, then chain 4 to create an opening for the armhole. Skip the next 4 stitches, then sc in the last 12 (13, 14) stitches. Your work will now show the armhole gap, making it ready for the front panel attachment.

Row 11: Front Panel Foundation
For the front panel, start with a new chain of 31 (33, 35) stitches. In the second chain from the hook, sc, and make your way across to the end. This should match the back panel in size and row count, ensuring consistency in your cozy crochet baby romper.

Row 12: Establishing the Front Shape
Ch 1 to turn your work for Row 12. Sc in each stitch until the end. Your front panel will mimic the back panel's form and enhance the overall fit of your crochet baby romper. After this row, you should have 30 (32, 34) stitches, and the piece should feel unified.

Step 1: Assembly of Panels
With both the front and back panels complete, it’s time to assemble. Place the back panel on top of the front panel, ensuring that the armhole openings align correctly. Whip stitch or sew through the edges of the panels using your yarn needle to secure them, creating the body of your crochet baby romper.

Step 2: Making the Straps
To create the straps, start with a chain of 6. Work in sc across for 10 rows (or until desired length), maintaining a consistent tension. After finishing two straps, they should feel sturdy and strong enough to support the romper. Attach them securely to the front and back panels, ensuring they are evenly placed.

Step 3: Final Edging and Buttons
In the final steps, you can add a simple sc border around the neckline and edges of the romper. Finish with placing the buttons on one side; ensure they're affixed securely for easy dressing. Your finished crochet baby romper should have a lovely clean edge and completion for your little one to enjoy!

How to Wash and Care for Your Crochet Baby Romper

Machine Washing: Use cold water on a gentle cycle to maintain the integrity of your crochet baby romper and prevent any unwanted stretching or damage. Avoid harsh agitation to keep the shape intact.

Hand Washing: For an even gentler approach, hand wash in lukewarm water with mild detergent. This method helps to preserve the soft texture and charming appearance of your cozy romper.

Drying/Blocking: Lay flat to dry on a clean, dry surface. Avoid hanging, as this can distort the romper's shape. After drying, you may lightly block it to restore its beautiful form and drape.

Storage: Store your romper in a cool, dry place. Use breathable fabric bags or bins to keep it safe from dust and avoid folding to prevent creasing.

Crochet Baby Romper: Creative Variations

Customize your crochet journey by exploring these delightful twists on the baby romper pattern, infusing each piece with your personal flair.

  • Color Swaps: Replace cream yarn with vibrant pastels or bold colors for a playful twist, perfect for any season.
  • Yarn Substitutes: Experiment with organic cotton or bamboo yarn for an eco-friendly, breathable option that feels gentle against baby's skin.
  • Size Adjustments: Create matching outfits by adjusting sizes for toddlers or down for newborns; make every occasion special with a coordinated look.
  • Texture Enhancements: Add a stunning border or playful pom-poms to the bottom edges for added charm, giving the romper a unique personality.
  • Creative Straps: Instead of simple straps, opt for crisscross or ruffled designs that not only look adorable but also provide extra support and comfort.
  • Detail Customization: Embroider whimsical patterns or appliqués to make the romper truly one-of-a-kind; these lovely touches will delight both you and the recipient.
  • Contrast Panels: Incorporate different color panels for the front and back to create a modern look while highlighting your crochet skills.
  • Button Variations: Choose fun, quirky buttons in various shapes, adding character and making dressing an enjoyable moment for both parent and baby.

Expert Tips for Your Crochet Baby Romper

  • Consistent Tension: Maintain even tension throughout your work; inconsistent stitches can lead to a poor fit, especially in the arms and body.

  • Stitch Markers: Use stitch markers to keep track of your rows and counts. This simple habit will save you from miscounts and help manage your crochet baby romper's assembly.

  • Blocking Benefits: After completing your romper, consider lightly blocking it. This technique can refine the shape of your stitches and enhance the overall finish.

  • Secure Buttons: When adding buttons, ensure they are sewn securely. This not only enhances the durability but also ensures easy dressing for quick diaper changes.

  • Practice Edging: For a polished look, practice adding a simple scalloped or single crochet edging around the neckline and openings to finish your crochet baby romper beautifully.

What to Pair with Crochet Baby Romper

As your crochet baby romper comes together, why not continue your crafting journey with delightful matching pieces that complete the look?

  • Tiny Booties: A sweet addition, these booties keep little toes warm and can be made in matching colors. Imagine tiny feet nestled in your very own creations!
  • Cozy Blanket: A soft, snuggly blanket not only complements the romper but is perfect for wrapping up your little one for chilly moments. Create a cohesive set that embraces comfort.
  • Matching Hat: Top off the outfit with an adorable hat that mirrors the romper’s design, adding extra warmth and style for outings. A hat will not only be practical but also enhance the charm!
  • Playful Toy: Crochet a small plush toy to accompany the romper—perfect for playdates and sure to spark joy. This personal touch makes the outfit truly special.
  • Sweet Headband: A matching headband adorned with bows or flowers can complete the look, giving your little one that extra touch of cuteness. Picture those precious moments captured in photos!

Crochet Baby Romper FAQs

Can I use a different yarn for my crochet baby romper?
Absolutely! While the pattern calls for a worsted weight yarn, you can substitute with acrylic, cotton, or even an organic blend. Just make sure to check your gauge to maintain the size and drape of the romper.

How do I make the crochet baby romper bigger or smaller?
To adjust the size, you can add or remove chains to the starting chain for the back and front panels. Adding a few stitches will increase the width, while decreasing stitches will help size it down. Remember to maintain consistent tension for the best fit!

Why is my work curling at the edges?
Don’t panic! Curling is often a result of tension that's too tight or an unbalanced stitch count. Ensure you’re using the right hook size, and try relaxing your tension as you work. If it persists, you can lightly block your completed romper, which should help flatten the edges.

What hook size should I use for this crochet baby romper?
The pattern specifically recommends using a 4.0 mm (G/6) crochet hook. This size is essential for achieving the proper gauge to ensure the romper fits comfortably on your little one.

How do I fix dropped stitches in my crochet project?
It's an easy fix! If you find a dropped stitch, use your yarn needle to carefully weave the yarn back through the missed stitch and stabilize it. If you're unsure, simply re-crochet that section for a neater finish—your romper will look impeccable in no time!

Filed Under: Uncategorized

Cozy Crochet Baby Romper for Summer Adventures

August 22, 2026 by Publisher Leave a Comment

Cozy Crochet Baby Romper for Summer Adventures

As I sat in my cozy corner, sunlight streaming through the window, I couldn’t help but smile at the thought of making a delightful crochet baby romper. This sage green crochet baby romper not only embodies a timeless style but also offers a breathable, comfortable fit perfect for little movers on warm summer days. The beauty of this project lies in its handmade charm, which easily outshines mass-produced outfits, creating a unique piece for your little one. Plus, with its gentle color palette and comfortable texture, this romper becomes a versatile go-to in any baby’s wardrobe. Ready to dive into this fun blend of skill and creativity? Let’s get started on crafting something special!

Crochet Baby Romper Materials & Tools

Get ready to gather everything you need for your crochet project!

Yarn

  • Medium Weight Yarn – A soft cotton blend is recommended, with approximately 200-300 yards, depending on the size of the romper.

Tools & Notions

  • 4.5mm to 5.0mm (G or H) Hook – This size provides the right balance of sturdiness and flexibility for your crochet baby romper.
  • Stitch Marker – This is essential for keeping track of your rows, ensuring everything aligns during assembly.
  • Three Wooden Buttons – These create a charming front closure; you'll also need needle and thread for easy attachment.

With these materials at hand, you're all set to create a delightful crochet baby romper!

Why Choose This Crochet Baby Romper?

Timeless Aesthetic: The sage green color and classic design make this romper a stunning addition to any baby's summer wardrobe.

Breathable Comfort: Crafted from soft cotton, it ensures that little ones stay cool and comfortable during warmer days.

Unique Handmade Touch: Unlike commercial outfits, this crochet baby romper showcases unique craftsmanship that family and friends will admire.

Perfect for Active Babies: Designed with free movement in mind, it allows your little explorer to crawl and play without any restrictions.

Easy to Customize: Whether you want to change colors or add embellishments, this pattern offers plenty of creative potential for a one-of-a-kind piece.

How to Check Your Gauge for Crochet Baby Romper

Don't skip the gauge swatch! Ensuring your tension is correct is crucial for achieving the perfect fit with your crochet baby romper. While a standard measurement may vary, a 4×4 inch (10×10 cm) square typically equates to around 14 double crochets by 8 rows—but please verify this with your own swatch for accuracy. If you wish to adjust the sizing of your romper, consider increasing your starting chain in multiples of 6 plus an additional 2 for stability. If your tension doesn't match the intended gauge, simply switch to a larger hook size to loosen your stitches, or go down a hook size if your swatch is too small. Happy crocheting!

Step-by-Step Pattern for crochet baby romper

Row 1: Foundation Chain
Ch 56 (or desired length for the romper). This foundation chain will serve as the base for the bodice of your crochet baby romper. Make sure your chain is not too tight to maintain flexibility; your work should lay flat and be ready for the subsequent rows.

Row 2: Beginning Bodice
In the 3rd ch from the hook, work 1 dc (double crochet) across the chain. Continue working 1 dc in each ch across (54 dc total). This establishes the main body of the romper. Your work should start to form a lovely rectangle as you progress to the end of the row.

Row 3: Shaping the Bodice
Ch 2 (counts as first dc here and throughout), turn, and work 1 dc in each of the next 53 sts. Each stitch should be laid neatly, maintaining a consistent tension. This row will repeat again to build the height of the bodice for your crochet baby romper.

Row 4: Adding Buttonholes
Ch 2, turn, work 1 dc in the first 26 sts, ch 1 (buttonhole), skip 1 st, work 1 dc in the last 27 sts (54 dc total). By creating this buttonhole, you'll ensure that the front closure accommodates your wooden buttons beautifully. Your bodice should appear neatly arranged but with an inviting opening now.

Row 5: Continue Bodice Rows
Ch 2, turn, work 1 dc in each st across, including the buttonhole from the previous row (54 dc). This row continues to build the bodice, ensuring a secure structure. The piece should feel sturdy and ready for the transition into the next section of your crochet baby romper.

Row 6: Shaping Armholes
Ch 2, turn, and work 1 dc in each of the next 13 sts, ch 5 (creating the armhole), skip 14 sts, work 1 dc in the next 13 sts, ch 5 (for the second armhole), skip the last 14 sts (54 dc total). Ensure the armholes are comfortably sized as you form the outer edges of your baby's romper, providing room for movement.

Row 7: Completing Bodice
Ch 2, turn, work 1 dc in the first 13 sts, then make 1 dc in each ch of the armhole, 1 dc in the next 13 sts, and lastly, work 1 dc in each st until you complete the row (54 dc total). This section should connect nicely around the armholes, creating an engaging silhouette for the crochet baby romper.

Row 8: Start the Body
Ch 1, turn your work, and switch to sc (single crochet). Work 1 sc in each st across, including armhole areas (54 sc total). This row indicates the transition from the bodice to the main body of your crochet baby romper, allowing for more structure and coverage.

Row 9: Continue Downward
Ch 1, turn, and continue with sc in each st across. Repeat this for 8 more rows (54 sc total in each). Your baby romper now begins to take shape, and you should feel the fabric become cozy yet breathable with every stitch.

Step 10: Begin Leg Openings
Ch 1, turn, and work 1 sc in the first 10 sts, ch 7 (leg opening), skip the next 34 sts (leg opening), work 1 sc in the remaining 10 sts (54 sc total). Ensure the leg openings have generous spacing for comfort, allowing your little one to move freely as they explore.

Step 11: Complete Leg Openings
Ch 1, turn, sc across the first leg opening, join with 1 sc in the skipped stitches, and finish the row by working 1 sc in remaining sts (54 sc total). Your crochet baby romper should now have defined openings for little legs, marking the transition to a complete garment.

Step 12: Binding Off and Finishing
Ch 1, work 1 sc in each st across each opening separately and finish with a sl st. Weave in loose ends. Your crochet baby romper is now finished, ready for its wooden buttons and delightful adventures, lending itself to the perfect cozy outfit for your little one!

How to Wash and Care for Your Crochet Baby Romper

Machine Washing: Use cold water on a gentle cycle to protect the integrity of your crochet baby romper. Avoid agitation to prevent felting or pilling.

Hand Washing: For a more delicate clean, hand wash in cold water using a mild detergent. Gently squeeze without twisting, ensuring your romper maintains its beautiful shape.

Drying/Blocking: Lay flat on a clean, dry towel to retain its form as it dries. Avoid hanging to prevent stretching, allowing it to maintain its cozy fit.

Storage: Store your crochet baby romper in a cool, dry place, away from direct sunlight. This helps preserve its color and texture, ensuring it's ready for your little one's next adventure!

Expert Tips for Crochet Baby Romper

Consistent Tension: Always check your tension to maintain an even fabric. Loose stitches could lead to uneven sizing, while tight ones can restrict movement.

Use a Stitch Marker: Place a stitch marker at the beginning of each row. This helps you accurately count your stitches and avoid losing track, especially vital in the bodice.

Double-Check Buttonholes: When creating buttonholes, ensure they're evenly spaced and large enough for your wooden buttons. Measure twice, crochet once!

Block Your Romper: After finishing, blocking your crochet baby romper enhances its shape and texture, giving it a professional finish.

Seamless Weaving: Weave in all loose ends carefully to avoid unraveling. This step not only tidies up the piece but also keeps it comfortable against your baby’s skin.

Crochet Baby Romper Variations

Ready to breathe your own creativity into this delightful crochet baby romper?

  • Color Swaps: Choose pastel pink or soft blue to create a fresh aesthetic for your little one's wardrobe.

  • Yarn Alternatives: Try a cotton-acrylic blend for a slightly different feel, providing both softness and durability as your baby moves.

  • Larger Size: Adjusting the foundation chain can easily create a version for older siblings, ensuring that your crochet skills grow along with your family.

  • Embellished Design: Add floral appliqués or personalized embroidery for a unique touch that will surely make this romper stand out.

  • Texture Play: Incorporate textured stitches, like bobbles or shells, to add extra charm and softness to the romper’s fabric.

  • Fringe Fun: Attach a playful fringe along the leg openings for a trendy twist that adds personality to the adorable outfit.

  • Ruffled Edges: Finish the romper with a delicate ruffled border for an extra feminine detail, making it a lovely choice for any occasion.

  • Belted Look: Add a matching crochet belt or tie to create a cinched waist effect, providing a stylish design element that can be adjusted as needed.

What to Pair with the Crochet Baby Romper

Imagine adorning your little one with an entire ensemble, elevating the charm of this cozy crochet baby romper.

  • Matching Bucket Hat: A stylish hat to shield baby's eyes while enhancing the romper's aesthetic—perfect for sunny adventures!
  • Sweet Booties: Tiny crochet booties to keep those little feet warm and fashionable, ensuring comfort on all summer strolls.
  • Snuggly Blanket: Create a lightweight, breathable baby blanket for cozy moments—ideal for picnics or naptime.
  • Charming Cardigan: A soft cardigan to layer over the romper; it adds warmth and flair for cooler summer evenings.
  • Floral Appliqués: Personalize your romper with cute crochet flowers, adding a unique touch and a pop of color!

Sage Green Crochet Baby Romper FAQs

Can I substitute the recommended yarn for this crochet baby romper?
Absolutely! While a soft cotton blend is ideal for breathability, you can certainly explore other options like cotton-acrylic blends or all-acrylic yarn. Just remember that you may need to adjust your hook size or gauge, so always check the yarn label for the recommended hook.

How do I make the romper bigger or smaller?
It's quite simple! To adjust the size, you can modify the foundation chain length and add or reduce rows in the bodice or body. For instance, if you want a larger romper, increase the foundation chain or add extra rows before shaping the armholes. Just be sure to keep proportions uniform throughout to maintain that lovely fit!

Why does my crochet baby romper keep curling at the edges?
Don't panic! Curling edges are a common issue often caused by too tight stitches or improper tension. Try loosening your grip on the yarn and ensuring your stitches are even. You can also block the finished romper to shape it more to your liking, which can help relax those edges nicely.

What size hook should I use for this project?
For this crochet baby romper, a 4.5mm to 5mm hook (G or H in US terms) works best. This size strikes a balance between sturdiness and flexibility, giving you a lovely texture without making the fabric too dense. Always check your gauge with a small swatch to ensure your work is coming out as expected!

How do I fix dropped stitches?
It's an easy fix! If you catch a dropped stitch while crocheting, simply pull the loop back through to the surface. Use your crochet hook to gently snag the yarn and pull it back up to the current row. If you're unsure, don’t hesitate to re-do a few stitches to keep your work nice and tidy. Remember, practice makes perfect!

Filed Under: Uncategorized

Cozy Crochet Baby Shoes: Cute & Quick for Tiny Feet

August 22, 2026 by Publisher Leave a Comment

Cozy Crochet Baby Shoes: Cute & Quick for Tiny Feet

As I sank into my favorite chair, a soft ball of baby yarn gripped my hands, whispering promises of cozy curls and plush stitches. This crochet baby shoes pattern is not just a project; it’s a heartwarming journey to create charming little footwear for infants around eight months old. With a beginner to intermediate skill level in mind, these shoes are both snuggly and stylish, providing warmth and protection for tiny toes while adding a lovely touch to any outfit. Crafted with baby-friendly yarn, they promise comfort against delicate skin while featuring an adorable cross-strap closure for easy dressing. What’s even better? They work up quickly, making them a delightful gift or keepsake for busy parents. Join me in making these sweet little shoes that will surely capture hearts—even if they're only meant for the tiniest of feet. Your next crafting adventure awaits!

Cozy Crochet Baby Shoes Materials & Tools

  • DK Weight Baby Yarn – Approximately 100-150 yards of soft, baby-friendly yarn like acrylic or cotton provides comfort against delicate skin.
  • 3.0mm (D) Crochet Hook – This size is perfect for creating tight stitches that form the shoe's structure.
  • Scissors – Essential for trimming yarn ends as you finish your cozy crochet baby shoes project.
  • Stitch Marker – Helpful for keeping track of rounds, ensuring your shoe shape stays on point.
  • Button (optional) – Add a whimsical touch to the cross-strap closure, enhancing the overall charm of the shoes.

Why Choose Crochet Baby Shoes?

Adorable Design: These crochet baby shoes feature a unique cross-strap closure that’s not only charming but also functional, making dressing up a breeze for busy parents.

Soft & Snuggly: Crafted with baby-friendly yarn, they provide maximum comfort for delicate skin while ensuring warmth and protection for little feet.

Quick Project: Perfect for crafters of all skill levels, these shoes work up quickly, allowing you to create a fabulous handmade gift in no time.

Endless Customization: Experiment with vibrant colors, fun variegated yarns, or personal touches like buttons or embroidery to match any outfit and make them truly special.

Perfect Fit: The pattern’s instructions guide you in adjusting sizes easily, ensuring a custom fit as your baby grows without compromising on style or function.

Gauge & Sizing Notes

Don't skip the gauge swatch! Checking your tension is essential to ensure your crochet baby shoes fit perfectly. A general guideline is to achieve your desired size through a tension swatch, which might measure around 4×4 inches (10×10 cm) and should yield approximately 12 single crochets by 10 rows. To customize the size of the shoes, adjust your foundation chain by increasing in multiples of 2; for instance, starting with ch 13 allows for minute sizing differences. If your swatch is too small, don't fret! Simply go up a hook size to loosen your tension, and soon you'll have sweet little shoes that cradle those tiny feet, crafted just the way you imagined.

Step-by-Step Pattern for Cozy Crochet Baby Shoes

Row 1: Foundation Chain
Begin by making a slip knot and chain 13 (ch 13). This foundation chain sets the base for the shoe. Make sure it’s not too tight, allowing enough give for the base of your crochet baby shoes.

Row 2: Base Row
Starting in the second chain from the hook, work a single crochet (sc) in each chain across (12 sc). This will form the bottom of the shoe, and your work should lay flat. When completed, you should have 12 stitches.

Row 3: Toe Increases
Ch 1 and turn your work. Begin by increasing in the first stitch (inc), then sc in the next 10 stitches, and inc in the last stitch (14 sts). Your work will slightly curl as we begin creating the rounded toe shape.

Row 4: Continue Shaping
Ch 1 and turn. Here, sc in the first stitch, inc in the next, sc in the next 10 stitches, and inc in the last stitch (16 sts). The shoe should start to resemble a more rounded shape, allowing for the baby's little toes to fit comfortably.

Row 5: Lengthening the Body
Ch 1 and turn your work. Sc in each stitch across (16 sc) and remember to maintain an even tension to keep the body of the shoe uniform. This row is crucial for lengthening the shoe before we begin the sides.

Row 6: Side Rows
Ch 1 and turn, then sc in the first 3 stitches, hdc (half double crochet) in the next 10 stitches, and sc in the last 3 stitches (16 sts). This row introduces a slight height, helping to form the side of your crochet baby shoes.

Row 7: Final Body Round
Ch 1 and turn. Work an even row, sc in the first 3 stitches, hdc in the next 10 stitches, and sc in the last 3 stitches (16 sts). Your shoe should feel sturdy and the sides should begin to stand up, enclosing the base securely.

Step 1: Cross-Strap Closure
For the strap, ch 10 (or desired length), and sc back into the second chain from the hook and across (9 sc). Fasten off, leaving a long tail for sewing. This is your cross-strap that will secure the shoe on tiny feet.

Step 2: Attaching the Strap
Position the strap on the front of the shoe and sew it securely using the long tail yarn. Be sure to attach it in a way that balances the strap across the toe area, allowing easy access for putting on and taking off the shoes.

Step 3: Finishing Touches
To complete the cozy crochet baby shoes, weave in any loose ends with your crochet hook or scissors. You may also want to add a button on the strap for extra charm, finishing with a gentle blocking to maintain their shape.

What to Pair with Charming Infant Girls' Shoes?

As you delight in crafting these charming baby shoes, consider expanding your cozy crochet projects into an adorable matching set for the little ones in your life.

  • Tiny Blanket: A soft, cuddly blanket in the same yarn will keep them warm and add a lovely layer to their nursery.
  • Matching Headband: Crocheting a cute headband with a simple flower will perfectly complement your shoes and enhance their outfit.
  • Sweet Booties: Create slightly larger booties that transition well as the baby grows—maintaining the same aesthetic for coordinated looks.
  • Habitual Bunnies: Adorable plush bunnies made from matching yarn will make playtime more delightful, allowing for beautiful gift sets.
  • Mini Cardigan: A tiny cardigan, utilizing the same DK weight yarn, will pull the whole outfit together for those snuggly outings.

Care Instructions for Crochet Baby Shoes

Machine Washing: Opt for cold water on a gentle cycle to maintain the integrity of your crochet baby shoes. Avoid high temperatures that could distort the shape.

Hand Washing: For a more delicate approach, hand wash using cool water and mild detergent. This method is gentler and helps protect the soft yarn from wear.

Drying/Blocking: Lay your crochet baby shoes flat to dry, reshaping them to their intended form. This prevents any stretch or misshaping while they dry.

Storage: Store in a cool, dry place to keep your crochet baby shoes looking fresh. Avoid damp areas to prevent any potential damage or mildew.

Expert Tips for Cozy Crochet Baby Shoes

  • Consistent Tension: Ensure your tension is even throughout the project; inconsistent tension can lead to sizing issues, potentially leaving shoes too loose or too tight.

  • Count Your Stitches: Regularly check your stitch count after each row. Losing count can create mismatched shapes, affecting the final appearance of your crochet baby shoes.

  • Foundation Chain Check: Always measure your foundation chain against the intended foot size for a perfect fit. Adjust the length if necessary to avoid any fit issues later on.

  • Watch for Rounding: Pay close attention to the techniques for rounding the toe. A well-formed toe shape is essential for both comfort and the overall look of the shoes.

  • Final Blocking: Consider gently blocking the finished shoes to help them maintain their shape. This extra step can make a significant difference in the final presentation.

Crochet Baby Shoes Variations & Substitutions

Delight in the freedom to make these charming baby shoes truly your own by exploring various creative options!

  • Yarn Weight Swaps: Try using a lighter weight yarn for a more delicate feel. This allows you to create airy baby shoes perfect for warmer days.

  • Color Blocked: Combine two or more colors for a fun and playful design. Picture vibrant shoes that match your little one's personality!

  • Fiber Alternatives: Experiment with cotton for breathability or soft wool blends for added warmth. Each fiber brings a unique touch to your cozy creation.

  • Size Adjustments: Modify the foundation chain to cater to tiny feet. Making these shoes for an older baby? Just increase the number of rows to fit their growing feet!

  • Textured Additions: Add tiny pom-poms or fringe at the shoe’s edges for a playful flair. This little detail will give your shoes a whimsical charm that’s hard to resist.

  • Embellished Straps: Craft custom straps with bows or embroidery using contrast colors. This personal touch will make the shoes even more special for gifting.

  • Button Variations: Switch out the button for something unique, like an animal-shaped or sparkly button. It’s a small change that can add a big impact to the overall design.

  • Decorative Borders: Crochet a simple border around the edges for a polished finish. This technique enhances the shoes’ structure and adds a cute decorative detail.

Cozy Crochet Baby Shoes FAQs

Can I use a different type of yarn instead of DK weight?
Absolutely! While DK weight is recommended for a balanced fit and flexibility, you can use other yarn types like worsted weight, but keep in mind it may cause the shoes to be a bit bulkier. If you opt for a lighter yarn, just ensure you adjust your hook size accordingly to maintain the structure of the crochet baby shoes.

How can I make these shoes larger or smaller?
To adjust the size of your cozy crochet baby shoes, you can modify the foundation chain length. For a larger size, add more chains, and for a smaller fit, reduce the number. Be sure to account for extra stitches in subsequent rows to maintain the shoe’s shape and proportions—you’ll want those little toes snug yet comfy!

Why is my work curling at the edges?
Don't panic! Curling can often happen when working in single crochet, especially if your tension is too tight. I recommend checking your gauge first to ensure you're not using a hook that's too small. You might also want to block your project after finishing, which can help even out those curls and give a neater appearance.

What hook size should I use for this project?
For the cozy crochet baby shoes, a 3.0 mm (US size D) crochet hook is suggested. This size is perfect for creating tight stitches, ensuring the shoes hold their shape while remaining flexible. If you prefer a looser fit, feel free to experiment with a slightly larger hook, but keep in mind it may affect the overall structure!

How do I fix dropped stitches?
It's an easy fix! Just use your crochet hook to pull the dropped stitch back up to the row above. Gently work the strand over the proper stitches and secure it back into place. If it feels too loose, you might want to add a stitch or two to ensure it looks tidy. Always remember to check your stitch count to ensure everything is in order.

Can I add decorations to my crochet baby shoes?
Of course! You can personalize your cozy crochet baby shoes with various decorative elements like bows, embroidery, or buttons. These additions not only enhance the aesthetic but also make the shoes one-of-a-kind. Just make sure that any embellishments are securely attached and safe for little ones to wear.

Filed Under: Uncategorized

  • « Previous Page
  • 1
  • …
  • 26
  • 27
  • 28
  • 29
  • 30
  • …
  • 41
  • Next Page »

Recent Posts

  • Chic Crochet Watch Band Pattern: Scalloped Elegance
  • Vibrant Crochet Granny Square: A Floral Delight to Create
  • Pocket Otter Crochet: Your Adorable Amigurumi Companion
  • Cozy Up with This Festive Crochet Tree Cozy Pattern
  • Chic Crochet Babydoll Dress: A Timeless Pattern for Spring

Recent Comments

No comments to show.
Fast Crochet Patterns Logo

Welcome to Fast Crochet Patterns, your curated editorial blog for modern, handmade aesthetics. Discover an elegant collection of contemporary designs and carefully crafted tutorials—where every beautiful pattern is completely free to inspire your next creation.

Join the Studio

Subscribe for our latest free patterns and warm, minimal crochet inspiration delivered to your inbox.


Collections

  • Accessories
  • Amigurumi
  • Baby
  • Bags

More Patterns

  • Cardigan
  • Dress
  • Flowers
  • Granny Square

Information

  • About
  • Contact
  • Privacy Policy
  • Terms Of Use
  • Disclaimer

© 2026 Fast Crochet Patterns. All rights reserved.