
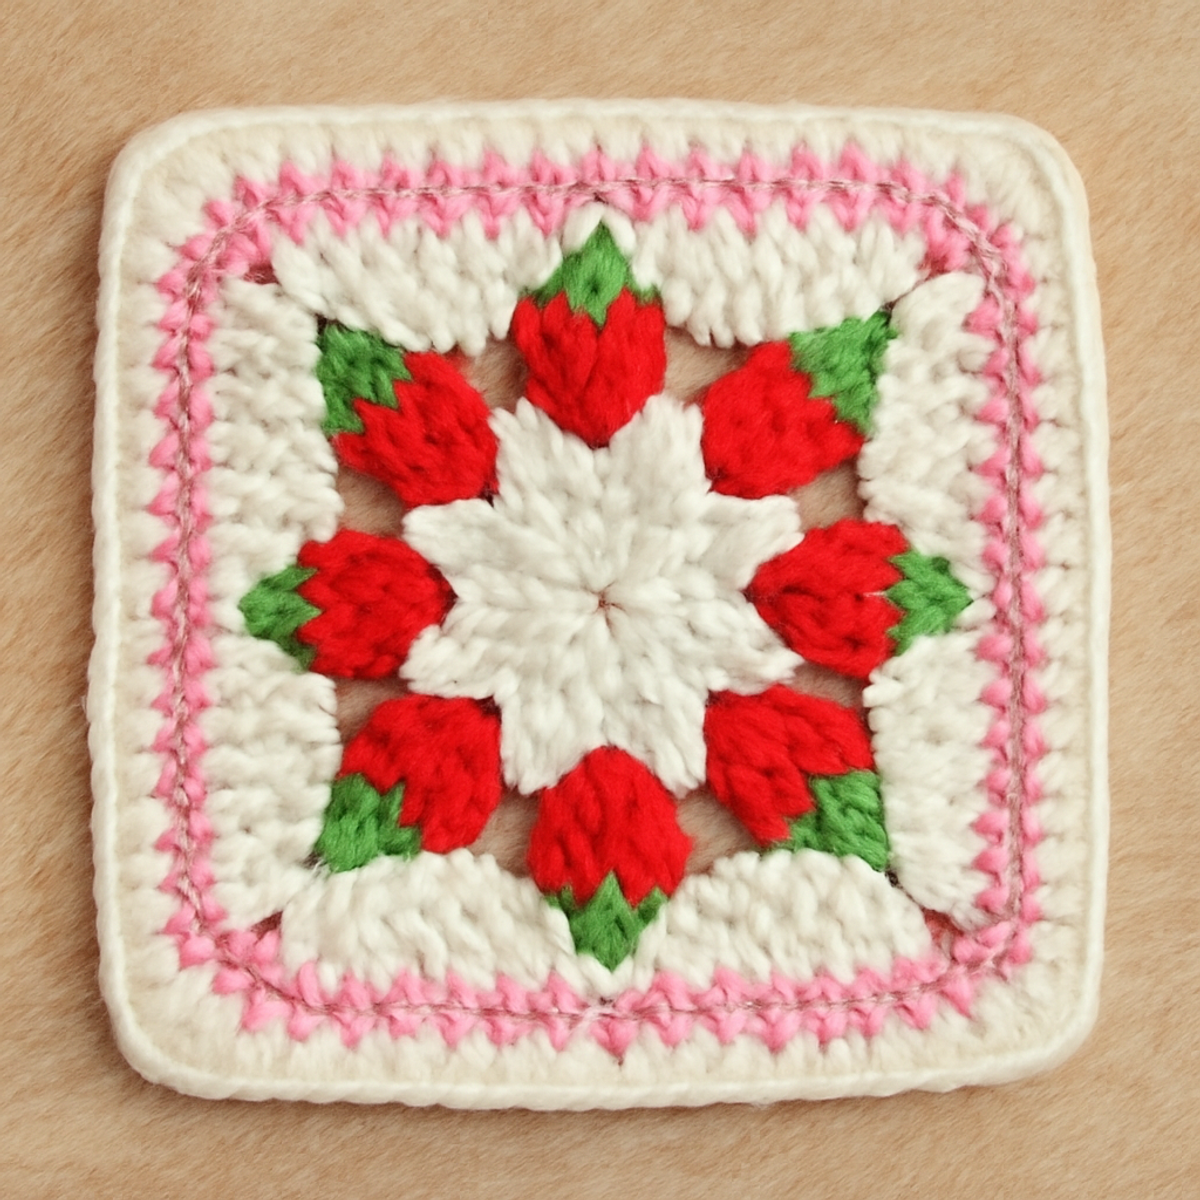
As I sat in my favorite cozy nook, the smell of fresh strawberries wafted through the open window, instantly sparking my creativity. Enter the Charming Strawberry Granny Square, a playful nod to summer’s bounty, bringing bright reds and lush greens right into your lap! This project is perfect for crafters of all levels, making it a delightful introduction to the world of granny squares. Not only is it a versatile piece—ideal for anything from blankets to cushion covers—but its engaging stitch work transforms crochet time into a joyful, meditative escape. With just 150 yards of yarn needed, this project is also a fantastic stash-buster that won’t keep you busy for long. Ready to dive into this sweetly whimsical creation? Let’s stitch up some summer vibes together!
Charming Strawberry Granny Square Materials & Tools
-
Yarn
- Worsted Weight Yarn – A blend of cotton and acrylic is recommended for durability and easy care, with a total of approximately 150 yards needed.
- Bright Red Yarn – You'll need about 50 yards for the main strawberry color to get that vibrant pop!
- Fresh Green Yarn – A small amount will be required for the leafy accents.
- Soft Pink Yarn – Use for the outer border, with just enough to complete the edge.
- Crisp White Yarn – Ideal for the center and will bring an airy finish to your square.
-
Tools & Notions
- 5.0mm (H-8) Hook – This size is perfect for achieving a lovely stitch definition in your strawberry granny square.
- Stitch Markers – Handy for keeping track of your rounds and ensuring symmetry in your work!
Why choose the charming strawberry granny square?
Versatile Crafting: This Granny Square isn't just a pretty face—its versatility allows you to use it for various projects like blankets, cushion covers, or cheerful home decor!
Engaging Stitch Work: With a mix of single and double crochet, each stitch adds a fun layer of complexity that keeps your hands busy and your mind at ease.
Vibrant Colors: The bright reds and lush greens create a stunning visual effect, perfect for evoking the spirit of summer gardens in every corner of your home.
Quick & Easy: Needing only 150 yards of yarn, this pattern is a delightful stash-buster that works up in no time, fitting perfectly into any crafter's busy schedule.
Cozy Texture: The finished square boasts a plush and cozy texture, making it not just a decorative piece, but a tactile delight as well!
Gauge & Sizing Notes
Don't skip the gauge swatch! It's essential for ensuring your Charming Strawberry Granny Square turns out just right. A standard gauge to aim for is approximately 4×4 inches (10×10 cm), but remember this can vary depending on your tension. If you find that your strawberry granny square is coming out smaller or larger than desired, you can adjust the starting chain by multiples of 4 + 2 to alter the width. If your swatch is too tight, simply switch to a larger hook size to create a cozier, more relaxed stitch. Embrace the joy of sizing—your perfect strawberry square awaits!
Step-by-Step Pattern for Charming Strawberry Granny Square
Row 1: Create the Center
Start with a magic ring in white yarn and ch 2 (this counts as your first dc). Work 11 dc (12 dc total) into the ring. Pull the ring tight to close, and sl st into the top of the first dc to secure the round. Your work should form a small circle, ready to blossom into the center of your strawberry granny square. (12 sts)
Row 2: Begin the Petals
Ch 3 (counts as 1 dc) and make 2 dc in the same stitch to form a cluster. Ch 2, skip the next dc, and make 3 dc into the next stitch. Repeat from * to * around, adjusting the last round with a ch 2 before joining with a sl st to the top of the ch 3. Your petals will now be popping out, creating cheerful detail! (4 clusters)
Row 3: Strawberry Shape Foundation
Switch to bright red yarn. Ch 1 and work 1 sc in each of the 3 dc of each cluster from Row 2, creating a solid foundation for the strawberry. Make sure to place 1 sc in each ch 2 space from the previous round as well. This round should feel plush, with the foundation for your strawberry shapes taking shape. (20 sc)
Row 4: Forming the Strawberry Shape
Ch 3 (counts as 1 dc) and work 2 dc in the same sc. In the next sc, make 3 dc, and in the following sc, 1 dc. Repeat this pattern around: increase to 3 dc in alternating stitches while making 1 dc between. This round will start to curl outward as the strawberry shape forms aesthetically. (36 sts)
Row 5: Adding the Leaves
Switch to fresh green yarn. Ch 2 (counts as 1 hdc) and in the same st, work 1 hdc, 1 ch, and 1 sl st to create a leaf point. Skip 2 dc, then repeat (2 hdc, ch 1, sl st) in the next dc. Continue around, adjusting to fit as you solidify the leaves. Your strawberry granny square will begin to showcase its vibrant details! (8 leaves)
Row 6: Outlining with Pink
Change to soft pink yarn. Join with a sl st in the nearest stitch and ch 1. Work 1 sc in each stitch around, making sure to work 2 sc into each ch-1 space from leaves. This round creates a lovely contrast and finish that will frame your strawberry highlight. Your granny square will start to feel complete and cozy. (48 sc)
Row 7: Edging the Square
Switch back to white yarn for a crisp edge. Ch 1 and work 1 sc in each stitch around. In each corner, work (1 sc, ch 2, 1 sc) to round the corners beautifully. You should feel the sturdiness of your charming strawberry granny square as you finish off this last round with a tidy appearance. (54 sc + 4 corners)
Step 8: Finishing Touches
Finish by cutting the yarn and pulling it through the last loop. Weave in all ends using a tapestry needle for a clean finish. Consider lightly blocking your square to shape it and enhance the stitch definition for that final touch. Your charming strawberry granny square is now complete and ready to be transformed into a beautiful creation!
Helpful Tricks for Strawberry Granny Square
-
Consistent Tension: Ensure you maintain even tension throughout your work to avoid uneven sizing, especially on corners where increases occur.
-
Regular Stitch Counting: Count your stitches at the start of each new round to ensure symmetry and prevent mistakes, helping your strawberry granny square look its best.
-
Lightly Block Your Work: After finishing, consider lightly blocking your square to enhance its shape and stitch definition, giving your project a polished finish.
-
Be Mindful of Color Changes: When switching colors, pull the new yarn snugly to avoid gaps between stitches, which can disrupt the visual flow of your strawberry granny square.
-
Check for Loose Ends: Always weave in ends as you go to prevent them from unraveling, giving you a cleaner and more professional-looking final piece.
How to Wash and Care for Your Strawberry Granny Square
Machine Washing: Use cold water and a gentle cycle to keep your strawberry granny square looking fresh. Avoid agitation to prevent any pilling or felting.
Hand Washing: For extra care, hand wash in cold water using a mild detergent. Gently press out excess water without twisting or wringing to maintain its shape.
Drying/Blocking: Lay your granny square flat to dry on a clean surface. Blocking after washing helps enhance its shape and stitch definition, making your work pop beautifully.
Storage: Store your finished piece in a cool, dry place, away from direct sunlight. This ensures the vibrant colors of your strawberry granny square remain bright for years to come.
Strawberry Granny Square Variations
Embrace your creativity and discover delightful ways to customize the strawberry granny square pattern to reflect your personal style!
-
Color Blocked Sections: Combine different color schemes for a patchwork effect. Play with bright reds and soft pastels to create a unique design that sings summer.
-
Bulky Yarn: Opt for a bulkier yarn to create a cozy, chunkier square. This twist works up faster and adds a delightful dimension—perfect for speedy crafting.
-
Mini Granny Squares: Scale down your design by using a smaller hook and lighter yarn. This adjustment creates cute, mini versions suited for coasters or embellishments.
-
Embellishments Galore: Add beads or embroidery to your squares for a personalized touch. These decorative elements elevate your granny squares into chic, one-of-a-kind treasures!
-
Textured Edges: Introduce a textured border by using front post double crochet (FPDC) stitches. The additional dimension brings a tactile aspect that makes your piece extra special.
-
Seasonal Switch: Swap the vibrant summer colors for warm autumn hues like burnt orange and deep browns. This seasonal update will transform your square's aesthetic wonderfully.
-
Fringed Finish: Try adding fringes along the edges for a playful, boho vibe. This whimsical touch invites a fun, tactile element that dances as it hangs.
Customizing your strawberry granny square is not only about enhancing its appearance; it’s also a journey of self-expression that fills your crafting heart with joy!
What to Pair with Charming Strawberry Granny Square?
Create a delightful crochet collection that captures the essence of a sun-kissed summer garden!
- Plush Strawberry Pillow: A cozy companion that uses the same yarn, perfect for adding a touch of charm to your favorite nook.
- Leafy Coaster Set: These small, vibrant coasters keep your table free of water rings while echoing the strawberry theme beautifully.
- Cheerful Blanket: Whip up a matching throw that showcases multiple squares, creating a colorful and inviting atmosphere in your living space.
- Woven Basket: Craft a charming storage solution that complements your squares, perfect for keeping your crochet supplies tidy and within reach.
- Strawberry Keychain: A fun little project that allows you to use scrap yarn while carrying a piece of summer wherever you go!
Charming Strawberry Granny Square FAQs
Can I substitute different yarn types for the strawberry granny square?
Absolutely! While I recommend a blend of cotton and acrylic for a soft and durable finish, you can use other worsted weight yarns. Just ensure that they maintain similar stitch definitions for the best results.
How can I make my granny square bigger or smaller?
To adjust the size, consider changing your hook size or using a thicker or thinner yarn weight. If using a bulkier yarn, remember to increase your starting chain to accommodate the larger stitches. Alternatively, you can simply add more rounds to make a larger square!
Why is my granny square curling at the edges?
Don't panic! Curling can happen if your tension is too tight, especially in corner areas. Try working with a looser grip, or check your stitch counts. Lightly blocking your finished piece can also help smooth out those edges beautifully.
What hook size should I use for the strawberry granny square?
For this pattern, a 5.0mm (H-8) hook is recommended. It provides a lovely stitch definition. However, feel free to adjust the hook size based on your yarn thickness and personal tension. Just keep a consistent tension throughout!
How do I fix a dropped stitch in my granny square?
It's an easy fix! If you notice a dropped stitch, gently pull on the yarn to bring it up to the correct row. Using a crochet hook, you can then pull the yarn through the loop and secure it with a slip stitch or yarn over. Remember to check your stitches regularly to catch any mistakes early on!
What if my square isn't turning out symmetrical?
If your strawberry granny square is uneven, check your stitch counts at the beginning of each round. Ensure you're making the correct increases, and don’t hesitate to use stitch markers to visually represent your sides. They can help maintain the symmetry and beauty of your work!

Leave a Reply