
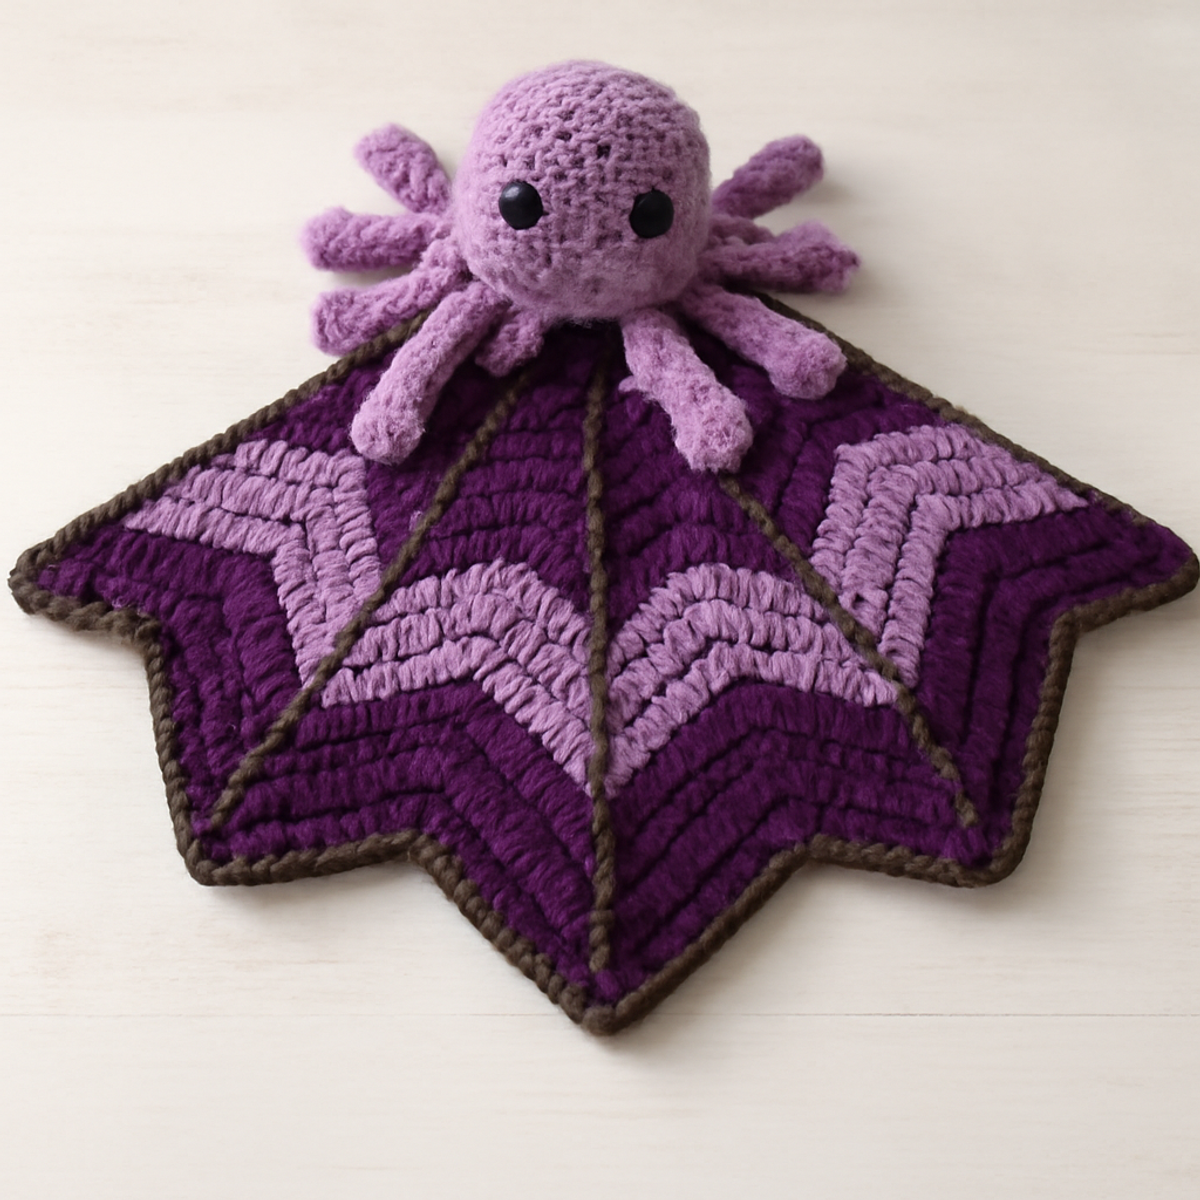
As I settled into my cozy corner with a skein of yarn, visions of a whimsical creation formed in my mind—the enchanting "Spider on a Web Lovey." This delightful crochet project balances function and charm effortlessly, inviting imagination while delivering comfort, making it the perfect addition to any nursery. With its engaging chevron pattern, you’ll not only enhance your colorwork skills, but also craft a unique, handmade gift that your little ones will treasure for years to come. The soft textures and contrasting hues of this spider lovey wrap up everything we adore about crochet: creativity, comfort, and a sense of playful magic. Are you ready to dive into this snuggly adventure? Let's bring your spider lovey to life!
Spider Lovey Materials & Tools
Note: Gather these materials to craft your enchanting spider lovey!
Yarn
- Medium Worsted Weight Yarn – Approximately 300-400 yards in contrasting colors for the cheerful chevron pattern.
- Cotton or Acrylic Blend – Soft and durable options that provide a cozy finish.
Tools & Notions
- 5.0mm (H-8) Hook – Ideal for achieving those snug, tight stitches featured in the pattern.
- Safety Eyes – A whimsical touch for your spider, best in black to stand out against lighter yarn.
- Tapestry Needle – Essential for weaving in ends and attaching the spider securely to the lovey.
Creating your spider lovey is an adventure in both skill and comfort! Happy crocheting!
Why You'll Adore This Spider Lovey?
Whimsical Design: The "Spider on a Web Lovey" combines functionality with charm, captivating children's imaginations while providing a comforting presence.
Skill Builder: Perfect for both beginner and intermediate crocheters, this pattern enhances your colorwork techniques through the engaging chevron design, giving you confidence with each stitch.
Soft & Cozy: Made from medium worsted weight yarn, this lovey offers a delightful drape that is both snuggly and warm—a perfect addition to any child's bedtime routine.
Creative Customization: Encourage your artistic side by experimenting with color schemes, whether you opt for soothing pastels or vibrant rainbows. Personalize the spider's size for an eye-catching effect!
Cherishable Keepsake: This unique handmade gift is destined to become a beloved treasure, providing comfort and affection for years to come, ensuring delightful memories are woven into every stitch.
Gauge & Sizing Notes
Don't skip the gauge swatch! Ensuring your tension is just right for the spider lovey is essential to achieving the cozy dimensions you desire. A common guideline is to aim for a tension swatch of approximately 4×4 inches (10×10 cm), which can be around 14 double crochets by 8 rows, though checking your pattern will confirm specifics. To adjust the size of your spider lovey, you can increase your starting chain in multiples of 4 for added width or make your chevron rows longer for height. If your swatch comes out smaller, simply switch to a larger hook size to help achieve that lovely drape!
Step-by-Step Pattern for Spider Lovey
Row 1: Foundation Chain
Start by creating a foundation chain of 42 chains (ch). This will serve as the base for the chevron pattern. Make sure to keep your chains loose enough for easy stitching in the next rows. At this point, your work should lay flat and be approximately 18 inches long.
Row 2: First Chevron Peak
In the second chain from the hook, insert your hook and work 1 single crochet (sc), followed by 1 double crochet (dc) in the next stitch. Skip the next stitch, then work 1 dc and 1 sc in the following stitch. Repeat this pattern across the row, ending with a sc in the last chain (20 sts). Your work will start to show peaks as you continue.
Row 3: Building the Chevron
Ch 1 to begin Row 3 and turn your work. Continue the established chevron pattern by placing 1 sc in the first stitch, followed by 1 dc in the peak of the previous row's chevron. Work 1 sc in the next stitch and skip a stitch before repeating this pattern across the row (24 sts). The shape should be clearly defined now.
Row 4: Expanding the Web
Ch 1 and turn your work for Row 4. Repeat the previous row's chevron stitches, ensuring to place an additional sc in the space between peaks for every repeat. You'll end this row with 1 sc in the last stitch (28 sts). You'll notice the lovely flow of your spider lovey's design is taking shape.
Row 5: Continuing the Chevron Series
Ch 1 and turn to start Row 5. Follow the same method, alternating 1 sc and 1 dc at the appropriate intervals between each chevron peak. This time, you'll aim for 32 stitches by the end of the row. Your work should look positively cozy as it grows wider.
Step 6: Adding Contrast Colors
Change colors for added interest in Row 6. Attach your new yarn color, ch 1, and turn. Continue the chevron pattern as established with your new color, adding a stitch or two for seamless transition, and finish this row with 36 stitches. The contrast will give your spider lovey a vibrant touch!
Step 7: Completing the Body
Continue working the chevron pattern for Rows 7 and 8, gradually increasing your stitch count to 40 and then to 44, respectively. Ensure each row maintains that beautiful chevron wave. After completing Row 8, your working piece should be substantial and filled with texture.
Step 8: Finalizing the Blanket Size
For the last row, ch 1, and do a simple sc across the entire row for a smooth edge. Make sure your final stitch count is 48 (you might need to add a few for completeness). At this point, your spider lovey will beautifully display its captivating design!
Step 9: Creating the Spider
For the spider, start with a magic ring and work 6 sc in it (6 sts). Continue to increase while forming the spider's body with 2 sc in each stitch around (12 sts). Make 8 legs separately by chaining 10 and securing with a sl st. Now, your spider's form is beginning to emerge.
Step 10: Assembly
Attach the completed spider securely to the center of the lovey with a tapestry needle. Position it to be the focal point, sewing it carefully to ensure it's secure for little hands. Your lovely spider lovey is ready for some snuggly love and imaginative adventures!
Expert Tips for Your Spider Lovey
Consistent Tension: Maintain even pressure on your yarn while crocheting to ensure uniformity in your chevron pattern. Avoid pulling too tightly, as it may complicate your stitches.
Count Regularly: It’s easy to lose track of your stitches in the pattern. Count after every row to ensure you don’t miss any, which helps preserve the integrity of your spider lovey.
Block for Definition: After completing your lovey, consider blocking it to enhance the defined peaks and valleys of the chevron design. This step adds to the overall appeal and neatness.
Secure the Spider Eyes: When attaching the safety eyes to your spider, double-check their placement to avoid them becoming loose, ensuring they're safe and secure for little ones.
Final Edging Touch: For a polished look, work a final round of slip stitches or single crochets around the edge after finishing the body, giving your spider lovey a neat, finished appearance.
How to Wash and Care for Your Spider Lovey
Machine Washing: Use cold water on a gentle cycle to protect the whimsical design of your spider lovey. Avoid agitation to prevent any felting or pilling.
Hand Washing: For added care, gently hand wash your lovey in cold water with mild detergent. This prolongs the life of your cozy creation and keeps it looking fresh.
Drying/Blocking: Lay your spider lovey flat to dry on a clean towel, reshaping it if necessary. Avoid hanging to prevent stretching and maintain its adorable form.
Storage: Store your lovey in a cool, dry place away from direct sunlight. Keep it in a cotton bag or a breathable container to avoid dust while preserving its charm.
Spider Lovey Variations & Substitutions
Embrace your creativity and explore unique twists for your cozy spider lovey!
-
Yarn Weight Swaps: Try a lighter sport weight yarn for a more delicate feel. This option creates a softer drape suitable for warmer climates.
-
Fiber Alternatives: Use cotton yarn for a breathable option that’s great for summer. Its natural fibers make washing easy while maintaining that snuggly comfort.
-
Color-Blocking Ideas: Create distinct blocks of color within the chevron pattern. This playful design can highlight different seasons, like autumn oranges or spring pastels, giving your lovey a unique charm.
-
Sizing Adjustments: To make a larger lovey, simply add more chains to your foundation. If you prefer a smaller version, reduce your stitch count for a compact and portable comfort guard.
-
Texture Modifications: Incorporate a fluffy chenille for the body of the spider. This will make it irresistibly soft, providing tactile joy for tiny hands.
-
Fun Accessories: Add a whimsical border of pom-poms around the lovey's edge. It's an eye-catching detail that adds flair and playfulness to your project!
-
Spider Size Variation: Scale down the spider for a minimalistic design or go big for an impressive centerpiece. Adjusting the size alters the overall aesthetic dramatically.
-
Fringe Addition: Experiment with a fringed edge for a modern twist. This fun detail introduces movement to your lovey, inviting little ones to explore its texture!
What to Make after Spider on a Web Lovey?
This whimsical journey doesn't need to end with the lovey—craft a charming set to delight little ones even more!
-
Cuddly Blanket Buddy: Create a matching blanket to snuggle under—perfect for cozy naps and adventures. This addition offers a larger canvas for your beautiful colorwork.
-
Chevron Pillow: A playful pillow mirroring the lovey's design will brighten any child's room and provide extra comfort for storytime. Imagine sinking into soft, coordinated textures!
-
Spider Hat: Keep your little one's head warm with a hat featuring a spider motif, using leftover yarn to tie in all elements of your project. It's both functional and fun!
-
Tiny Spider Coaster: Craft a cute coaster using similar crochet techniques to teach little ones about responsibility while adding a fun accent to their space.
-
Mini Travel Lovey: Whip up a smaller version for on-the-go cuddles, ensuring that comfort travels with your child wherever they may venture.
These projects not only complement the spider lovey but also extend the charm and coziness it offers, making your crafting journey delightfully interconnected!
Spider Lovey FAQs
Can I substitute the yarn for my spider lovey?
Absolutely! While the pattern recommends a medium worsted weight yarn, you can use any similar weight yarn like a chunky acrylic or a soft cotton blend. Just keep in mind that different fibers can affect the drape and feel of your finished lovey!
How can I make my spider lovey larger or smaller?
To adjust the size of your spider lovey, simply add or reduce the number of foundation chains before starting the chevron pattern. Just remember to maintain the same stitch count consistency throughout each row for balance. For a smaller version, you could also work fewer rows in the chevron pattern.
My work is curling up; what should I do?
Don't panic! Curling can often happen when the tension is too tight, or if there's an imbalance in stitch types. I recommend checking your tension throughout your project—try loosening your grip on the yarn a bit and see if that helps reduce the curling effect. Blocking your finished lovey can also help flatten it out beautifully!
What hook size should I use for the spider lovey?
For the spider lovey, a 5 mm (H-8) hook is recommended. However, if you're a tighter crocheter, you may want to go up a hook size to achieve the intended gauge and texture. Getting the gauge right ensures your lovey ends up nice and cozy!
Why do my stitches look uneven on the spider lovey?
It could be a tension issue or a variety of factors. I recommend practicing a couple of rows before diving into the main project, ensuring you’re comfortable with your tension. Counting your stitches regularly will also help maintain that lovely consistency throughout your spider lovey.
How do I fix dropped stitches in my chevron pattern?
It’s an easy fix! If you catch a dropped stitch while working, simply use a crochet hook or your fingers to pull the stitch back up in alignment with your previous stitches. If it's a larger section, consider using a tapestry needle to weave the yarn through those stitches to secure them. You'll be back to crochet bliss in no time!

Leave a Reply