
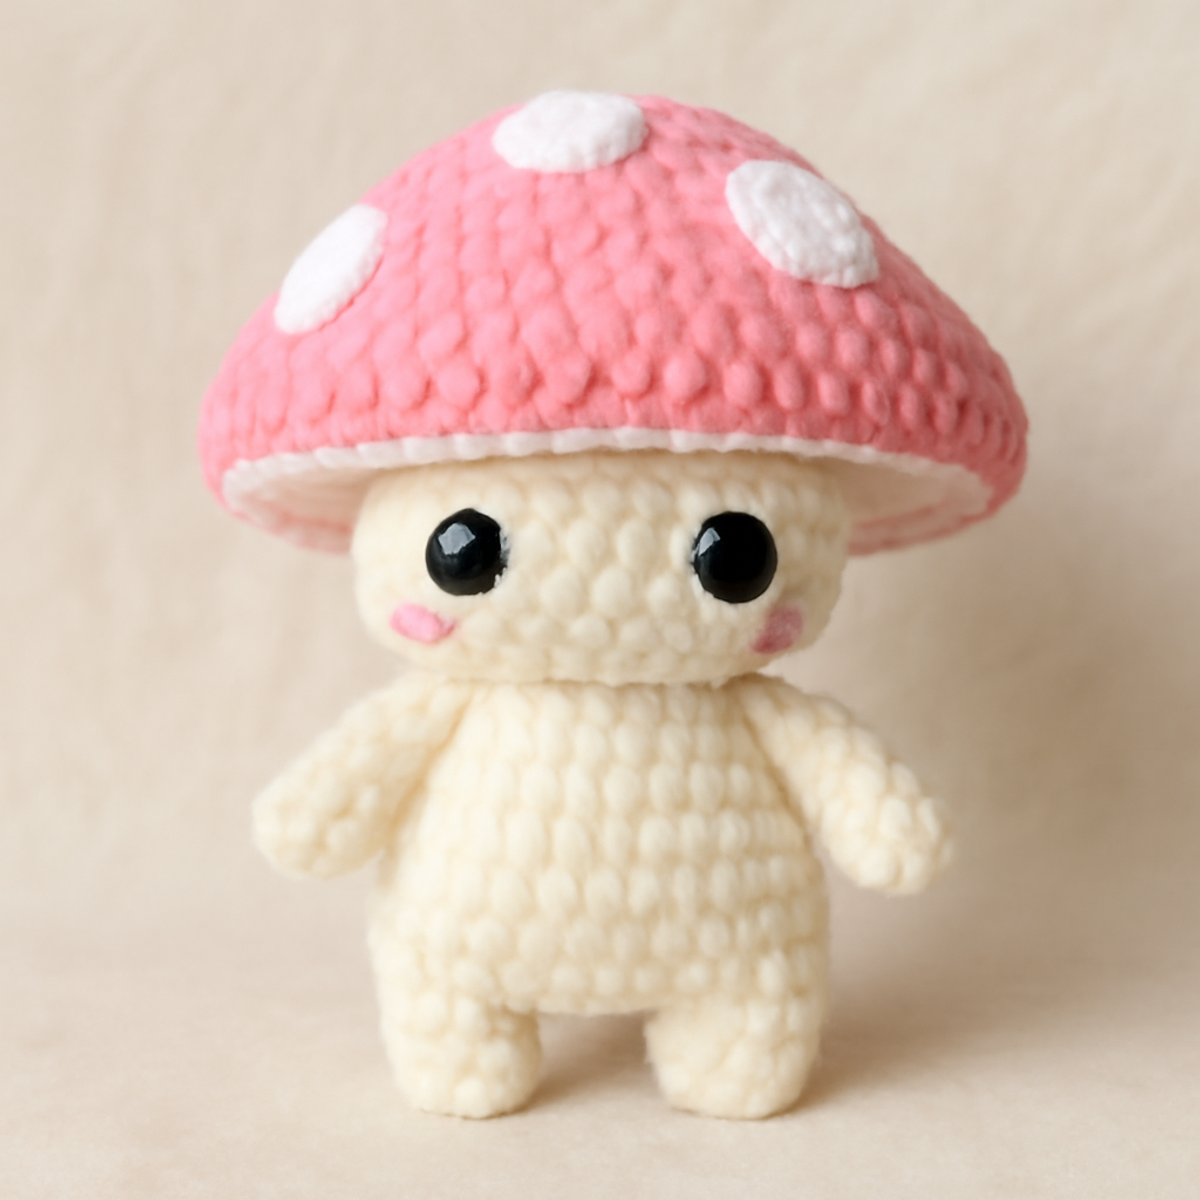
As I nestled my crochet hook into soft, plush yarn, the idea of a whimsical mushroom plushie emerged, inviting me into a world of color and creativity. The 'Charming Mushroom Amigurumi' is a delightful project designed for both the budding crochet artist and those looking to level up their amigurumi skills. This mushroom crochet plush not only brings vibrant colors to your workspace but also results in a cuddly companion that sparks joy and imagination for all ages. With an accessible skill level and a satisfying stitch experience, you’ll find yourself laughing and reminiscing as you create this enchanting piece. Let’s dive into the steps to craft your own charming friend; it’s time to let your creativity bloom!
Charming Mushroom Amigurumi Materials & Tools
- Bulky Weight Yarn – Approximately 150-200 yards of plush yarn, like chenille or velveteen, will give your mushroom crochet plush the perfect soft texture.
- 6.5 mm (K) Crochet Hook – This size will help you achieve a nice dense fabric for a cuddly feel.
- Safety Eyes (12mm) – Essential for adding character; these will bring your mushroom plush to life with a friendly expression.
- Yarn Needle – Use this for weaving in ends and securing stitches for a polished finish.
- Stitch Markers – Helpful for keeping track of rounds as you work on shaping your adorable mushroom plushie.
Why Choose the Mushroom Crochet Plush?
Endearing Design: The mushroom crochet plush features a whimsical, playful design that appeals to both children and adults, making it a perfect gift for any occasion.
Engaging Techniques: You'll enjoy exploring a combination of crochet techniques, including double and single stitches, to create a structure that's both fun and fulfilling to make.
Soft & Cuddly: Crafted from bulky yarn, this plushie has an irresistibly soft texture, inviting hugs and cuddles while becoming a charming addition to your decor.
Customizable Fun: With endless color combinations and design variations, you can personalize your mushroom plush to match any style, from vibrant and bold to earthy and understated.
Quick Completion: Designed for a swift crafting experience, this project is perfect for when you want something cozy and satisfying without spending weeks on end.
Gauge & Sizing Notes
Don't skip the gauge swatch! Ensuring your tension is correct is essential for creating the perfect mushroom crochet plush, especially since a consistent gauge helps maintain the plushie's adorable shape. Aim for a standard crochet gauge of approximately 4×4 inches (10×10 cm), which typically would yield around 10 single crochets and 12 rows. To adjust the size of your mushroom plush, if you desire a larger cap, increase your starting chain in multiples of 12; for a shorter body, decrease the number of rounds worked. If your swatch is smaller than expected, simply try going up a hook size to achieve the right fit. Happy crocheting!
Step-by-Step Pattern for Mushroom Crochet Plush
Round 1: Start the Cap
Begin with a magic ring, then work 10 dc into the ring to form the center cap of your mushroom crochet plush. Pull the ring tight to secure it, ensuring there are no gaps. Your work should start to form a small circle (10 sts).
Round 2: Increase the Circle
Chain 2, then make 2 dc in each stitch around to increase the size of your cap. This will create a fuller shape, characteristic of a mushroom. By the end of this round, you should have doubled your stitches (20 sts).
Round 3: Create Volume
Chain 2 and work 1 dc in the first stitch, then 2 dc in the next stitch; repeat this pattern around. This will help create a gentle, flaring shape for the mushroom cap. Your work should have a smooth curve forming (30 sts).
Round 4: Shape the Cap's Edge
Chain 2, then work 1 dc in each of the next 2 stitches followed by 2 dc in the next stitch; continue this sequence. This will further enhance the rounded shape of the cap as you start to build its brim (40 sts).
Round 5: Add Character Spots
Switch to white yarn for the accent spots. Chain 2, then make 1 dc in the first 3 stitches, followed by a ch 1; repeat this around. The chain spaces will later become white spots, adding whimsy to your mushroom crochet plush (40 sts).
Round 6: Complete the Cap
In this round, switch back to your main color yarn. Chain 2 and work 1 dc in each stitch around, filling in the white spots with your main color. Your cap should look round and adorable at this point (40 sts).
Step 1: Start the Body
Using a magic ring, work 6 sc in the ring to form the base of the body. This foundational round will help create a sturdy base for your mushroom crochet plush. Pull the ring tight to secure your stitches (6 sts).
Step 2: Build Up the Body
Chain 1, then work 2 sc in each stitch around to increase the body size. This creates a little bulbous shape, resembling the mushroom stem. Your body should be pleasantly round and soft (12 sts).
Step 3: Progress the Body Height
Chain 1, and then sc in each stitch around for this round. This will give the body its height while maintaining a smooth texture. Continue making rounds until your plushie measures about 4 inches tall (12 sts each round).
Step 4: Prepare for Closing
Once you reach your desired height, switch to a decreasing pattern. Chain 1 and work 1 sc in the first stitch, then dec in the next; repeat this pattern to taper the body. Your work should start to narrow toward the top (8 sts).
Step 5: Final Decreases and Closing
In this round, chain 1 and dec in each stitch around. This will complete the shaping of your mushroom body. Stuff gently but firmly as you go, ensuring the plushie retains its shape (4 sts).
Step 6: Assembly
Position the cap atop the body securely; use a yarn needle to stitch them together with careful attention to detail. Once attached, your mushroom crochet plush should stand nicely, showing off its delightful features.
Step 7: Adding Facial Features
Embroider a friendly smile and attach safety eyes to give your mushroom plush character. Customize with blush marks or other details that appeal to your artistic vision. Your mushroom crochet plush is now ready for admiration!
What to Pair with Charming Mushroom Amigurumi?
As you complete your delightful mushroom crochet plush, consider crafting a whimsical ensemble that enhances its charm and complements its colors.
-
Forest Critter Friends: Create adorable animals like bunnies or squirrels to accompany your mushroom, forming a cozy woodland scene.
These charming plush pals evoke the same playful nostalgia and would look adorable side by side. -
Mushroom-shaped Pillow: A coordinating pillow can bring a touch of whimsy to any space, featuring a 3D design that echoes your plushie’s style.
The soft aesthetic ties beautifully together, ensuring your crafting journey feels cohesive and inspired. -
Crochet Flower Bouquet: Add a splash of color with cheerful flower amigurumi, perfect for brightening up any room alongside your mushroom plush.
These blooms can be customized in vibrant hues, enhancing the natural elements of your creations. -
Charming Tote Bag: Create a matching crochet tote to carry your mushroom plush and other treasures, showcasing your unique crafting style.
This practical piece offers an opportunity for creativity, allowing you to play with patterns and colors that harmonize with your plushie. -
Mini Mushroom Varieties: Craft smaller mushrooms in various colors and sizes to create a delightful mushroom family, enhancing the whimsy of your decor.
Mix and match hues to add depth and interest to your creations, adding layers of charm to any setting.
Mushroom Crochet Plush Variations
Dive into creative possibilities with your mushroom crochet plush, transforming it into a unique masterpiece that resonates with your personal style!
-
Yarn Weight Swaps: Consider using a lighter weight yarn for a smaller, more delicate version, or a super bulky yarn for a delightful oversized plush.
-
Fiber Alternatives: Experiment with cotton yarn for a breathable, summery feel, or choose acrylic for an affordable, colorful option that holds its shape beautifully.
-
Color Blocking: Create a vibrant, multicolored cap by using two or three contrasting colors, or opt for an ombré effect that blends shades seamlessly for a stunning visual impact.
-
Size Adjustments: Modify the dimensions by increasing or decreasing the number of stitches in each round, allowing for custom versions that fit any decor style, from keychain to floor pillow.
-
Textural Enhancements: Add delightful texture by stitching a pom-pom on top of the cap or incorporating fringe along the edge, creating a fun, playful look that stands out.
-
Accessory Additions: Personalize your plushie with tiny crochet accessories, like a miniature flower, a whimsical hat, or even a tiny friend like a ladybug, adding charm and individuality.
-
Facial Expression Variations: Alter your plushie’s mood by changing the facial expressions; add a wink or a quirky smile for extra personality that speaks to your craft's spirit.
-
Edging Details: Finish your mushroom plush with a contrasting border around the cap or body, enhancing its outline and providing a polished, professional touch to your creation.
Expert Tips for Mushroom Crochet Plush
-
Consistent Tension: Keep your tension uniform throughout the project to prevent gaps and ensure a neat finish, particularly when using soft, plush yarn.
-
Count Stitches Regularly: Regularly count your stitches after each round to avoid losing count, especially during increases, which can lead to uneven shapes.
-
Careful Stuffing: Stuff the plushie moderately to achieve a squishy, huggable shape without making it too firm. Adjust stuffing as needed while assembling.
-
Securely Attach the Cap: Use a yarn needle to securely stitch the cap onto the body, ensuring that all facial features, like safety eyes, are positioned correctly for maximum charm.
-
Embroider with Care: When adding facial features, use a light touch for embroidery. This will bring your mushroom crochet plush to life while keeping the details subtle and cute.
How to Wash and Care for Your Mushroom Crochet Plush
-
Machine Washing: Use a gentle cycle with cold water to protect your mushroom crochet plush from agitation that could cause pilling or distortion. Always place it in a mesh laundry bag for extra protection.
-
Hand Washing: For a more delicate touch, hand wash your plushie in cold water with mild detergent. Gently squeeze to remove dirt without twisting or rubbing, preserving its whimsical shape.
-
Drying/Blocking: After washing, lay your mushroom plush flat on a clean towel to dry naturally. Avoid hanging or direct sunlight, as this can cause it to lose its charming plush texture.
-
Storage: Store your plushie in a cool, dry place, away from direct sunlight to maintain its color and shape. Be sure to keep it in a breathable fabric bag to prevent dust accumulation while showcasing its delightful design!
Charming Mushroom Amigurumi FAQs
Can I substitute yarn for this mushroom crochet plush?
Absolutely! If you don’t have bulky weight yarn on hand, you can substitute with worsted weight yarn (weight category 4) for a smaller plushie—just grab a size I (5.5 mm) crochet hook. Keep in mind that the texture will differ, so check your gauge to maintain a similar feel!
How do I adjust the size of my mushroom plush?
To make your mushroom crochet plush larger or smaller, experiment with different yarn weights and hook sizes. For a mini version, use sport weight (weight category 3) yarn with a smaller hook, while an oversized version can be achieved by choosing super bulky yarn (weight category 6) and a larger hook, ensuring to follow an increase pattern accordingly.
Why is my work curling at the edges?
Don’t panic! Curling often happens due to inconsistent tension or if you're working at too tight a gauge. You can try blocking your work to correct the shape—simply dampen the plushie, then gently reshape it and let it dry flat. Also, make sure your stitches are not too tight; a gentle hand applies more even tension.
How do I fix dropped stitches while crocheting?
It’s an easy fix, my friend! If you spot a dropped stitch, just grab your yarn needle and gently pull the working yarn through the stitch to re-secure it. If a stitch is completely missing in your work, you can use the yarn needle to weave in a new stitch using the nearby stitches as a guide for chain or single crochet to fill in the gap.
What hook size should I use for this project?
For the charming mushroom amigurumi, a 6.5 mm (US size K) crochet hook works best. This size helps achieve a lovely plush texture while keeping your stitches tight enough to retain the stuffing inside, so your mushroom plushie stays cozy and cuddly!
How can I maintain my plushie’s shape after stuffing?
Maintaining the shape of your mushroom crochet plush is all about the stuffing! Make sure to use just the right amount—enough to give it a nice plump shape but not so much that it feels rigid. Gently manipulate the stuffing as you close the plushie to evenly distribute it, creating that squishy charm we all love.

Leave a Reply