
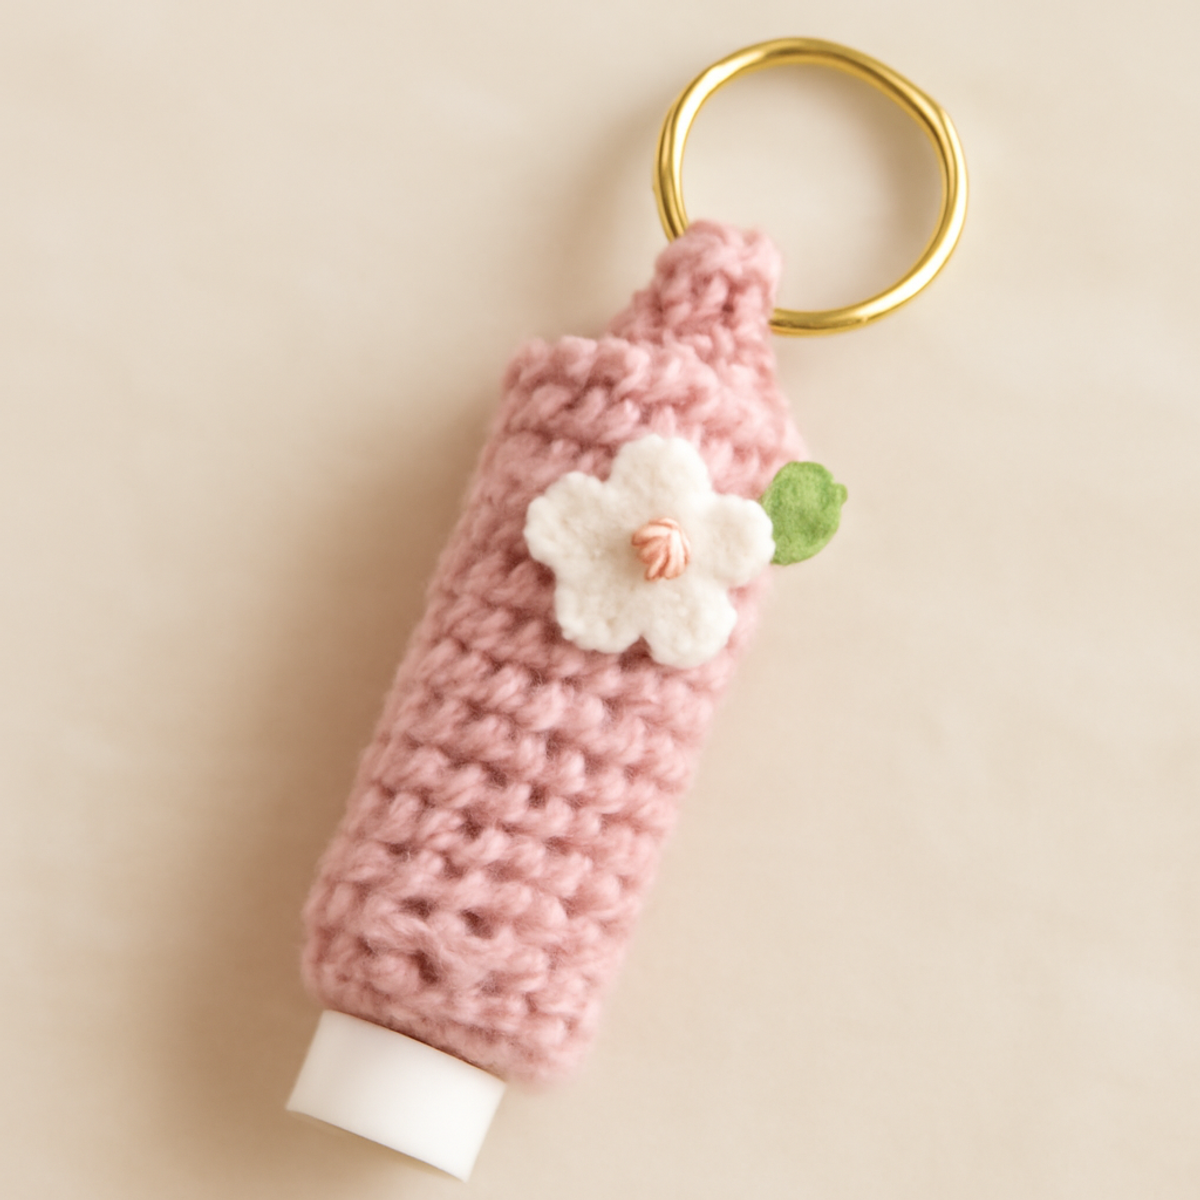
As I rummaged through my bag for my favorite lip balm, it struck me just how often things go missing in that chaotic abyss. That’s when I decided to crochet a cute and practical lip balm holder to keep it secured on my keychain! This beginner-friendly project is a wonderful way to showcase your growing crochet skills while adding a touch of charm to your everyday essentials. Not only will it save you from that frantic search, but it also offers endless customization options—making it a heartfelt gift for friends and family. With a few simple stitches, you’ll create a delightful accessory that combines style with functionality, and trust me, you'll love how easy it is to whip up. Let’s dive into this cozy crafting adventure together!
Lip Balm Holder Materials & Tools
- Cotton Yarn – Choose a pastel shade in light DK weight; approximately 50-75 yards will work perfectly.
- 3.5mm (E) Hook – This size is ideal for creating a cozy and snug fit for your lip balm holder.
- Yarn Needle – Great for weaving in those ends and tidying up your project.
- Scissors – Keep these handy for cutting your yarn cleanly as you go.
- Sturdy Metal Keyring – Essential for attaching your adorable lip balm holder to your keychain and making it easy to carry!
Why Love This Lip Balm Holder?
Style & Functionality: This lip balm holder is an adorable way to keep your favorite balm within reach, ensuring you’ll never lose it again.
Beginner-Friendly: The pattern is perfect for novices looking to expand their crochet skills, using simple stitches to achieve a lovely design.
Customizable Delight: Add your personal touch with color combinations or embellishments, making each piece truly one-of-a-kind.
Portable & Practical: Its compact size makes it ideal for a keychain, allowing for easy access while adding a dash of charm to your keys.
Soft & Durable: Crafted with cotton yarn, this holder is both cozy and sturdy, ensuring your lip balm stays safe for everyday use.
Gauge & Sizing Notes
Don't skip the gauge swatch! Checking your tension is crucial for ensuring your crochet lip balm holder fits snugly around your lip balm without being too loose. A good general guideline is to aim for a 4×4 inch (10×10 cm) square to match the standard measurements of 16 single crochets by 18 rows. If you want to adjust the size, to make the holder taller or shorter, simply increase or decrease the number of rounds in the tube body section accordingly. If your tension doesn’t match, and your swatch is too small, try going up a hook size. This way, you’ll create the perfect cozy enclosure for your lip balm!
Step-by-Step Pattern for lip balm holder
Row 1: Start with a Magic Ring
Begin by creating a magic ring. Work 8 single crochets (sc) into the ring, pulling it snug to close. This forms the base of your lip balm holder. As you complete this row, your work should form a small circle, ready for additional rounds (8 sts).
Row 2: Increase Round
For the second row, chain 1 and then make 2 single crochets (sc) in each stitch around to increase the size. You will double the stitch count in this row, so you should have a total of 16 stitches at the end, making the base wider (16 sts). Your circle will start to flatten out.
Row 3: Maintaining the Base
In Row 3, chain 1 and then work 1 single crochet (sc) in each stitch around without any increases. This will help maintain a flat base while allowing your lip balm holder to sit stable. After completing this round, you should have a total of 16 stitches again (16 sts).
Row 4: Continue Building
Now, for Row 4, chain 1 and again work 1 single crochet (sc) in each stitch around. This is another maintenance round that keeps the base diameter consistent. Your holder will begin to take shape, and it should still measure roughly the same size at this point (16 sts).
Row 5: Begin the Tube Body
Transitioning into the tube body, for Row 5, chain 1 and continue with 1 single crochet (sc) in each stitch around. This will create the vertical sides of your lip balm holder. Repeat this for several rows (typically 8-10) until the height comfortably fits your lip balm, maintaining 16 stitches per round (16 sts).
Row 6: Defining the Top Edging
For the top edging in Row 6, chain 1 and work 1 single crochet (sc) in each stitch around. This establishes a neat finish for your lip balm holder as you prepare to close off the top. Your work will remain consistent with 16 stitches in this row as well (16 sts).
Step 7: Create the Keyring Loop
Next, we’ll create the keyring loop. Chain 12 and slip stitch (sl st) back into the same stitch you just completed. This small loop will attach your lip balm holder to the keyring, giving it practicality. After this step, your holder will have a functional top loop ready for attaching (1 loop).
Step 8: Final Touches
To finish, slip stitch around the top for a clean edge, then fasten off and weave in any loose ends with your yarn needle. This final step ensures everything is secure and tidy. Once completed, your adorable lip balm holder will be ready to show off on your keychain!
Care Instructions for Your Lip Balm Holder
Machine Washing: Use cold water on a gentle cycle to avoid agitation, which can cause felting or pilling. This keeps your lip balm holder in great shape for everyday use.
Hand Washing: For best results, hand wash with mild detergent and cold water. Gently squeeze to clean, ensuring the yarn stays vibrant and soft without distortion.
Drying/Blocking: Lay your lip balm holder flat to dry, away from direct sunlight. This helps maintain its shape and prevents any unwanted stretching or curling.
Storage: Keep your lip balm holder in a cool, dry place when not in use. Proper storage keeps the yarn fibers intact and ready for your next adventure!
What to Pair with the Cute and Practical Lip Balm Holder
Creating a matching set elevates your crochet game and adds a touch of whimsical charm to your everyday essentials.
-
Charming Keychain Purse: This petite purse is perfect for keeping your essentials close. Its whimsical design adds functional flair alongside your lip balm holder.
-
Colorful Flower Hair Clip: Whip up this adorable accessory to bring harmony to your look; the same floral detail creates a lovely, cohesive aesthetic.
-
Crochet Tote Bag: Craft a stylish tote in complementary shades to hold your lip balm holder. It’s a wonderful way to showcase your unique crochet style.
-
Matching Wristlet: Create a handy wristlet bag using the same yarn. The coordinated look is not only practical but oh-so-adorable!
-
Decorative Plant Hanger: Elevate your space with a crochet plant hanger in matching colors. This adds a cozy touch while drawing the eye back to your crafty skills.
Expert Tips for the Lip Balm Holder
-
Check Tension: Maintain a consistent tension throughout your work to ensure the lip balm holder fits snugly. Loose stitches may lead to a larger opening, making your balm prone to slipping out.
-
Count Your Stitches: Regularly count your stitches after each row. It's easy to lose count, especially in rounds, but keeping track helps avoid errors that might affect the holder's shape.
-
Secure the Edges: When defining the top edging, ensure slip stitches are tight but not too tight. This prevents the top from curling, giving your lip balm holder a polished finish.
-
Weave Ends Properly: Don’t forget to weave in your loose ends neatly. This not only tidies your project but also enhances durability, especially since the lip balm holder will see frequent use.
-
Test Fit as You Go: Keep your lip balm handy to check the fit periodically. Adjust stitch counts if necessary to ensure it sits comfortably within your handmade holder.
Lip Balm Holder Variations & Substitutions
Explore the lovely ways to tweak your crochet lip balm holder, inviting your creativity to shine through in every stitch!
- Yarn Alternatives: Swap cotton for acrylic yarn for a softer feel and added warmth, perfect for cozying up your lip balm holder.
- Color Combinations: Use variegated yarns for a playful twist, bringing a vibrant pop of color to each holder. Every row will surprise you with delightful patterns!
- Size Adjustments: Easily alter the height of the tube body to fit different lip balm sizes, allowing you to customize for your favorite products. This tweak can also create matching holders for different occasions!
- Decorative Elements: Attach decorative beads or charms to the keyring to elevate your holder into a mini work of art, showcasing your crafting personality.
- Textured Edging: Try a scalloped or shell stitch for the top edging to give an extra touch of charm and whimsy to your holder. It adds visual interest and an inviting texture!
- Floral Designs: Experiment with different flower appliqués or motifs for a unique top embellishment. You could even create seasonal themes for a playful variety!
- Fringe Fun: Add a small fringe along the bottom edge for a bohemian flair, providing a lovely movement to your finished piece. It’s an unexpected twist that’s sure to draw attention!
- Keyring Size: Select larger or themed keyrings to personalize the look further, making your lip balm holder not only functional but also a statement accessory.
Cute and Practical Crochet Lip Balm Holder FAQs
Can I substitute different yarn types for my lip balm holder?
Absolutely! While cotton yarn gives a lovely finish, you could try acrylic or bamboo yarn for a different texture. Just be sure they're a similar weight to maintain the holder's size and shape.
How can I adjust the size of my lip balm holder?
If you want to make it bigger or smaller, consider adding or reducing the number of rows in the tube body. I recommend checking the fit of your lip balm often as you work to ensure it will fit snugly, adjusting stitch counts as necessary.
Why is my work curling at the edges?
Don't panic! Curling can occur with single crochet projects if your tension is too loose. Making the slip stitches a bit tighter when defining the edge can help mitigate this issue. Checking your tension consistently throughout the project is also a good practice.
What hook size should I use for this lip balm holder?
A 3.5 mm (E) crochet hook is ideal for this lip balm holder, as it creates a tightly woven fabric that's durable and maintains the holder's structure while fitting your lip balm perfectly.
How do I fix dropped stitches in my lip balm holder?
It's an easy fix! Simply use your yarn needle to pick up the dropped stitch, then crochet it back into place to maintain the integrity of your work. Don’t forget to double-check your stitch count afterward to keep everything even.

Leave a Reply