
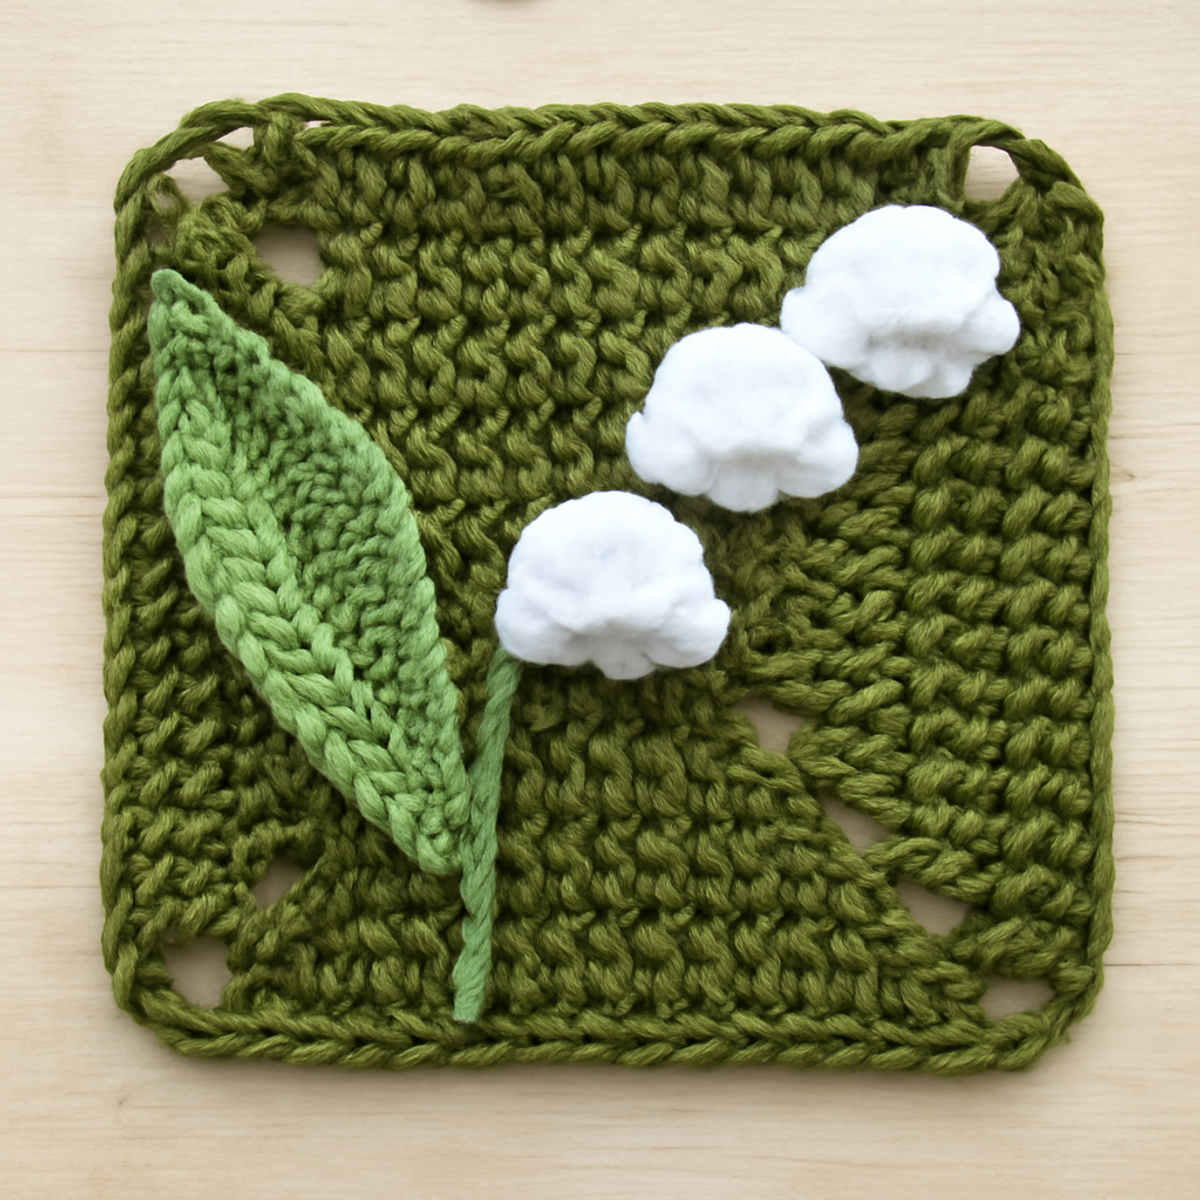
As I sat on my porch, the gentle scent of spring filled the air, bringing to mind the delicate beauty of lily of the valley. This inspiration led me to create the lily of the valley crochet square, a pattern that captures the essence of these charming flowers in a delightful, textured design. Perfect for spring-themed décor or cozy afghans, this intermediate-level project combines basic and textured stitches to elevate your crochet skills. With stunning three-dimensional flowers sprouting from a beautifully crafted square, it’s not just a feast for the eyes — it’s a fantastic stash-buster too! Whether you’re looking to gift something special or simply adorn your space with a handmade touch, the end result will surely bring joy and elegance to any room. So, let’s dive into this beautiful project and watch our stitches bloom into something extraordinary!
Lily of the Valley Crochet Materials & Tools
- Medium Weight Yarn (Category 4) – Approximately 100 yards of green yarn for the background and leaves, plus around 30 yards of white yarn for the flowers.
- 5.0mm (H-8) Crochet Hook – This size is ideal for achieving the stitch density required for the lily of the valley crochet pattern.
- Yarn Needle – Useful for weaving in ends and ensuring your project looks polished.
Why is the lily of the valley crochet special?
Vibrant Inspiration: The lily of the valley crochet square beautifully captures the essence of spring with its charming floral design.
Textural Delight: You'll enjoy the dimension created by 3D flowers that truly bring this project to life.
Skill Boost: This pattern allows crafters to level up their skills by combining basic and textured stitches.
Seasonal Versatility: Easily customizable, you can swap yarn colors to align with various seasonal themes or personal style.
Elegant Appeal: The end result is not just practical; it offers a stunning focal point for any home décor, making it perfect for gifting or personal use.
Gauge & Sizing Notes
Don't skip the gauge swatch! Ensuring your tension is correct is crucial for the lily of the valley crochet square, as it determines the final size and overall look of your project. A general guideline is to aim for a tension swatch of approximately 4×4 inches (10×10 cm), which should yield around 14 double crochets by 8 rows; however, it’s best to check your own tension to confirm. If you want to create a larger square, you can increase your starting chain in multiples of 6 + 2 for each additional repeat. If your swatch is smaller than desired, try using a larger hook size for a looser gauge. Happy crocheting!
Step-by-Step Pattern for lily of the valley crochet
Row 1: Foundation Chain
Begin by chaining 36 stitches. This will form the foundation for your lily of the valley crochet square. Ensure that the chain is not too tight to allow for easy stitching later. Once completed, join with a slip stitch (sl st) in the first chain to form a ring.
Row 2: First Round of Double Crochet
Chain 3 (counts as your first double crochet), then work 2 double crochets (dc) into the same stitch. In each subsequent chain, place 3 dc. Your work should form a ruffled effect. Join with a sl st to the top of the starting chain—this round should have 105 stitches (105 sts).
Row 3: Texture Round
Chain 1, then sc in the same stitch. Skip the next 2 dc and work 5 dc in the following stitch. Continue this pattern of sc in the next stitch and 5 dc in every third stitch across. Your square should start to take shape, and you should have 35 clusters of 5 dc by the end of this round (35 clusters).
Row 4: Establish Flower Placement
Chain 1, then work 1 sc in the first sc cluster. Place 1 hdc in the same cluster, followed by 3 dc, a chain 2, and 3 dc back into the same cluster to form a flower. Repeat this for every fifth cluster around the square for a total of 7 flowers. Your square should now feature prominent flower placements.
Row 5: Complete the Flowers
In row 5, continue from your established flowers: sl st into the cluster where the flower begins. Work 2 sc down the side of the first flower, then backtrack with 2 sl sts into the top of the flower. This finishes the flower shape at this location. Repeat for all flowers, ensuring a cohesive flow across the square.
Step 6: Leaf Attachment
For the leaves, chain 6. Starting in the second chain from the hook, work 1 sc, 1 hdc, and 2 dc in the last chain to form a leaf shape. Skip to the next flower and attach it with a sl st. Repeat to create at least 3 leaves attached at varying points for depth in your lily of the valley crochet design.
Step 7: Final Edging
Once the leaves are positioned, create an edging by chaining 1 and working 1 sc in each stitch around the entire square, including around the flowers and leaves. This tidies up the edges and gives your lily of the valley square a professional finish. Join with a sl st in the first sc, and your project is complete!
What to Pair with the Lily of the Valley Square?
As you wrap up this enchanting square, why not continue the floral theme with delightful accessories that will enhance your cozy space?
- Graceful Coasters: Create matching coasters to protect your surfaces while showcasing those delicate lily motifs.
- Charming Pillows: Use your square as a decorative front for a pillow, bringing comfort and beauty to your seating.
- Floral Wall Hanging: Combine several squares to craft a stunning wall decoration that captures the spirit of spring.
- Matching Blanket Squares: Transform your squares into a beautiful blanket, perfect for snuggling on chilly evenings.
- Adorable Keychains: Make smaller versions of the lily of the valley crochet to gift as charming keychains or bag embellishments.
These pairings can help you further explore your creativity while embracing the delightful charm of the lily of the valley crochet!
Expert Tips for Lily of the Valley Crochet
-
Tension Matters: Maintain even tension throughout your work, particularly in open spaces, to achieve a consistent appearance.
-
Count Those Stitches: Regularly check your stitch count, especially when creating flowers, to prevent misalignment and ensure beautiful symmetry.
-
Block for Perfection: After finishing, consider blocking your square. This technique reshapes your project for a polished finish and helps flatten any uneven edges.
-
Avoid Twisting Chains: Ensure your foundation chain isn’t twisted before joining it. A twisted chain can lead to uneven edges and awkward positioning later.
-
Secure Flower Attachments: When attaching 3D flowers, use slip stitches carefully for strong connections; this ensures they hold their shape beautifully in the final piece.
Remember, mastering the lily of the valley crochet square will elevate your crochet skills while creating a stunning piece of art!
Lily of the Valley Crochet Variations
With a little creativity, you can tailor this crochet pattern to reflect your own style and preferences!
-
Yarn Weight Swap: Use a lighter or heavier weight yarn to create a different size square, perfect for coasters or larger blankets.
-
Fiber Alternatives: Substitute acrylic yarn for cotton yarn for a cooler, breathable finish; ideal for warmer months or summer decorations.
-
Color-Blocking: Play with contrasting colors for the square’s background and flowers. A vibrant mix can bring a lively look to floral designs.
-
Sizing Adjustments: By adjusting the foundation chain length, you can easily create either a smaller square perfect for a coaster or a grander version for a blanket square.
-
Textured Edging: Add a fun textured border using puff stitches or scallops to bring a new layer of interest and charm to the overall design.
-
Fringe Accent: Attach fringe along one edge after finishing; this delightful addition can offer a whimsical touch to your finished piece.
-
Pom-Pom Flowers: Instead of traditional flowers, create pom-pom blooms. This playful spin will add a fluffy texture and lively feel to your crochet square.
-
Seasonal Color Themes: Change the colors of the flowers and leaves to suit various seasons. Pastels for Easter or fiery hues for fall can give your piece a fresh look throughout the year.
How to Wash and Care for Your Lily of the Valley Crochet
Washing: Use cold water and a gentle cycle if machine washing. For your lily of the valley crochet square, avoid agitation to maintain the beautiful texture and prevent any pilling.
Drying/Blocking: Lay flat to dry to preserve the shape and dimension of your square. Blocking may help reshape and smooth the stitches, enhancing the overall appearance.
Storage: Store your finished piece in a cool, dry place, away from direct sunlight. Proper storage will ensure your lily of the valley crochet stays vibrant and lovely for years to come.
Lily of the Valley Crochet FAQs
Can I substitute the yarn used for the lily of the valley crochet pattern?
Absolutely! You can swap medium weight acrylic yarn for cotton or a cotton blend to give your square a cooler feel and a bit more drape. Just make sure to adjust your hook size accordingly if you choose a different fiber.
How do I adjust the size of the lily of the valley crochet square?
To make your square bigger or smaller, you can increase or decrease the initial chain stitches. For example, if you’d like a larger square, add more chains in multiples of the stitch pattern, while keeping the same stitch count in your following rounds. Enjoy experimenting with sizes!
Why is my work curling at the edges?
Don't panic! Curling often happens if your tension is too tight or if you're using a hook that's too small for your yarn. Try using a larger hook or checking your tension as you stitch, especially in those open areas. Blocking the finished piece can also help flatten any curls.
What size hook should I use for the lily of the valley crochet project?
For this project, a 5mm (H-8) crochet hook is recommended. This size strikes a nice balance for creating the textured stitches and the drape needed for your square. If you find your project too loose or tight, feel free to adjust your hook size slightly.
How can I fix dropped stitches in my crochet square?
It's an easy fix! If a stitch drops, you can use a yarn needle to weave the yarn through the missed stitch and secure it back into your work. Alternatively, you can carefully pull up the adjacent stitches and re-crochet them to restore the correct shape and structure.
Is it necessary to block my finished lily of the valley crochet square?
While not mandatory, blocking is highly recommended! This technique reshapes your crochet square, allowing it to lay flat and enhancing the textures of your piece. It helps smooth out any uneven edges, giving your project a polished and professional appearance.

Leave a Reply