
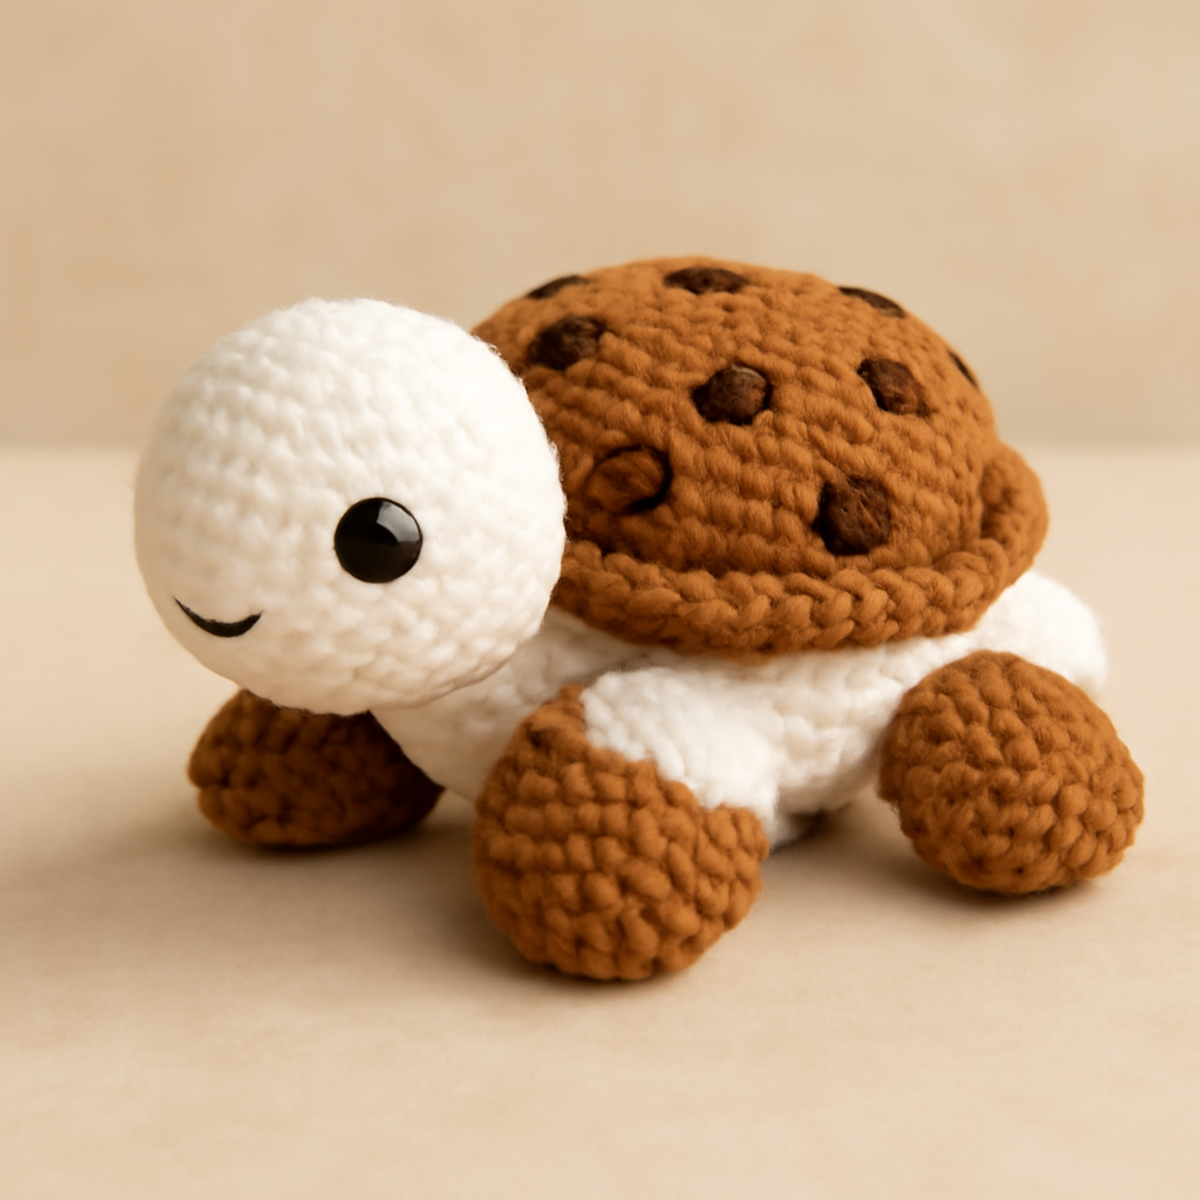
As I sat in my cozy corner, the sounds of gentle waves in my mind, I couldn't help but be drawn to the delightful imagery of an ice cream cookie turtle. This whimsical amigurumi crochet project captures the essence of fun and charm, making it a must-try for any intermediate crafter. The crochet Amigurumi Ice Cream Cookie Turtle showcases a unique blend of playful design and the beloved aesthetics of sea turtles, perfect for adding a touch of whimsy to any playroom decor or making a cherished gift. One of the greatest perks of this pattern is its versatility; you can play with colors to evoke any mood you desire. Plus, once completed, it's a soft, huggable piece that brings smiles to both children and adults alike. I'm excited to guide you through the process of making this adorable turtle—let's dive into it and bring your crochet dreams to life!
Ice Cream Cookie Turtle Materials & Tools
- Plush or Chenille Yarn – Use three colors: white for the head and body, brown for the cookie base, and dark brown or black for the cookie chips; approximately 150–200 yards total.
- 5.0mm (H-8) Hook – This size helps achieve the softness and drape necessary for your ice cream cookie turtle.
- 14 mm Safety Eyes – These give your turtle an adorable look while ensuring it's safe for children.
- Polyester Stuffing – Use to fill the turtle's body for that perfect plush feel.
- Scissors – Essential for snipping yarn ends and ensuring neat edges.
- Yarn Needle – Perfect for assembly and weaving in any loose ends, making your finished piece look polished.
Why Choose the Ice Cream Cookie Turtle?
Whimsy & Charm: This delightful pattern combines the playful elements of an ice cream cone and a turtle, making it an instant favorite for anyone who loves character-driven designs.
Soft & Cuddly: Made with plush yarn, the finished turtle boasts a wonderfully soft texture that’s perfect for snuggling, ensuring it's a hit with kids and kids-at-heart.
Creative Color Play: Enjoy the freedom to customize your turtle's colors! Switch up the hues to match your decor or seasonal themes, allowing your creativity to shine.
Fun for All Ages: Whether crafting for yourself or as a thoughtful gift, this whimsical piece is perfect for both experienced crafters and those new to crochet.
Easy to Follow: Clear instructions and an engaging design make this project approachable, even for intermediate crocheters looking to expand their skills while crafting something adorable.
Gauge & Sizing Notes
Don't skip the gauge swatch! Ensuring the correct tension is crucial for your ice cream cookie turtle, as it affects the final size and overall appearance of your cuddly creation. A general guideline for tension is approximately 4×4 inches (10×10 cm), with roughly 14 single crochets across and 8 rows. If you find your swatch is smaller than expected, consider going up a hook size; if it's larger, try a smaller hook to achieve the right dimensions. To make your turtle bigger, simply adjust your starting chain or rounds in multiples of 6 as needed, allowing your ice cream cookie turtle to be as whimsically large or small as you desire!
Step-by-Step Pattern for ice cream cookie turtle
Row 1: Head Creation
Begin with a magic ring (MR) and make 6 sc into the ring. Pull the tail to close the hole, and join with a sl st to the first sc. Your work should be round and tight as you start forming the turtle's head (6 sts).
Row 2: Increase Round
Ch 1, then inc in each stitch around. This will give your turtle head a smooth, rounded shape. Be sure to keep your tension even and look for a slight curl at the edges (12 sts).
Row 3: Continue Increasing
Ch 1, sc in the next stitch, inc in the following stitch; repeat from * to * around. This helps to gradually widen the turtle's head, giving it that characteristic plush form. Your head should be starting to bulge out nicely (18 sts).
Row 4: Straight Round
Ch 1, sc in each stitch around to allow the head to stabilize; continue keeping your stitches firm but not too tight. The head should feel rounded and plush (18 sts).
Row 5: Decrease Round
Ch 1, sc in the next stitch, dec over the next two stitches; repeat from * to * around. This will start to shape the turtle's head more, making it look defined as you prepare to add stuffing (12 sts).
Row 6: Stuffing and Closing
Stuff the head lightly with polyester stuffing. Ch 1, dec in each stitch around to secure the stuffing inside, and ensure it retains a nice shape while remaining cuddly (6 sts).
Row 7: Body Formation
Start another MR and make 6 sc into the ring for the turtle's body. The body will mimic the ice cream scoop shape, so keep it soft and rounded as it begins (6 sts).
Row 8: Body Increases
Ch 1 and inc in each stitch around to form a larger base. The body should be well-defined now, nearing the desired shape of an ice cream scoop (12 sts).
Row 9: Continue Body Increases
Ch 1, sc in the next stitch, inc in the following stitch; repeat from * to * around. As you work through this round, look for the body to grow round and slightly larger (18 sts).
Row 10: Final Body Round
Ch 1, sc in each stitch around, ensuring the body feels strong and full. It should look nice and squishy, ready to join with the head (18 sts).
Step 11: Leg Creation
For each leg, start a MR and make 4 sc into the ring. Repeat this for all four legs, keeping them round and compact. They should resemble a tiny scoop shape as you finish each (4 sts per leg; make 4 total).
Step 12: Shell Top
Begin with a MR and make 6 sc into the ring. Ch 1, and then inc in each stitch around. You will be working the shell to have flat circular base (6 sts).
Step 13: Increase for Shell
Ch 1, sc in the next stitch, inc in the following stitch; repeat from * to * around, establishing your classic cookie turtle shell shape as you go along (12 sts).
Step 14: Finished Shell Rounds
Ch 1, sc in each stitch around. Keep the shell flat yet pliable; this is key for maintaining that cookie-like appearance (12 sts).
Step 15: Assembly
Carefully sew the head to the body using your yarn needle, ensuring it’s centered. Attach the four legs evenly around the bottom of the body. Your ice cream cookie turtle will start to take shape joyfully!
Step 16: Adding Final Details
Use dark brown yarn to create cookie chips on the turtle's shell and attach the 14 mm safety eyes on the head. Now your charming ice cream cookie turtle is ready, displaying its delightful features beautifully!
How to Wash and Care for Your Ice Cream Cookie Turtle
-
Machine Washing: Use a gentle cycle with cold water to keep your ice cream cookie turtle looking fresh. Avoid using fabric softeners as they may alter the plush texture.
-
Hand Washing: If you'd like to be extra cautious, hand wash your turtle in cold water with mild detergent. Gently agitate the water, then rinse thoroughly without twisting or wringing.
-
Drying/Blocking: Lay your turtle flat on a clean towel to dry, reshaping it as needed. Avoid hanging to prevent your turtle from stretching out of shape.
-
Storage: Store your ice cream cookie turtle in a cool, dry place away from direct sunlight to preserve its colors and plushness.
What to Pair with Ice Cream Cookie Turtle
As your charming turtle comes to life, let's explore delightful companions to enhance your crochet creations and keep the whimsy flowing.
- Joyful Rainbow Scarf: A soft, vibrant scarf adds a splash of color, perfect for playtime adventures alongside your turtle.
- Adorable Ice Cream Cone Plush: Pair a cone that echoes the turtle's fun food theme, creating a sweet-themed playset.
- Cheerful Beach Ball: This playful addition inspires beach fun, inviting imaginative scenarios that your cookie turtle would love to join!
- Snuggly Seaweed Cuddler: Make a cuddly seaweed buddy to evoke an under-the-sea setting, complementing the overall theme beautifully.
- Radiant Coral Reef Blanket: A matching blanket in oceanic hues offers cozy comfort, perfect for snuggling up during playtime.
Embrace the magic of creation by pairing your Ice Cream Cookie Turtle with these delightful projects!
Ice Cream Cookie Turtle Variations
Embrace the joy of personalization with these delightful twists for your crochet project!
-
Yarn Weight Swaps: Experiment with different yarn weights for a unique look. A chunky yarn creates a larger, pillow-like turtle, while lace-weight gives a dainty touch.
-
Fiber Alternatives: While plush yarn is ideal, try cotton for a more summer-friendly version. Cotton provides a breathable texture perfect for warm days.
-
Color-Blocking Delight: Combine various colors in playful sections on the shell to enhance visual interest. Imagine a rainbow of flavors making your turtle stand out!
-
Sizing Adjustments: Opt for a smaller hook size to create a cute keychain version or upgrade to a bulkier yarn for a giant turtle that's perfect for cuddling.
-
Textured Enhancements: Add whimsical pom-poms or ruffled edges around the shell for extra charm. These fun additions can make each turtle a unique creation.
-
Embellishments: Use beads or sequins on the cookie part to introduce a bit of sparkle. A soft shimmer can give your amigurumi an extra layer of enchantment!
-
Alternative Shell Designs: Consider creating a patterned shell by integrating stitches like bobbles or shells for a textural surprise that captures attention.
-
Facial Expressions: Play with different eye placements or create distinct smiles by adjusting the yarn tension for varied, lovable expressions on your turtles.
Expert Tips for the Ice Cream Cookie Turtle
-
Consistent Tension: Ensure you maintain even tension while crocheting with plush yarn. This will keep the stuffing evenly distributed and your finished turtle looking smooth.
-
Count Stitches Carefully: Losing count during increases is a common mistake. Use a stitch marker in your first stitch to help keep track and avoid any disfigured shapes.
-
Lightly Stuffing: While stuffing the turtle's head and body, be careful not to overstuff. A lightly filled turtle will have a soft, huggable quality that enhances its cuddle factor.
-
Check Round Shapes: Before completing a round, gently check the symmetry of your work. If it looks uneven, unravel a few stitches to correct it before continuing.
-
Final Touches Matter: Don't rush the assembly! Take your time attaching the legs and details like the safety eyes, as these small features bring your ice cream cookie turtle to life beautifully.
Ice Cream Cookie Turtle FAQs
Can I use a different type of yarn for the Ice Cream Cookie Turtle?
Absolutely! You can substitute plush or chenille yarn with acrylic or cotton yarn, although the texture will differ. Just keep in mind that your turtle may not be as huggable, but it could still look adorable!
How do I make my Ice Cream Cookie Turtle larger or smaller?
To adjust the size of your turtle, try using a larger or smaller hook size. Additionally, you can increase or decrease the number of stitches in the foundational rounds to create the desired dimensions. Just remember to keep your stitches consistent for a balanced appearance!
Why is my Ice Cream Cookie Turtle curling as I crochet?
Don't panic! Curling can happen, especially with plush yarn. Make sure you’re maintaining even tension and that your stitch count is accurate. Check that you’re following the pattern properly, as uneven stitches may lead to this issue.
What size hook should I use for making the Ice Cream Cookie Turtle?
For this pattern, a 5.0 mm (H-8) crochet hook is recommended. This size helps create the soft texture needed for the turtle while allowing for comfy stitch placement.
How can I fix dropped stitches while crafting the Ice Cream Cookie Turtle?
It's an easy fix! If you notice a dropped stitch, simply go back to the last completed round and use a yarn needle or crochet hook to pull that stitch back up. Make sure to maintain your tension and ensure the stitch is secured properly.
What if my turtle's head and body don't connect well during assembly?
If you're having trouble with the head and body connection, take a moment to reposition them. If needed, you can use a soft scrap yarn to temporarily stitch the pieces together to see how they fit before making permanent stitches. Just go slow and adjust until it looks right!

Leave a Reply