
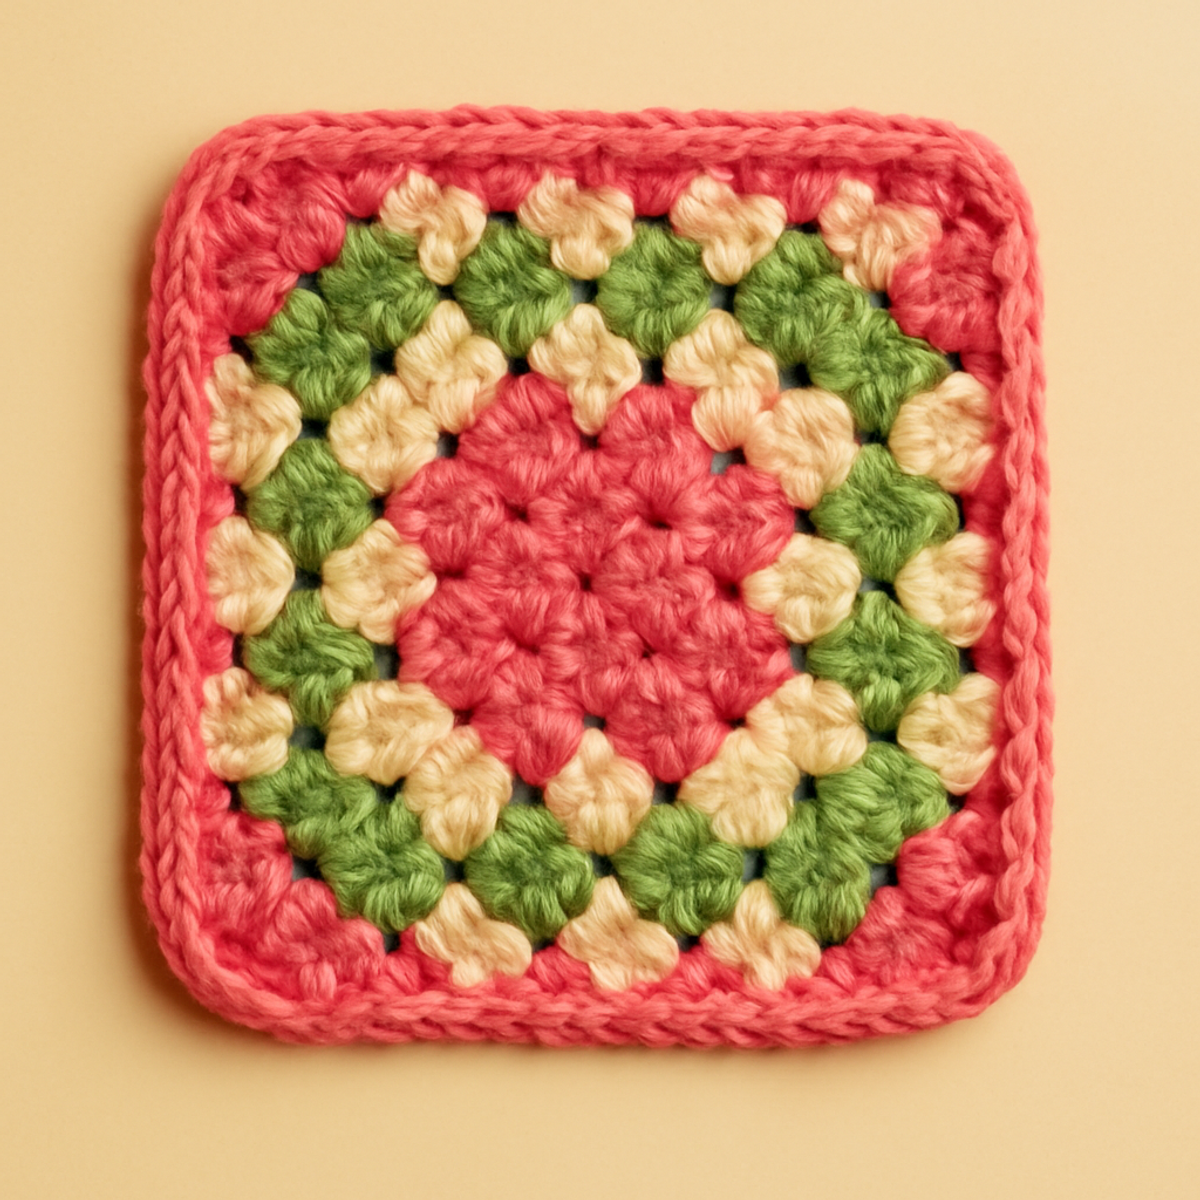
As I sift through my stash of vibrant yarns, I’m reminded of the joy that a single granny square can bring. Today, I’m excited to share the “Vibrant Garden Granny Square”—a delightful project that harmoniously blends a classic design with a modern twist. This granny square crochet pattern is perfect for both beginners eager to build their skills and seasoned crafters looking for a satisfying challenge. Not only does each square pop with color, adding a cheerful touch to any space, but the pattern is also incredibly versatile, perfect for creating beautiful blankets, stylish bags, or unique home decor. So, let your creativity bloom and discover the endless possibilities that await you in each stitch!
Vibrant Garden Granny Square Materials & Tools
- Worsted Weight Yarn – Approximately 150-200 yards needed for a colorful granny square crochet project; acrylic or cotton is ideal for durability.
- 5.0mm (H) Crochet Hook – The perfect size for creating the lovely motifs and maintaining a good tension in your stitches.
- Stitch Markers – These are helpful for keeping track of rounds, especially for beginners learning new techniques.
Why Is This Granny Square Crochet Special?
Classic Design: This pattern embraces the timeless allure of granny squares while inviting creativity with modern color combos.
User-Friendly: Beginners will appreciate the well-structured instructions, while experts can enjoy the beautiful complexity of the motifs.
Versatile Use: From cozy blankets to chic bags, the potential for this granny square is boundless!
Textured Finish: Expect a delightful balance of softness and sturdiness in your finished piece, making it a dream to touch and behold.
Quick Satisfaction: With just a few rounds, you’ll see your project come to life, encouraging those "just one more square" moments.
How to Check Your Gauge for Vibrant Garden Granny Square
Don't skip the gauge swatch! Checking your crochet gauge is essential to ensure your Vibrant Garden Granny Square turns out the perfect size. A typical guideline is to aim for a 4×4 inch (10×10 cm) square with approximately 12 double crochets by 8 rows; however, this may vary depending on your crochet tension and yarn choice. If you want to adjust the size of your square, simply increase your starting chain in multiples of 3 to make the square wider or narrower. If your swatch is too small, try going up a hook size to achieve that cozy feel we all love in granny square crochet projects.
Step-by-Step Pattern for Vibrant Garden Granny Square
Round 1: Forming the Ring
Start by making a slip knot and chaining 4. Join with a slip stitch (sl st) to the first chain to form a ring. Inside this ring, work 3 double crochets (dc) to create your first cluster. Then, work (2 dc) into the ring, followed by (3 dc) x 2 around the ring. Your work should start to cup slightly as you complete this round for a total of 12 stitches (12 sts).
Round 2: Expanding the Floral Motif
Chain 3 (this acts as your first dc) and then work 2 dc in the same ring. Next, in the next chain-2 space from the previous round, work (3 dc) to form a corner. Repeat this in each of the chain spaces around, ensuring to finish the round with a slip stitch to the top of the starting chain. At this point, you’ll have 36 stitches (36 sts), and your square should begin to lay flat.
Round 3: Elevating the Texture
Begin this round with a chain 3, representing your first dc. In the same stitch, work 2 dc. Next, in each chain-2 corner space, work (2 dc) to enhance the textured appeal of your granny square crochet. This round will begin giving more volume and structure. Complete the round with a slip stitch in the top of the starting chain, resulting in 48 stitches (48 sts), and the piece should feel more defined.
Round 4: Creating the Final Shape
Start with a chain 3, then work 2 dc in the first stitch. In each corner, instead of continuing the previous corner stitches, alternate between (1 sc) and (3 dc) to amplify the corners while creating a beautiful finish. Join with a sl st at the end of the round to seal your work. You should now have a wonderful balance of texture and structure, measuring approximately 6 to 8 inches per side.
Step 5: Finishing Touch with a Border
For a polished look, you’ll be adding a simple single crochet (sc) border around the entire square. Start with a slip knot, then sc evenly into each stitch around. In each corner, work 3 sc to ensure your border lays flat. After reaching back to your starting point, finish off with a slip stitch. This final touch not only frames your granny square crochet piece beautifully but also enhances its sturdiness.
What to Pair with Vibrant Garden Granny Square
As you enjoy the colorful artistry of your granny square crochet, why not extend that joy into a matching ensemble?
- Cozy Throw Blanket: Use multiple granny squares for a delightful blanket that transforms any space into a cozy retreat.
- Charming Pillow Covers: Craft pillow covers from your granny squares to add vibrant accents to your living room or bedroom.
- Stylish Market Bag: Combine your granny squares to create a practical yet chic bag perfect for your next market run or beach day.
- Colorful Coasters: Use smaller granny squares to make cheerful coasters, spreading warmth and color around your home.
- Playful Baby Blanket: Join smaller squares into a whimsical baby blanket, a perfect gift for little ones filled with vibrant joy.
Expert Tips for Granny Square Crochet
-
Maintain Even Tension: Use a tension guide or keep practicing to watch for changes in yarn thickness, ensuring consistent results throughout your granny square crochet.
-
Count Stitches Carefully: Always double-check your stitch count after each round to prevent inadvertent increases or decreases, which can alter your square's size.
-
Block with Care: Gently block your completed squares to help them lay flat and maintain their beautiful shape, especially after finishing your cozy granny square crochet.
-
Stitch Markers Are Your Friends: If you're new to crochet, use stitch markers to keep track of your rounds and any corner spaces, simplifying the process and enhancing your success.
-
Take Your Time: Enjoy the journey! Crocheting should be a relaxing experience, so don’t rush it. Each square is a small victory in your crafting adventure.
How to Wash and Care for Your Granny Square Crochet
Machine Washing: Use cold water on a gentle cycle to protect the vibrant colors and prevent any shrinkage or felting in your granny square crochet; always place the square in a laundry bag.
Hand Washing: For extra care, hand wash your crochet square in cool water with a mild detergent; gently squeeze to remove excess water without wringing or twisting.
Drying/Blocking: Lay your granny square flat on a clean, dry towel to air dry; this helps maintain its shape and texture while avoiding any distortion from hanging.
Storage: Store your finished granny squares in a cool, dry place away from direct sunlight; this will help keep the colors vibrant and the fibers in great condition for years to come.
Granny Square Crochet Variations Made Easy
Let your creativity flow as you explore unique twists on this classic design to make it all your own!
-
Yarn Weight Swaps: Switching to chunky yarn will produce a larger, cozier square, perfect for quick projects or warmer throws. Embrace the plush texture that chunky yarn offers; it’s sure to make a statement.
-
Fiber Alternatives: Try cotton yarn for a softer feel and cooler touch, making it ideal for summer projects. Cotton is lightweight and breathable, allowing for versatile use in various climates.
-
Pastel Palette Twist: Opt for pastel shades instead of bold colors for a gentle, serene aesthetic. The soft hues can create a calming effect, perfect for light and airy spaces.
-
Color-Blocking Fun: Use contrasting colors for each round to create a vibrant color-block effect. This not only enhances visual interest but also adds a modern flair to the traditional granny square design.
-
Textured Borders: Adding a fluffy pom-pom or a playful fringe along the edges can add personality and charm. These finishing touches transform any square into a delightful standout piece.
-
Size Adjustments: Customize the square by adding or removing rounds, allowing you to create different sizes that appeal to various projects. A larger square can become a cozy cushion cover, while a smaller version might be perfect for a trendy coaster.
-
Festive Colors: Incorporate seasonal colors for holidays, such as rich reds and greens for Christmas or vibrant pastels for spring. This not only celebrates the festivities but adds a personal touch to your decor.
-
Border Variations: Experiment with different border stitches, like shell or scallop edges, to give your granny square a finishing touch that reflects your unique style. The right border can elevate your piece from lovely to utterly stunning!
Vibrant Garden Granny Square FAQs
Can I use a different yarn weight for this granny square crochet pattern?
Absolutely! While Worsted weight yarn is recommended for this pattern, you can certainly experiment with thicker or thinner yarns. Just keep in mind that using a different weight may change the size of your finished square. If you opt for a lighter weight, you might need to adjust your hook size and stitch count accordingly.
How can I make my granny square larger or smaller?
No problem! To increase the size, simply add more rounds of double crochets. You can also use a larger hook or thicker yarn. If you want a smaller square, reduce the number of rounds or experiment with a smaller hook. Just remember to keep your tension consistent to maintain an even shape!
Why is my granny square curling at the edges?
Don’t panic! Curling is a common issue, especially if your tension is too tight. To fix this, try loosening your grip while crocheting and ensure you’re not missing stitches. After completing the square, blocking it can also help flatten the edges for a more polished look.
What's the best hook size to use for this granny square?
For the Vibrant Garden Granny Square, a 5 mm (H/8) crochet hook is ideal to create the defined stitches and beautiful texture. If you find your stitches too tight or too loose, feel free to adjust accordingly. Just remember that changing hook sizes can impact the square's final measurements.
How do I fix a dropped stitch in my granny square?
It’s an easy fix! First, don’t panic. You can simply identify the dropped stitch and use a smaller crochet hook to pull it back up through the stitches of the previous rounds. If you’ve progressed quite a bit, you might need to unravel a few rounds to fix the drop, but with patience, you can restore your square to its lovely state!

Leave a Reply