
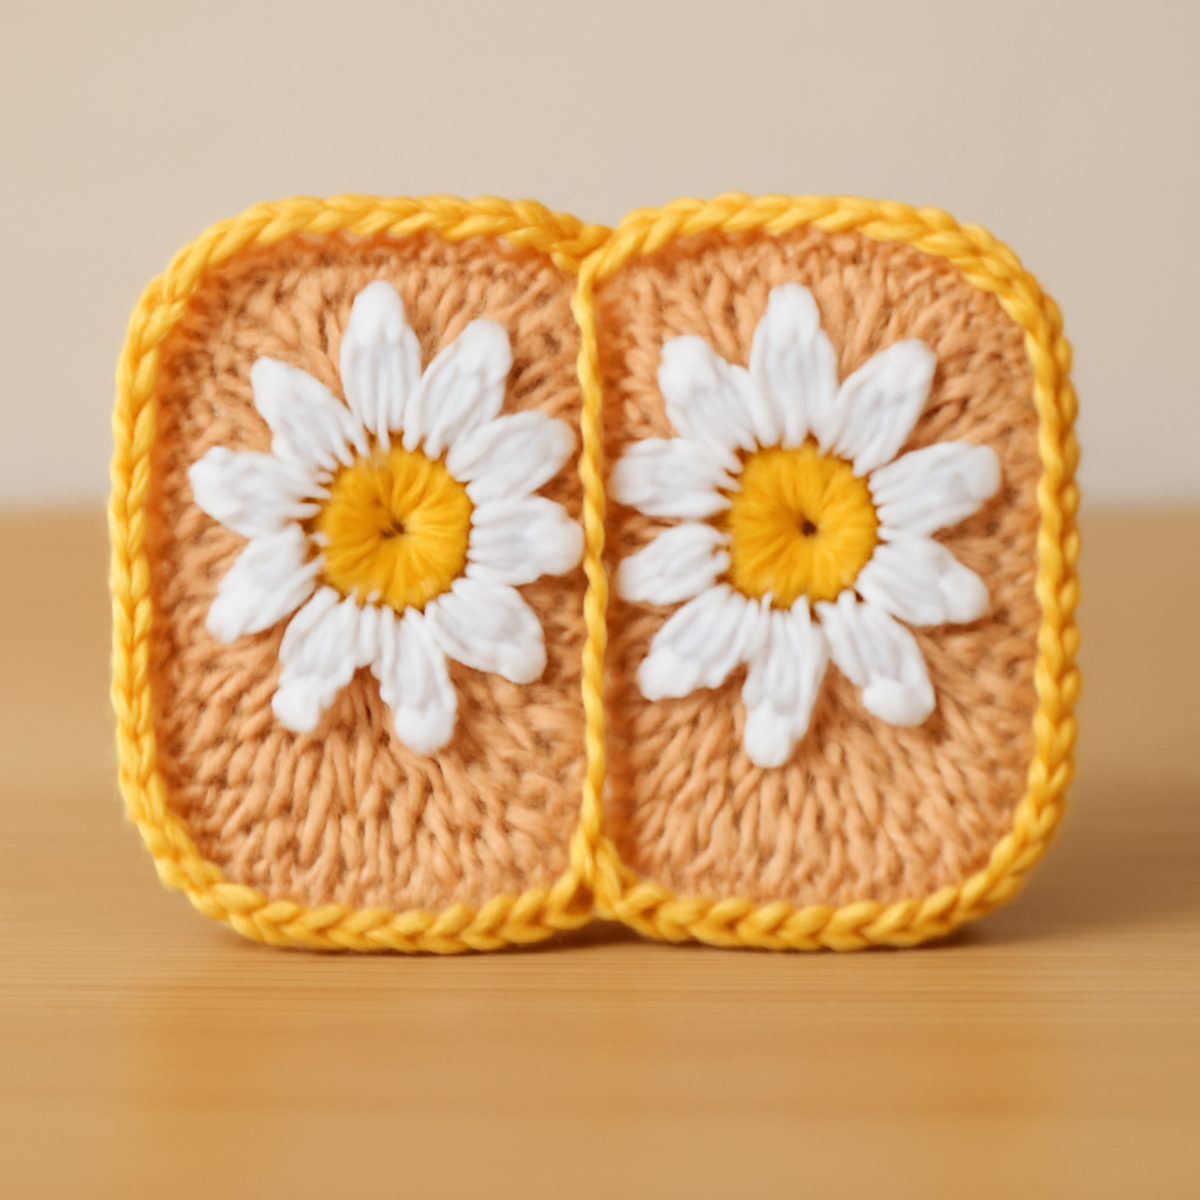
There’s something irresistibly joyful about the sight of blooming daisies, don’t you think? As spring blankets the world in color, I can’t help but be inspired by the cheerful flower motifs that bring life to my crochet projects. Enter the Daisy Granny Square—a delightful pattern that stitches together creativity and coziness, perfect for crafters of all levels. This beginner-friendly design doesn’t just challenge your skills; it also transforms simple yarn into stunning pieces for your home, from vibrant blankets to charming wall hangings. Plus, these squares work up quickly, making them an ideal option for those spontaneous gifting moments. So, let’s grab our hooks and yarn, and dive into creating these lovely squares that are sure to brighten your space and your heart!
Daisy Granny Square Materials & Tools
Note: Gather these supplies to bring your cheerful daisy granny squares to life!
Yarn
- Medium Weight Yarn (4) – Choose an acrylic yarn for its durability and ease; bring your squares to life with vibrant or pastel hues!
- Approx. 40-50 Yards per Square – Each square will need this amount; consider getting extra for practice or color variations.
Tools & Notions
- 5.0mm (H-8) Hook – This size is ideal for achieving the perfect tension for your daisy granny squares.
- Stitch Markers – Use these to keep track of your rows easily, especially helpful for beginners!
- Yarn Needle – Essential for weaving in those pesky ends and finishing your squares neatly.
Why Choose the Daisy Granny Square?
Endless Creativity: This pattern is wonderfully adaptable, allowing you to create everything from warm blankets to eye-catching cushion covers and wall hangings.
Beginner-Friendly: With simple stitches and straightforward instructions, the Daisy Granny Square is perfect for crafters just starting their crochet journey.
Cheerful Aesthetic: The playful flower design radiates a joyful vibe, making it a delightful addition to any home, especially during spring.
Quick Projects: These squares work up fast, perfect for those last-minute gifts or to quickly add pops of color to your room.
Customizable Colors: Mix and match yarn shades to create your own unique touch, whether you prefer soft pastels or bold hues!
Textured Elegance: The use of medium-weight yarn gives these squares a lovely drape, combining cozy comfort with artistic charm.
Gauge & Sizing Notes
Don’t skip the gauge swatch! Achieving the correct tension is crucial when creating your daisy granny square, as it directly affects the final size of your project. A standard gauge measurement to aim for is about 4×4 inches (10×10 cm), which should contain approximately 12 double crochets by 8 rows, but this can vary based on personal tension. If you’d like to make your squares larger or smaller, simply adjust your starting chain in multiples of 3 to scale the pattern to your liking. If your swatch is too small, consider using a larger hook size to achieve the desired dimensions for your cheerful daisy granny square!
Step-by-Step Pattern for Daisy Granny Square
Row 1: Foundation Chain and First Round
Begin by making a slip knot and chaining 4. Slip stitch into the first chain to form a ring. Chain 3 (counts as 1 dc), then work 11 double crochets (dc) into the ring. Join with a slip stitch (sl st) to the top of your beginning chain (12 dc total). Your work should form a small circle.
Round 2: Petals Creation
Start with a sl st in the next dc to position your yarn. Chain 3 (counts as 1 dc), then work 2 dc in the same stitch. Chain 2, then slip stitch into the next dc. Repeat this 4 times around to form the petals of the daisies. After finishing, join with a sl st to the top of the initial chain (4 petals total, your work should visually show the flower shape).
Round 3: Completing the Square
For this round, slip stitch into the chain-2 space of any petal. Chain 3 (counts as 1 dc), then work 2 dc, chain 2, and 3 dc into the same space, creating a corner. In the next petal, slip stitch to the chain-2 space, and repeat the previous stitches. Continue this pattern until all corners are made and join to the initial chain (total of 4 corners formed).
Round 4: Edge and Final Touches
Slip stitch to the next chain-2 corner, then chain 1. Work 1 sc (single crochet) in each dc and chain-2 space around the square. Make 2 sc in each corner space for added structure. Continue this until you reach your starting point, then join with a sl st to complete the edge. Your daisy granny square should now have a lovely finished border and a charming layout.
Finishing: Weaving in Ends
Once your square is complete, use a yarn needle to weave in any loose ends. Carefully tuck them into the back of the square for a neat finish. If desired, you can also block your finished square by wetting it and shaping it to ensure a tidy appearance. Your beautiful daisy granny square is now ready for use in any project you dreamed of!
Daisy Granny Square Variations
Embrace the joy of customization with these playful ideas to make your Daisy Granny Squares uniquely yours!
- Yarn Substitutions: Swap acrylic for cotton yarn for a soft, breathable feel perfect for warmer weather projects.
- Color Blocked Design: Use contrasting colors for the petals and the center to create a striking visual effect that pops!
- Larger Squares: Increase the number of rounds for oversized squares that make ideal throws or mats; let your creativity bloom!
- Textured Touches: Add fringe or a delicate border around the edges to enhance texture and elevate your aesthetic.
- Pastel Palette: Opt for soft pastel shades for a gentle, dreamy look, perfect for a cozy spring atmosphere.
- Mixed Motifs: Combine this pattern with other granny square styles to create a vibrant collage that tells your crochet story.
- Daisy Variants: Experiment with different flower motifs or petal shapes for a fresh, whimsical twist on the traditional design.
- Personalized Sizes: Modify the dimensions of your squares by adjusting your hook size or yarn weight to fit your project's needs.
Expert Tips for Daisy Granny Squares
-
Maintain Tension: Consistent tension results in neat and uniform squares. Practice keeping your grip relaxed to avoid uneven stitches.
-
Track Your Stitches: Use stitch markers at the beginning of each round to stay on track. This helps prevent losing count, especially during the petal section.
-
Join Carefully: Take care not to pull too tightly when joining your squares; overly tight edges can warp the shape. Aim for a gentle and relaxed joining technique.
-
Weave Ends Neatly: Use a yarn needle to weave in ends securely, making sure to tuck them into the back of the daisy granny square to maintain a polished look.
-
Block for Perfection: After finishing your squares, blocking helps shape them into perfect squares. This step ensures any inconsistencies are evened out beautifully.
Care Instructions for Daisy Granny Square
Machine Washing: Use cold water on a gentle cycle to preserve the integrity of your daisy granny square. Avoid agitation to reduce the risk of felting or pilling.
Hand Washing: For delicate care, hand wash your squares in lukewarm water with mild detergent, gently pressing and rinsing without twisting. This method keeps your design vibrant and intact.
Drying/Blocking: Lay your finished squares flat to dry, reshaping as necessary. Blocking helps even out any inconsistencies while ensuring your squares maintain their beautiful shape.
Storage: Store your finished daisy granny squares in a cool, dry place to protect them from dust and moisture. This keeps them fresh and ready for your next creative project!
What to Pair with Cheerful Daisy Granny Squares?
As you stitch through cheerful floral motifs, envision how these designs can complement each other to create a delightful matching set.
-
Floral Cushion Covers: Craft these vibrant covers to bring a burst of joy to your living space, perfectly matching your granny squares.
-
Bright Tote Bag: Create a tote that showcases your daisy squares and is perfect for summer outings; it’s functional and adorable!
-
Daisy Wall Hanging: Elevate your home décor with this stunning wall hanging, joining multiple squares to celebrate the beauty of daisies.
-
Colorful Coasters: Whip up some coasters to protect your surfaces while incorporating those lovely daisy designs into your everyday life.
-
Charming Baby Blanket: Combine several granny squares into a soft blanket, creating a cozy gift that radiates love and cheer for new parents.
Cheerful Daisy Granny Squares FAQs
Can I substitute the yarn for my Daisy Granny Square?
Absolutely! While the pattern recommends medium-weight acrylic yarn for its durability and ease, you can certainly substitute it with cotton yarn for a different texture or bamboo yarn for a unique drape. Just make sure to adjust the hook size as needed to match your yarn's weight.
How can I make my Daisy Granny Square bigger or smaller?
Don't panic! To increase the size, add more rounds to your square after the petals; just ensure you maintain the same stitch count in the corners. For a smaller square, decrease the number of rounds or use a lighter weight yarn. I recommend checking your gauge first to achieve your desired dimensions.
Why is my Daisy Granny Square curling at the edges?
Curling can occur due to tight tension or using the wrong hook size. An easy fix is to loosen your grip while crocheting. If it continues to curl, try blocking your completed square by soaking it in water and shaping it flat to achieve a neat finish.
How do I fix dropped stitches in my granny square?
Don't worry! If you find a dropped stitch, simply unravel back to the last completed stitch and redo it. For a quick fix while you work, you can use your yarn needle to thread back through the previous stitches, securing them, and then continue crocheting.
What size hook should I use for my Daisy Granny Square?
The recommended hook size for this project is a 5.0mm (H-8) crochet hook. This size is ideal for creating the right tension for your granny square pattern, but feel free to adjust if your stitches are too tight or loose.
Can I join my squares with a different stitch?
Definitely! While slip stitching is suggested for a seamless look, you can join your Daisy Granny Squares using a whip stitch or even a single crochet for a more textured finish. Experiment with different methods to find your preferred joining technique!

Leave a Reply