
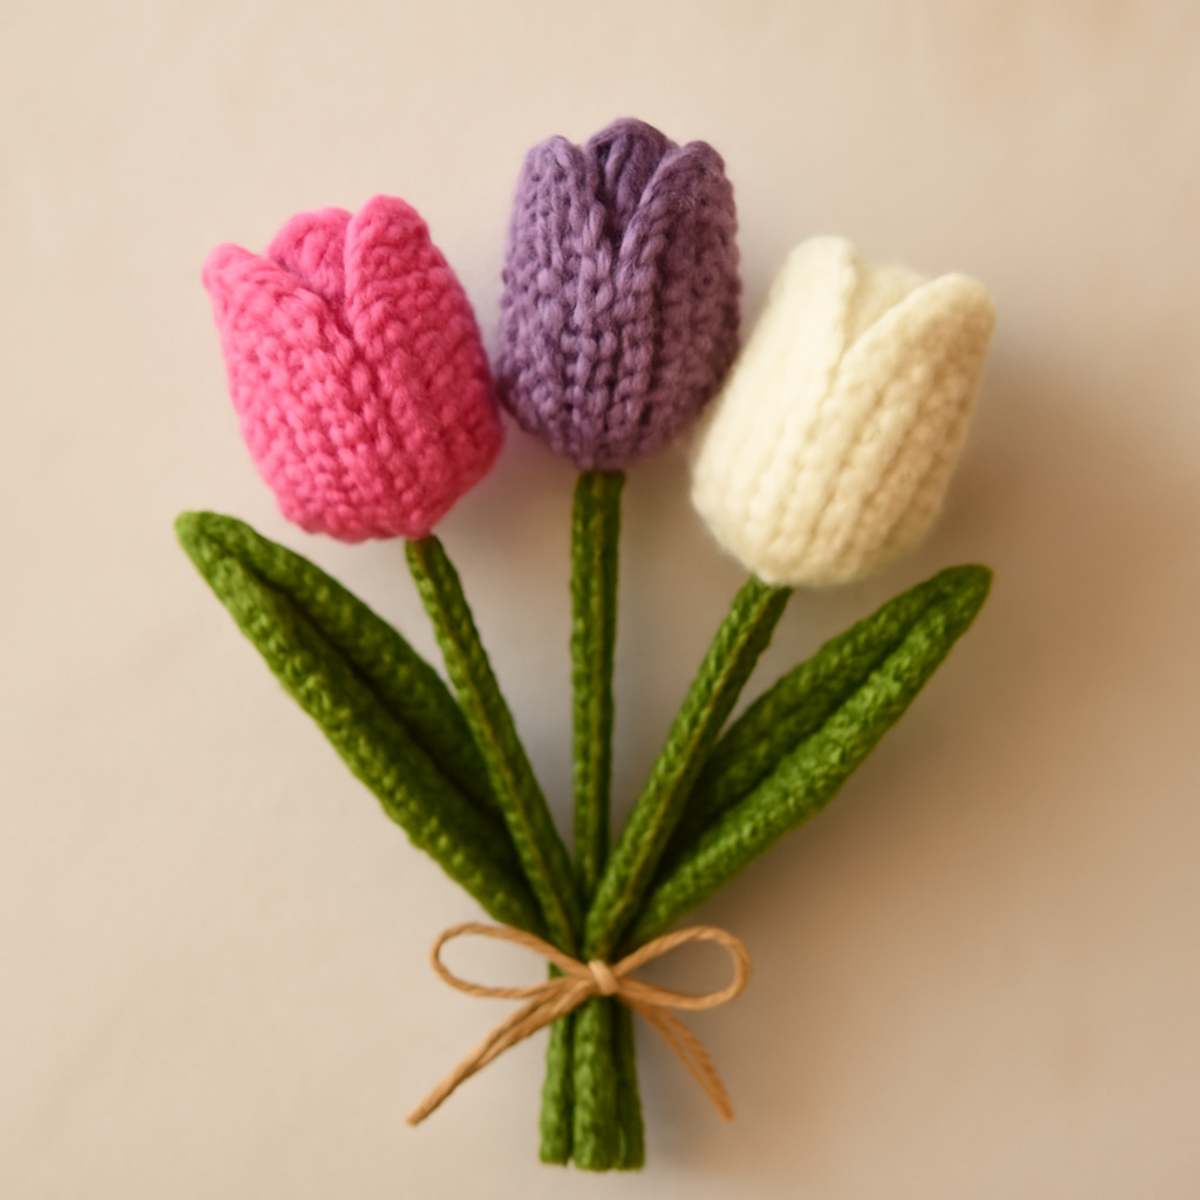
There’s something magical about transforming a simple yarn into a stunning bouquet of colorful tulips that can brighten up any corner of your home. This crochet tulip pattern invites you on a delightful journey to create lifelike flowers that not only mimic the beauty of spring blooms but also serve as lasting mementos for your decor. As you work through this charming project, you'll practice essential skills like working in the round and shaping petals, making it suitable for crochet enthusiasts from beginner to intermediate levels. With a quick turnaround time and the opportunity for customization, these tulips are perfect for gifting or personalizing your space. Grab your favorite colored cotton yarn and let’s start stitching a charming crochet tulip bouquet that will add a breezy touch to your home!
Charming Crochet Tulip Materials & Tools
Yarn
- Cotton Yarn – Choose colors like pink, purple, white, and green for a vibrant bouquet, with about 50-100 yards total needed for each tulip.
Tools & Notions
- 2.5 mm (C) Hook – This size helps create tight stitches that give your tulips a polished look.
- Yarn Needle – Essential for weaving in ends and ensuring a neat finish.
- Scissors – Perfect for trimming yarn and snipping those stray strands.
- Floral Wire or Stems – Use to secure your flowers, wrapping them in green floral tape for a natural touch.
This charming crochet tulip pattern is sure to bring beauty to your spring decor!
Why Love This Crochet Tulip Pattern?
Lifelike Beauty: Each flower showcases stunning detail, capturing the essence of real tulips, perfect for seasonal decor.
Skill-Building: This pattern encourages essential skills like increasing and decreasing stitches, making it ideal for beginners and intermediate crafters.
Quick Project: With a faster completion time, you'll have beautiful blooms to display or gift in no time.
Versatile Colors: Customize your tulips with various yarn shades, allowing your creativity to flourish.
Timeless Decor: These charming flowers provide lasting beauty, offering a delightful alternative to traditional blooms that will never wilt!
Gauge & Sizing Notes
Don't skip the gauge swatch! Checking your tension is crucial for ensuring that your charming crochet tulip pattern turns out just as beautifully as envisioned. A standard guideline is to create a 4×4 inch (10×10 cm) square to match the desired density—generally, your tension swatch should achieve a fabric that feels both firm and well-structured for the tulip’s petals. If you find your stitches are too tight or too loose, adjust by choosing a different hook size; for instance, if your swatch is smaller, try going up a hook size to loosen it. To customize the tulip size, you can also increase your starting stitches in multiples of 12 for a wider base. Happy crocheting!
Step-by-Step Pattern for Charming Crochet Tulip Bouquet
Row 1: Starting the Tulip Base
Begin by creating a magic ring. Ch 3 (counts as your first dc), then work 11 dc into the ring. Pull the tail to close the ring tightly. Join with a sl st to the top of the ch 3 to form the first round. Your work should form a small circle with 12 dc stitches (12 sts).
Row 2: Increasing Petals
Ch 1 to start the new row. In the same stitch, make an inc (2 sc in the same stitch). Continue to inc in each stitch around. Join with a sl st in the first ch to close the round. Your tulip's base should have a rounded shape now, with 24 stitches (24 sts).
Row 3: Shaping the Petals
Ch 1. Sc in the next stitch, inc in the following stitch. Repeat from * to * around, then join with a sl st. You will notice the petals start taking shape, and your work should have a fuller appearance. Count to ensure you have 36 stitches (36 sts).
Row 4: Forming Distinct Petals
Ch 1. Sc in the next 2 stitches, inc in the next stitch. Repeat from * to * around. Join with a sl st. At this point, your tulip pattern should look more defined, with 48 stitches (48 sts) forming larger petals.
Row 5: First Petal Rounds
Ch 1. Sc in the next 3 stitches, inc in the next stitch. Repeat from * to * around, then join with a sl st. Your tulip is now developing beautiful edges, and you should have 60 stitches (60 sts).
Row 6: Creating Tulip Texture
Ch 1. Sc in the next 4 stitches, inc in the next. Repeat from * to * around and join with a sl st. Your tulip should start taking on a charming profile, and you will have a total of 72 stitches (72 sts).
Row 7: Establishing Petal Points
Ch 1. Sc in the next 5 stitches, inc in the next. Continue to repeat from * to * around, then join with a sl st. You should notice your crochet tulip pattern is shaping up beautifully. Count your stitches: you should have 84 in total (84 sts).
Row 8: Prepping for Petal Decreases
Ch 1. Now, we start reducing the petal size. Sc in the next 6 stitches, dec (sc two together). Repeat this pattern around and join with a sl st. The belly of your tulip is starting to close. Your stitch count should now be 72 (72 sts).
Row 9: Continuing Petal Decrease
Ch 1. Sc in the next 5 stitches, dec in the next. Repeat around and join with a sl st. Notice how the tulip petals are becoming more defined and elegant. Ensure your total stitch count is 60 (60 sts).
Row 10: Finalizing Petal Shape
Ch 1. Sc in the next 4 stitches, dec in the next. Repeat around and join with a sl st. Your tulip should be star-like in shape now, with 48 stitches remaining (48 sts).
Step 11: Finishing the Tulip
Ch 1. Work sc in the next 3 stitches, dec in the next. Repeat this process to finish the round, then fasten off, leaving a long tail for assembly. The tulip petals should now be distinctively formed and ready for the assembly stage.
Step 12: Assembly
To assemble the tulip, use the long tail to sew the petals together at the base. Weave in ends and attach to a floral wire wrapped in green tape. Now you have completed your charming crochet tulip!
Expert Tips for Your Crochet Tulip Pattern
Consistent Tension: Ensure your tension remains even throughout the project; this keeps your tulips looking uniform and professional.
Count Stitches Frequently: After every round, count your stitches to avoid discrepancies in petal size. Losing count can lead to uneven edges.
Block Your Tulips: After finishing, gently block your tulips to give them a polished shape; this enhances their lifelike appearance.
Secure Assembly: Use a sturdy yarn needle to securely stitch petals together, ensuring stability and preventing any fall apart during handling.
Color Blending: Experiment with color gradients or mixed shades; being mindful of how colors combine can elevate the overall look of your crochet tulip pattern.
How to Wash and Care for Your Crochet Tulip
Hand Washing: Use cold water and a gentle detergent when hand washing your crochet tulip to maintain its shape and color. Avoid agitation to prevent felting or pilling.
Drying/Blocking: After washing, lay your tulip flat on a clean, dry towel to reshape and dry naturally. This helps maintain the petals' beautiful structure and form.
Storage: Store your crochet tulip in a cool, dry place, away from direct sunlight to prevent fading. Consider wrapping it in tissue paper for added protection and to maintain its shape.
Final Tip: Keep your crochet tulip pattern's details intact by using a gentle touch during cleaning to preserve the artistry of your handmade blooms!
Crochet Tulip Pattern Variations
Explore the endless possibilities as you customize this delightful crochet tulip pattern, bringing your own flair to your floral creation.
-
Yarn Weight Swaps: Experiment with sport or bulky weight yarn for larger or more plush tulips. Adjust your hook size accordingly for a varied texture.
-
Fiber Alternatives: Try using acrylic for a budget-friendly choice or bamboo for a silky sheen. Each fiber brings a unique look and feel to your flowers.
-
Color-Blocking Ideas: Embrace a rainbow palette by crocheting tulips with contrasting colors. Alternate shades per row for a vibrant burst in your bouquet.
-
Size Adjustments: Use a larger hook to create oversized tulips that make a bold statement in your decor. Or opt for a smaller hook for delicate miniatures.
-
Textured Finishes: Add a whimsical touch by attaching pom-poms to the tips of the petals or fringe to mimic blooming leaves. A charming way to enhance visual interest!
-
Layered Petals: Mix petal shapes by incorporating additional rows to some tulips, creating a lush bouquet where some flowers appear more full and others delicate.
-
Stems with Personality: Wrap your floral wires with yarn of different colors or textures to personalize each tulip’s stems, introducing another layer of creativity to the arrangement.
-
Decorative Borders: Add a simple border stitch around the bottom of each tulip to finish off with a polished look. A touch of scallops or picots can elevate your project!
What to Pair with Charming Crochet Tulip Bouquet
Imagine creating a delightful garden of crochet wonders that complement your beautiful tulips and enhance your decor.
- Crochet Flower Pot: Craft a cozy crocheted pot cover to showcase your tulips, adding texture and a homey feel.
- Lush Greenery: Make some leafy vines or ferns in green to accentuate your bouquet with a touch of natural elegance.
- Spring Table Runner: Design a vibrant table runner to create a beautiful display underneath your tulips, harmonizing colors for a fresh look.
- Floral Coasters: Whip up matching coasters adorned with floral motifs for a cohesive and charming table setting.
- Crocheted Gift Wrapping: Use leftover yarn to create unique, handmade wrapping for gifting your tulips, adding that special DIY touch.
Dive into these lovely crochet projects to create a harmonious atmosphere inspired by the enchanting beauty of your crochet tulip pattern!
Charming Crochet Tulip FAQs
Can I use a different type of yarn for this crochet tulip pattern?
Absolutely! While cotton yarn is recommended for its durability and smooth texture, you can substitute with acrylic or wool yarn. Just keep in mind that the final shape and drape might vary, so adjust your hook size accordingly to maintain tight stitches.
What if my tulip petals are curling? How can I fix this?
Don't panic! Curling petals can happen if your tension is too loose or if you're using a yarn that doesn't hold its shape well. I recommend blocking your tulips after completion, which will help reshape the petals. Pin them gently while they dry to ensure they maintain their beautiful form!
How can I make my crochet tulip pattern larger or smaller?
Simple adjustments can help you customize your tulip's size! To make them larger, try using a thicker yarn or increasing your hook size. Conversely, use a lighter yarn and a smaller hook to create petite blooms. Just remember to keep track of your stitch count as you do this!
What hook size should I use for this crochet tulip pattern?
For this project, a 2.5 mm crochet hook (C/2) is suggested to create tight, defined stitches. If you prefer a looser texture, you can experiment with a slightly larger hook, but be cautious as this may affect the tulip's overall shape.
I dropped a stitch while crocheting my tulip. How do I fix this?
It's an easy fix—just unravel your work back to where the drop occurred, then carefully re-insert your hook and continue stitching. If you're unsure, use a yarn needle to weave the loose stitch back into the project securely. Checking your stitches after each round helps prevent this from happening again!

Leave a Reply