
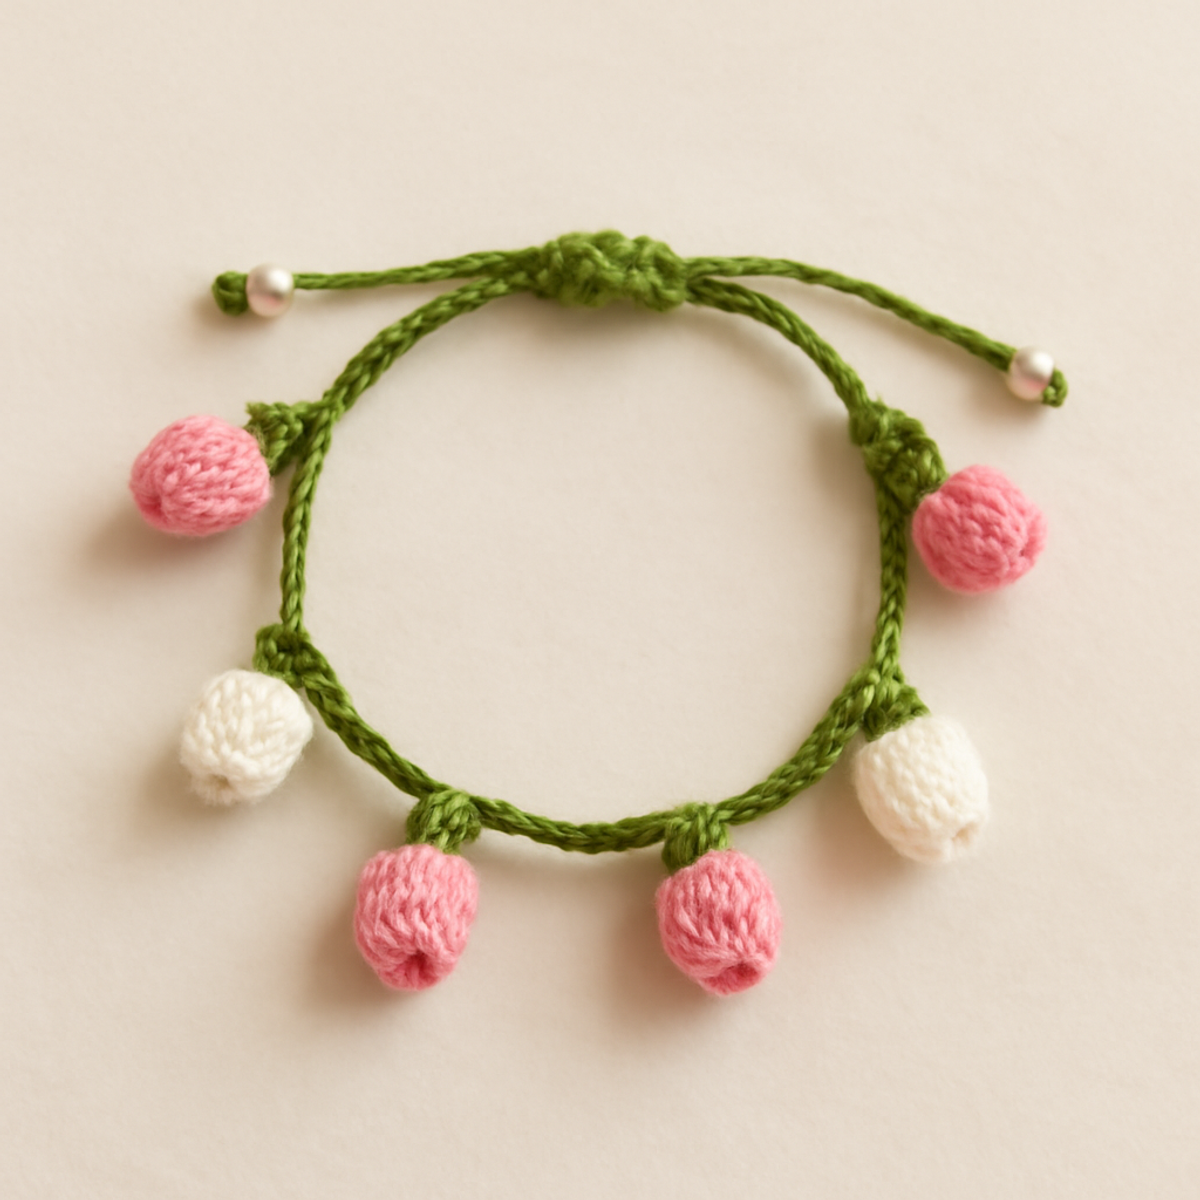
As I flipped through the vibrant hues of yarn, I felt an irresistible tug towards something fresh and blossoming—a perfect project for the spring season. The crochet tulip bracelet captures the essence of fleeting floral beauty, inviting crafters to weave delicate motifs that bring a touch of nature to any outfit. With its adjustable closure and charming tulip designs, this piece is ideal for both everyday wear and special occasions. Not only does this project allow you to showcase your creativity through color choices, but it also offers the satisfaction of wearing your very own handmade jewelry. Whether you're looking to elevate your accessory game or gift someone special, this bracelet project will surely blossom into a cherished favorite. Get ready to pick up your hook and embrace the beauty of springtime stitches!
Crochet Tulip Bracelet Materials & Tools
Yarn
- Lightweight Cotton Yarn (DK or Sport weight) – Choose green for vines and pink or white for tulips; estimate 50-70 yards total.
Tools & Notions
- 2.0-2.5mm (US Size B or C) Hook – This size will help achieve the delicate stitch work necessary for the tulip motifs.
- Tapestry Needle – Essential for weaving in ends and sewing pieces together.
- Scissors – Handy for cutting yarn with precision during your project.
- 6mm Pearl Beads (2) – Optional decorative accents that will add an elegant touch to your crochet tulip bracelet.
- Measuring Tape – Use it to ensure the bracelet fits perfectly around your wrist size.
Why Choose This Crochet Tulip Bracelet?
Unique Design: The charming motifs of tulips and vines give this bracelet a distinctive style that stands out.
Adjustable Fit: Enjoy the flexibility of customizing the size to any wrist, making it perfect for gifting.
Easy to Personalize: With a variety of color combinations, you can create a one-of-a-kind piece that truly reflects your personality.
Nature-Inspired Elegance: This bracelet embodies the beauty of spring, adding a fresh touch to any outfit.
Satisfying Craft: Experience the joy of crafting a delicate accessory that you'll be proud to wear or share.
Embrace this delightful project and let your creativity bloom with every stitch!
Gauge & Sizing Notes
Don't skip the gauge swatch! It's essential for ensuring your crochet tulip bracelet turns out just the way you envision it. For this project, a common guideline is to aim for a tension swatch that measures 4×4 inches (10×10 cm), although the exact gauge may vary based on your individual crochet style. To make your bracelet larger, simply increase your starting chain in multiples of 10 for every extra inch in length you desire. If you find your swatch is too small, don't worry—try going up a hook size to achieve the perfect fit. Adjusting your size and maintaining consistent tension will ensure your floral masterpiece is a comfortable and beautiful addition to your accessory collection!
Step-by-Step Pattern for crochet tulip bracelet
Row 1: Base Chain
Start by chaining 80-90 stitches to create the base for your crochet tulip bracelet. Ensure it’s long enough to fit comfortably around your wrist. Use a loose tension to maintain flexibility, allowing the chain to drape nicely. Once completed, your work should lay flat and be easy to manipulate for adding the tulip motifs later.
Row 2: First Tulip Flower
Begin your first tulip by forming a magic ring and chaining 3 (counts as your first dc). Work 2 dc, then 2 hdc, followed by 2 sc into the magic ring. Finish with a sl st to close the flower. Pull the magic ring tight, and you'll have a blossom shape that measures about 1 inch in diameter. Attach this tulip to the base chain, leaving a gap of about 5 chain spaces between each flower.
Row 3: Second Tulip Flower
Repeat the process from Row 2 to make a second tulip flower. Remember to work into the same magic ring sequence of 3 dc, 2 hdc, and 2 sc. Connect this flower to the bracelet in the same manner, ensuring that it sits securely on the chain. Your tulip flowers should be evenly spaced, creating a lovely floral rainbow on your bracelet.
Row 4: Leaf Motifs
To add a touch of nature, create leaves by chaining 5 and then working 1 sl st into the 2nd ch from the hook. Continue with 1 hdc in the next ch and finish with 2 dc in the last ch. This leaf should have a slight curl. Attach it next to each tulip to complement your crochet tulip bracelet, enhancing its charm. Aim for 2 leaves per flower for balance.
Row 5: Continue Flower and Leaf Addition
Continue adding tulip flowers and their corresponding leaves to the base chain, following the established spacing of approximately 5 chain spaces between each flower. Work in an alternating pattern for variety—after every tulip, place two leaves. Repeat until your bracelet reaches the desired length or you run out of yarn, ensuring an elegant floral arrangement throughout.
Step 6: Finalizing the Bracelet
Once all flowers and leaves are attached, securely weave in any loose yarn ends with your tapestry needle. This guarantees a clean finish for your crochet tulip bracelet. You may choose to block the bracelet gently to enhance the shape of your flowers and leaves. Ensure that it retains a natural drape, reflecting the essence of spring blooms beautifully.
Step 7: Creating the Adjustable Closure
To create the adjustable slide closure, cut a long strand of yarn (approximately 20 inches). Secure one end to a tulip flower, then create a sliding knot around the base chain, ensuring that the knot is loose enough to allow movement. This technique will make your bracelet easily adjustable to fit any wrist size comfortably.
Expert Tips for Your Crochet Tulip Bracelet
-
Consistent Tension: Keep your stitches even to ensure the tulip flowers maintain their shape. Avoid pulling too tightly, as this can distort their delicate look.
-
Count Carefully: Always double-check your stitch count, especially when moving between flowers. Losing count can lead to uneven spacing and disrupt the bracelet's flow.
-
Block for Beauty: After completing your bracelet, blocking can significantly enhance its visual appeal. It helps the tulips and leaves sit beautifully, showcasing your hard work.
-
Yarn Estimates: If you plan on adding more flowers or modifying the bracelet size, anticipate using more yarn than initially estimated. Better to have a bit extra than to run out mid-project!
-
Finishing Touches: Use a tapestry needle to weave in all stray ends securely. This not only gives your crochet tulip bracelet a polished finish but also prevents any loose threads from unraveling.
What to Pair with the Spring Bloom Crochet Bracelet
Imagine wrapping yourself in a world of vibrant spring hues, surrounded by the warmth of nature's beauty — there's always room for a perfectly paired project.
-
Tulip Earrings: Create these lovely earrings with the same floral motifs as your crochet tulip bracelet for a cohesive look. Their lightweight design makes them perfect for daily wear.
-
Floral Hair Clip: A charming hair accessory that echoes the bracelet’s tulip design, adding a delightful touch to your hairstyles and bringing a whimsical vibe to any outfit.
-
Matching Anklet: Consider crafting an anklet using the same colors and patterns; it’s a refreshing accessory that lends a playful charm to your feet in springtime.
-
Woven Tote Bag: A stylish bag incorporating the floral motif would be a perfect accompaniment, allowing you to show off your love for crochet and spring blooms in everyday life.
-
Miniature Flower Bouquet: Use leftover yarn to create a small bouquet of tulips; not only does it utilize your materials, but it adds a cheerful touch to your home decor.
Crochet Tulip Bracelet Variations
Feel free to let your creativity blossom as you explore these delightful variations for your project!
-
Color Swaps: Experiment with vibrant yarn colors for the tulip flowers to brighten your bracelet. Choosing complementary shades can create a stunning, one-of-a-kind accessory.
-
Larger Blooms: Consider increasing the size of your tulip flowers for a bolder statement piece. This simple adjustment can transform your bracelet from delicate to eye-catching.
-
Textured Yarns: Use textured yarns, such as boucle or cashmere, to add depth and warmth. Each stitch will bring a unique feel to your floral motifs, making them truly special.
-
Fringed Edging: Add some playful fringe along the entire edge of the bracelet for a whimsical touch. This small detail will elevate the overall design, capturing a carefree spirit.
-
Mixed Fibers: Substitute cotton yarn with bamboo or a cotton blend for a different sheen and softness. This will transform the bracelet’s drape, making it even cozier to wear.
-
Multiple Flowers: Create volume by adding more tulip flowers to your bracelet. Positioning them closer together can give a lush, garden-like effect, perfect for warmer months.
-
Bead Alternatives: Swap the pearl beads for decorative buttons or charms to infuse your personality into the piece. Each alternative will tell a different story, adding character to your creation.
-
Statement Leaves: Craft oversized leaves to accompany your flowers, enhancing the nature-inspired theme. This modification can bring a dramatic flair, making your tulip bracelet even more memorable.
Care Instructions for Crochet Tulip Bracelet
Machine Washing: Use cold water on a gentle cycle if you prefer machine washing. Always place your crochet tulip bracelet in a mesh laundry bag to avoid snagging and pilling.
Hand Washing: For best results, hand wash your bracelet in cool water with a mild detergent, gently swishing it for a few minutes. Rinse thoroughly without wringing or twisting to maintain its delicate shape.
Drying/Blocking: Lay your crochet tulip bracelet flat on a clean towel to air dry. Avoid hanging it, as this may cause stretching. Consider blocking it lightly to enhance the floral shapes and overall drape.
Storage: Store your bracelet in a cool, dry place away from direct sunlight. A soft pouch or a dedicated jewelry box can prevent it from snagging on other items and keep it looking fresh.
Spring Bloom Crochet Bracelet FAQs
Can I substitute yarn types for this crochet tulip bracelet?
Absolutely! While lightweight cotton is preferred for its breathability and drape, you can use acrylic if you want a different texture. Just remember to check your gauge, as switching yarns may change the final sizing and drape.
How do I adjust the size of my crochet tulip bracelet?
To customize the fit, you can add or decrease the number of base chain stitches. A chain of 80-90 stitches should suit most wrists, but if you need it larger or smaller, simply add or subtract chain stitches in multiples of 5 for even spacing of the flowers.
Why is my tulip flower curling up?
Don’t panic! This can happen if the stitches are too tight. A gentle blocking will usually flatten those flowers out beautifully. If you didn’t block them before, try lightly steam blocking them to shape them properly while keeping their soft look.
I lost my count while making flowers; how do I fix my spacing?
That’s an easy fix! Just try to evenly distribute the flowers and leaves based on your total chain length. If your spacing feels off, consider adding or moving flowers around as necessary to keep a nice flow throughout your crochet tulip bracelet.
What hook size should I use for this project?
For the best results, you'll want to stick with a 2.0-2.5mm (US size B or C) crochet hook. This size allows for the delicate stitches needed for the flowers while maintaining the bracelet's structure and flexibility.
What if I run out of yarn while making the bracelet?
It’s best to buy extra yarn of the same color and weight to avoid mismatches. If you're low on yarn, consider using beads or buttons as decorative features to add flair while keeping the project cohesive. Plus, it can give your crochet tulip bracelet a fun twist!

Leave a Reply