
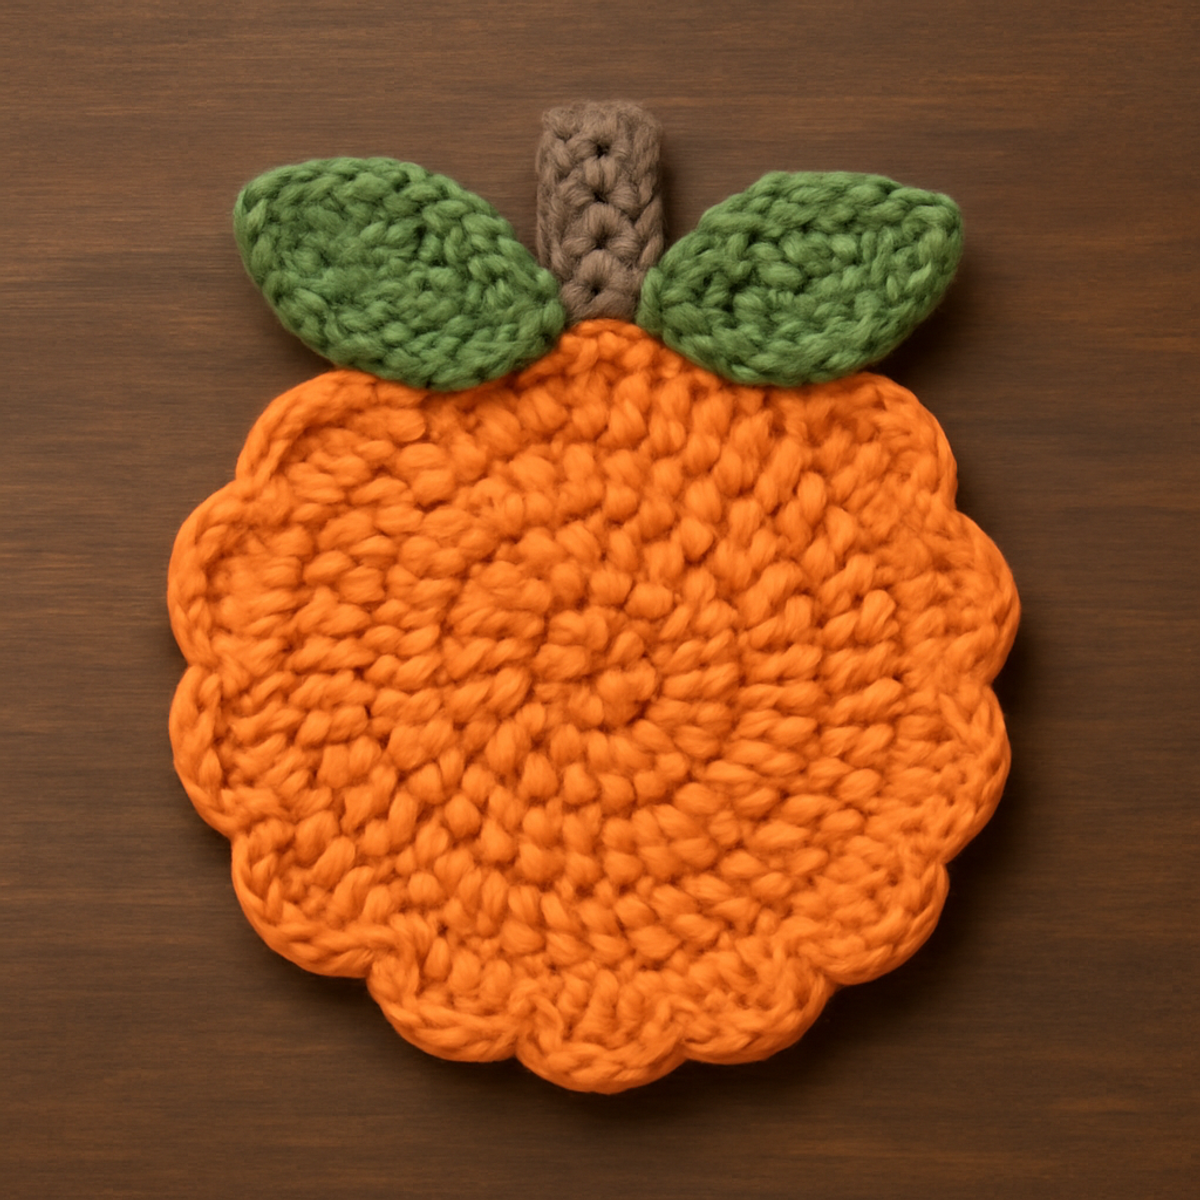
As the leaves turn and a crisp breeze fills the air, there’s a certain joy in bringing a touch of whimsy into our homes. That’s why I’m excited to share my Charming Crochet Pumpkin Applique pattern with you! This delightful crochet pumpkin isn’t just a seasonal treat; it offers a perfect blend of simplicity and versatility for all skill levels, whether you're a crochet novice or a seasoned crafter needing a quick make. The best part? You can easily customize its size and colors, making it ideal for any autumn decor—sewn onto bags, blankets, or even worn as a festive accessory. So grab your yarn, let’s dive into stitching this cozy pumpkin together, and add a splash of fall flair to whatever your heart desires!
Crochet Pumpkin Materials & Tools
- Worsted Weight Yarn – Choose an orange hue for the body, with contrasting green for the leaves, and brown for the stem; around 25 to 50 yards total is estimated.
- 4.0mm (G) Crochet Hook – An ideal size for creating the pumpkin's soft texture and shape.
- Yarn Needle – Essential for weaving in ends after your crochet pumpkin is complete.
- Stitch Marker (optional) – Helpful for keeping track of your rows as you work through this charming crochet pumpkin project.
Why Choose This Crochet Pumpkin?
Instant Gratification: This crochet pumpkin applique is quick to create, perfect for tapping into your seasonal crafting energy.
Beginner-Friendly: With just a few basic stitches and a straightforward design, even newcomers can craft this charming piece with confidence.
Versatile Decor: Whether embellishing a cozy blanket or adding flair to a favorite bag, this pumpkin makes a delightful accent anywhere you choose.
Customizable: Choose from a variety of colors and sizes, ensuring your crochet pumpkin will perfectly match your unique style.
Textured Appeal: The combination of stitches creates a soft, plush texture that makes this pumpkin not just beautiful but inviting, perfect for those autumn vibes!
Gauge & Sizing Notes
Don't skip the gauge swatch when crafting your crochet pumpkin! Checking your tension is crucial to ensure your pumpkin has the desired shape and size. A good rule of thumb for this project is to aim for a crochet gauge of approximately 4×4 inches (10×10 cm) resulting in around 18 double crochets by 10 rows. To make your crochet pumpkin larger or smaller, adjust your starting chain in multiples of 6 + 2; this way, you'll have a perfect fit for any decor idea! If your swatch is smaller than expected, consider going up a hook size and keep your stitches loose for a lovely, rounded finish. Happy stitching!
Step-by-Step Pattern for Crochet Pumpkin
Round 1: Start the Center
Begin with a magic ring and make 6 single crochet (sc) stitches into the ring. Pull the tail to close the ring tightly, ensuring there are no gaps. Your work should form a small circle. This will form the base of your crochet pumpkin. (6 sts)
Round 2: Increase for Body
Chain 1 and make 2 sc in each stitch around for a total of 12 stitches. As you create this round, notice that the circle will begin to expand. This increase will give your crochet pumpkin its rounded shape. (12 sts)
Round 3: Continue Increasing
Chain 1 and sc in the next stitch, inc in the following stitch. Repeat from * to * around. By the end of this round, your pumpkin should be forming a lovely rounded shape, and you will have 18 stitches. (18 sts)
Round 4: More Increases
Chain 1 and sc in the next 2 stitches, inc in the next stitch. Repeat from * to * around. After completing this round, your crochet pumpkin should be getting more substantial and round. Count to ensure you have a total of 24 stitches. (24 sts)
Round 5: Establish Shape
Chain 1 and sc in the next 3 stitches, inc in the next stitch. Continue this pattern all around the circle. At the end of this round, you will have a beautiful, rounded pumpkin shape with a total of 30 stitches. (30 sts)
Rounds 6–8: Maintain Size
For Rounds 6, 7, and 8, simply chain 1 and sc in each stitch around, maintaining the total of 30 stitches. This will help you create the body before transitioning to the scalloped edge. Your work should appear fuller and more defined as the pumpkin begins to take shape. (30 sts each)
Round 9: Create the Scalloped Edge
Chain 1 and sc in the next stitch, hdc in the next stitch, dc in the next stitch, then hdc in the next stitch, followed by sc in the next stitch. Repeat this all the way around, which will start forming a lovely scalloped edge for your crochet pumpkin. (30 sts)
Round 10: Finish Body
Chain 1, then sc in each stitch around one last time to tighten the edges of your pumpkin. You should now see a beautiful, rounded shape with distinct scallops at the top, ready for the leaves and stem. (30 sts)
Step 1: Create Leaves
Switch to green yarn. Chain 4, then make 1 dc in the 4th chain from the hook. Chain 1 and turn. In the same stitch, make 2 dc, then dc in the next stitch, and finish with a sl st in the last to create the leaf shape. You can make 2 leaves to attach to your crochet pumpkin.
Step 2: Form the Stem
Using brown yarn, chain 4 and sc in the second chain from the hook. Continue with sc in the next 2 chains. This should create a small stem to top off your crochet pumpkin. Attach this at the center top of your finished pumpkin using a slip stitch.
Step 3: Assembly
Once all parts are complete, sew the leaves and stem onto the top of the pumpkin using a yarn needle. Ensure everything is securely attached and weave in any loose ends to give your adorable crochet pumpkin a polished look.
How to Wash and Care for Your Crochet Pumpkin
Washing: Use cold water and a gentle detergent when washing your crochet pumpkin. Avoid hot water and agitation to protect its shape and prevent any felting or pilling.
Drying: Always lay your crochet pumpkin flat to dry, avoiding the dryer. This will help maintain its lovely texture and shape without any unwanted shrinkage or distortion.
Storage: When storing your crochet pumpkin, keep it in a cool, dry place away from direct sunlight to prevent fading and maintain its vibrant colors.
Blocking: For a polished finish, lightly steam block your crochet pumpkin after it’s complete. This enhances the scalloped edges and smooths out any minor imperfections.
Crochet Pumpkin Variations & Substitutions
Discovering new ways to customize your crochet pumpkin brings an extra layer of joy to this delightful craft.
-
Yarn Weight Swaps: Try using bulky yarn for a plushier pumpkin; just adjust your hook size for a full-bodied look. This change gives your pumpkin a cozy vibe while making it even faster to create.
-
Color Blocking: Experiment with mixing multiple shades of orange or even using a variegated yarn for a unique twist. Imagine a pumpkin that boasts swirls of autumn colors, capturing the season’s essence!
-
Texture Modifications: Add cozy textures by incorporating a few bobble stitches or textured yarn. These additions will bring visual interest, making your crochet pumpkin even more captivating.
-
Larger Sizes: Want a grand display? Simply increase your rounds to create a bigger pumpkin. A collection of sizes will create a beautiful fall centerpiece.
-
Leaf Variations: Get creative with the leaves by trying different stitch patterns like fans or shells. This will add an elegant flair and can blend beautifully with the pumpkin's body.
-
Embellishments: Consider adding pom-poms or tiny decorative buttons for added charm. A whimsical touch can elevate the whole look and make your pumpkin a conversation starter.
-
Sport Weight Yarn: If you prefer a lighter pumpkin, using sport weight yarn can enhance the delicate aspect of your project. Your pumpkin will be lightweight and perfect for adorning clothing or accessories.
-
Fringe Bottom: Add a playful fringe to the bottom of your pumpkin for a fun twist. This simple adjustment can tie in beautifully with other fall decorations, bringing a unique spin to your crochet piece.
What to Pair with the Charming Crochet Pumpkin Applique
As you weave your charming masterpiece, consider crafting delightful accessories that will enhance your fall aesthetics and complete your cozy vibe.
-
Autumn Leaf Garland: Add a string of crocheted leaves to bring a warm, seasonal touch to your home. Hang it near your pumpkin for a beautiful ensemble.
-
Mini Pumpkin Friends: Create smaller versions of the crochet pumpkin to form a charming cluster. These little cuties can line your table or be placed on your mantle.
-
Cozy Throw Blanket: Crochet a soft, textured blanket in warm autumn tones. Drape it over your couch beside the pumpkin for a welcoming seasonal look.
-
Crochet Acorn Applique: Pair your pumpkin with adorable acorns to accentuate your fall decor. These tiny embellishments add a fun and thematic element to your projects.
-
Fall-Themed Coasters: Protective and pretty, these coasters can feature autumn colors and designs, making them a perfect pairing for your cheerful pumpkin display.
Helpful Tricks for Crochet Pumpkin
-
Maintain Tension: Ensure your stitches are even throughout your project to achieve a uniform look for your crochet pumpkin. Uneven tension can lead to an misshapen piece.
-
Count Your Stitches: Regularly count your stitches after each round to avoid losing track. This helps in maintaining the even shape of your pumpkin, especially during increases.
-
Secure Your Ends: Weave in any loose ends thoroughly. A tidy finish not only looks professional but will also prevent unraveling and keep your crochet pumpkin intact.
-
Block for Shape: Once finished, consider blocking your pumpkin. This technique can make the scalloped edges appear more defined and flatten out any uneven stitches.
-
Use a Stitch Marker: If you're not using one already, employ a stitch marker at the beginning of each round. It simplifies counting and helps keep your rounds even throughout your project.
Charming Crochet Pumpkin Applique FAQs
Can I substitute a different type of yarn for the crochet pumpkin?
Absolutely! While worsted weight cotton yarn is ideal, you can substitute acrylic yarn if you prefer. Just be aware that cotton provides a sturdier finish, while acrylic may have more stretch. Always check the yarn's weight and gauge to ensure the final pattern matches your desired result.
How can I adjust the size of my crochet pumpkin?
It's super easy! To make your crochet pumpkin larger, simply add more rounds of increases before switching to the scalloped edge. For a smaller pumpkin, you can start with fewer stitches in the magic ring and reduce the number of rounds. Just keep in mind that the shape might be slightly different based on size adjustments.
Why does my crochet pumpkin look uneven or curled at the edges?
Don't panic! This can happen if your tension is inconsistent. Make sure you're keeping an even tension throughout your stitches. If it’s a slight curl, consider blocking the finished piece, which can help shape the edges and smooth out any inconsistencies.
What size crochet hook should I use for this pumpkin?
For the crochet pumpkin pattern, I recommend a size G/4.0mm crochet hook. This size helps create the lovely texture and structure you'll need for this project. If your stitches seem too tight or loose, feel free to try a different hook size to adjust your tension accordingly.
How do I fix dropped stitches in my crochet pumpkin?
Oh no, dropped stitches can happen to the best of us! To fix this, carefully pull the work back to the dropped stitch and reinsert it on your hook. Then continue crocheting from that point. If you're unsure, don't hesitate to unravel a few rounds back to make sure everything is neat and tidy!
Can I add embellishments to my crochet pumpkin?
Of course! Customizing your crochet pumpkin is part of the fun! You can sew on decorative stitching, beads, or even additional leaves in different colors. Let your creativity shine, and make it uniquely yours!

Leave a Reply