
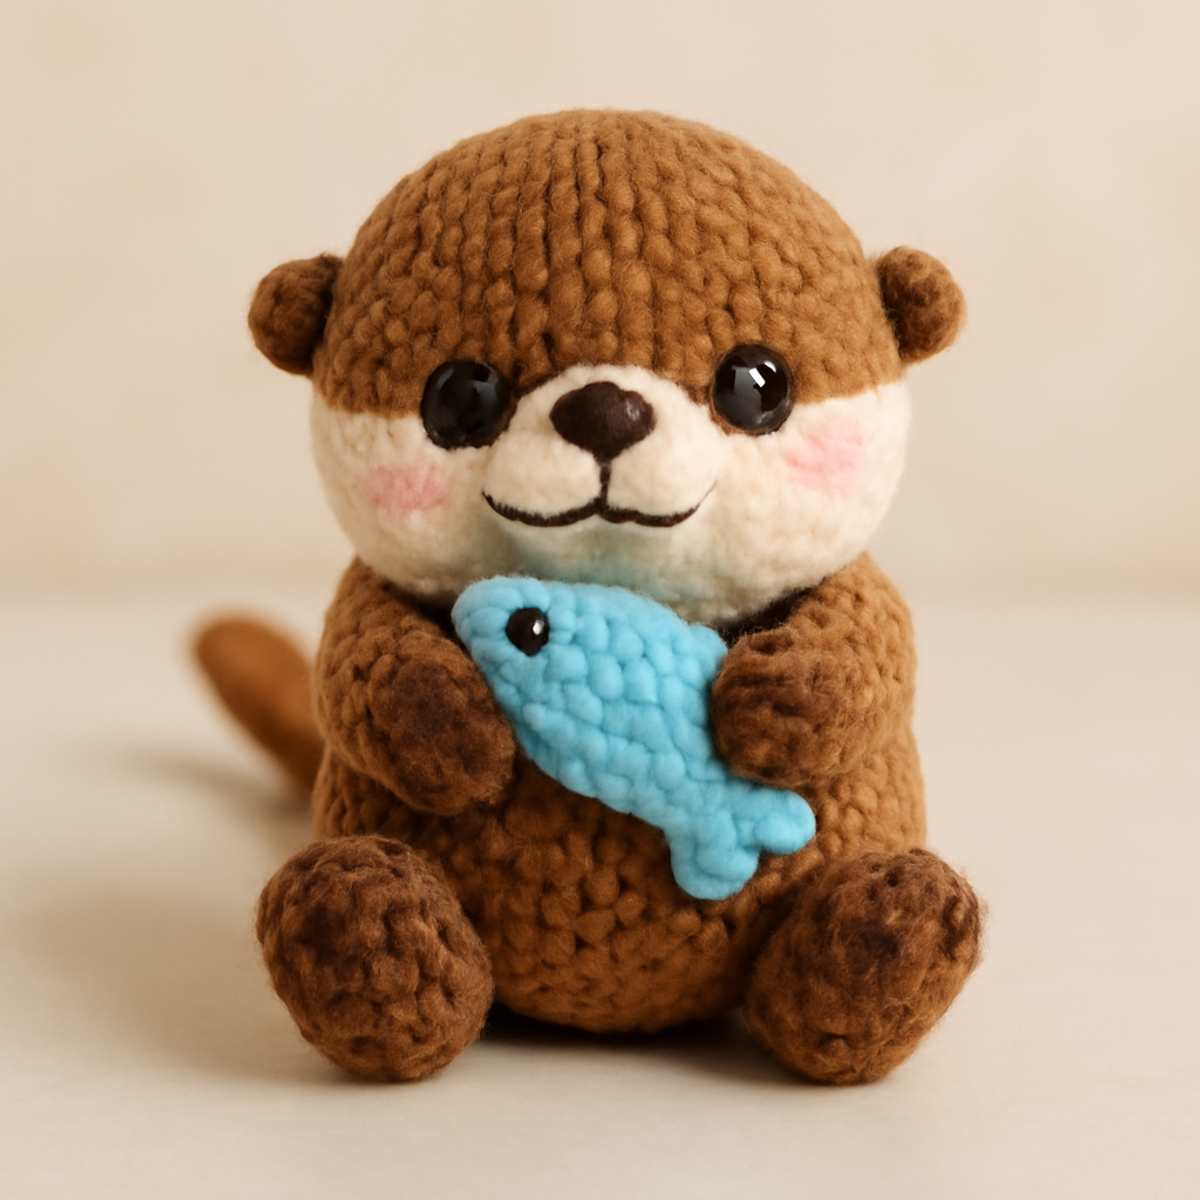
As I sat on my couch one cozy afternoon, surrounded by a rainbow of plush yarn, the idea for my latest crochet adventure sparked joy. Enter the "Dreamy Otter Love" crochet otter pattern, a delightful project that brings a playful character to life, perfect for gifting or simply enhancing your décor. With its soft, huggable texture and charming expression, this adorable plush toy will surely captivate both crafters and kids alike. One of the standout features of this pattern is how quickly it works up—ideal for last-minute gifts or a cozy weekend project. Plus, the educational aspect of creating an interactive toy means the joy of stitching translates directly into laughter and playtime. So grab your yarn and hooks, and let’s dive into the whimsy of amigurumi together!
Dreamy Otter Love Materials & Tools
- Plush or Chenille Yarn – Approximately 200-250 yards total in various colors creates that irresistibly soft look and feel.
- 4.0mm (G-6) Hook – This size is perfect for working with plush yarn, ensuring a snug and visually pleasing stitch.
- Safety Eyes (10mm) – These add character to your otter’s playful expression; make sure they're securely attached!
- Yarn Needle – A must-have for weaving in ends and assembling parts neatly for your crochet otter pattern.
- Scissors – Essential for cutting your yarn to the desired lengths during your crafting journey.
- Polyester Stuffing – Use this to fill your otter, giving it that lovable, huggable shape we all adore!
Why Will You Adore This Otter?
Quick & Convenient: This crochet otter pattern works up rapidly, making it perfect for those who need a swift gift or a delightful weekend craft.
Irresistibly Plush: Utilizing soft and cuddly plush yarn, your otter will have a huggable quality that’s simply irresistible.
Endearing Design: Its playful expression and adorable size will captivate both kids and adults, making it a lovely addition to any space.
Interactive Play: Crafting this plush toy not only provides joy but brings hours of imaginative play for children, blending creativity and fun.
Personalize Freely: With customization options from color to size, this pattern allows you to add a unique twist that reflects your own style!
Gauge & Sizing Notes
Don't skip the gauge swatch! Ensuring your tension is accurate is essential for achieving the delightful size and shape of your plush toy in the crochet otter pattern. A common guideline is to aim for a tension swatch that measures 4×4 inches (10×10 cm) and contains around 12 single crochets across and 10 rows high, but please note that your individual results may vary based on your crochet style. If you wish to adjust the size of your otter, you can do this by modifying your starting magic ring or increasing your chain in multiples of 6 for each piece. If you find your tension is too tight and your swatch is smaller than desired, try switching to a larger hook size for a plushier outcome!
Step-by-Step Pattern for Dreamy Otter Love
Row 1: Head Construction
Start by creating a magic ring and crochet 6 single crochets (sc) into the ring. Pull the ring tight to close. Continue with increasing rows by working 2 sc in each stitch around, giving you a total of 12 stitches (12 sts). Your work should start to curl into a small, round shape, forming the head of your cute crochet otter.
Row 2: Shaping the Head
For the next row, work (sc in the next stitch, inc) around. This means you'll increase by adding a sc in every second stitch, leading to a total of 18 stitches (18 sts). The shape will start to round out further, giving your otter's head a soft and adorable form.
Row 3: Further Head Increases
Continue with the head by doing (sc in the next 2 stitches, inc) around. This will create additional increases, bringing your total stitch count to 24 stitches (24 sts). At this point, your work will appear more dome-like, perfect for the otter’s cute face.
Row 4: Head Completion
Now, crochet 3 rows of sc without any increases or decreases. This means simply continue in the established stitch pattern for the next three rows (24 sts each). Your head should feel complete and firm with a lovely rounded shape, ready for facial features.
Row 5: Body Construction
Change to creating the body by working a magic ring and crocheting 6 sc into the ring again. Pull it tight, just like the head. This forms the base for the sturdy body of your crochet otter.
Row 6: Shaping the Body
For this round, work (sc in the next stitch, inc) around, increasing as you did with the head. After this row, you will have a total of 12 stitches (12 sts). The body will start to widen, giving a robust outline for your plush otter.
Row 7: Continuing the Body
Work (sc in the next 2 stitches, inc) around to further shape the body. This round should bring your total to 18 stitches (18 sts). You will notice the form becoming more stable, creating a supportive base for your otter to sit.
Row 8: Body Expansion
Continue increasing with (sc in the next 3 stitches, inc) around for one row, yielding 24 stitches (24 sts). The body will take on a more rounded shape as it opens out, making an ideal structure for the otter's snug sitting position.
Row 9: Body Completion
Crochet 5 rows of sc without any increases or decreases, maintaining a consistent stitch count of 24 for each row. This section will give the otter a sturdy base, ensuring it can sit just right. The dimensions should feel well-proportioned as you finish this part.
Step 10: Arms and Legs
For the arms, create a magic ring and stitch 6 sc into it. For the legs, follow the same pattern but use a magic ring with 6 sc too. After the magic ring, make 1 increase on each arm and leg in the next round (12 stitches each) to provide cute little limbs. These should look small and round, perfect for your crochet otter pattern.
Step 11: Assembling the Pieces
Once all parts are crocheted, stuff the head, body, arms, and legs with polyester stuffing. Use a yarn needle and sl st to attach the arms and legs to the body securely. Their placement should allow the otter to look cozy and ready for play.
Step 12: Tail and Finishing Touches
For the tail, create a magic ring with 4 sc, then increase to 6 sc for one row. Make it tapered by reducing stitches gradually in subsequent rows. Once completed, securely attach the tail to the back of the body using sl st and weave in any loose ends. The otter now comes to life with a cute, distinctive touch!
Crochet Otter Pattern Variations
Embrace the joy of customization with these delightful twists for your crochet otter pattern!
-
Color Swaps: Experiment with fun colors like lavender or teal for a unique otter look. Choose colors that reflect your personality or the recipient's favorite hues!
-
Yarn Choices: Swap plush yarn for cotton to create a sturdier, more structured toy. This will also give a different texture, making it perfect for older children who enjoy rougher play.
-
Size Adjustments: Create a larger or smaller otter by using thicker or thinner yarn. Adjust the hook size accordingly, and let your creativity dictate the size!
-
Texture Modifications: Add a pom-pom or fringe to the tail for a playful touch! A pop of texture will make your otter stand out and give it a whimsical flair.
-
Embellishments: Consider adding cute embroidered designs like fish on the body or a heart on the belly. These little details can pack a big visual punch!
-
Facial Expressions: Play with different embroidery styles for the eyes or mouth to give your otter a variety of emotions. A sleepy smile or a wide grin can change its character entirely!
-
Color-Blocking: Use two or three contrasting yarn colors when starting the body for a trendy, color-blocked look. This adds a modern twist to your adorable design.
-
Accessorize: Create little hats or scarves for your otter to match seasonal themes or special occasions. These can be quick, additional projects that enhance your otter’s personality!
What to Pair with Dreamy Otter Love?
As you embark on the whimsical journey of crafting this delightful otter, why not create a charming ensemble that complements its playful spirit?
-
Mini Fish Toy: Craft a cute fish companion using similar plush yarns to enhance your otter's playfulness. This pairing ignites imaginative play, ideal for little ones.
-
Cozy Blanket: A soft, fluffy blanket will make a perfect backdrop for your cuddly otter. The texture not only matches but amplifies the plush aesthetic of your creation.
-
Adorable Pouch: Design a small crochet pouch to keep treasures safe beside your otter. It's functional, sweet, and a delightful way to extend your crochet otter pattern adventure!
-
Matching Hat: Create a tiny hat that echoes your otter's colors to dress it up. This playful accessory adds a touch of charm and whimsy to your plush project.
-
Snuggly Pillow: A plush pillow adorned with your otter’s color palette will not only elevate your home décor but also remind you of your crafting adventure. Perfect for both display and cozy snuggles!
How to Wash and Care for Your Otter
- Machine Washing: Use cold water and a delicate cycle to prevent any felting or pilling of your crochet otter pattern. Always place your plush toy in a mesh bag for added protection.
- Hand Washing: For utmost care, gently hand wash in lukewarm water using mild detergent. Swirl the water without agitating to preserve your otter’s shape.
- Drying/Blocking: Lay flat on a clean, dry towel to maintain shape while drying. Avoid hanging, as this could stretch your plush yarn.
- Storage: Store your otter in a cool, dry place away from direct sunlight to prevent fading. A breathable fabric bag is ideal to keep dust at bay!
Expert Tips for Your Otter
- Tension Consistency: Maintaining even tension throughout your work ensures that all parts of your crochet otter pattern fit together seamlessly. Avoid tight or loose spots for a polished finish.
- Counting Made Easy: Use stitch markers in your rounds, especially in the body, to keep track of your stitches and avoid losing count. This helps maintain shape and size.
- Blocking Advice: Lightly steam block the plush pieces before assembly to shape them without losing their softness. This can refine edges and define your otter's features beautifully.
- Secure Attachment: When assembling pieces, ensure that all limbs and features are securely attached using slip stitches. This prevents any wobbly or loose parts that could detract from the otter’s overall charm.
- Final Touches: Take your time to sew in ends and shape your otter's face with care. These details enhance the character and expression of your crochet otter pattern!
Dreamy Otter Love FAQs
Can I use a different yarn weight instead of plush yarn for this crochet otter pattern?
Absolutely! While plush or chenille yarn gives the otter its soft and huggable quality, you can substitute with medium-weight cotton or acrylic yarn if you prefer a sturdier finish. Just remember to adjust your hook size accordingly to maintain the desired look and feel.
How can I make my otter larger or smaller?
To create a larger otter, simply switch to a thicker yarn and use a larger hook size. Conversely, for a smaller version, opt for a lighter yarn and a smaller hook. Adjusting the number of stitches and rounds can also help you achieve your desired size!
Why is my crochet work curling?
Don't panic! Curling is often caused by tight tension or not using the correct stitch count. I recommend checking your tension first; try to keep it consistent throughout. If you’re working on the body or head, review your stitch counts to make sure you haven’t missed any increases.
What size hook should I use for this crochet otter pattern?
The recommended hook size for this project is a 4.0mm (G-6) hook. This size is perfect for working with plush yarn, allowing for neat stitches and a lovely finish. Always feel free to check your gauge before starting to ensure you're on the right path!
How do I fix dropped stitches in my crochet otter?
It’s an easy fix! Simply use your yarn needle to weave the strand of yarn from the dropped stitch back through the surrounding stitches. Gently pull it back up to the correct height and secure it in place. If you're unsure, don't hesitate to rework that section to maintain the integrity of your plush toy!
Can I use safety eyes that are different from the recommended 10mm size?
Of course! While 10mm safety eyes create a delightful expression on your otter, you can choose larger or smaller eyes to give your character a unique look. Just ensure they are securely attached to keep the otter safe during playtime.

Leave a Reply