
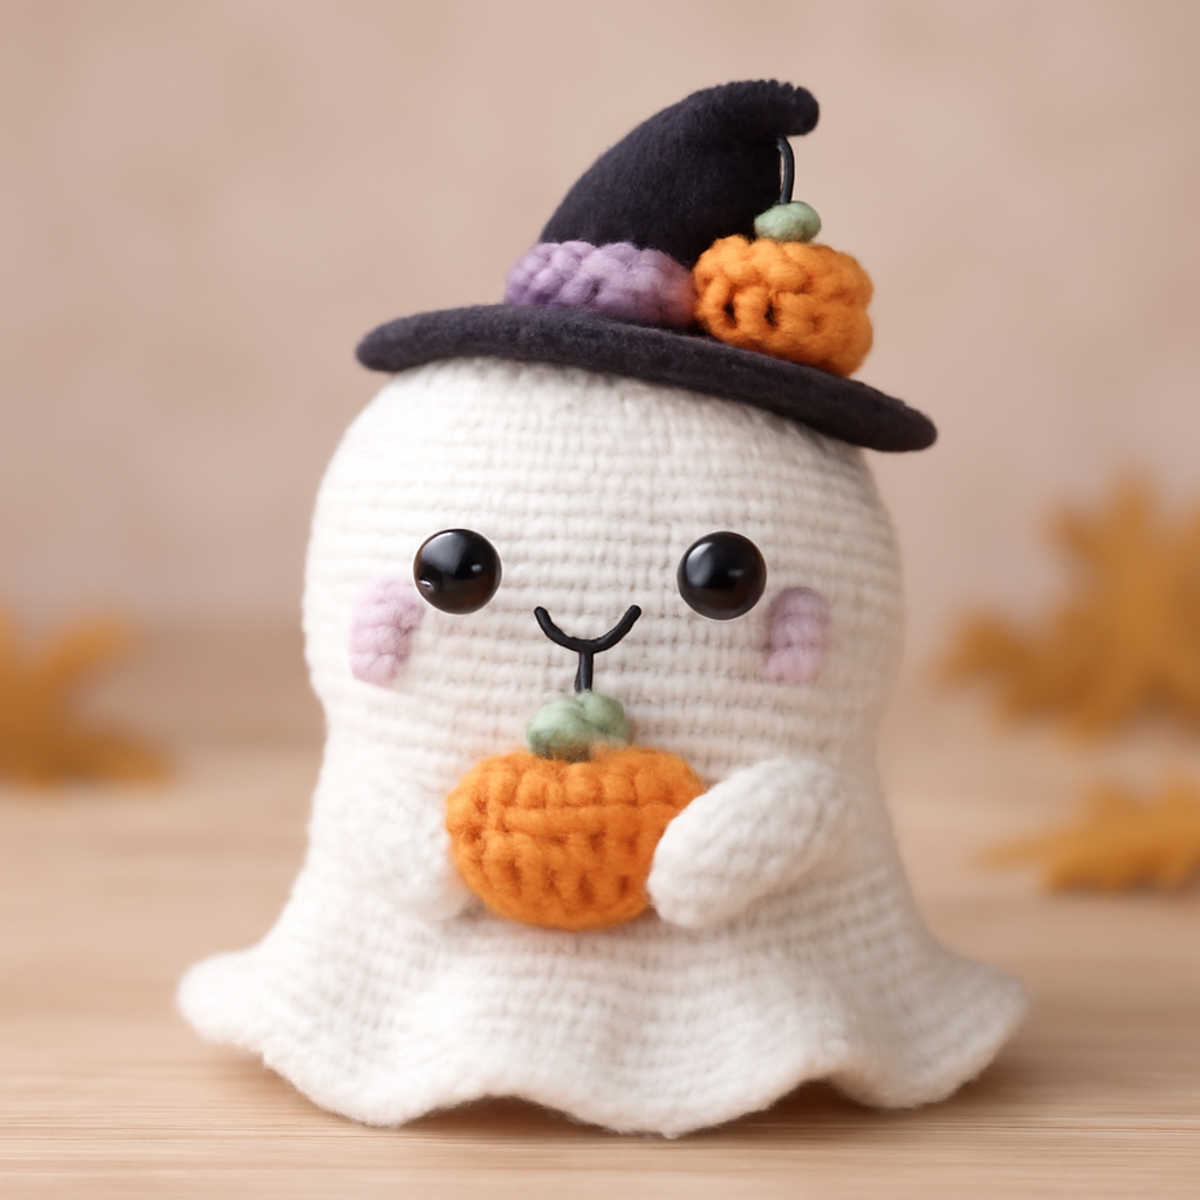
As the crisp autumn air sets in, there's a spark of whimsy that calls us to crochet seasonal delights. Introducing the ‘Adorable Halloween Ghost Amigurumi,’ a charming project that embodies the playful spirit of Halloween! This crochet ghost offers an ideal blend for beginners, thanks to its simple stitches and assembly techniques, while still presenting fun challenges for seasoned crafters. Imagine the sheer joy of customizing your ghost with colors and embellishments, creating a delightful piece to brighten your fall decor or give as an irresistible gift. Not only is this project a fantastic stash-buster, allowing you to use up those beloved yarn scraps, but it also promises a cozy and plush finish that perfectly captures the essence of the season. Ready to bring some spooky charm to life? Let’s dive in and start stitching!
Crochet Ghost Materials & Tools
Yarn
- Medium (Worsted) Weight Yarn – Look for 200-250 yards of acrylic or similar synthetic blends for durability and ease of care.
Tools & Notions
- 3.5 – 4 mm (E to G) Crochet Hook – This size is perfect for creating tight stitches that will conceal stuffing.
- 10mm Safety Eyes – Essential for giving your crochet ghost its charming face.
- Yarn Needle – A must-have for seamless assembly of all parts.
- Scissors – For cutting yarn as needed during your project.
Why Crochet This Adorable Ghost?
Whimsical Spirit: Perfect for Halloween, this crochet ghost adds a playful touch to your seasonal decorations or makes for a charming gift.
Beginner-Friendly: Designed with simple stitches, this pattern welcomes novice crocheters while offering delights for experienced makers alike.
Customizable Fun: Unleash your creativity by experimenting with color palettes and personal touches, ensuring each ghost is uniquely yours.
Stash-Buster: A great opportunity to use leftover yarn scraps, this project is an easy way to clear out your stash.
Cozy Texture: Expect a soft and plush finish that not only looks delightful but also feels wonderful to the touch, making it a cozy addition to any space.
Gauge & Sizing Notes
Don't skip the gauge swatch! Ensuring the proper tension is crucial for your crochet ghost project, as it directly impacts the finished size and overall appearance. A general guideline is to aim for a crochet gauge of 4×4 inches (10×10 cm) that includes approximately 8 sc rows and 14 stitches across, but checking your own tension with a swatch is essential. If you wish to make your ghost larger, simply adjust your starting chain in multiples of 6 when shaping the body; similarly, to make it smaller, decrease your starting chain. If your tension doesn’t match, don’t worry! If your swatch is too small, try using a larger hook size to achieve the desired results for your cozy crochet ghost.
Step-by-Step Pattern for crochet ghost
Row 1: Magic Ring and Head
Start with a magic ring (MR) and crochet 6 single crochets (sc) into the ring. Pull the ring tight to close it. This forms the base of the ghost's head. Your work should appear like a small circle. Remember to count your stitches as you go; you should have 6 sc (6 sts).
Row 2: Increase Round
Continue to build the head by crocheting 2 sc in each stitch around the magic ring. This will create a rounded shape for the ghost's head. By the end of this round, your head should start expanding, and you will have 12 stitches (12 sts).
Row 3: Expand the Head
For this round, work 1 sc in the first stitch, then 2 sc in the next stitch. Repeat this pattern around, effectively increasing the size of the head while giving it a rounded look. Count your stitches to ensure a total of 18 (18 sts) at the end; your head should be noticeably larger now.
Row 4: Continue to Shape the Head
In this round, crochet 1 sc in the first two stitches, then 2 sc in the next stitch. Repeat this pattern all around. Your crochet ghost's head will become even more pronounced, culminating in 24 stitches (24 sts) that should maintain a dome-like shape.
Row 5: Flare the Body
Next, crochet 1 sc in the first 3 stitches, then 2 sc in the next stitch. Repeat this for the rest of the round. This will allow the body to begin flaring out. By the end of this round, you will have 30 stitches (30 sts); your work should start to cup outwards.
Row 6-10: Build the Body Height
For the next five rounds, crochet 1 sc in each stitch around to maintain the even shape of the ghost’s body. You should have a total of 30 stitches in each round (30 sts). Your crochet ghost should now start looking fuller and take shape wonderfully.
Row 11: Start Decreasing for the Bottom
Begin to taper the body down by doing 1 sc in the first 3 stitches, then 1 decrease (dec) in the next stitch. Repeat around. This creates a gradual narrowing toward the bottom. At the end of this row, you should have 24 stitches (24 sts), and the shape will start to look more ghostly.
Row 12: Final Decrease Round
Continue decreasing by crocheting 1 sc in the first two stitches, then dec in the next stitch. Repeat this step around. Your crochet ghost will be taking shape now, with 18 total stitches (18 sts) as it starts to look like a whimsical figure.
Row 13: Closing the Body
In this round, crochet 1 sc in the first stitch, then dec in the next. Continue around until you reach the starting point. Your ghost's body will be nearly finished, leaving you with 12 stitches (12 sts) at the end of this round. The work should maintain its form with a noticeable bottom.
Step 1: Assemble the Body
Stuff your crochet ghost gently to give it a plush appearance. Using a yarn needle, sew up the bottom, joining the last 12 stitches together seamlessly to complete the ghost's body. Your crochet ghost should now stand tall and take shape beautifully.
Step 2: Create the Arms
For the arms, create two pieces using a magic ring. Crochet 6 sc into the ring, increasing according to your preferred arm width for 3 rounds. Finish by decreasing and sewing the arms onto the sides of your ghost's body. You should see your character come to life!
Step 3: Craft the Witch Hat
To make the witch hat, start with a magic ring (MR) and do 8 sc to form its base. Increase to 16 stitches in the second round, followed by 1 sc in each stitch for a couple of rounds. Shape the top with decreases. The hat should stand upright and complement your crochet ghost’s playful demeanor.
Step 4: Adding Eyes and Face
Place 10mm safety eyes securely on your ghost's head. Remember to choose eye placement that gives an adorable expression, enhancing the cute character of your crochet ghost. This step brings personality and charm to your finished project.
Step 5: Final Assembly and Edging
With all pieces crocheted, sew together all assembled parts solidly. Snip any excess yarn, and weave in the ends to ensure a polished look. Optionally, add tiny stitches at the neckline for more security. And there you have it—a cozy crochet ghost ready for your Halloween decor!
How to Wash and Care for Your Crochet Ghost
Machine Washing: Use a gentle cycle in cold water to maintain the shape of your crochet ghost, avoiding agitation to prevent any felting or pilling.
Hand Washing: For a tender touch, immerse your crochet ghost in cold water mixed with mild detergent, gently swishing it to keep the plush texture intact.
Drying/Blocking: Lay your crochet ghost flat on a clean, dry towel to reshape and allow to air dry away from direct sunlight, ensuring it maintains its adorable form.
Storage: When not in use, store your crochet ghost in a cool, dry space, preferably in a breathable bag to protect it from dust while keeping the playful spirit alive.
What to Pair with Adorable Halloween Ghost Amigurumi
As you revel in the delightful world of crochet ghosts, consider crafting a whimsical collection to enhance your seasonal decor.
- Mini Pumpkin Pals: Create these cute pumpkins to accentuate your ghost, bringing a touch of Halloween brightness to your display.
- Spooky Witch Hat: A tiny hat can transform your ghost into an even more charming character, adding layers of whimsy and fun.
- Ghostly Garland: String together multiple ghosts for a playful garland that adds a festive touch to any mantle or doorway.
- Matching Amigurumi Bat: A cute companion for your crochet ghost, this bat can flutter in alongside for a delightful Halloween theme.
- Festive Coasters: Use similar yarn to craft spooky coasters, providing functional décor that ties your whole Halloween aesthetic together beautifully.
Crochet Ghost Customization Ideas
Ready to make your crochet ghost even more enchanting? Let your creativity shine through!
-
Color Variations: Experiment with different color palettes, like traditional whites or vibrant purples, to suit your Halloween theme.
-
Thicker Yarn: Swap for a bulky weight yarn to create a larger ghost that will make a bolder statement in your decor.
-
Antique Charm: Consider using cotton yarn for a vintage feel; this will give your ghost a unique texture and look.
-
Embellished Decorations: Add glitter or sequins to the pumpkin for an enchanting, festive flair that sparkles in the light.
-
Character Faces: Change up the facial expressions by using embroidered features or felt for a personal touch that reflects your style.
-
Add a Friend: Crochet a mini ghost to accompany your main character, creating a charming duo that delights all who see them.
-
Pom-Pom Fun: Attach a playful pom-pom to the witch hat for an extra touch of whimsy, lifting the design with delightful character.
-
Fringed Edges: Incorporate fringe along the bottom of the ghost for a unique finishing touch that adds movement and texture.
Expert Tips for Crochet Ghost
Consistency is Key: Ensure you maintain a steady tension throughout your work to achieve a uniform size for the ghost's components.
Count Carefully: Regularly count your stitches after each round to avoid accidental increases or decreases that can distort your crochet ghost's shape.
Block for Perfection: Block your finished ghost to help it stand upright, particularly around the neckline where the head meets the body.
Keep Yarn Tidy: When assembling, always weave in the yarn ends securely to prevent any unraveling, ensuring your crochet ghost remains intact and adorable.
Safety First: Double-check the placement of safety eyes before securing them to ensure a whimsical expression that delights everyone who sees your ghost.
Adorable Halloween Ghost Amigurumi FAQs
Can I use a different yarn weight for this crochet ghost?
Absolutely! While a medium (worsted) weight yarn is recommended for the best results, you can experiment with other yarn weights. Just keep in mind that changing yarn types may affect the size and final texture of your ghost. If you choose a thicker yarn, your ghost will be larger and more striking!
How can I make my crochet ghost bigger or smaller?
To adjust the size of your crochet ghost, you can switch to a thicker yarn with a larger hook size for a bigger ghost, or use a lighter yarn and smaller hooks for a more petite version. Additionally, you can increase or decrease the number of rounds in the body to suit your desired dimensions.
Why is my crochet ghost curling at the edges?
Don't panic! Curling can occur if your tension is too tight or if you have an incorrect stitch count. I recommend checking your gauge and being mindful of stitch counts in each round. If you find your edges are curling, gently block your ghost to help it stand upright and improve its shape.
How do I fix dropped stitches on my crochet ghost?
It's an easy fix! If you notice a dropped stitch, carefully locate it and re-insert your hook back into the stitch, pulling the yarn through to secure it. You can also use a yarn needle to sew the dropped stitch back into place if it’s further down in the work. Just be cautious to avoid pulling too tightly!
What size crochet hook should I use for this project?
For this pattern, a 3.5 – 4 mm (E to G) crochet hook is ideal. This size creates tight stitches that help conceal stuffing, ensuring a clean and finished look for your crochet ghost. Remember to check your gauge if you're using a different yarn!

Leave a Reply