
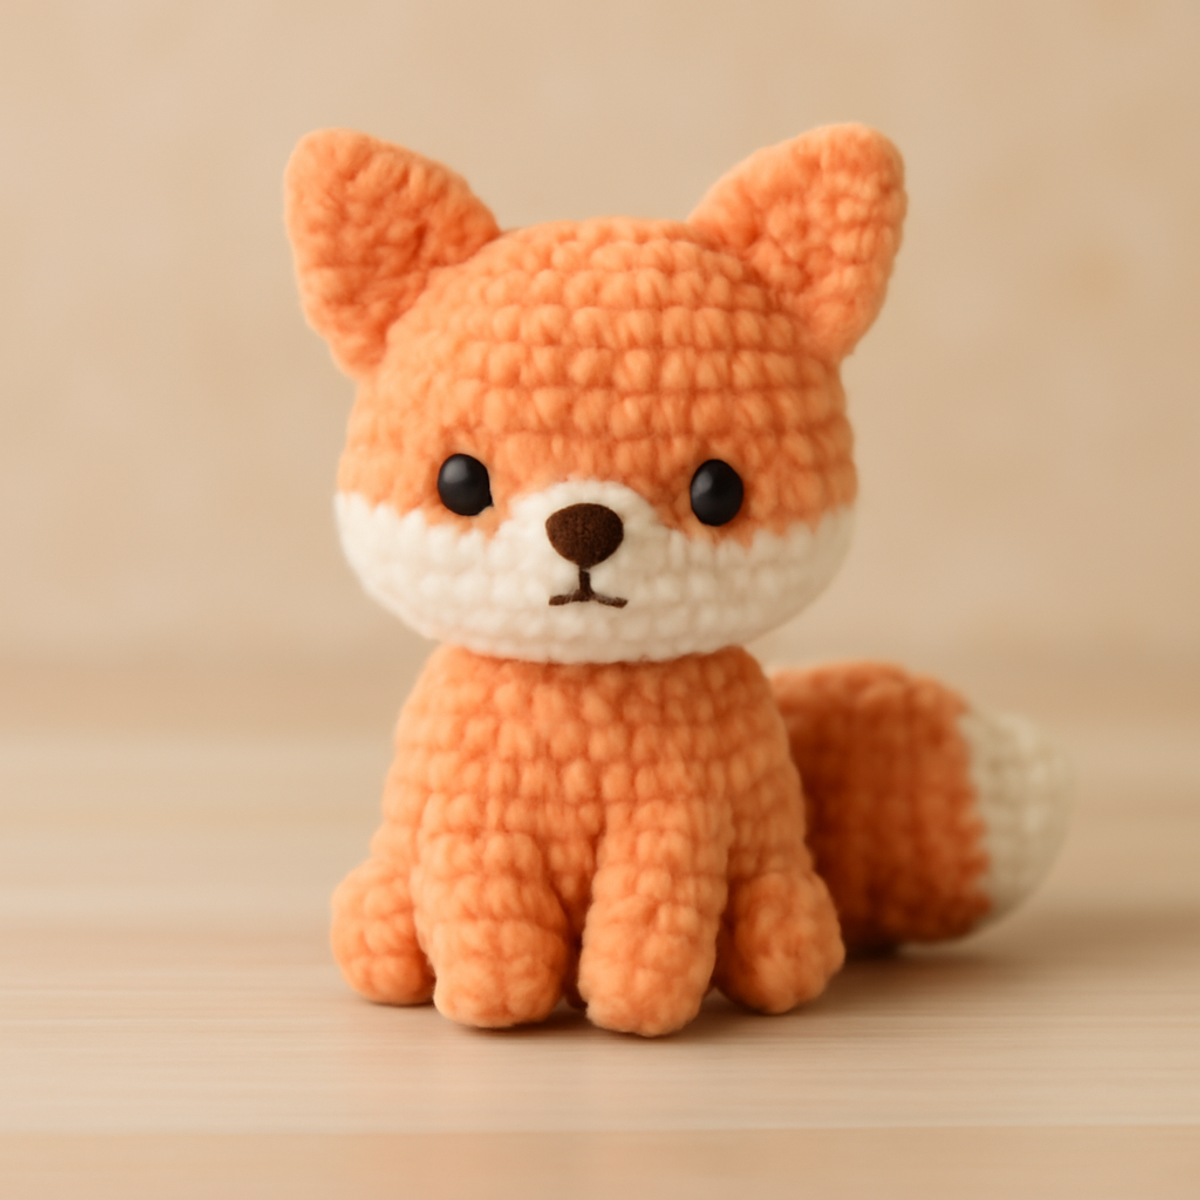
As I settled into my favorite crochet nook, the soft feel of plush yarn slid through my fingers, inspiring me to create something adorable. Today, I’m excited to share my crochet fox pattern, a delightful project perfect for both beginners and intermediates eager to dip their hooks into amigurumi. Not only does this charming little fox boast a cuddly texture and playful appearance, but its simple construction makes it a joy to create. Plus, you’ll love the opportunity to add your unique flair with embellishments like safety eyes and embroidered facial features. Imagine gifting this whimsical toy as a nursery decoration or charming collectible; it’s bound to bring smiles all around! Ready to start stitching up your own lovable fox? Let’s dive in!
Cozy Crochet Fox Materials & Tools
- Plush or Chenille Yarn – Choose yarn in peach, orange, white, and brown for that soft texture essential for your crochet fox pattern; you'll need approximately 150-200 yards total based on desired size.
- 4.0mm (G) Crochet Hook – This hook size is perfect for achieving tight stitches to ensure stuffing doesn't show through your stitches.
- 10mm Safety Eyes – These add whimsical character to your fox; make sure to sew them securely for safety.
- Polyester Stuffing – Use this to give your fox a cuddly, squishy surface that little hands will love.
- Scissors – A sharp pair is essential for cutting yarn and finishing your cute plush toy.
Why is this crochet fox pattern special?
Adorable charm: The finished fox toy captures hearts with its playful look and friendly smile, making it irresistible for both kids and collectors.
Beginner-Friendly: Combining simple stitches with easy assembly, even novice crocheters can successfully create this delightful project without getting overwhelmed.
Plush Texture: Crafted from soft chenille yarn, this fox has a cozy feel, perfect for cuddling and snuggling.
Endless Customization: Change up the colors or add fun accessories to make your fox unique, allowing for creativity in every stitch.
Quirky Gift: Ideal for any occasion, this fox makes a whimsical gift or charming nursery decoration that brings joy to any space.
Gauge & Sizing Notes
Don't skip the gauge swatch! Checking your tension is essential for this crochet fox pattern to ensure you achieve the desired size and cuddly texture. Generally, aim for a gauge of 4×4 inches (10×10 cm) to help keep everything consistent. If you want to tweak your fox's dimensions, consider adjusting your starting chain in multiples of 6; for example, to make a rounder body, simply add an extra 6 stitches. If your tension is not matching the gauge, and your swatch is coming out too small, try going up a hook size to loosen your stitches a bit. This way, you'll create a perfect plush companion!
Step-by-Step Pattern for crochet fox pattern
Row 1: Magic Ring Setup
Start with a magic ring (or adjustable loop) and work 6 single crochet (sc) stitches into it, ensuring to pull the yarn tail to tighten the ring. This forms the beginning of your crochet fox's head. Your work should start to curl into a small circle. (6 sts)
Row 2: Increasing for Shape
In this round, do an increase by placing 2 sc in each stitch around. This will help your head to expand and form a soft round shape. Make sure to count your stitches as you go along, keeping them tight so the stuffing doesn’t show. (12 sts)
Row 3: Continuing to Increase
Round 3 will involve doing 1 sc in the first stitch, followed by an increase (2 sc in the next stitch). Repeat this pattern for the entire round. You should notice your work widening, continuing to build a round head for your crochet fox. (18 sts)
Row 4: More Shaping
For Round 4, work 1 sc in the first two stitches, followed by an increase. Repeat across until you complete the round. This gradual increase helps maintain a smooth shape, essential for your fox's head. Your round should feel fuller now. (24 sts)
Row 5: Starting to Form the Face
In Round 5, make 1 sc in the first three stitches, followed by an increase. Continue this to the end of the round for a nice rounded form. You should see the head beginning to take a lovely shape. (30 sts)
Row 6: Begin Decreasing
To start shaping the fox's head, Round 6 will feature 1 sc in the first four stitches, followed by a decrease (dec). This helps to narrow the top of the head while maintaining a smooth curve. Your work will begin to gather. (24 sts)
Row 7: Continuing Decrease
For Round 7, work 1 sc in the first three stitches, then a decrease. Repeat this pattern until you've made it around the round. The head should be starting to look more defined and rounded for your adorable fox. (18 sts)
Row 8: Final Shaping
Complete Round 8 by placing 1 sc in the first two stitches followed by a decrease. Continue this pattern to finish the head. Pinch your work slightly to check the depth; it should be starting to look more fox-like. (12 sts)
Row 9: Adding Safety Eyes
Before closing up the head, insert your safety eyes between the 9th and 10th rounds, spaced appropriately to form the face. Now is your chance to personalize your crochet fox by adjusting placement and stance!
Row 10: Final Decrease and Stuffing
Round 10 involves doing a decrease all the way around. Before your last stitch, stuff the head firmly with polyester stuffing, giving it a nice shape. Ensure it’s rounded yet firm to the touch for a cuddly feel. (6 sts)
Step 2: Transition to Body
Next, we will be creating the body of your fox. To do this, chain 1 and crochet 6 sc into the base of the head. This transition links the head and body seamlessly, guiding your work down. (6 sts)
Row 12: Building the Body
For Round 12, increase each stitch by 2 sc around. This will create a wider body for the plush toy, enhancing its cuddly appearance. The shape should resemble the beginning of a small dome. (12 sts)
Row 13: Continuing the Body
In Round 13, make 1 sc in the first stitch followed by an increase, repeating until the end of the round. By now, the body of your toy is taking form and should be puffy and inviting! (18 sts)
Row 14-15: Establishing Form
In the next two rounds (14 and 15), sc in each stitch around. This will help establish the body size, providing stability and the squishiness desired in your crochet fox pattern. (24 sts for Round 14, 24 sts for Round 15)
Step 3: Legs
Now let’s move on to create the four legs. To start the legs, chain 1 and crochet into the body’s bottom with 6 sc in a single round, establishing a sturdy base. (6 sts)
Row 17: Shaping the Legs
For Round 17, increase by adding 2 sc into each stitch around. As you work, keep your tension even to ensure the legs don’t become loose. Your legs should appear nice and chunky! (12 sts)
Row 18: Continuing Legs
In Round 18, sc 1 in each stitch around again for a stable structure. With each stitch, you’ll be creating a nice hold for the legs, ensuring they remain sturdy on this cuddly fox. (12 sts)
Step 4: The Tail
To create the tail, chain 1, and work 6 sc into a magic ring, following the same method as you did for the head. This will form the base before adding fluff. (6 sts)
Row 20: Fluffy Tail
For Round 20, do an increase of 2 sc in each stitch around. This round will ensure the tail looks nice and fluffy once you stuff it. Your tail should begin to take shape, becoming a perfect little addition to your fox! (12 sts)
Row 21-22: Completing the Tail
In the next two rounds (21 and 22), continue with sc in each stitch, thoroughly stuffing as you go. Your tail should look wonderfully plush, complementing the rest of the body. (18 sts for Round 21, 18 sts for Round 22)
Step 5: Ears Assembly
For the ears, chain 1 and create a magic ring with 6 sc in the ring. This will form the base for your fox's adorable ears. (6 sts)
Row 24: Shaping Ears
In Round 24, do an increase of 2 sc in every stitch around. As you shape the ears, they should begin to flare out, giving your fox a cutely expressive look. (12 sts)
Row 25-26: Final Ear Touches
For the next two rounds (25 and 26), alternate between 1 sc in each stitch and an increase to give the ears a well-defined shape while making sure they stay securely attached. (18 sts for Round 25, 18 sts for Round 26)
Step 6: Final Assembly
Now it’s time to assemble your cute crochet fox! Start by sewing the legs securely to the body, ensuring they are spaced evenly. Next, attach the head to the body and sew on the ears, ensuring they have a friendly lift.
Step 7: Embellishments
Finish your cozy crochet fox pattern by embroidering the facial features like the nose and mouth. This final touch gives your fox its charming personality and truly completes your adorable project!
What to Pair with Your Crochet Fox Pattern
Imagine wrapping your cozy fox in a delightful array of matching accessories that enhance the playful charm of your creation.
-
Plush Rabbit Toy: Create a cuddly rabbit to accompany your fox, using similar yarn to maintain that heartwarming aesthetic.
-
Whimsical Blanket: A vibrant crochet blanket makes the perfect backdrop for your fox, providing warmth and a cozy spot for playtime.
-
Matching Hat: Design a tiny hat for your fox, using leftover yarn for a customizable touch that showcases your creativity.
-
Charming Storage Basket: Crochet a small basket in complementary colors to keep your fox’s friends organized, adding a decorative touch to any room.
-
Sweet Baby Booties: Pair your fox with adorable booties made from the same soft yarn, perfect for little ones and their cuddly companion.
Expert Tips for Your Crochet Fox Pattern
-
Keep Even Tension: Maintain consistent tension throughout your work to help the plush fabric hold its shape, ensuring a cuddly and visually appealing fox.
-
Count Your Stitches: Regularly count your stitches, especially on the head and body rounds. This prevents discrepancies that could alter the fox's proportions.
-
Secure Assembly: As you sew the legs, head, and ears, ensure they are firmly attached. This durability is important, especially for your fox being a toy for play.
-
Insert Safety Eyes Early: Position your safety eyes before closing the head. Adjust the placement if needed, as these embellishments bring your crochet fox to life.
-
Stuff Firmly: When stuffing, aim for a rounded yet firm feel to help maintain the plush look of your crochet fox pattern, making it snuggly and durable.
Crochet Fox Pattern Variations
Want to add a personal touch to your crochet fox? Let’s explore some fun and creative ideas!
-
Color Swaps: Change the color palette to create different fox species, like a gray or arctic fox. Play with combinations like toasty browns or icy whites for unique personalities!
-
Yarn Alternatives: Try cotton yarn for a firmer feel or bamboo for a silky touch. Each fiber will transform your fox's appearance and texture, making it truly yours.
-
Size Adjustments: Alter the finished size by adjusting your hook or yarn weight. A bulkier yarn with a larger hook could result in a cuddly giant, while a smaller weight offers a delicate mini fox.
-
Accessory Love: Adorn your fox with knitted or crocheted hats, scarves, or even tiny sweaters. Seasonal themes can sprinkle delightful character, making your fox suitable for any time of year.
-
Textured Enhancements: Add fun embellishments like pom-poms on the tail, fringes on the ears, or a stylish border around the base for added flair. Each option brings a new level of charm!
-
Whimsical Features: Go beyond safety eyes by experimenting with embroidered or felted features. A different nose shape or expressive eyebrows can give your fox even more personality!
-
Ribbon or Bow: Attach a cute ribbon or bow around the neck for a sweet finishing touch. This simple addition can elevate your fox to a celebratory gift or keepsake.
-
Grouped Scene: Consider crafting a family of foxes in various sizes and colors for a playful display! This creates a lively group that will surely delight anyone who sees them.
How to Wash and Care for Your Crochet Fox
Machine Washing: Use a gentle cycle in cold water to keep your crochet fox looking fresh without risking felting or pilling. Always place it in a mesh laundry bag for extra protection.
Hand Washing: If you prefer, wash your crochet fox by hand in cold water with a mild detergent. Gently press to remove dirt, ensuring not to agitate, which helps maintain its lovely shape.
Drying/Blocking: After washing, lay your crochet fox flat on a clean, dry towel to dry. Avoid hanging, as this can distort its adorable form and keep it looking plush.
Storage: Store your crochet fox in a cool, dry place, away from direct sunlight and moisture. This keeps it safe and ready for cuddles anytime, while preserving the quality of your crochet fox pattern.
Cozy Crochet Fox FAQs
Can I substitute yarn types for this crochet fox pattern?
Absolutely! While plush or chenille yarn is recommended for its soft texture, you can experiment with other yarns like cotton for a firmer option or wool for added warmth. Just be mindful that different yarns may affect the final size and overall feel of your fox.
What size hook should I use for the crochet fox pattern?
I recommend using a 4.0 mm crochet hook (US size G) to achieve tight stitches that prevent stuffing from showing through. However, if you decide to use a different yarn weight, consider adjusting your hook size accordingly to match the recommended tension for that yarn.
How can I make my fox bigger or smaller?
Great question! To alter the size of your crochet fox, you can use a different yarn weight or hook size. For a larger fox, opt for bulkier yarn and a larger hook. Conversely, if you want a smaller fox, use a lighter yarn and a smaller hook. Just remember to adjust your stitch counts to maintain the shape as you go!
Why is my crocheted fox’s body curling?
Don't panic! Curling can often result from uneven tension or using a hook that's too small for your yarn. Make sure you're maintaining consistent tension, and check that your hook size matches the recommended gauge for your yarn. A quick check of your stitch count can also help identify any inconsistencies.
What should I do if I drop a stitch while working on the fox?
It's an easy fix! If you notice a dropped stitch, carefully pull the yarn back to the last complete row, and reinsert your hook into the dropped stitch. You can then work to fix it by crocheting back to the previous row, ensuring everything stays neat and secure.
How do I attach the safety eyes correctly?
When placing the safety eyes, do so before closing up the head. I recommend positioning them between the 9th and 10th rounds since this spot provides an adorable placement for the facial features. Ensure they are spaced evenly for a balanced look, and secure them tightly for safety!

Leave a Reply