
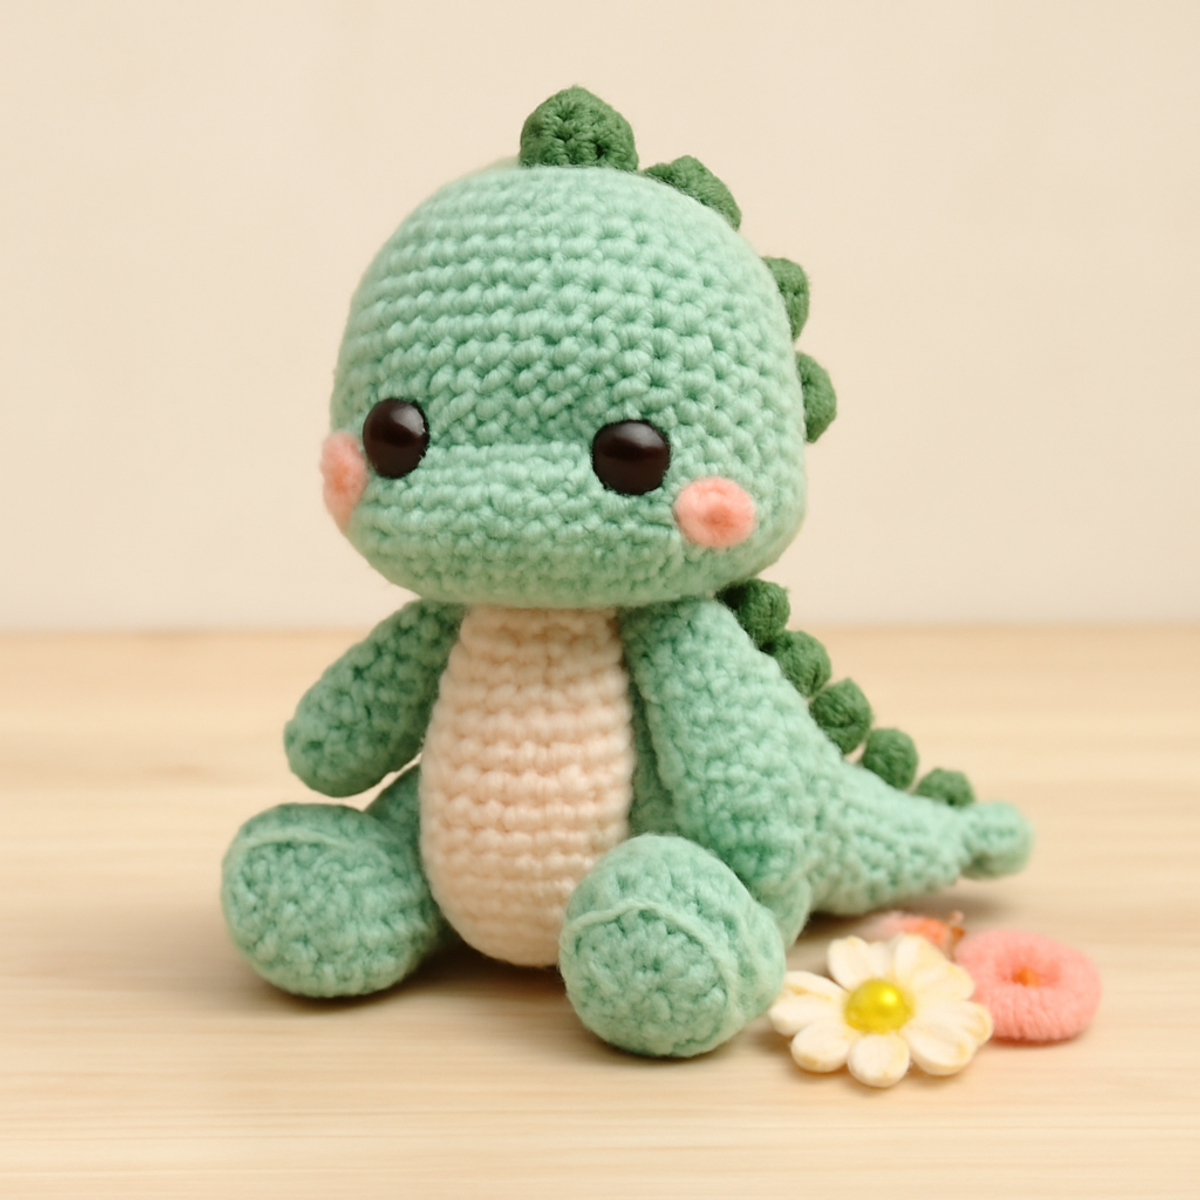
As I sat with my hook and yarn, the soft mint green plush in my hands sparked a wave of childhood nostalgia. The Dreamy Dinosaur Plush is more than just a project; it crafts a cozy companion that can bring smiles to both kids and adults alike. This crochet dinosaur plush offers the thrill of assembling various adorable parts, allowing you to customize colors and create a delightful keepsake or gift. Not only is this pattern perfect for honing your intermediate skills, but it also transforms yarn into a whimsical treasure that will surely be cherished for years to come. So let's dive into this cuddly adventure and stitch our way to creating a charming dino buddy that's just bursting with personality!
Dreamy Dinosaur Plush Materials & Tools
Note: Gather these essentials before embarking on your cozy crochet dinosaur plush adventure!
Yarn
- Plush or Chenille Yarn – Choose weight category 4 (medium) for a soft, squishy finish.
- Mint Green – Approx. 100-200 yards for the main color.
- Cream – Approx. 50-100 yards for the belly or accents.
- Pink & Green – Minimal amounts (20 yards each) for charming embellishments.
Tools & Notions
- 5.0 mm (H-8) Hook – This size is perfect for the plush yarn type, ensuring a consistent tension.
- Safety Eyes (12 mm) – Add these for a cute and safe feature; perfect for your charming dino!
- Polyester Stuffing – Needed to give your plush a cuddly, huggable form.
- Yarn Needle – Essential for sewing pieces together and weaving in ends.
- Scissors – Handy for trimming yarn as needed.
- Optional Stitch Markers – Useful for tracking rounds if you need a little extra help!
Why Make a Crochet Dinosaur Plush?
Endearing Design: The Dreamy Dinosaur Plush showcases a whimsical look that's bound to captivate hearts, making it a delightful addition to any creative space.
Fun Assembly: Enjoy the satisfying challenge of crafting multiple components, from the rounded head to the charming spikes, enhancing your skills as you go.
Soft & Cuddly: Using plush yarn ensures a dense, squishy finish, perfect for hugging, gifting, or adorning your home.
Color Customization: Choose your own color palette to match any decor or personality, creating a truly unique creation that stands out!
Versatile Gift: This playful toy is ideal for all ages, making it a heartfelt gift for children or a charming addition to adult collectors.
Gauge & Sizing Notes
Don't skip the gauge swatch! Checking your crochet gauge is essential for the Dreamy Dinosaur Plush to ensure all parts fit together beautifully and have a cohesive look. A general guideline for tension is to aim for a 4×4 inch (10×10 cm) square = 15 single crochets by 10 rows, but this may vary with your technique. To adjust the size of your dinosaur, you can increase your starting magic ring or chain in multiples of 6 for the body and legs. If your swatch is smaller than desired, try going up a hook size; likewise, if it's too large, switch to a smaller hook. Remember, your plush's size depends on your tension, so make that swatch count!
Step-by-Step Pattern for Crochet Dinosaur Plush
Row 1: Head Creation
Begin with a magic ring and make 6 single crochet (sc) into the ring. Pull tightly to close, then work in continuous rounds. For Row 2, increase each stitch (12 sts). In Row 3, crochet 1 sc in the first stitch, followed by an increase, repeating to the end (18 sts). Your work should start to cup slightly, forming the rounded shape of the head.
Row 2: Continue Building the Head
For Row 4, work 2 sc in each stitch around (36 sts). In Row 5, sc in the first 4 stitches, then inc in the next, repeat to end (45 sts). From Row 6 to Row 8, sc in each stitch without increases to build height. At this point, your head should feel plush and round.
Row 3: Color Change for Cheeks
Change to cream yarn for a cozy touch. In Row 9, sc around while adding decorative blush yarn for cheeks. Make 2-3 small sections on opposite sides of the head. Keep working until you have a total of 45 sts. Your dinosaur's face will start to take shape with the pleasant contrast.
Row 4: Body Assembly
Transition to the body by switching back to mint green. In Row 1, create a magic ring and make 6 sc (6 sts). For Row 2, increase each stitch (12 sts). In Row 3, sc in the first stitch, then increase (18 sts). Continue to work in rounds, adding sc until the body measures about 6 inches long, transitioning smoothly from the head.
Row 5: Creating the Arms
Start arms with a magic ring and 6 sc. For Row 2, sc and inc to shape (9 sts). Row 3 should have 2 sc followed by one inc, repeating to the end (12 sts). After 4 more rounds of sc, flatten the end of each arm before sewing to the body. This will provide a cute, stubby appearance for the arms.
Row 6: Crafting the Legs
Similar to the arms, begin the legs with a magic ring and 6 sc. Work 2 rounds of inc (9 and then 12 sts), then continue with 3 rounds of sc for stability. Finish by flattening the ends as you did with the arms. Ensure the legs are sturdy to support the plush's chubby shape.
Row 7: Forming the Tail
Start with a magic ring and 6 sc. For Row 2, work an inc in every stitch (12 sts). In Rows 3 through 5, sc in each stitch, gradually tapering the tail by decreasing in the final 2 rows (12, then 6 sts). You should see a delightful tapered end, giving your dinosaur a cute, dynamic tail.
Row 8: Making the Spikes
For the spikes, create 7 individual pieces using a magic ring of 6 sc. In Row 2, increase each stitch (12 sts). Work in rounds, using inc every third stitch to add texture. The spikes should be around 3-4 inches long. After finishing, they'll be sewn onto the back, adding a charming flair to your crochet dinosaur plush.
Step 1: Assembly of Parts
Begin assembly by securely stuffing the head, body, and limbs with polyester stuffing. Attach the head to the body with the yarn needle, ensuring it’s proportionate and secure. Then, sew on the arms and legs in desired positions, creating a cuddly dinosaur pose. Finally, stitch the tail and spikes, arranging them evenly along the back.
Step 2: Final Touches
Embellish your completed crochet dinosaur plush by attaching safety eyes and embroidering any facial details for personality. Weave in all loose ends with your yarn needle. Block your plush lightly to enhance its shape. Your cozy crochet dinosaur plush is now ready to bring joy and warmth!
How to Wash and Care for Your Crochet Dinosaur Plush
Machine Washing: Use a gentle cycle with cold water to avoid agitation that could cause felting or pilling on your crochet dinosaur plush.
Hand Washing: For best results, wash your plush toy by hand in cold water with mild detergent to keep it looking fresh and maintain its shape.
Drying/Blocking: Lay your dinosaur flat to dry, reshaping it as needed. Avoid using a dryer, as heat can distort the plush texture and features.
Storage: Store your plush in a cool, dry place, away from direct sunlight to prevent color fading and preserve its cuddly charm.
What to Pair with Dreamy Dinosaur Plush?
As you craft your delightful crochet dinosaur plush, consider expanding your whimsical collection with these charming companions.
-
Cuddly Dino Blanket: Create a soft blanket featuring the same mint green to snuggle with during playtime. The texture will harmonize beautifully with your plush companion.
-
Matching Dino Pillow: A plush pillow in coordinating colors can complement your dino perfectly, making every cuddle session even cozier.
-
Tiny Dino Keychain: Transform leftover yarn into a miniature dino that can accompany your larger plush. It's a charming way to showcase your creativity!
-
Adorable Dino Hat: Whip up a cute hat adorned with dino spikes to match your plush. This pairing is not only practical but brings extra fun to the playtime experience.
-
Playful Dino Pouch: A small crochet pouch can be a perfect home for your tiny treasures or tools, all while echoing the playful spirit of your dinosaur plush!
Crochet Dinosaur Plush Variations
Feel free to let your creativity shine by customizing this delightful crochet dinosaur plush in unique ways!
- Yarn Substitutions: Use cotton yarn for a more lightweight option that’s perfect for warmer climates, but beware of losing some of that plush feel.
- Size Adjustments: Swap your regular 5.0 mm hook for an 8.0 mm hook and a super bulky yarn to create an oversized dino buddy that will be even more huggable!
- Color Play: Explore color-blocking techniques by mixing mint green with a vibrant blue or soft pastel hues for a more playful experience.
- Eye Alternatives: Opt for embroidered eyes to give your dino a cute and whimsical touch, adding a personal flair to its expression. There's a certain charm in hand-stitched details!
- Spike Variation: Change the spikes' color to match the body for a seamless look or contrast with pink for a bold statement, allowing for endless personality!
- Texture Additions: Incorporate fun elements like a fringed tail for texture or a pom-pom on the head for added whimsy, making your plush truly one-of-a-kind.
- Arm & Leg Styling: Consider varying the arm and leg lengths for a child-like proportion, enhancing the quirky appeal of your dinosaur and giving it a playful stance.
- Decorative Features: Add a cute scarf or a decorative border around the base for a cozy touch that speaks to your personal style and adds character.
Unleash your imagination as you craft this charming crochet dinosaur plush!
Expert Tips for Crochet Dinosaur Plush
-
Watch Your Tension: Consistent tension is key for a cohesive look; uneven stitches can lead to mismatched parts, so practice maintaining an even pull.
-
Count Stitches Frequently: Prevent gaps and ensure a smooth finish by counting your stitches regularly, especially in spherical parts like the head and body.
-
Proper Stuffing Technique: Don’t overstuff your dinosaur; a little fiber fill goes a long way in keeping the shape plush without losing form.
-
Light Blocking: After finishing, lightly block your work to enhance the shape, particularly for the spikes which benefit from a defined point.
-
Secure Assembly: Take your time when attaching pieces—ensure everything is secure and proportionate to give your crochet dinosaur plush a charming and sturdy appearance.
Dreamy Dinosaur Plush FAQs
Can I use a different type of yarn for my crochet dinosaur plush?
Absolutely! While plush or chenille yarn is recommended for its squishy finish, you can substitute it with a worsted weight acrylic or cotton yarn. Just remember, this might affect the overall texture and squishiness, so keep that in mind when choosing.
How can I make my dinosaur plush bigger or smaller?
To adjust the size of your crochet dinosaur plush, you can use a thicker yarn and a corresponding larger hook for a larger dino. Alternatively, if you want a smaller version, try using a lighter weight yarn and a smaller hook. Just check your gauge first, to ensure the proportions feel right.
Why is my work curling at the edges?
Don't panic! Curling can happen, especially when working in single crochet. It’s often due to tight tension. Try loosening your grip a bit or consciously making your stitches a little looser. Another trick is to add a row of double crochet around the edge, as this can help flatten those edges out.
How do I fix dropped stitches on my dinosaur plush?
It’s an easy fix! Simply use your crochet hook or a yarn needle to pick up the dropped stitch and pull the working yarn through. If the stitch has a gap, you might want to crochet a few stitches around it to reinforce and secure it back in place.
What hook size should I use for this project?
For the Dreamy Dinosaur Plush, a 5.0 mm (H-8) crochet hook is recommended. However, if you find your stitches are too loose or tight, you can adjust with a different size. It’s essential for ensuring you maintain the right tension for your plush toy.
Is there a way to customize my dinosaur's spikes to make them stand out more?
Definitely! You can change the color of the spikes or even incorporate a fun textured stitch like a puff stitch to give them extra flair. Play around with color combinations and yarn types for a unique twist that reflects your personal style!

Leave a Reply