
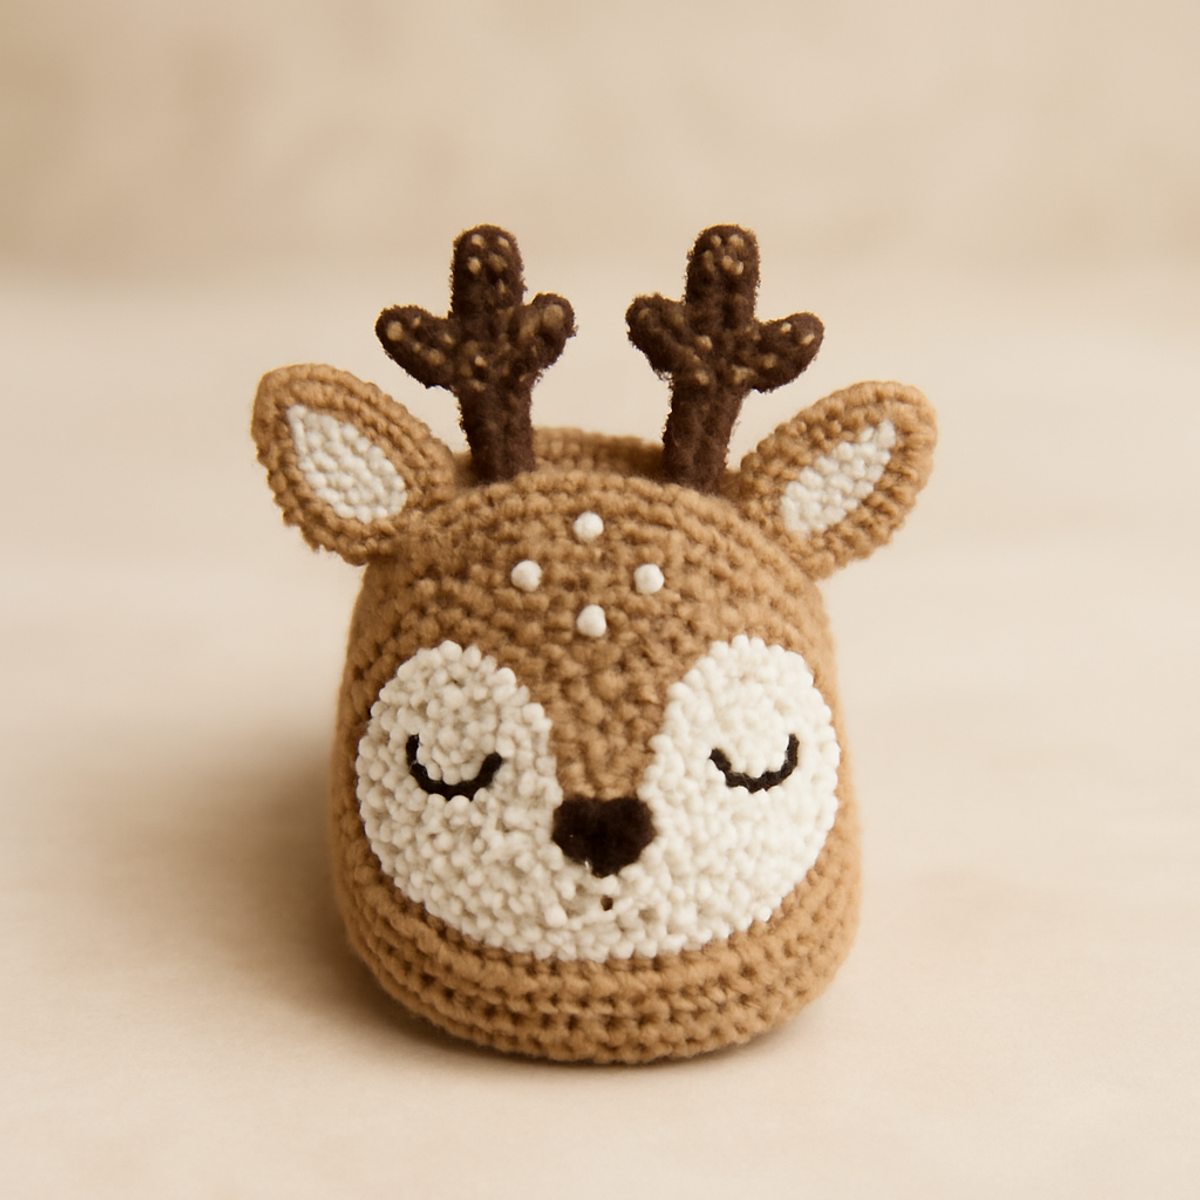
As I sat by the window, a gentle autumn breeze drifted in, bringing with it the vibrant colors of the season—a perfect backdrop for crafting cozy projects. Enter the adorable crochet deer slippers, a whimsical design that transforms tiny feet into delightful woodland critters. Boasting both a playful aesthetic and the chance to master advanced crochet techniques, this intermediate-level pattern is not just about keeping little toes warm; it’s about creating a beloved keepsake that will surely bring smiles to both kids and parents alike. Plus, with just a small amount of DK yarn, you can easily manage this stash-buster while enjoying the satisfaction of stitching something truly special. So, let’s dive into this charming project that promises to sprinkle a touch of magic into your crochet repertoire!
Crochet Deer Slippers Materials & Tools
-
Yarn
- DK (Light Worsted) Yarn – Approximately 150 yards in light brown, cream, and dark brown to achieve that charming deer look.
-
Tools & Notions
- 3.5 mm (E) or 4 mm (G) Hook – Choose based on your personal tension for an ideal fit.
- Safety Eyes – Add these for a playful deer feature that brings your crochet deer slippers to life.
- Yarn Needle – Essential for weaving in ends to ensure your lovely creation stays intact.
- Stitch Markers – Use these to keep track of rounds, especially when changing colors for that adorable design.
Why Crochet Deer Slippers Shine?
Unique Design: These charming slippers offer a whimsical deer look that sets them apart from ordinary footwear, making little feet feel special.
Intermediate Skills: Perfect for expanding your crochet talents, you'll practice color changes and working in the round, all while creating a fun, functional piece.
Cozy Fit: With a snug yet soft texture, these slippers are designed to keep tiny toes warm during chilly seasons, making them ideal for autumn and winter.
Customizable Options: Play with different yarn colors and embellishments, allowing your creativity to shine as you create unique versions for every little one.
How to Check Your Gauge for Crochet Deer Slippers
Don't skip the gauge swatch! Checking your gauge is essential to ensure your crochet deer slippers fit snugly and comfortably on tiny feet. A general guideline is to aim for a 4×4 inch (10×10 cm) square to achieve the best results. To adjust the size if your swatch is larger or smaller, consider changing your hook size—if you're finding your tension too tight, simply switch to a larger hook. To make the slippers larger, increase your starting chain in multiples of 6 + 2. With these tips, you can craft delightful slippers that will be both cute and fitting, bringing joy to the little ones who wear them!
Step-by-Step Pattern for Crochet Deer Slippers
Row 1: Magic Ring Base
Start by creating a magic ring. Chain (ch) 2, then work 8 single crochet (sc) into the ring. Pull the ring tightly to close. This will form the base for your crochet deer slippers. At this stage, your work should resemble a small circle, which will set the foundation for the slipper body (8 sts).
Row 2: Build the Body
In this row, work 2 single crochet (sc) in each stitch around. This will increase your stitch count while starting to give your deer slippers a slight cup shape. Make sure to place a stitch marker to track your rounds, as this will be essential for keeping your crochet neat (16 sts).
Row 3: Continuing the Body
For the next round, work 1 single crochet (sc) in the first stitch, then 2 single crochet (sc) in the next stitch. Repeat this pattern around to create additional increases while maintaining the rounded shape. Your work should be expanding nicely to resemble a croqueted cup, perfect for the sides of your slippers (24 sts).
Row 4: Forming the Snout Color Change
In this round, change to your cream yarn. Work 1 single crochet (sc) in each of the first 10 stitches, then switch to dark brown yarn. Work another 8 single crochet (sc) to form the snout. This will give your crochet deer slippers a sweet, adorable face (24 sts).
Row 5: Define the Body Shape
Continue using the dark brown yarn. Work 1 single crochet (sc) in each of the next 24 stitches around. This will help maintain the body shape of the slipper, providing a sturdy yet soft foundation. Your work should feel dense yet soft enough for little feet (24 sts).
Step 6: Creating the Eyes
Using the cream yarn, create the eyes by working 2 half double crochet (hdc) in the same stitch for the first eye, then skipping 1 stitch and repeating in the next stitch for the second eye. This will result in raised eye features, adding charm to your crochet deer slippers (2 eyes formed).
Step 7: Crocheting the Ears
For the ears, create a small foundation chain of 5. Then work 1 single crochet (sc) in the 2nd chain from the hook, 1 half double crochet (hdc) in the next chain, and 2 double crochet (dc) in the last chain. This creates a cute ear shape. Make a second ear to match (2 ears total).
Step 8: Attaching the Ears
Position the ears on the sides of the body and use safety eyes to secure them in place. You want to sew them tight enough so they stand up but also maintain a playful angle. This gives your crochet deer slippers their whimsical character and visual appeal.
Step 9: Adding Antlers
Make antlers by chaining 10. Work a slip stitch (sl st) in the 3rd chain from the hook. Then, chain 4 and slip stitch in the same stitch for a forked look. Repeat to make a second antler. Once finished, attach the antlers to the top of the head section (2 antlers).
Step 10: Final Assembly & Border
To finish the top edge of your slippers, work a slip stitch (sl st) around the entire opening. This adds a neat border and secures all your pieces together. Make sure everything is nicely aligned as you finish up your charming crochet deer slippers, ready for little feet to enjoy!
How to Wash and Care for Your Crochet Deer Slippers
Machine Washing: Use a gentle cycle with cold water to protect the delicate stitches of your crochet deer slippers and avoid any felting or pilling.
Hand Washing: For the best care, hand wash in cold water with mild detergent. Gently agitate without scrubbing to keep the charming design intact.
Drying/Blocking: Lay your slippers flat on a clean, dry towel to maintain their shape while drying. Avoid hanging, as this can distort their structure.
Storage: Store your crochet deer slippers in a cool, dry place away from direct sunlight to preserve their colors and craftsmanship.
What to Pair with Crochet Deer Baby Slippers
Embark on a whimsical journey to create a charming set that delights the senses and warms little hearts.
-
Deer Hat: A matching hat featuring antlers will complete the woodland ensemble, keeping little heads cozy and adorable. A simple pattern complements the slipper's playful design beautifully.
-
Cozy Baby Blanket: Create a soft blanket using similar colors, perfect for wrapping up snugly during chilly nights. The whimsical color palate enhances the entire deer theme, making it an ideal companion.
-
Mini Deer Stuffed Animal: Craft a miniature deer toy to accompany the slippers. This cute plush can become a treasured friend for little ones, adding a layer of joy to their playtime.
-
Colorful Scarf: Whip up a cheerful scarf in coordinating hues to brighten up their winter wardrobe. A textured pattern will beautifully balance the detailed design of the slippers, making a stylish feature.
-
Matching Mittens: Finish the look with cute mittens that mimic the deer design. These tiny accessories not only keep hands warm but also add a playful charm that ties the whole outfit together.
Crochet Deer Slippers Variations & Substitutions
Discover the joy of personalizing your crochet deer slippers, making them truly one-of-a-kind!
-
Yarn Substitutions: Swap out DK yarn for cotton for a lightweight summer version that's soft against delicate skin.
Embrace a whole new feel with a cotton blend that warms little toes while remaining gentle. -
Color Variations: Experiment with pastel shades like soft pinks and blues for an enchanting touch.
A sprinkle of whimsy can transform these slippers, capturing a dreamy essence perfect for imaginative little ones. -
Add Embellishments: Incorporate delightful features such as tiny bows or fringed pom-poms on the antlers.
These charming additions create a festive air, making your slippers shine even brighter during celebrations. -
Size Customization: Adjust the starting chain and number of rounds to tailor the fit for varying ages.
By resizing, you can create slippers that grow with your little one, continuously bringing smiles with their adorable design. -
Texture Modifications: Work in a bulky yarn for a squishier feel or add a cozy lining for extra warmth.
The right texture can elevate comfort, ensuring those little feet are enveloped in warmth throughout chilly seasons. -
Contrast Colors: Use a contrasting color for the slip stitch border to create a fun pop around the top edge.
This subtle tweak enhances the cozy aesthetic while showcasing your crochet skill and creativity. -
Different Animal Designs: Try transforming the deer slippers into playful bunnies with simple modifications to the ears and facial features.
This fun twist makes for a delightful surprise, offering more options for seasonal gifting or playful wear. -
Themed Versions: Create seasonal variations, such as incorporating Halloween colors or Christmas embellishments for festive occasions.
Seasonal themes sparkle with creativity, enriching your crochet experience and adding cheer to special moments.
Expert Tips for Crochet Deer Slippers
-
Watch Your Gauge: Make sure to check your gauge before starting to ensure that your slippers fit snugly. A too-tight fabric may alter the adorable shape.
-
Track Your Rounds: Use stitch markers to mark the beginning of each round. This will help you avoid losing count and keep your color changes neat and accurate.
-
Secure Your Ends: Always trim yarn ends neatly and weave them in with a yarn needle to prevent unraveling. This is especially important to maintain the look of your crochet deer slippers.
-
Avoid Twisting: When starting your foundation chain, be careful not to twist it. A twisted chain can complicate your project and alter the final appearance.
-
Don’t Rush Color Changes: Take your time with color changes to ensure smooth transitions. This will enhance your slippers' overall charm and maintain their whimsical design.
Crochet Deer Baby Slippers FAQs
Can I substitute yarn for this project?
Absolutely! While the pattern recommends DK (light worsted) yarn, you can opt for cotton yarn for a lighter, breathable version, especially great for warmer seasons. Just ensure that the final fabric remains soft against little feet!
How can I adjust the sizing of the slippers?
To customize the size of your crochet deer slippers, start by adjusting the initial chain length and the number of rounds you crochet. I suggest adding a few more increases in Row 3 to widen the base, which will help accommodate larger feet if needed.
Why is my work curling at the edges?
Don't panic! Curling can happen if your gauge is too tight or if there's not enough stitch variety. Be sure to check your tension; if it's too tight, consider using a larger hook size. Adding a slip stitch border can also help flatten and stabilize the edges.
What hook size should I use for these slippers?
The recommended hook size is between 3.5 mm (E) and 4 mm (G), depending on your individual tension. If you're a more relaxed crocheter, the 4 mm might suit you better, while those who crochet tightly may prefer the 3.5 mm. Always check your gauge for the best fit!
How do I fix a dropped stitch in my project?
It's an easy fix! Simply pull the working yarn gently to create enough slack, then use your yarn needle to weave the dropped stitch back up through the last few rows. Be sure to secure it well to prevent it from unraveling further!

Leave a Reply