
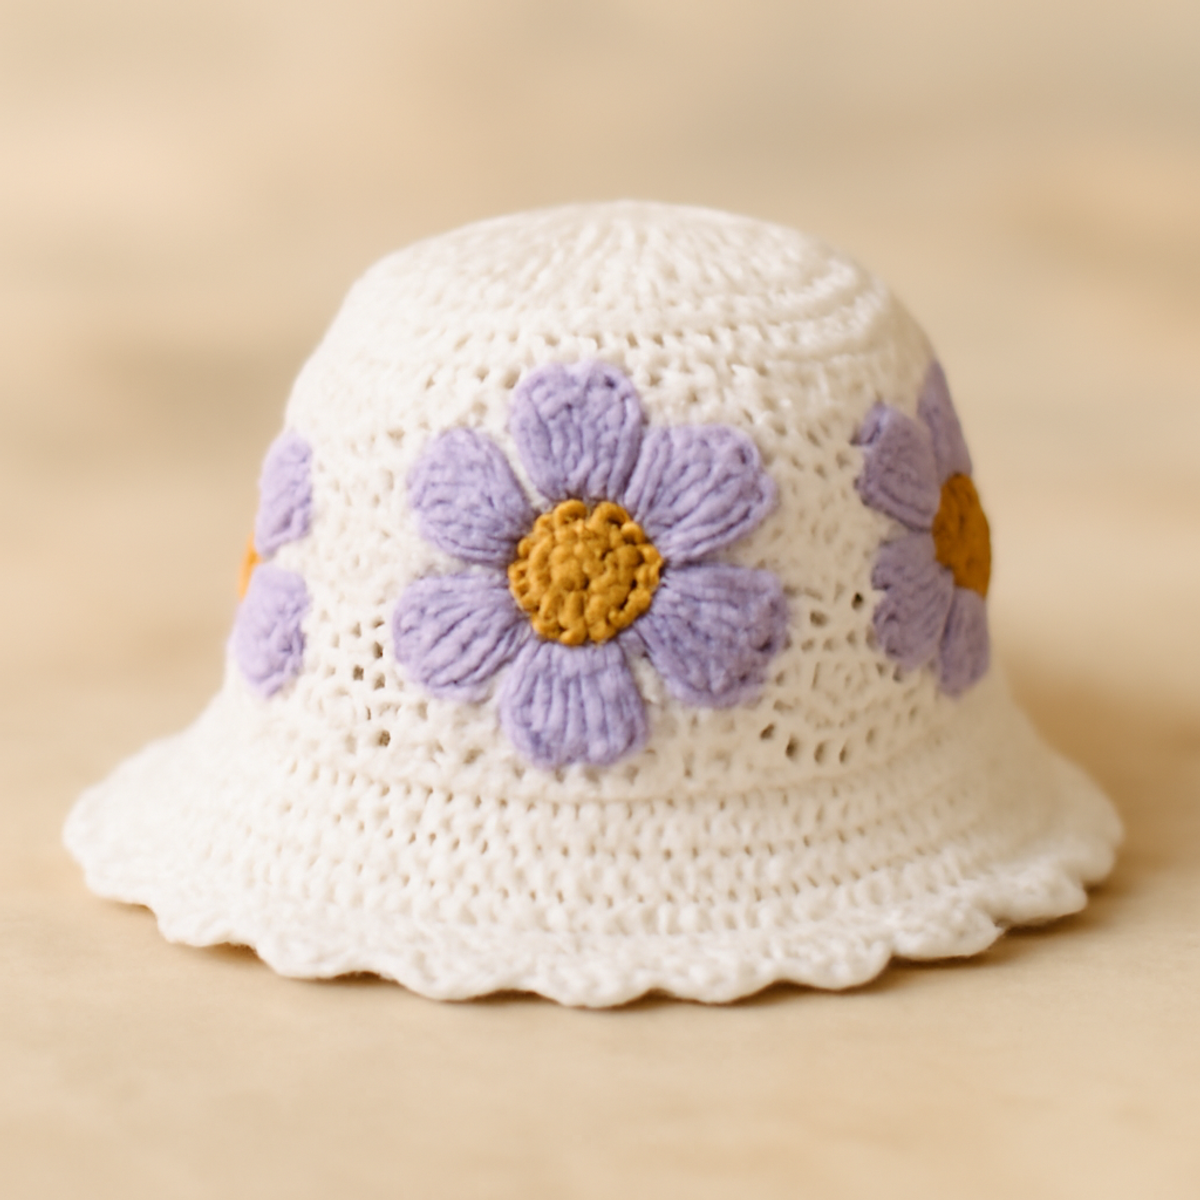
As I sit on my porch with a warm cup of tea, I can’t help but be inspired by the blooming daisies dancing in the breeze, filling my heart with hope for summer days ahead. This feeling is perfectly encapsulated in my latest creation: the Daisy Delight Bucket Hat. Designed especially for children, this crochet bucket hat not only provides sun protection but also adds a splash of whimsy to their summer outfits. With bright colors and delightful floral motifs, this pattern strikes a perfect balance between style and functionality. Plus, it’s a rewarding project for crafters, working up quickly while showcasing intermediate techniques like color changes and flower construction. If you’re ready to make a treasured accessory that your little ones will cherish, let’s dive in and get those hooks moving!
Daisy Delight Bucket Hat Materials & Tools
-
Yarn
- Lightweight Cotton or Acrylic Yarn – Approximately 150-200 yards will create two crochet bucket hats with cheerful daisy motifs.
-
Tools & Notions
- 4.5mm (US 7) to 5.0mm (US 8) Hook – A comfortable size for handling worsted-weight yarn while working on this crochet bucket hat.
- Stitch Markers – Use these to keep track of your rounds for a seamless finish.
- Scissors – Essential for cutting yarn and ensuring a tidy workspace.
- Yarn Needle – Perfect for weaving in ends and finishing off your beautiful hat securely.
Why Choose This Crochet Bucket Hat?
Cheerful Aesthetic: The blend of bright colors and charming daisy motifs makes this hat an eye-catching accessory perfect for sunny days.
Intermediate Techniques: You'll enjoy honing your skills with color changes and flower constructions, proving that crafting can be both fun and educational.
Sun Protection: With its stylish brim, this crochet bucket hat offers a fashionable way to shield little ones from the sun.
Quick Project: Thanks to its logical construction, you can whip up this hat in no time, making it ideal for last-minute gifts or seasonal updates.
Versatile Sizes: Customize the fit by adjusting the starting chain or adding more rounds, ensuring the perfect hat for any child.
Gauge & Sizing Notes
Don't skip the gauge swatch! Ensuring the right tension is crucial for your crochet bucket hat to achieve the desired fit and look, so you want those sunny days to shine through perfectly! A standard gauge measurement to aim for is 4×4 inch (10×10 cm) square = 12 double crochets by 10 rows, but be sure to check with your own swatch as individual crochet styles can vary. To make the hat larger, simply adjust your starting chain by increments of 3 or increase the number of rounds as needed. If your tension doesn't match, you can easily adapt by trying a different hook size; if your swatch is small, go up a hook size for a looser gauge.
Step-by-Step Pattern for Daisy Delight Bucket Hat
Round 1: Starting the Crown
Begin by creating a magic ring. Inside the ring, work 12 sc to form a tight center. Pull the ring closed and join with a sl st to the first sc. Your work should be a small circle. This forms the foundation of your crochet bucket hat (12 sts).
Round 2: Increasing for the Crown
Ch 1, then make 2 sc in each stitch around. This will increase the total stitch count, creating a wider circle for the crown. Join with a sl st to the first sc. Your work should be a larger circle, approx. double the size of Round 1 (24 sts).
Round 3: Continuing Increases
Ch 1, sc in the next st, 2 sc in the next st; repeat from * to * around. This pattern of alternating single crochet and an increase will help shape the crown further. Join with a sl st to the first sc. Your work should continue to grow, appearing as a wider circle expanding beautifully (36 sts).
Round 4: Final Crown Increase
Ch 1, sc in the next 2 sts, 2 sc in the next st; repeat from * to * around. This will add additional size to your crown, ensuring a comfortable fit for the crochet bucket hat. Join with a sl st to the first sc. Your circle should still look proportional, further preparing for the body of the hat (48 sts).
Round 5-7: Establishing the Body
Ch 1, sc in each st around for 3 rounds. This will create a solid body for the hat while adding height. Ensure each round is joined with a sl st to the first sc. Your work should now resemble a tube, the foundation of your crochet bucket hat (48 sts each round).
Round 8: Adding the Daisy Motifs
Ch 5 (counts as your first dc). In the same st, make 1 dc, skip 2 sts, 2 dc in the next st, ch 1, 2 dc in the st after the skipped sts; repeat until you reach the round's end. Your work should show cheerful daisy motifs beginning to form (6 petals if done right).
Round 9: Completing the Motifs
Sl st into the ch-1 space, then work 3 sc in the same space to form the center of each daisy. Continue around for each motif and join with a sl st to the first sl st. Your daisy flowers will pop out, adding the final touch of whimsy to the crochet bucket hat.
Round 10: Creating the Brim
Ch 1, sc in the next 3 sts, inc in the next st; repeat from * to * around. This sets the base for the brim while creating slight flares. Join with a sl st to the first sc. The brim should start to spread, defining the edges of your bucket hat (60 sts).
Round 11: Finishing the Brim
Ch 1, sc in the next 4 sts, inc in the next st; repeat from * to * around. Continue enhancing the brim's width for that gorgeous floppy effect. Join with a sl st to the first sc. Your brim should now be well defined, giving your crochet bucket hat a beautiful and practical shape.
Step 12: Final Edging and Assembly
For a polished look, make an additional round of slip stitches around the entire brim to create a finished edge. After tying off, use a yarn needle to weave in all ends, ensuring everything is secure. Your lovely Daisy Delight Bucket Hat is now complete and ready for sunny adventures!
Expert Tips for Crochet Bucket Hat
-
Maintain Tension: Consistent tension is key to a well-shaped bucket hat. Avoid discrepancies by checking your stitches frequently throughout the project.
-
Track Your Rounds: Use stitch markers to clearly indicate the start of each round. This will help prevent confusion while managing increases and decreases.
-
Count Carefully: It's easy to lose count when working in rounds. Take a moment to double-check your stitch count at the end of each round to ensure a perfect fit.
-
Block Your Hat: After finishing, block your crochet bucket hat to set its shape and enhance stitch definition, particularly for that lovely scalloped brim edge.
-
Weave Ends Securely: Don’t forget to weave in all loose ends properly. This final step ensures durability and keeps your beautiful hat looking neat and tidy.
Crochet Bucket Hat Variations
Embrace your creativity and personalize this delightful crochet bucket hat with these fun customization ideas!
-
Yarn Weight Swaps: Try a bulkier yarn for added warmth, perfect for cooler summer evenings or transitioning into fall.
-
Color Variations: Switch to pastel shades or vibrant neons for an entirely different look. You can even explore unique color gradients for added flair.
-
Fiber Alternatives: Use a soft bamboo or cotton-linen blend. This swap introduces a unique texture that feels even more luxurious against the skin.
-
Motif Switch-Up: Add whimsical elements like butterflies or stars alongside the daisies. This playful adaptation can cater to your child's personal style, making it extra special.
-
Brim Texture Modifications: Incorporate a shell stitch along the brim for an elegant, beachy feel. This small twist can transform the entire look of the hat.
-
Sizing Adjustments: Adjust the starting chain length or the number of rounds to create the perfect fit for different ages. This simple tweak makes it adaptable for siblings or friends.
-
Fringe or Pom-Poms: Attach short fringe or pom-poms around the hat's edge for a fun, playful touch. Kids adore these playful details, enhancing their summer fun.
-
Color Blocking: Experiment with various colors in sections of the hat. Color blocking can create contemporary vibes while making the hat uniquely yours.
What to Pair with Daisy Delight Bucket Hat?
Crafting a playful ensemble is a joyful way to keep the summer vibes alive for your little crafters.
-
Daisy Earwarming Headband: Create a matching headband adorned with daisy motifs for a complete floral look that’s ideal for sunny picnics.
-
Floral Fingerless Gloves: These sweet gloves will keep tiny hands snug while adding a touch of whimsy to any summer outfit. Pair the colors with the hat for instant charm!
-
Charming Tote Bag: A lightweight bag with matching colors can hold all the little treasures collected on summer adventures, tying the whole look together.
-
Colorful Flower Hair Clips: Using the same flowers as the hat, these clips will add a delightful pop to any hairstyle, making playtime even more fun.
-
Playful Crochet Sun Dress: Whip up a coordinating dress that captures the spirit of sunshine and flowers, completing the perfect summer outfit for your children.
How to Wash and Care for Your Daisy Delight Bucket Hat
-
Machine Washing: Use cold water on a gentle cycle to preserve the colors and delicate stitches of your crochet bucket hat. Avoid agitation to prevent any chance of felting or pilling.
-
Hand Washing: For the gentlest care, soak the hat in cold water with mild detergent. Gently squeeze without wringing to maintain the integrity of the daisy motifs.
-
Drying/Blocking: Lay the hat flat on a clean towel to dry, reshaping the brim as needed. Blocking will enhance the scalloped edges and definition, ensuring your crochet bucket hat looks its best.
-
Storage: Keep your hat in a cool, dry place away from direct sunlight to avoid fading. Store it flat or in a breathable bag to maintain its shape.
Daisy Delight Bucket Hat FAQs
Can I substitute yarn for this crochet bucket hat?
Absolutely! While a lightweight cotton or acrylic is recommended, feel free to swap in other fibers like bamboo or linen blends for a unique texture. Just be sure to check your gauge since different yarns can alter the size and drape.
How do I make the bucket hat smaller or larger?
Don’t panic—it's an easy adjustment! To alter the size, you can adjust the starting chain. For a smaller hat, reduce the initial chain length. To make it larger, you can add more rounds before beginning the brim, ensuring plenty of room for comfort.
Why is my crochet bucket hat curling at the edges?
If your brim is curling, it could be due to tight stitches or incorrect tension. Make sure you’re maintaining consistent tension throughout the project. If curling persists, blocking your hat after completion will help reshape and flatten the brim beautifully.
What hook size should I use for this pattern?
I recommend using a 4.5mm to 5.0mm (US 7-8) hook as indicated in the materials section. This size works well with the yarn weight and keeps your tension just right for a lovely, finished look.
How do I fix dropped stitches in my work?
Don't worry! For dropped stitches, you can simply pick them back up by pulling the yarn through the correct loops. If you notice a drop as you go, weave the yarn back up through the stitches below to tidy everything up. Keeping a close eye on your work will help avoid this issue too!
Can I add other motifs to my bucket hat?
Absolutely! Personalization is one of the joys of crafting. You can add motifs like butterflies or stars to give your hat a unique flair. Just make sure to keep the spacing and balance in mind for a cohesive design!

Leave a Reply