
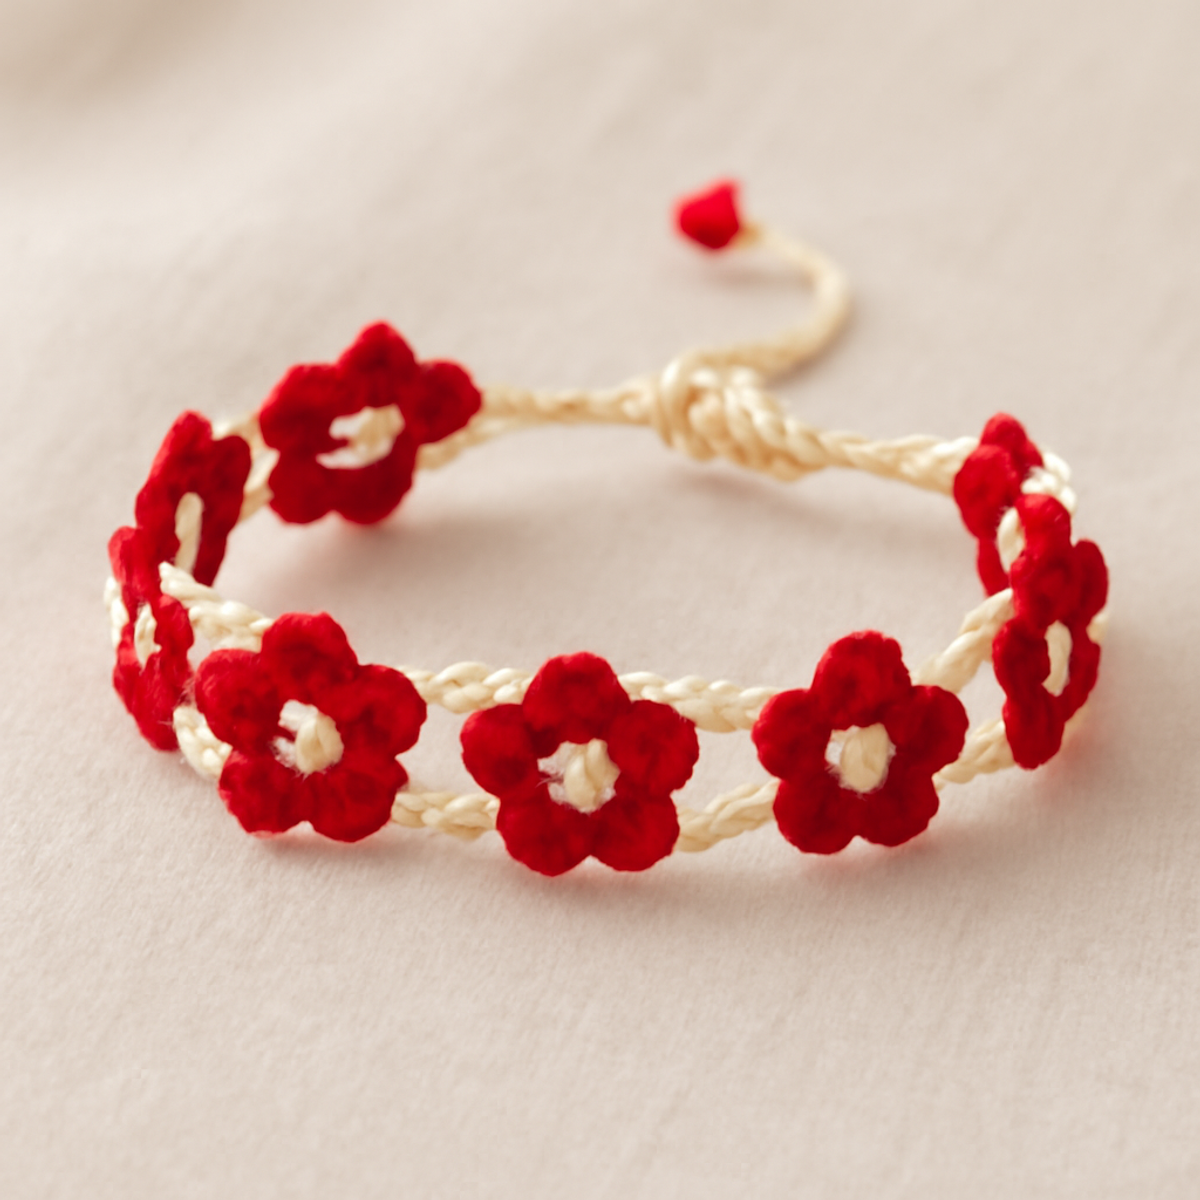
As I was sorting through my yarn stash, a delightful idea blossomed: a whimsical crochet bracelet adorned with charming flower motifs! This Floral Charm Bracelet is not only a stunning accessory but also an enjoyable way to express your creativity through crochet. Perfect for adding a touch of playfulness to your casual wear or dressing up for special occasions, this bracelet speaks to every yarn lover’s heart. Plus, one of the best perks is how quickly it works up—ideal for whipping up multiple bracelets for gifts or your own collection. With the opportunity to personalize it in your favorite colors, this project is perfect for beginners eager to try something new. So, gather your hooks and let’s dive into creating this beautiful piece that will surely brighten your style!
Floral Charm Bracelet Materials & Tools
- 4-ply Cotton Yarn – Approximately 50-70 yards in total, with about 30 yards in cream and 20-40 yards in red for the flower motifs.
- 3.5 mm (US E/4) Hook – Ideal for achieving the correct tension and compact stitch for your crochet bracelet.
- Scissors – Handy for trimming yarn ends as you complete each section.
- Yarn Needle – Perfect for weaving in ends and ensuring a tidy finish for your bracelet.
- Stitch Marker – Useful for tracking your rounds, especially when working those delightful flower motifs.
Why Crochet This Beautiful Bracelet?
Easy to Follow: The simple structure of this crochet bracelet incorporates basic stitches, making it beginner-friendly while still engaging for intermediates.
Whimsical Style: Featuring playful flower motifs, this accessory is perfect for casual outings or festive events, allowing you to showcase your feminine flair.
Quick to Make: Thanks to the efficient stitch design, you can complete several bracelets in a single sitting—ideal for personal use or delightful gifts!
Personal Touch: With endless color combinations and customizations available, this crochet bracelet enables you to express your unique style beautifully.
Comfortable Fit: Made with lightweight yarn, the finished bracelet boasts a soft and flexible drape, ensuring it’s comfortable to wear all day long.
Gauge & Sizing Notes
Don't skip the gauge swatch! Ensuring that your crochet bracelet has the correct tension is vital so that you achieve the delicate look intended, especially with those charming flower motifs. A general guideline for testing your crochet gauge is to create a 4×4 inch (10×10 cm) square and check that your tension aligns with your chosen yarn and hook size. If you find that your flowers are too tight or loose, you can easily adjust by chaining in multiples of 4 for the desired length of your tie cord. If your swatch is smaller than needed, try going up a hook size to enhance the drape and fit of your whimsical crochet bracelet!
Step-by-Step Pattern for Floral Charm Bracelet
Row 1: Start the Tie Cord
Ch 70 (or desired length for your bracelet). This will form the tie cord for your floral charm bracelet. Ensure your starting chain is not too tight, as this will affect the overall drape of the piece. Your work should lie flat and have a little flexibility.
Row 2: Join the Base
Sl st into the first ch to form a loop. Ch 1, then work 1 sc into each ch around the loop. Continue this for a total of 70 sc in the round. Your work should feel sturdy yet supple, forming a smooth base for the flowers.
Row 3: Begin the Flower Motifs
Start your first flower with a magic ring. Ch 3 (counts as 1 dc), then work 11 dc into the ring. Pull the yarn tail to close the ring, then join with a sl st to the top of the ch-3 at the start. Your flower should be rounded and have a lovely "cup" shape.
Row 4: Finish the Flower and Attach to Cord
Change to red yarn. Ch 1, then work 1 sc in each dc around the flower. Join with a sl st to the first sc. Next, place the flower on the tie cord, evenly spaced. Use a sl st to attach the flower to the tie cord. Your flower motifs should pop with that cheerful contrast!
Row 5: Repeat Flower Motifs
Repeat Rows 3 and 4 to create additional flower motifs; aim for a total of 4 to 5 flowers evenly spaced along the tie cord. Ensure to maintain even tension to keep your flowers consistent in size and shape. Your cord should now be adorned with beautiful blossoms.
Row 6: Secure the Ends
Once you've attached the desired number of flowers, ensure the last flower is securely fastened. Ch 1, then work 1 sc into the next three stitches for stability. Fasten off and weave in your ends with a yarn needle for a neat finish. Your crochet bracelet should now be complete and ready to wear!
What to Make after Floral Charm Bracelet?
As you revel in the joy of creating this whimsical accessory, let your imagination bloom with these delightful pairings to enhance your crochet collection.
-
Charming Hair Clips: Craft adorable hair clips using the same flower motifs to add a whimsical touch to your hairstyle. They make fun, coordinated accessories!
-
Delicate Anklet: Create a matching anklet to wear alongside your bracelet; it’s a perfect way to show off your crochet skills and playful style.
-
Flower Earrings: Whip up some simple flower earrings that echo the bracelet’s motifs. They’ll bring the charm to your ears, elevating any outfit.
-
Embellished Tote Bag: Design a tote bag adorned with flower appliqués to carry your crochet projects in style. It’s both practical and pretty!
-
Matching Necklace: Form a delicate necklace using the same flower technique to complete your ensemble, perfect for both casual gatherings and special outings.
Expert Tips for the Floral Charm Bracelet
-
Consistent Tension: Make sure to maintain a uniform tension while crocheting to avoid uneven spacing in the flower motifs.
-
Count Your Stitches: Always double-check your stitch count after each round, especially when creating flower motifs. This helps prevent losing count.
-
Use a Stitch Marker: Placing a stitch marker at the start of each round can help you keep track of where each flower should be attached, avoiding confusion.
-
Secure Ends Properly: Don’t forget to securely fasten off the last flower and weave in all ends with a yarn needle to ensure your crochet bracelet holds its shape beautifully.
-
Lightly Block Your Bracelet: Lightly blocking the finished piece can enhance the overall aesthetics of the floral motifs, giving it a more polished look.
Care Instructions for Floral Charm Bracelet
Machine Washing: Use cold water on a gentle cycle to prevent potential felting or pilling. Ensure the bracelet is placed in a mesh laundry bag for added protection during the wash.
Hand Washing: For added care, hand wash your crochet bracelet in cold water using a mild detergent. Gently agitate without twisting to maintain the flower motifs' shape and vibrancy.
Drying/Blocking: Lay the bracelet flat on a clean towel to dry, reshaping the flowers as needed. Avoid hanging to prevent stretching, preserving that charming look of your crochet bracelet.
Storage: Keep your finished bracelet in a cool, dry place, ideally in a fabric pouch. This helps protect it from dust and potential snagging, keeping it beautiful for every occasion.
Crochet Bracelet Variations & Substitutions
Customize your crochet bracelet effortlessly to reflect your personal style and creativity, transforming it into a unique piece of art!
-
Yarn Weight Swap: Change to a lighter or heavier yarn for different drapes. This can give your bracelet a more delicate or chunkier look.
-
Fiber Alternatives: Experiment with bamboo or silk yarn for a luxurious touch. These fibers can introduce fascinating textures while maintaining the whimsical charm.
-
Color Blocking: Use multiple color sections on the tie cord, alternating between shades for a vibrant, eye-catching design. This adds a playful flair that enhances the flower motifs beautifully.
-
Sizing Adjustments: Modify the starting chain length to create a larger or smaller bracelet. Just ensure the flower motifs are proportionately spaced to maintain the overall design harmony.
-
Different Flower Shapes: Incorporate various flower motifs, such as daisies or roses, for a lively twist. Each flower's unique shape invites fresh creativity into your piece.
-
Add Textures: Introduce a pom-pom at the end of the tie cord or fringe on the edges. These little additions can lend a fun dimension to your bracelet.
-
Layered Design: Create a double-wrap bracelet by extending the cord length and adding more flowers. This look offers ample opportunity for pairing delightful colors and textures.
-
Embellishments: Consider adding beads or sequins to the center of each flower motif for a touch of sparkle. These embellishments can take your bracelet from casual to wow in no time!
Floral Charm Bracelet FAQs
Can I use a different type of yarn for this crochet bracelet?
Absolutely! While the pattern suggests lightweight 4-ply cotton yarn for its delicate finish, you can experiment with other fibers like bamboo or silk blends. Just be sure to adjust your hook size if changing yarn types to maintain the right tension and comfort.
How can I adjust the size of my crochet bracelet?
It's easy to customize the fit of your crochet bracelet! Start by adjusting the length of your chain for the tie cord. If you want a looser fit, add more chains at the beginning. You can also modify the number of flower motifs to better suit your wrist size.
Why is my work curling as I crochet?
Don't panic! If your piece is curling, it may be due to tight tension or not using the right hook size. I recommend checking your gauge before starting and loosening your tension as you create. If necessary, you might want to switch to a larger hook size to help it lay flatter.
What hook size should I use for this pattern?
For the Floral Charm Bracelet, a 3.5 mm (US E/4) crochet hook is suggested. This size allows for a compact stitch that keeps your work looking neat and helps maintain the right tension. If you find your flowers look too tight or too loose, feel free to experiment with a hook size up or down.
How do I fix dropped stitches in my crochet bracelet?
It’s an easy fix! Simply locate the dropped stitch and gently pull the yarn through the stitch to create a new loop. You can then work that stitch back into place with the appropriate crochet stitch for your pattern. Remember to double-check your work frequently to catch any mistakes early on!

Leave a Reply