
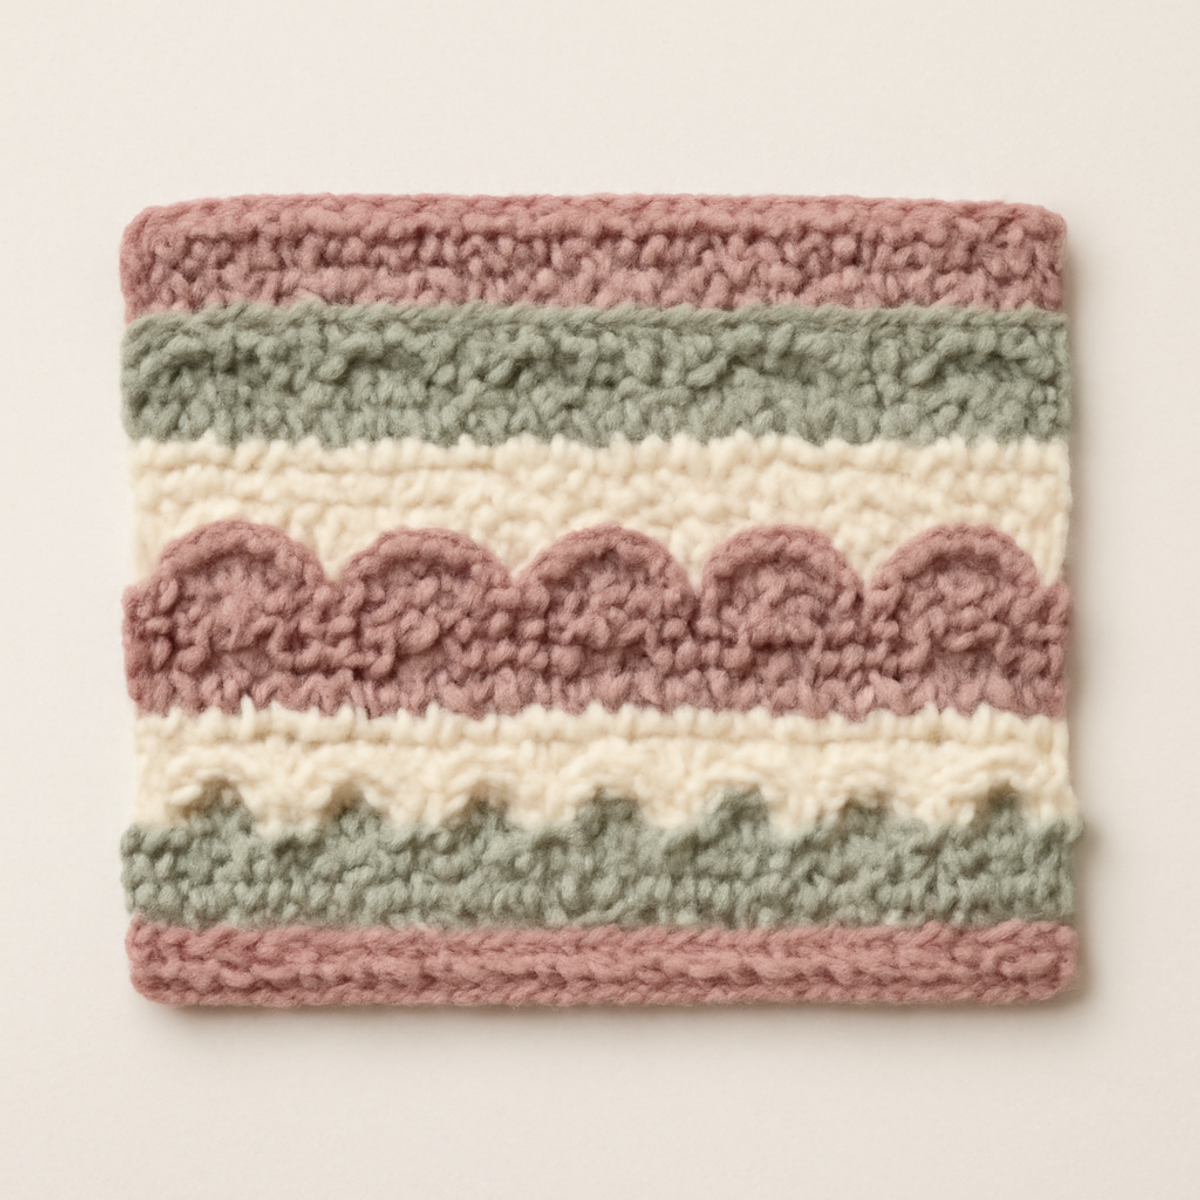
As I sat wrapped in my favorite crochet blanket, I couldn’t help but admire how a simple border transforms an ordinary piece into a cherished keepsake. Today, I’m excited to share some delightful crochet border ideas, perfect for elevating your handmade blankets into works of art. Whether you’re a beginner or a seasoned crafter, these versatile border styles will not only add a polished finish but also allow your personal flair to shine through. With options ranging from minimalist single crochet to the intricate shell and picot borders, you’ll have the chance to practice various stitches while creating something truly one-of-a-kind. Plus, they’re designed to complement any yarn color or blanket design, making them a fantastic way to use up your stash. So grab your hook, and let’s explore the world of crochet borders that will make your blankets even cozier!
Crochet Border Ideas Materials & Tools
- Medium-Weight Yarn – Opt for worsted weight in pastel colors like soft pink, sage green, creamy white, and dusty rose; approximately 200–300 yards of each color is recommended for sufficient coverage.
- 5.0mm (H) Hook – Perfect for the various stitches utilized in the crochet border ideas, providing a smooth experience for beginners and seasoned crafters alike.
- 5.5mm (I) Hook – A great alternative hook size to experiment with slightly different stitches and texture variations for your borders.
- Stitch Markers – Handy for tracking your rounds or rows, keeping your crochet projects organized as you create beautiful borders around your blankets.
Why Try These Crochet Border Ideas?
Charming Borders enhance the beauty of your blankets by adding a personalized touch that truly stands out. Beginner-Friendly options make it easy for crafters of all skill levels to dive in and experiment. Versatile Styles mean you can mix and match borders with various blanket designs, from baby blankets to chic throws. Texture Variation in styles like Shell and Puff creates unique surfaces that are both eye-catching and cozy. Finally, Endless Customization allows you to play with colors and yarn types, ensuring your project reflects your personal style!
Gauge & Sizing Notes
Don't skip the gauge swatch! Correct tension is crucial for these crochet border ideas, as it ensures your borders lay flat and look polished. A common guideline for checking your gauge is to create a tension swatch of 4×4 inches (10×10 cm) to measure your stitches. If you want your border to fit a larger blanket, increase your starting chain by multiples of 6 for decorative borders, or adjust the number of stitches accordingly for simpler styles. If your tension doesn’t match, and your swatch is too tight, simply switch to a larger hook size for a more relaxed stitch. This little preparation can make a big difference in achieving the perfect finish!
Step-by-Step Pattern for Crochet Blanket Borders
Row 1: Single Crochet Border
Start by joining your yarn with a slip stitch to any corner of your blanket. Chain 1, then work single crochet (sc) stitches evenly along the edge. Place 3 sc in each corner stitch to maintain shape, ensuring a smooth transition at each corner. Continue this process until you return to the starting point, making sure to count 60–80 sc stitches around the blanket edge (total will vary based on blanket size).
Row 2: Half Double Crochet Border
Begin your Half Double Crochet (hdc) border by rejoining your yarn in an arbitrary corner. Chain 2 to start, then work hdc evenly across the edge, placing 2 hdc in each corner stitch for roundness. This border will create a slightly taller edge than single crochet. Continue to hdc around the blanket, maintaining consistency, until you return to the starting point, totaling approximately 60–80 hdc stitches (depending on the blanket size).
Row 3: Shell Stitch Border
For the Shell Stitch Border, attach yarn to any corner and chain 3 to start. Work 5 double crochet (dc) into the same stitch for the first shell. Skip 2 stitches, then in the next stitch, create another shell (5 dc). Repeat this pattern, placing shells across the edge, ensuring to add a shell in each corner for a decorative flare. You should have about 12–16 shells, depending on the size of your blanket.
Row 4: Picot Border
To create the Picot Border, join yarn on an edge and chain 3 to start. Work a single crochet (sc) in the next stitch. Chain 3 again, then slip stitch back into the first chain to form a picot. Repeat this pattern along the edge with single crochets in between each picot for a delicate touch, adding a picot in each corner. You should have approximately 36–48 sc and picots combined, creating a lovely textured finish.
Row 5: Puff Stitch Border
Begin the Puff Stitch Border by attaching yarn at a corner. Chain 1 and work a puff stitch (yo, insert hook, yo, pull up a loop, repeat twice) into the same stitch, then pull all loops through the final loop on the hook. Chain 1, skip one stitch, and repeat across the edge. This adds a beautiful texture. Don’t forget to place a puff stitch in each corner, resulting in about 20–25 puff stitches around the entire blanket (depending on size).
Row 6: Crab Stitch Border
For the Crab Stitch Border, join yarn in a corner and chain 1. Work reverse single crochet (or crab stitch) across the edge by inserting the hook from front to back. This creates a unique twist that adds depth to your border. Continue this stitch to the next corner and place 3 crab stitches in the corner stitch for neatness. You should have approximately 50–60 crab stitches all around, seamlessly finishing your beautiful blanket.
Expert Tips for Crochet Borders
-
Watch Your Tension: Ensure your tension is consistent across different stitch techniques. This will help maintain a uniform look throughout your crochet border ideas.
-
Count Stitches: Regularly count your stitches, especially when working intricate designs like the Shell or Picot Borders. This prevents any irregular edges from occurring.
-
Block Your Work: For plush borders like the Puff Stitch, consider lightly steaming or pinning your work to block it. This helps in achieving a polished finish that showcases your craftsmanship.
-
Use Stitch Markers: Employ stitch markers to keep track of your rounds or rows. They can be a lifesaver, preventing lost counts and ensuring each corner looks fabulous.
-
Avoid Twists: Be mindful of the foundation chain when starting your border. Twisting it can lead to uneven edges, so make sure it’s laid flat before you begin.
What to Pair with Versatile Crochet Blanket Borders?
Creating a beautiful matching set can enhance your crafting experience and allow your creativity to flow even further.
- Cozy Crochet Pillow Covers: Add charming softness to your space with coordinating pillow covers that use the same yarn and stitch theme as your blanket borders.
A well-designed pillow cover not only adds extra comfort to your relaxing nook but also carries the aesthetic of your borders into another beloved item.
- Warm Crochet Throw: Why stop at just a blanket? Create a lovely matching throw, perhaps with a different border style, for a dynamic look.
This complementary piece can serve as both a decorative item and an extra layer of warmth during chilly nights on the couch.
- Charming Crochet Coasters: Use your leftover yarn to craft cute coasters that echo the color palette of your blanket borders.
Every sip of coffee or tea will be a reminder of your cozy creations, keeping your crafting magic alive in day-to-day life.
- Stylish Crochet Basket: Organize your yarn or miscellaneous items in a crochet basket designed with a border that matches your blanket.
A beautiful basket not only tidies up your space but also showcases your skills, blending art with functionality seamlessly.
- Decorative Crochet Wall Hanging: Create a wall hanging that incorporates similar border techniques, bringing your crochet journey into your home decor.
This art piece will not only celebrate your crafting journey but also add character to any room, inviting warmth and charm wherever it’s displayed.
How to Wash and Care for Your Crochet Blanket Borders
-
Machine Washing: Wash in cold water on a delicate cycle to prevent felting or pilling. This gentle approach ensures your crochet border ideas retain their shape and texture.
-
Hand Washing: For extra care, soak your blanket in cold water mixed with a mild detergent. Gently agitate to clean, avoiding any harsh scrubbing that could distort your beautiful borders.
-
Drying/Blocking: Lay your finished project flat to dry, reshaping any edges as needed. Blocking may help achieve a professional finish for intricate borders, so consider pinning them in place until fully dry.
-
Storage: Keep your crochet blankets in a cool, dry place, ideally folded rather than hung, to maintain their shape. Avoid storing in direct sunlight to preserve the yarn's colors and texture.
Crochet Border Ideas for Customization
As you embark on your crochet journey, let your creativity flow and explore ways to make your blanket borders uniquely yours!
-
Yarn Substitutions: Switch to cotton for a breathable summer aesthetic, or use plush yarn for a cozy winter finish.
-
Color Contrasts: Bright jewel tones will add vibrancy, creating cheerful borders that pop against your blanket design.
-
Textured Touches: Experiment with adding fringe to your edges for a playful, bohemian flair that beautifully dances with movement.
-
Larger Borders: Scale up your border by increasing the number of rows or stitches for a bolder, more dramatic finish.
-
Playful Pom-Poms: Incorporate pom-poms at each corner for a whimsical look that invites a touch of fun into your crochet creations.
-
Multi-Colored Borders: Try color-blocking by alternating yarn colors within your border for an eye-catching and personalized effect.
-
Mixed Stitch Techniques: Combine different stitch styles within a single border; perhaps a shell stitch followed by a picot for added interest.
-
Use of Beads: Incorporate beads into your border for a hint of sparkle, transforming the edges into a charming detail that catches the eye.
Versatile Crochet Blanket Borders FAQs
Can I substitute yarn types for the borders?
Absolutely! While the suggested medium-weight yarn works beautifully, you can experiment with different fibers. For a breathable summer blanket, try a soft cotton yarn, or use a plush yarn for a cozy winter finish. Just keep in mind that the texture and drape may vary, so adjust your stitch count accordingly!
What if my blanket border turns out bigger or smaller than expected?
Don't panic! If you want to make your border larger, simply increase the number of rows or stitches in your chosen border technique. Conversely, if it’s too big, you can frog back and reduce the number of rounds. Remember, practice makes perfect!
Why is my work curling at the edges?
Curling edges can be frustrating, but it's usually an easy fix! Ensure your tension is consistent while working through your border. Additionally, trying a border with a taller stitch, like the Half Double Crochet or Puff Stitch, may help level out those pesky curls.
What hook size should I use for these border techniques?
I recommend starting with a size H (5 mm) or I (5.5 mm) crochet hook, as they work nicely with the medium-weight yarn. However, if you're looking to create a different texture or drape, feel free to try a hook size up or down to see how it affects your work!
How do I fix dropped stitches in my border?
It's easy to lose track of stitches, but fixing them is simple! When you notice a dropped stitch, gently unravel back to that point, ensuring you maintain the proper tension. Rework the missing stitches carefully, and don't forget to count them to keep your border neat!
Can I mix and match different border techniques?
Absolutely! Mixing different crochet border ideas can create stunning results. Feel free to combine simpler styles like the Single Crochet Border with more decorative options like the Shell or Picot Borders for a unique and personalized touch to your blanket!

Leave a Reply