
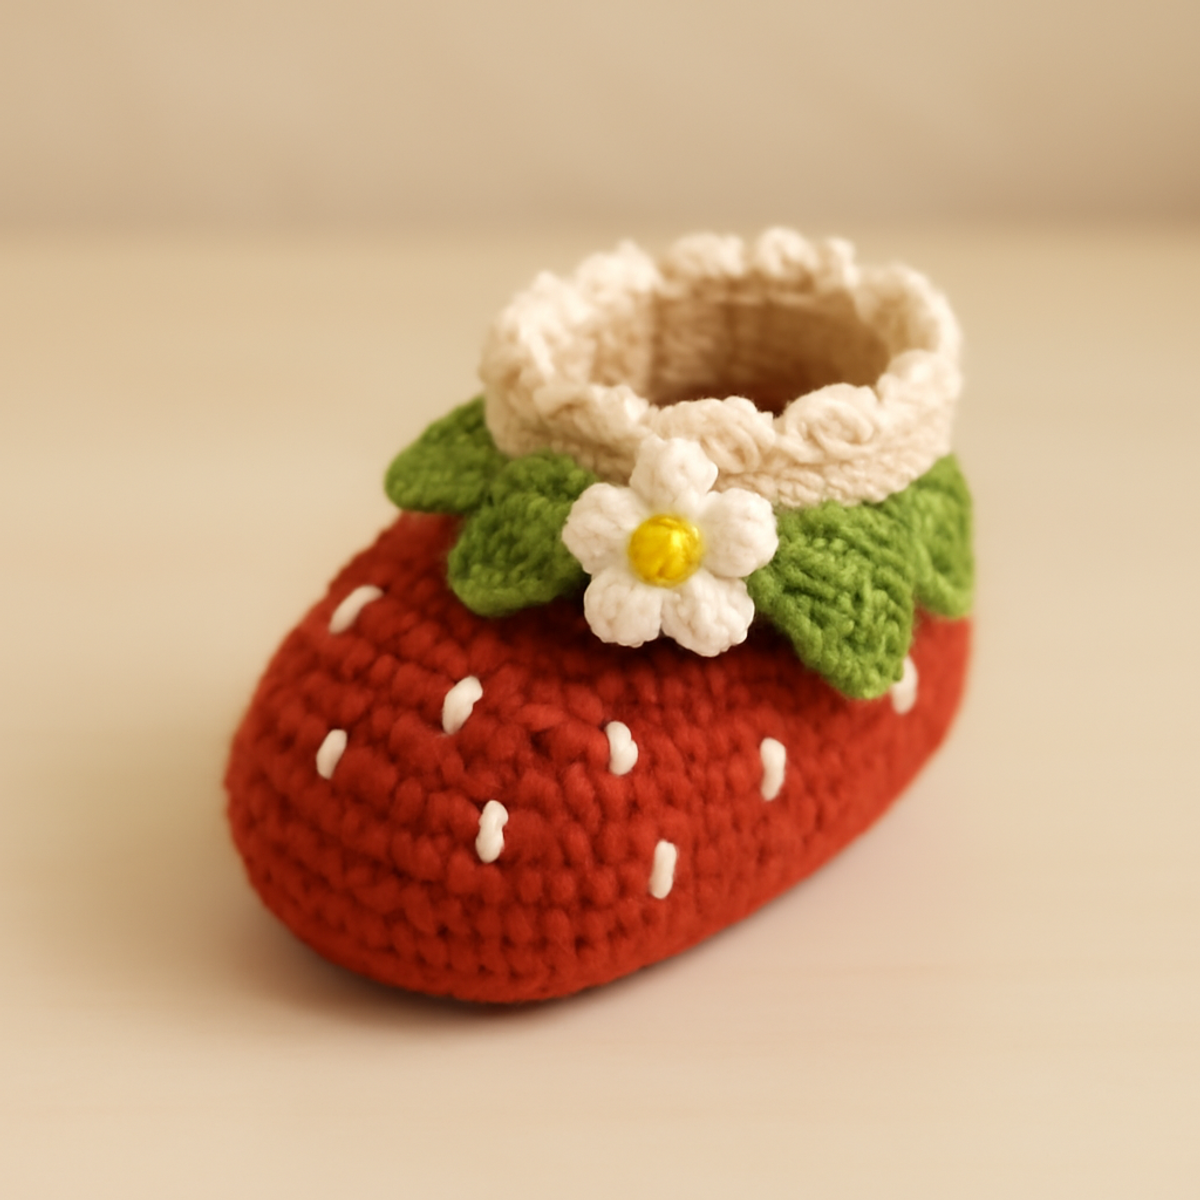
There’s something truly magical about the squish of soft yarn gliding through my fingers, and today it guides me to craft a pair of delightful crochet baby booties. These whimsical ‘Crochet Blooming Strawberry Booties’ are not only chic but also practical, making them the perfect addition to a little one’s wardrobe. With their playful design, they invite creativity in yarn choices and allow for personalization with charming embellishments. Plus, they work up quickly, making them ideal for those last-minute gifts that never go out of style. Whether you're a seasoned crocheter or just stepping into the world of yarn, these adorable booties promise to keep tiny toes warm and stylish. So, let’s dive in and make some fruity magic together!
Crochet Baby Booties Materials & Tools
- Worsted Weight Yarn – Approximately 100-150 yards in red (body), green (leaves), white (flowers), and a contrasting color for the finish, perfect for these crochet baby booties.
- 4.00mm (G/6) Crochet Hook – Ideal for achieving a tight stitch that keeps your booties snug and warm.
- Safety Eyes – Add these for a customizable touch to your bootie design, making them even more adorable.
- Stitch Markers – Keep track of your rows easily; they're essential for maintaining your place through this fun project.
- Sewing Needle – Use it for attaching components like flowers and leaves, ensuring everything stays beautifully in place.
Why Choose These Crochet Booties?
Adorable design: These booties feature a charming strawberry theme that adds a whimsical touch to any baby's outfit.
Easy-to-follow instructions: With clear guidance, even intermediate crafters will find joy in every stitch, making the project delightful and rewarding.
Quick project: Perfect for those last-minute baby gifts, these booties can be whipped up in no time, ensuring you’re always ready for special occasions.
Cozy fit: The snug design keeps little toes warm, combining style with comfort seamlessly.
Unique embellishments: Customize your booties with various colors and textures, allowing your creativity to shine through each piece.
Gauge & Sizing Notes
Don't skip the gauge swatch! For your crochet baby booties, checking your tension is crucial to ensure a perfect fit for little feet. A standard gauge is often a 4×4 inch (10×10 cm) square that typically yields about 18 single crochets by 22 rows; however, since exact measurements may vary, it’s best to check your own crochet style. If the booties seem too tight or loose, adjust your hook size—if your swatch is too small, try going up a hook size. To make these delightful crochet baby booties larger, simply increase your starting chain and rounds in multiples of 6 for the body. Happy crafting!
Step-by-Step Pattern for Crochet Blooming Strawberry Booties
Row 1: Start the Bootie Base
Begin with a magic ring using red yarn. Work 6 sc into the ring, pulling it tight to close (6 sts). Your work should form a small circle, ready to build upon. Be sure to keep the tension snug for a well-fitted base.
Row 2: Expand the Base
Chain 1, then make 2 sc in each stitch around, resulting in 12 sc (12 sts). Your circle should start to appear more pronounced, maintaining a compact structure. This expansion is crucial for achieving the rounded shape of the booties.
Row 3: Increase for Bootie Size
Chain 1, then (sc in next stitch, inc in the following stitch) repeat around (18 sts). As you work, your piece should start to grow, resembling a small bowl. Ensure your stitch count is accurate to maintain the bootie's proportions.
Row 4: Further Increases
Chain 1, then (sc in next 2 stitches, inc in the next stitch) repeat around (24 sts). Your project will begin to take on a more defined shape, expanding outward. Keep your tension even for a consistent finish, smoothing out any inconsistent stitches.
Row 5: Solid Body Work
Chain 1, then sc in each stitch around without any increases for this row (24 sts). You’re establishing the sturdy body of the bootie, and your work should lie flat without curling. This will be the foundational part before you shape the top.
Row 6: Texture with Seed Stitch
Chain 1, then sc in next 1 stitch, skip 1 stitch, sc in next stitch around (24 sts). This seed stitch will start adding a lovely textured dimension to your crochet baby booties. Your rows should feel cozy to the touch as you proceed.
Row 7: Forming the Top of the Bootie
Chain 1, then sc in the first 10 stitches, ch 5 (to create the heel), skip 5 stitches, sc in the remaining 9 stitches (24 sts). This forms the heel portion and allows for extra comfort when worn. Ensure the heel area is prominent but still smooth in transition.
Step 1: Creating the Leafy Trim
Switch to green yarn. Slip stitch to the first sc to join, chain 1, then sc in each of the next 24 stitches around to create a smooth transition and finish the outside edge of the bootie (24 sts). Your work should feel cohesive, connecting the body with a pop of color.
Step 2: Adding the Flower Embellishments
Using white yarn, create small flower motifs separately. Begin with a magic ring, ch 1, then work 4 dc into the ring, pull tight (4 dc). Create 2 more petals using the same method, ensuring a lovely layered flower shape that can be attached later.
Step 3: Attaching Flowers
With your completed motifs, use a sewing needle and thread to stitch the flowers onto the leafy trim securely. Position the flowers to your liking, ensuring they grab attention while also harmonizing with the rest of your crochet baby booties.
Step 4: Finishing Touches
Weave in all loose ends from your crochet baby booties using a needle. Block the finished booties gently to maintain their shape. You should see the beautiful contrast between the vibrant colors and the overall charming strawberry design, ready to impress anyone who sees them.
Crochet Baby Booties Customization Ideas
Embrace your creativity and give your crochet baby booties a personal touch with these fun variations!
-
Yarn Weight Swap: Choose a lighter or heavier yarn to create different sizes or textures for the booties. Adjust your hook size accordingly for the best results.
-
Fiber Alternatives: Experiment with cotton for a breathable summertime option or acrylic for added warmth in cooler months. Both lend their unique charm to your booties.
-
Pastel Palette: Opt for a soft pastel color scheme instead of the classic vibrant hues, lending a sweet, dreamy feel to your finished booties. Imagine those delicate shades adorning little feet!
-
Texture Modifications: Add a delightful pom-pom on top or attach fringe around the ankle for a playful twist. These simple additions can elevate the whimsy of your design.
-
Size Adjustments: Make the booties larger by tweaking the number of rows in the body and the length of the bootie, adapting them for toddlers or growing little feet.
-
Color Blocking: Get adventurous by using different colors for each section of the bootie, such as a contrasting heel or toe. This adds an eye-catching flair, making each pair truly unique.
-
Embellished Accents: Incorporate small buttons or charms nestled among the faux leaves for a personalized touch. Each little detail can tell its own story!
-
Layered Stitch Techniques: Utilize special stitches like the popcorn or shell stitch for added dimensions and depth. The visual appeal of your booties will echo the playful spirit they embody.
What to Pair with Crochet Blooming Strawberry Booties?
Creating a delightful matching set can enhance the magic of your crafting experience.
-
Strawberry Hat: A sweet hat adorned with leafy accents mirrors your booties, making for the perfect cozy combo.
Craft a whimsical hat using the same vibrant red and green yarns; this pairing is sure to turn heads on any outing. -
Crochet Berries Rattle: Complement those adorable booties with a crochet rattle shaped like a berry for playtime fun.
This charming addition allows you to blend playful elements while keeping your crochet theme consistent. -
Fruity Blanket: Consider a cozy blanket featuring strawberry motifs that echoes the playful vibe of your booties.
Wrap your little one in warmth and creativity; this pairing not only looks lovely but offers soft comfort during naptime. -
Matching Diaper Cover: Design a diaper cover adorned with leafy detials to match those strawberry booties for an adorable outfit.
This sweet set is wonderful for photos, adding a cohesive charm that makes for perfect keepsakes. -
Charming Baby Dress: Create a simple crochet dress complementing your booties' theme with strawberry appliqués for a complete look.
This darling outfit will add an extra touch of whimsy to any occasion, making memories that last a lifetime.
Expert Tips for Crochet Baby Booties
-
Consistent Tension: Maintain a uniform tension throughout your project to ensure that your crochet baby booties turn out evenly sized and beautifully crafted.
-
Stitch Counting: Regularly count your stitches, especially when increasing or changing colors. This practice will help you avoid any unforeseen issues like running out of yarn.
-
Blocking for Shape: Use blocking on your finished booties to enhance their structure and appearance. This technique can help smooth out any inconsistencies and hold the whimsical shape well.
-
Secure Embellishments: When adding decorations like flowers or leaves, use a needle and strong thread to attach them securely, ensuring they stay in place during wear.
-
Yarn Choice Matters: Opt for soft and cozy yarn like cotton or acrylic, which are not only easy to care for but also perfect for these charming crochet baby booties.
How to Wash and Care for Your Crochet Baby Booties
-
Machine Washing: Use cold water on a gentle cycle to avoid felting or damaging your crochet baby booties. This will maintain their vibrant colors and cozy texture.
-
Hand Washing: If preferred, hand wash in cold water with mild detergent. Gently squeeze out excess water without agitating the fibers to prevent pilling.
-
Drying/Blocking: Lay your finished booties flat on a clean towel to dry, reshaping them as needed. Avoid hanging to prevent stretching and maintain their whimsical form.
-
Storage: Store in a cool, dry place away from direct sunlight to preserve the colors and textures of your crochet baby booties. This ensures they'll be ready for wear when needed!
Crochet Blooming Strawberry Booties FAQs
Can I use a different yarn than worsted weight for these booties?
Absolutely! While worsted weight yarn is recommended for a structured fit, you can opt for a lighter weight yarn if you're aiming for a softer, more delicate look. Just remember to adjust your hook size accordingly and check your gauge to ensure a proper fit for the booties.
How can I make the booties larger or smaller?
To adjust the size of your crochet baby booties, you can modify the number of increases in the first few rows of the base. For larger sizes, add more stitches than indicated, while reducing the increase rows will create smaller booties. Always keep a consistent tension throughout to maintain a good shape.
Why does my work keep curling up?
Don't panic! Curling is often caused by an uneven tension or too few stitches for the desired row. Ensure that your starting foundation ring is tight but not overly constricted. If the issue persists, consider adding a row of single crochet around the edge to help smooth it out.
What hook size should I use for these booties?
A 4.00mm (G/6) crochet hook is the recommended size to achieve a snug and comfortable fit for your crochet baby booties. If you're using a different yarn weight or feel that your stitches are too tight or too loose, feel free to experiment with a hook size that works best for your tension.
How do I fix dropped stitches in my work?
It’s an easy fix! You can reinsert your hook into the nearest stitch directly below the dropped one and pull the yarn back through. Make sure to secure the stitch as you work, and try to prevent this by counting your stitches regularly, especially after color changes.
What if I run out of yarn while making the booties?
If you find yourself running low on yarn, it might be possible to switch to a coordinating color for the finishing touches. Alternatively, try to complete one bootie in full before moving to the second to ensure you’re using your yarn efficiently. Always have a little extra yarn handy to avoid last-minute surprises!

Leave a Reply