
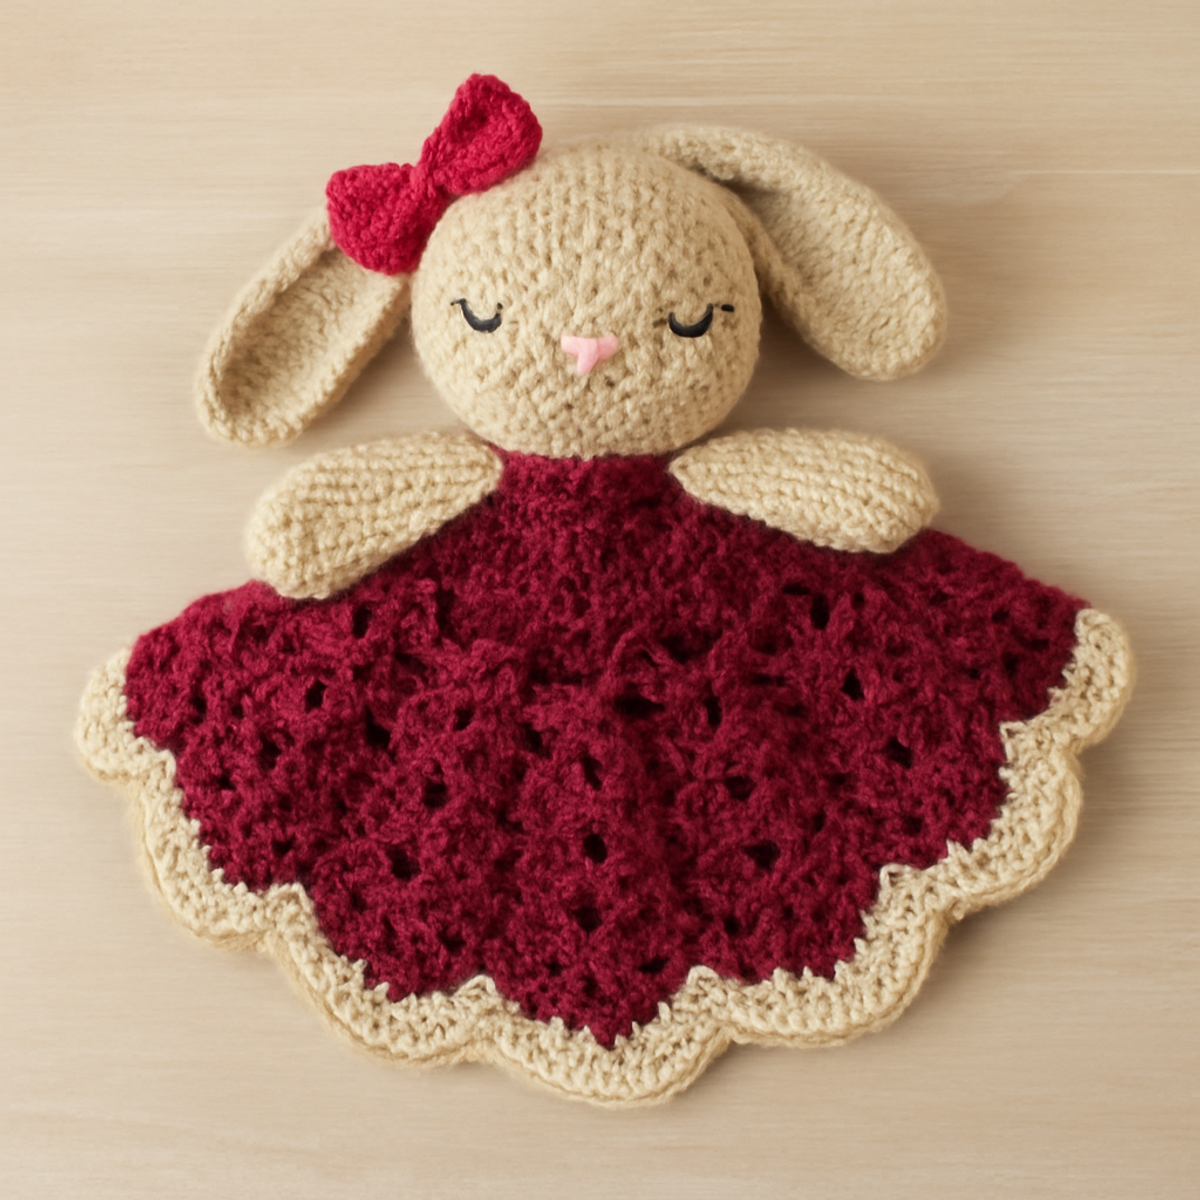
As I sat quietly on the couch, my fingers danced over the soft yarn, and a wave of nostalgia washed over me—those cherished childhood moments spent with comforting toys. Today, I'm thrilled to share my Bunny Lovey crochet pattern, a delightful hybrid of a cuddly toy and a reassuring security blanket. This whimsical project works up quickly, making it perfect for both novice crocheters and seasoned pros seeking a cozy stash-buster. Not only does the soothing texture of the soft crochet fabric beckon little ones for snuggles, but its charming design also captivates imaginations, creating endless opportunities for creativity in color choice. Ready to stitch up some joy? Let's dive in and bring this adorable bunny lovey to life!
Bunny Lovey Crochet Materials & Tools
- Worsted Weight Yarn – Approximately 200-300 yards of soft, durable burgundy yarn for the blanket, plus about 50 yards for the bunny’s head and arms.
- 4.5mm (US 7) Crochet Hook – This size works perfectly for creating a cozy, snuggly texture in your bunny lovey crochet.
- Safety Eyes – Opt for eyes that are 12mm to bring your bunny’s face to life, ensuring they’re securely attached before stuffing.
- Medium Pink Bow (optional) – You can create a cute bow using either a contrasting yarn or a ribbon for an extra touch of charm.
Why is This Bunny Lovey a Must-Create?
Whimsical Charm: This bunny lovey showcases adorable design details that bring smiles to little faces, combining function and fun.
Quick Project: With straightforward techniques suited for all skill levels, you’ll rapidly whip up this cozy cutie, making it ideal for last-minute gifts or a delightful afternoon craft session.
Soft & Snuggly: Crafted with soft yarn, it offers the comforting texture that every child craves during cuddle time, ensuring they have a trusted companion.
Endless Customization: Play with color and yarn choices to create a truly unique bunny lovey that reflects the personality of its little owner, from pastel hues to fluffy textures.
Gift-Ready: This pattern is perfect for baby showers or first birthdays, allowing you to create a special keepsake that holds sentimental value for years to come.
Gauge & Sizing Notes
Don't skip the gauge swatch! Checking your tension is crucial in crafting the perfect bunny lovey crochet, ensuring that your cuddly creation has the right dimensions and drape. A common guideline to follow is to create a 4×4 inch (10×10 cm) square with approximately 14 double crochets by 8 rows; however, your personal gauge may vary based on your hook size and yarn choice. To make your blanket wider, simply increase your starting chain in multiples of 6. If your tension swatch is too small, try going up a hook size to achieve the desired size for your bunny lovey crochet masterpiece. Happy stitching!
Step-by-Step Pattern for Bunny Lovey Crochet
Row 1: Creating the Bunny's Head
Begin by making a magic circle and work 6 sc into the circle (6 sts). Pull the circle tight to close. Your work should start to form a small round shape as you complete this foundational round.
Row 2: Increasing for Head Shape
In the next row, crochet 2 sc into each stitch around (12 sts). This increase creates a fuller and rounded shape for the bunny's head, so your work should continue to round out as the stitches grow.
Row 3: More Head Shaping
For the next round, crochet 1 sc in the first stitch, then inc in the next and repeat around (18 sts). The increased stitches will provide dimension to the bunny's head, and your piece will really start to take form!
Row 4: Final Head Shaping
Continue with another round by crocheting 2 sc in the first stitch, then inc in the next repeated all the way around (24 sts). Your bunny's head should now have a nice size and shape, appearing rounded and slightly plump.
Row 5: Eyes and Stuffing
Before proceeding, attach safety eyes between Rows 3 and 4, about 5 stitches apart. Once the eyes are securely in place, stuff the head lightly. Your head should now look like an adorable little bunny face with eyes ready!
Row 6: Closing the Head
Next, work 1 sc in the first stitch, then dec in the next around (18 sts). Work carefully here, and your head should still maintain its shape while beginning to close up at the bottom.
Row 7: Prepare to Attach Arms
Continue by crocheting 1 sc in first two stitches and then dec in the next (12 sts). This round will tighten the head further, and you should notice how the form is stabilizing as the stitches close around the stuffing.
Row 8: Adding Arms
To attach the arms, crochet 2 sc, place the arm (work each arm as a small oval of 6 sc), and then 2 more sc in between them (12 sts). Your head will now have little arms, ready to hug!
Round 1: Start the Blanket
For the blanket part, ch 4 (counts as the first dc), then 2 dc into the 4th ch from the hook to create the first shell (3 dc). Your foundation should now form a small curve, beginning the cozy blanket section.
Round 2: Blanket Shelving
Continue along the chain, creating more shells by 3 dc in the next chain stitch until you reach the end. Your work should begin to fan out, forming the lovely texture of the blanket (approximately 6 shells).
Round 3: Expanding Blanket Size
Ch 3 to start the next round, dc in each shell while making sure to add 2 extra dc to each shell from the previous row (12 shells). Your blanket should now be expanding beautifully, giving it that cozy touch.
Round 4: Adding Texture
In this round, continue to form 1 dc in each dc and 2 dc in the center of every shell to further enhance texture (approximately 24 shells). Your blanket will now appear fluffy and inviting.
Final Round: Scalloped Edging
To finish the blanket, ch 1 and make a sc in the first stitch, skip one, then 5 dc in the next stitch, and skip one for the next sc (repeat around). The scalloped edges will make your bunny lovey crochet look delightful and polished!
Bunny Lovey Crochet Customization Ideas
Embrace the joy of personalization as you explore delightful variations to make your bunny lovey truly unique!
-
Color Swaps: Change the burgundy to pastel shades for a softer look, perfect for a nursery or playful spaces. Consider mint green or soft yellow for a cheerful vibe.
-
Yarn Fiber Variety: Try using cotton yarn instead of acrylic for a breathable alternative, ideal for warmer climates. Cotton provides a slightly different texture that still feels wonderful against little hands.
-
Fluffy Texture: Use a boucle or fluffy yarn for the bunny's head to add visual interest and cuddly charm. The playful look enhances the whimsical feel, inviting more snuggles.
-
Size Adjustments: To tailor the size, simply add or reduce rounds in the blanket’s foundation to suit different ages—ideal for both infants and toddlers! Adjusting yarn weight can further modify the proportions.
-
Color-Blocking: Create a striped or color-block design within the blanket section, alternating colors every few rounds for a playful twist that adds depth. This also allows for immense creativity depending on the child’s favorite colors!
-
Decorative Edges: Incorporate embellishments like pom-poms or fringe on the blanket's edge for a playful flair, inviting little fingers to touch and explore.
-
Additional Features: Consider adding fun accessories, like a small heart patch or a detachable bow, to elevate the charm and personalize it for gifting.
-
Embroidery Details: Embroider initials or small designs onto the bunny’s body or blanket to create a treasured keepsake. This extra touch makes it even more meaningful and personalized!
Expert Tips for Bunny Lovey Crochet
-
Watch Your Tension: Maintain consistent tension throughout to ensure a uniform look. Loose stitches can lead to a floppy bunny, while tight stitches may create stiffness.
-
Count Your Stitches: Regularly count your stitches, especially when increasing for the bunny’s head. Losing count can alter the shape and ruin your progress.
-
Join with Slip Stitch: When finishing the blanket, always join rounds with a slip stitch for a seamless appearance. This keeps the edges clean and polished.
-
Stuff Wisely: Don’t overstuff the bunny’s head; it should be cuddly yet hold its shape. A little stuffing goes a long way for a cozy finish.
-
Secure Safety Eyes Early: Attach safety eyes before fully stuffing to easily adjust their placement and avoid complications later on. Making them secure ensures your bunny is safe for little hands.
The cozy bunny lovey crochet awaits your creative touch—let’s make this charming piece together!
What to Pair with Bunny Lovey Crochet?
Crafting a whimsical world of coziness is just a stitch away; let’s explore delightful projects to enhance your crafting journey!
-
Matching Bunny Hat: Create a soft hat featuring bunny ears to make playtime even more adorable and themed.
-
Cozy Bunny Blanket: Design a small blanket that echoes the lovey’s colors, perfect for playdates or snuggling during storytime.
-
Sweet Bunny Booties: Crochet a pair of cute booties to keep tiny toes cozy, using the same yarn to maintain a charming aesthetic.
-
Charming Bunny Rattle: Make an engaging rattle with a soft, stuffed bunny head—great for little hands and perfect for playtime.
-
Colorful Bunny Bunting: Craft a playful bunting using removable bunny shapes to brighten up any nursery or play area.
Embark on these projects and create a delightful bundle of joy that any child will love!
How to Wash and Care for Your Bunny Lovey Crochet
Machine Washing: Use cold water on a gentle cycle to help maintain the integrity of the bunny lovey crochet. Avoid agitation to prevent felting or pilling, keeping your cuddly creation looking fresh.
Hand Washing: For extra care, hand wash your lovey in a basin of cool water with mild detergent. Gently squeeze the fabric, avoiding wringing, to protect its soft texture and adorable shape.
Drying/Blocking: Lay your bunny lovey flat on a clean towel to dry, reshaping it as needed. Avoid hanging to prevent stretching, ensuring it stays the perfect snuggle buddy it was meant to be.
Storage: Store your bunny lovey in a dry, cool place away from direct sunlight. Use a breathable bag to keep it dust-free, so it remains ready for those cozy cuddle sessions whenever needed!
Bunny Lovey Crochet FAQs
Can I substitute different yarns for this bunny lovey crochet?
Absolutely! While the pattern suggests a medium worsted weight yarn, you can use acrylic, cotton, or even a fluffy yarn for a softer texture. Just be mindful of your gauge and adjust your hook size accordingly for best results.
How can I adjust the size of the bunny lovey?
To make your bunny lovey larger or smaller, simply add or reduce rounds in the blanket portion. For the bunny head, you can modify the number of increase rows to achieve the desired size. Don’t forget to keep your tension consistent!
Why does my work keep curling at the edges?
Don't panic! Curling can often happen if your tension is too tight or if the pattern stitch counts aren’t maintained. Make sure to check your gauge and relax your grip on the yarn. Also, adding a border, like the scalloped finish in this pattern, can help lay it flat.
What hook size should I use for this pattern?
I recommend using a 4.5mm (US 7) crochet hook for this bunny lovey crochet pattern. This size helps to create a soft and cozy texture. If you’re using a different yarn or if your tension varies, feel free to experiment with a larger or smaller hook to see what works best for you!
How do I fix dropped stitches if I notice them while crocheting?
It’s an easy fix! Just take a moment to locate the dropped stitch and gently pull the yarn to bring the loop back onto your hook. If it’s a previous row, use a small crochet hook or the tip of your current hook to work the stitch back up. Always keep an eye on your stitches and check counts regularly!

Leave a Reply